Daikin BRC1D71 Скачать руководство пользователя страница 9


Operation manual


5


BRC1D71

Remote controller

3P166742-1


30

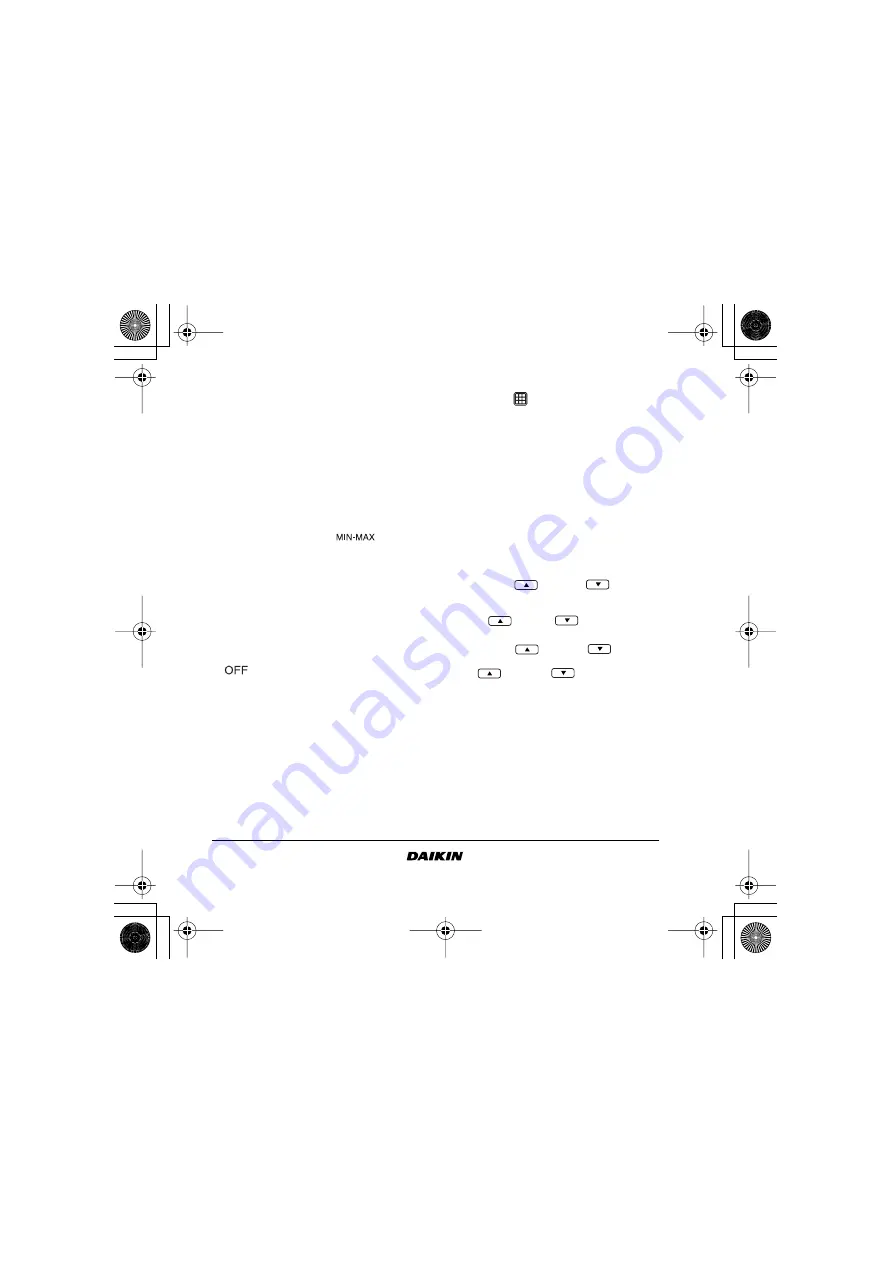
SCHEDULE TIMER BUTTON 

This button enables or disables the schedule timer.

31

TIME ADJUST BUTTON  

These buttons are used to adjust the clock or, when in
programming mode, to adjust the programmed action
time. Both buttons have an auto-repeat function.

32

TEMPERATURE ADJUST BUTTONS 

These buttons are used to adjust the current setpoint
or, when in programming mode, to adjust the
programmed setpoint temperature (step = 1°F). Both
buttons are also used to adjust the day of the week.

33

OPERATION CHANGE/

 BUTTON 

This button is a multi-purpose button. Depending on
the previous manipulations of the user, it can have
following functions:

34

SETPOINT/LIMIT BUTTON

This button toggles between setpoint, limit operation
or 

 (programming mode only).

35

FAN SPEED BUTTON

This button toggles between L (Low), H (High), HH
(very High), AUTO (Automatic).

36

AIR FLOW DIRECTION ADJUST BUTTON 

This button enables to adjust the air flow direction.

37

AIR FILTER CLEANING TIME ICON RESET 
BUTTON 

This button is used to reset the air filter cleaning time
icon.


3. Setting up the controller


After initial installation, the user can set the clock and
day of the week.

The controller is equipped with a schedule timer that
enables the user to operate the installation
automatically; setting the clock and day of the week is
required to be able to use the schedule timer.

1

CLOCK SETTING FUNCTION

Hold down the SCHEDULE button for 5 seconds. The
clock read-out and the day of week indicator will blink,
both can now be adjusted.

Use the TIME 

 & TIME 

 buttons to

adjust the clock. Each time pressing the time adjust
button will in/decrease the time by 1 minute. Keeping
the 

TIME  

or 

TIME  

button 

pressed 

will

in/decrease the time by 10 minutes.

Use the TEMP 

 & TEMP 

 buttons to

adjust the day of the week. Each time pressing the
TEMP 

 or TEMP 

 buttons will display

the next or previous day.

Press the FUNCTION button to confirm the current
set time and day of the week.

If the controller, with blinking clock and day of week
read-out, is left untouched for 5 minutes, the clock
and day of the week will return to their previous
settings; the clock setting function is no longer active.

2

SETTING UP THE SCHEDULE TIMER

To set up the schedule timer, refer to chapter 6.
"Programming the schedule timer" on page 11.


1


select the operation mode of the installation 
(FAN, DRY, AUTOMATIC, COOLING, HEATING) 


2


toggle between minimum temperature and 
maximum temperature when in limit operation

✦✷✤✩✩✪✧✥-✤_✲N.❇m ✷❂❈❆ 5✻❉❑❍s❅❂❖, O❄❏o❃❆❍ ✩, ✥✣✣5 5:✥✫ ✷M

Содержание BRC1D71

Страница 1: ......

Страница 2: ......

Страница 3: ...1 1 35 36 37 34 31 32 30 28 27 26 29 33 25 22 11 10 2 9 3 8 23 7 6 12 14 17 4 24 5 20 21 18 16 13 15 19 1 _ L m s O o 5 M...

Страница 4: ...ION TIME TEMP TEMP TEMP FUNCTION FUNCTION FUNCTION FUNCTION FUNCTION FUNCTION FUNCTION SETBACK SETBACK SETBACK FUNCTION FUNCTION FUNCTION FUNCTION FUNCTION SCHEDULE FUNCTION 5s 5s 5s 5s 5s End SETBACK...

Страница 5: ...user when he takes over the operation DANGER Do not install unit in an area where flammable materials are present due to risk of explosion resulting in serious injury or death Never place a spray bot...

Страница 6: ...d Never inspect or service the remote controller yourself ask a qualified service person to do this CAUTION The remote controller should be installed in such a way that children cannot play with it Co...

Страница 7: ...ent ventilation mode only AUTOMATIC HEAT EXCHANGE BYPASS 5 VENTILATION ICON The ventilation icon appears when the ventilation is adjusted with the ventilation amount button only Simultaneously the ven...

Страница 8: ...FLOW DIRECTION ICON This icon indicates the air flow direction only for installations with motorised air flow flaps 21 NOT AVAILABLE is displayed whenever a non installed option is addressed or a func...

Страница 9: ...an set the clock and day of the week The controller is equipped with a schedule timer that enables the user to operate the installation automatically setting the clock and day of the week is required...

Страница 10: ...d is displayed This prevents cold air from leaving the indoor unit Defrost heat pump types only In heating operation freezing of the outdoor heat exchanger may occur If so the heating capacity of the...

Страница 11: ...TEMP buttons Fan speed use the FAN SPEED button Air flow direction adjust use the AIR FLOW DIRECTION button Ventilation mode use the button Ventilation amount use the button 4 COOLING OPERATION User...

Страница 12: ...the SCHEDULE button to enable or disable the schedule timer To set up the SCHEDULE TIMER refer to chapter 6 Programming the schedule timer on page 11 KEEP IN MIND THAT THE BUTTON MUST BE OFF TO GUARA...

Страница 13: ...edule timer NOT do The schedule timer will not control fan speed control air flow direction control ventilation mode control ventilation amount change the operation mode for a scheduled setpoint The p...

Страница 14: ...current day not blinking you have now quit browsing How do I interpret the programmed actions To be able to understand the behaviour of your installation when the schedule timer is enabled it is impo...

Страница 15: ...ps are limited to a minimum Below are some tips and tricks to ensure successful programming of the schedule timer familiarise yourself with the icons and the buttons you will need them when programmin...

Страница 16: ...n limit operation the selected temperature will blink Enter the time when the action must start using the TIME TIME buttons min step 10 minutes NOTE When changing day during programming you will have...

Страница 17: ...y 2 I WANT TO EDIT PROGRAMMED ACTIONS Editing programmed actions is easy Make sure you are not in program mode not blinking if required press the SCHEDULE button to quit program mode Browse to the pro...

Страница 18: ...guidelines below might help to solve your problem If you cannot remedy the problem consult your installer No readings on the remote controller display blank Check if the mains power is still applied t...

Страница 19: ..._ m s m 5 5 M...

Страница 20: ..._ m s m 5 5 M...

Страница 21: ...3P166742 1 EM05A053 0511 HT _ m n s O o 5 5 M...

Отзывы: