


5 Electrical installation
Installation manual
15
EGSAH/X06+10DA9W(G)
Daikin Altherma 3 GEO
4P569811-1 – 2019.02
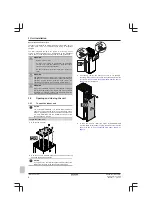
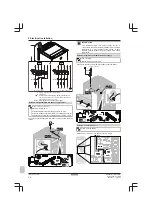
Detail C5: Option kit
EKGSPOWCAB
Install the option kit EKGSPOWCAB (= power cable for split
power supply). For installation instructions, see the installation
manual of the option kit.
Q2DI
L
N
1N~, 50 Hz, 230 V AC
F2B
1
3
2
4
I
I
BRN
BLU
YL
W/GRN
Z15C
N=1
2
3
X22YB
1
X22Y
Z2F/1
Z2F/2
Z2F/3
EKGSPOWCAB
F2B
Overcurrent fuse (field supply). Recommended fuse:
2‑pole, 16 A fuse, C curve.
Q2DI
Earth leakage circuit breaker (field supply)
Configuration power supply
[9.3]
Backup heater
[9.8]
Benefit kWh power supply
5.4
To connect the remote outdoor
sensor
The remote outdoor sensor (delivered as accessory) measures the
outdoor ambient temperature.
INFORMATION
If the desired leaving water temperature is weather
dependent, the full time outdoor temperature measurement
is important.
Remote outdoor cable (40 m) delivered as accessory
[9.B.2]
Ext. amb. sensor offset
(= overview field setting
[2‑0B])
[9.B.3]
Averaging time
(= overview field setting [1‑0A])
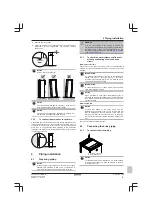
1
Connect the external temperature sensor cable to the indoor
unit.
a
c
d
b
a
Factory-mounted cable
b
Splicing connectors (field supply)
c
Remote outdoor sensor cable (40 m)(delivered as
accessory)
d
Remote outdoor sensor (delivered as accessory)
2
Fix the cable with cable ties to the cable tie mountings.
3
Install the remote outdoor sensor outside as described in the
installation manual of the sensor (delivered as accessory).
5.5
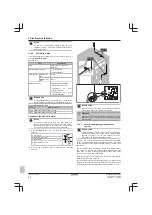
To connect the shut-off valve
INFORMATION
Shut-off valve usage example.
In case of one LWT zone,
and a combination of under floor heating and heat pump
convectors, install a shut-off valve before the under floor
heating to prevent condensation on the floor during cooling
operation. For more information, see the installer reference
guide.
Wires: 2×0.75 mm²
Maximum running current: 100 mA
230 V AC supplied by PCB
[2.D]
Shut off valve
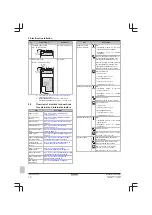
1
Open the following (see
"3.2.1 To open the indoor unit" on
):
1
Top panel
1
3
2
2
User interface panel
3
Installer switch box cover
2
Connect the valve control cable to the appropriate terminals as
shown in the illustration below.
NOTICE
Wiring is different for a NC (normal closed) valve and a NO
(normal open) valve.
M2S
1×
2×
NO
NC
OR
X2M
1×
2128
X2M
1×
21
29
3
Fix the cable with cable ties to the cable tie mountings.
Содержание Altherma 3 GEO
Страница 38: ......
Страница 39: ......
Страница 40: ...4P569811 1 2019 02 Copyright 2019 Daikin 4P569811 1 0000000S ...


