Dahua LS460UCM-EF Скачать руководство пользователя страница 11

No. 

Port 

Function 

CVBS input 

Inputs CVBS signals. 

10 

CVBS output 

Outputs CVBS signals. 

11 

VGA in 

Inputs VGA signals. 

12 

VGA out 

Outputs VGA signals. 

13 

DVI in 

Inputs DVI signals. 

14 

HDMI in 

Inputs HDMI signals. 

15 

HDMI out 1 

Outputs HDMI signals. 

16 

HDMI out 2 

Outputs HDMI signals. 

3.3


Remote Control 

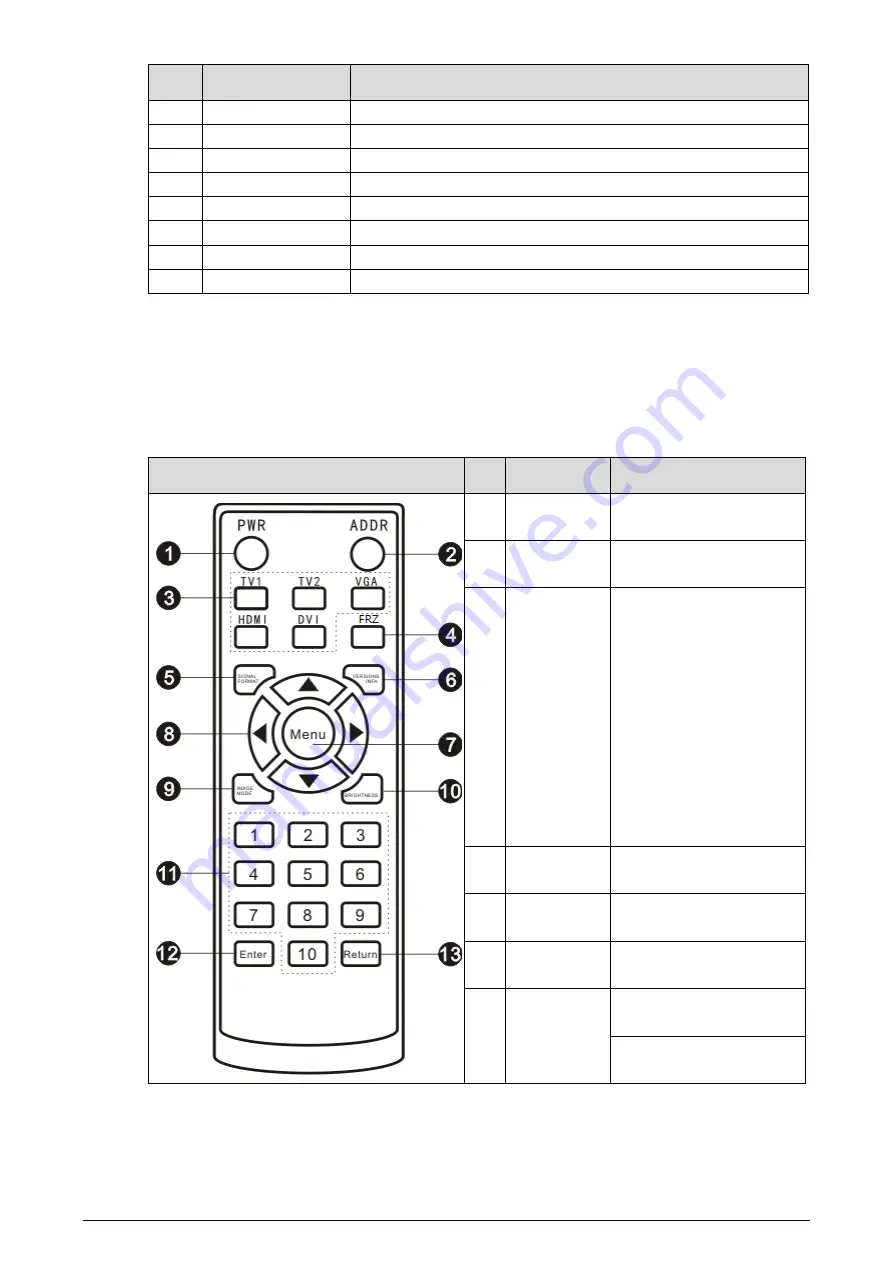
Remote control is a must-have device. For functions of its buttons, see Table 3-2. 

Table 3-2


Button functions 

Picture 

No  Name 

Function 


Power 

Power on/Standby.   

Address 

Address setting (dedicated 
to monitors). 

Signal source 

Signal source selection. 


TV1:  Switch signals to 
CVBS signal. 


TV2:  Switch signals to 
CVBS signal. 


VGA: Switch signals to 
VGA signal. 


HDMI:  Switch signals 
to HDMI signal. 


DVI:  Switch signals to 
DVI signal. 

FRZ 

Pause button, used to stop 
playing videos. 

Signal format 

Displays current input 
signals. 

Version info 

Displays version of the 
system. 

Menu 

Press 

Menu

 to display or 

exit the menu interface. 
Press 

Menu

 to confirm the 

operation you have done. 

Содержание LS460UCM-EF

Страница 1: ...XXX User s Manual V1 0 0 XXX User s Manual V1 0 0 XXX User s Manual V1 0 0 XXX User s Manual V1 0 0 LCD Video Wall User s Manual V1 0 0...

Страница 2: ...the Manual The manual is for reference only If there is inconsistency between the manual and the actual product the actual product shall prevail We are not liable for any loss caused by the operations...

Страница 3: ...any names in the manual are the properties of their respective owners Please visit our website contact the supplier or customer service if there is any problem occurring when using the device If there...

Страница 4: ...all within the rated range of power input and output Do not dissemble the Video Wall Transport use and store the Video Wall under the allowed humidity and temperature conditions Electrical Safety Impr...

Страница 5: ...2 Contrast 10 4 1 3 Brightness 10 4 1 4 Saturability 10 4 1 5 Sharpness 11 4 1 6 Color Temperature 11 4 1 7 Aspect Ratio 12 4 1 8 Noise Reduction 13 4 2 Geometry 13 4 3 Sound 16 4 4 Advanced 17 4 4 2...

Страница 6: ...with the maintenance rule strictly to prolong the life span of the video wall and to implement energy conservation and emission reduction Operating Time Because of high temperature electronic products...

Страница 7: ...he video wall has been off for a long time check if there are water drops on the surface If there are water drops do not dry the surface with wet cloth Dry the surface with absorbent paper do not powe...

Страница 8: ...d heat radiation will be influenced Dust Proof Requirement During debugging and operation the dust concentration of the working area should not exceed 10 mg m3 If the video wall must be used in enviro...

Страница 9: ...appearance items or quantity might be different depending on the model that you purchased and the actual packing list shall prevail Table 2 1 Packing list Component Quantity Liquid crystal video wall...

Страница 10: ...ction 1 Power input port Inputs AC power 2 Power switch Controls the on and off of the AC input port 3 LAN in An RJ 45 port inputs RS 232 signals It controls the screen 4 LAN out An RJ 45 port outputs...

Страница 11: ...able 3 2 Button functions Picture No Name Function 1 Power Power on Standby 2 Address Address setting dedicated to monitors 3 Signal source Signal source selection TV1 Switch signals to CVBS signal TV...

Страница 12: ...u can use these buttons to adjust the volume Up and down direction button Use it to select items up or below the current item you have selected on the screen 9 Image mode Select image mode 10 Brightne...

Страница 13: ...ll Geometric icon used to set positions for images Sound icon used to adjust volume for the videos played on the video wall Advanced icon used to do advanced settings to images Advanced options must b...

Страница 14: ...the overall effects of images through image mode Step 1 Press Menu on the remote control Figure 4 3 Image mode Step 2 Adjust the image mode by the left and right buttons on the remote control accordin...

Страница 15: ...ns on the remote control according to your requirement The range of contrast is 0 100 4 1 3 Brightness You can adjust the brightness of images Step 1 Select Image Brightness Figure 4 5 Brightness Step...

Страница 16: ...on of images can be adjusted by adjusting sharpness The higher the sharpness is the clearer the images are and image noise might occur Step 1 Select Image Sharpness Figure 4 7 Sharpness Step 2 Adjust...

Страница 17: ...Aspect Ratio Figure 4 9 Aspect ratio Step 2 Select Aspect Ratio by the up and down buttons on the remote control according to your requirement Table 4 2 Parameters of zoom mode Parameter Descriptions...

Страница 18: ...ct Image Noise Reduction Figure 4 10 Noise reduction Step 2 Select noise reduction parameters by the up and down buttons on the remote control according to your requirement Step 3 Press Menu on the re...

Страница 19: ...On the Geometry menu select H Position Figure 4 12 H position Step 2 Adjust the horizontal position by the left and right buttons on the remote control according to your requirement V Position You can...

Страница 20: ...second taken from a continuous signal The higher the frequency the more accurate the signals are Step 1 On the Geometry menu select Sampling Frequency Figure 4 14 Sampling frequency Step 2 Adjust the...

Страница 21: ...adjusted Step 1 On the Gemetry menu select Auto Adjust Figure 4 16 Auto adjust Step 2 Press Menu on the remote control and then the position of the screen will be automatically adjusted 4 3 Sound On t...

Страница 22: ...Step 3 Adjust the on and off status of the sound adjust by the left and right buttons on the remote control If you select off then the video wall is in silent mode 4 4 Advanced On the main menu press...

Страница 23: ...rs in the Advanced menu You can select Advanced by the up and down buttons on the remote control Figure 4 20 Enter passwords The default password is 8888 On the Advanced interface technical personnel...

Страница 24: ...ware update files must be stored at the first level directory otherwise the files cannot be identified 4 4 4 Mirror Image Press the up and down direction buttons on the remote control to select Mirror...

Страница 25: ...Language Figure 4 23 OSD language Step 2 Select the OSD language by the left and right buttons OSD language includes English and Chinese Step 3 Press Menu on the remote control to complete the settin...

Страница 26: ...he menu will not disappear automatically 4 5 3 OSD Blending OSD blending is used to set the transparency for the menu Step 1 Select System OSD Blending Figure 4 25 OSD blending Step 2 Adjust the menu...

Страница 27: ...ft address switch Step 2 Set soft address by the left and right buttons on the remote control according to your requirement For detailed parameters Table 4 3 Soft address parameters Parameter Descript...

Страница 28: ...tting 4 6 Input Source You can select input signal source types for video walls Step 1 On the main menu press the left and right direction buttons until the Input Source interface is displayed Figure...

Страница 29: ...by the left and right buttons on the remote control and then press Enter the interface of items you selected is displayed Figure 4 31 Multimedia 2 3 You can also change settings for the pictures musi...

Страница 30: ...hether the indicator light is on Blank screen no signal displayed Check whether the signal wires are in bad contact Check whether there is signal source output Check whether the signal wires are broke...

Страница 31: ...We suggest that you download and use the latest version of client software Nice to have recommendations to improve your device network security 1 Physical Protection We suggest that you perform physi...

Страница 32: ...inder encrypted transmission will cause some loss in transmission efficiency 11 Secure Auditing Check online users we suggest that you check online users regularly to see if the device is logged in wi...

Отзывы: