background image

User’s Manual 

7


Foundation Construction Requirements 

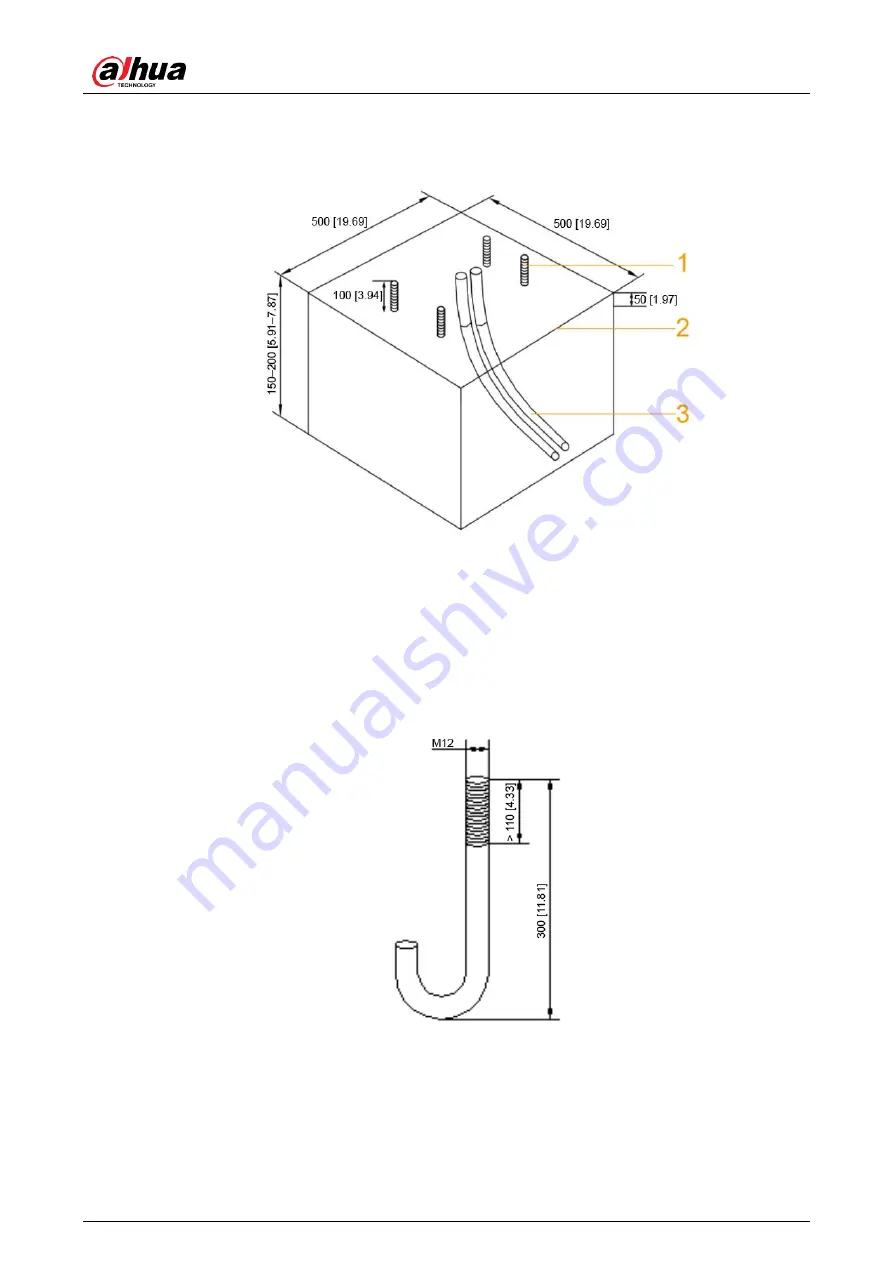
 Foundation construction requirements (mm [inch]) 

Figure 3-2


1: Foundation bolt; 2: Foundation surface; 3: PVC pipe. 


Pouring concrete to construct a foundation of 500 mm × 500 mm (19.69'' × 19.69'') (L × W), 

and make sure that the depth is between 150 mm

–200 mm (5.91''–7.87''). Depth not falling 

within this range will greatly influence the accuracy of radar detection. 


Use concrete of at least grade C15. 


Bury  foundation  bolts  in  the  foundation.  Make  sure  that  the  bolts  are  exposed  100  mm 

(3.94'') above the foundation. 

 Foundation bolt (mm [inch]) 

Figure 3-3


(Optional) If no foundation bolts are buried, you can use the expansion bolts provided in 

the accessories of the Barrier. 


After the concrete foundation is hardened, drill 4 holes with diameter of 16mm (0.63'') 

for installing the Barrier. 


The drilled holes and the installation position should meet the requirements shown in 

Figure 3-4 to facilitate installing the metal plates and fixing the Barrier. 

Содержание DHI-IPMECD-3011 Series

Страница 1: ...Parking Barrier User s Manual V1 0 0 V1 0 0 ZHEJIANG DAHUA VISION TECHNOLOGY CO LTD ZHEJIANG DAHUA VISION TECHNOLOGY CO LTD...

Страница 2: ...DHI IPMECD 3011 RM2020 T20 DHI IPMECD 3011 LM2020 T20 DHI IPMECD 3011 RM1515 T09 AC110 DHI IPMECD 3011 LM1515 T09 AC110 DHI IPMECD 3011 RM1515 T14 AC110 DHI IPMECD 3011 LM1515 T14 AC110 DHI IPMECD 30...

Страница 3: ...ECD 3013 DH IPMECD 3013 RM30 T14 DH IPMECD 3013 LM30 T14 DH IPMECD 3013 RM30 T20 DH IPMECD 3013 LM30 T20 DH IPMECD 3013 RM40 T20 DH IPMECD 3013 LM40 T2 Safety Instructions The following categorized si...

Страница 4: ...he latest laws and regulations of related regions For detailed information see the paper manual CD ROM QR code or our official website If there is inconsistency between paper manual and the electronic...

Страница 5: ...that the power supply requirement is subject to the device label Connect device type I structure to the power socket with protective earthing The appliance coupler is a disconnection device Keep a co...

Страница 6: ...sing the surface of the Barrier to laser beam radiation Do not provide two or more than two kinds of power supply modes otherwise the Barrier might be damaged Do not lengthen or truncate the barrier a...

Страница 7: ...ou Start 8 3 2 2 Installing Casing 9 3 2 3 Installing Radar 9 Installing Barrier Arm 11 3 3 3 3 1 Installing Folding Arm 11 3 3 2 Installing Straight Arm 12 3 3 3 Installing Fence Arm 13 Cable Connect...

Страница 8: ...opening closing time of 0 9 s or 1 4 s Barrier with 4 m 13 12 ft straight arm enjoys opening closing time of 1 4 s Barrier with 5 m 16 40 ft straight arm enjoys opening closing time of 2 s Barrier wi...

Страница 9: ...ying lifespan for more than 10 years Automatic lifting when the barrier arm meets obstacle Barriers with 3 m 9 84 ft or 4 m 13 12 ft straight arm support anti collision function A turning gear is inst...

Страница 10: ...User s Manual 3 2 Structure Appearance 2 1 Straight Arm Barrier Straight arm barrier Figure 2 1 Folding Arm Barrier Folding arm barrier Figure 2 2...

Страница 11: ...User s Manual 4 Fence Arm Barrier Fence arm barrier Figure 2 3 Dimensions 2 2 Dimensions mm inch Figure 2 4...

Страница 12: ...well designed drive unit and balance spring the Barrier enjoys stable and reliable operation 3 Control box The intelligent barrier inverter and connection terminals are installed on the control board...

Страница 13: ...ruction guide Foundation must be constructed before installing the Barrier Selecting Construction Site of Foundation The center of the foundation should be more than 300 mm 11 81 away from the road si...

Страница 14: ...detection Use concrete of at least grade C15 Bury foundation bolts in the foundation Make sure that the bolts are exposed 100 mm 3 94 above the foundation Foundation bolt mm inch Figure 3 3 Optional I...

Страница 15: ...n After installation make sure that when opening the Barrier there are no obstacles within a 90 vertical range Installing Barrier 3 2 3 2 1 Before You Start Read the manual carefully before installati...

Страница 16: ...rol box and then place metal Step 3 plates on the foundation bolts Adjust the horizontal and vertical positions of the casing and then tighten the nuts with Step 4 a wrench 3 2 3 Installing Radar Open...

Страница 17: ...User s Manual 10 Install radar 2 Figure 3 6 Apply silicone sealant around the radar on the outer surface of the casing for waterproofing...

Страница 18: ...Mounting plate 3 M14 nut and spring washer 2 M14 140 hex head bolt and plain washer 4 Fixing plate Align the arm with the mounting plate and fix the mounting plate to the arm with M14 Step 1 M14 140...

Страница 19: ...late 3 Straight arm 2 M14 140 hex head bolt and plain washer 4 M14 nut and spring washer Place the arm in the mounting plate and aign the holes of the arm with those of the Step 1 plate Thread the M14...

Страница 20: ...e 3 9 Thread four M10 75 bolts and plain washers through parts 1 2 and 3 Step 1 Fix the bolts with four M10 nuts and spring washers Step 2 3 3 3 Installing Fence Arm Install fence arm Figure 3 10 Four...

Страница 21: ...Fix parts 3 and 5 to part 2 and secure the bolts with M10 nuts and spring washers Step 3 Thread part 6 two JFM 1214 flange bearings through two sides of part 8 Step 4 Thread part 8 through part 1 and...

Страница 22: ...ual 15 Cable Connection 3 4 3 4 1 Barrier Inverter Description Barrier inverter Figure 3 12 Table 3 3 Barrier inverter description Parameter Description Connects to remote control Ports for adjusting...

Страница 23: ...se of power failure 7 ON Enable auto barrier opening in case of power failure 7 OFF Disable auto barrier opening in case of power failure 8 9 10 OFF by default Buttons Open barrier Close barrier Pair...

Страница 24: ...ose of barrier VD Common anti smashing interface The barrier automatically closes after the anti smashing signal disappears Barrier switch control interface GOUP Opening signal interface GODN Closing...

Страница 25: ...O1 camera and connect GND terminal to NC1 camera through port 4 terminal See green lines in the figure above Close barrier Generally you do not need to connect cables for controlling barrier closing s...

Страница 26: ...intenance 4 2 4 2 1 Regular Maintenance Maintain the Barrier every three months to check The rubber buffer Mechanical transmission Whether there is abnormal noise during motor operation Whether the wi...

Страница 27: ...e Barrier jitters obviously How to check angle sensor Cut off power supply to the Barrier and remove the three leads of the angle sensor Step 1 labeled 4 5 6 Use a multimeter 20K resistance and connec...

Страница 28: ...User s Manual 21 Adjust balance spring Figure 4 1 Horizontal...

Страница 29: ...able the auto check for updates function to obtain timely information of firmware updates released by the manufacturer We suggest that you download and use the latest version of client software Nice t...

Страница 30: ...services SNMP Choose SNMP v3 and set up strong encryption passwords and authentication passwords SMTP Choose TLS to access mailbox server FTP Choose SFTP and set up strong passwords AP hotspot Choose...

Страница 31: ...re are no communication requirements between two sub networks it is suggested to use VLAN network GAP and other technologies to partition the network so as to achieve the network isolation effect Esta...

Страница 32: ...icensors or affiliated companies have been advised of the possibility of such damages Some jurisdictions do not allow limitations on liabilities for personal injuries incidental or consequential damag...

Отзывы: