background image

 Chapter 4  Common Parameters and Color-changing Order


50                                                                                          BECS-A88/C88 computerized embroidery machine owner’s manual 


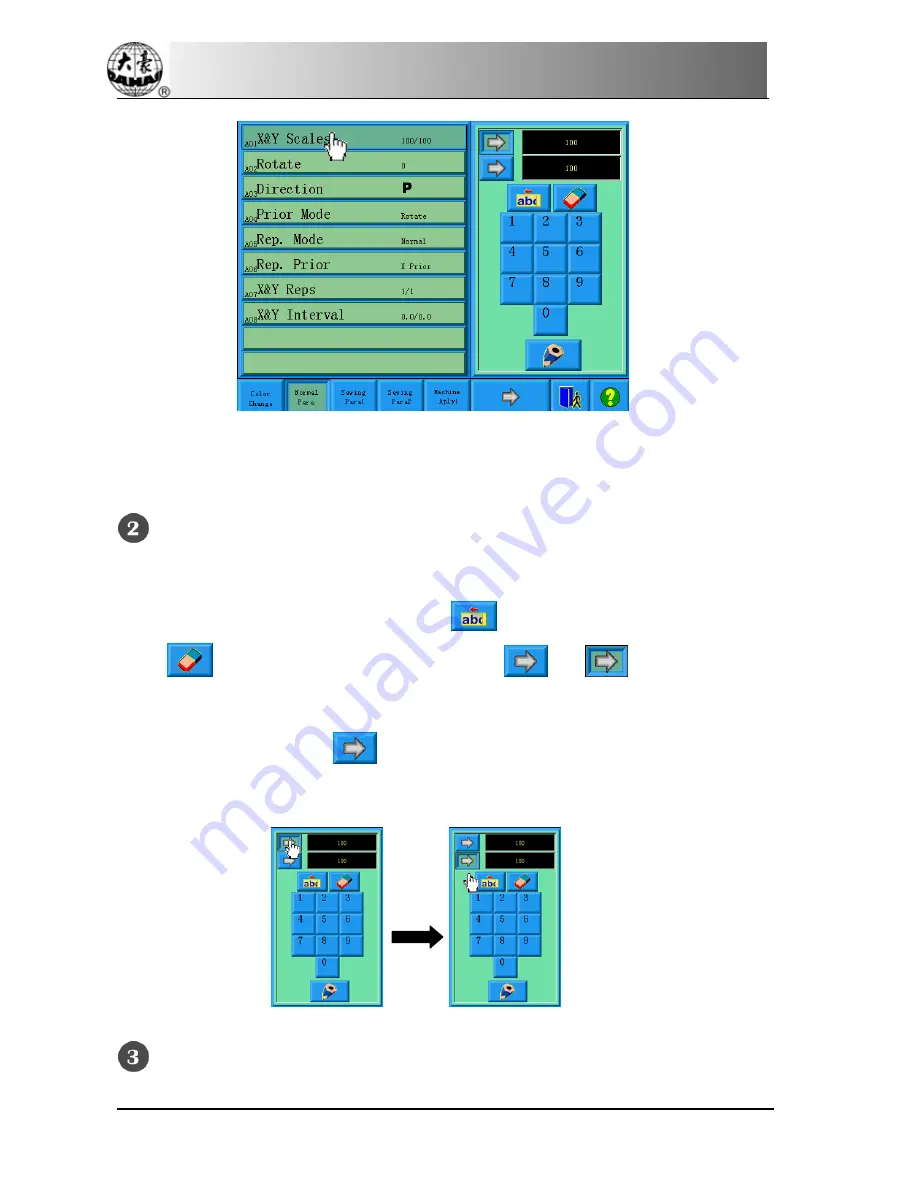
Click “X&Y Scales” in the normal parameter screen, and the right of the screen 

will show the parameter-setting window. 

  Set the parameter “X&Y Scales” 

Click the number panel in the parameter-setting window to change the scaling 

ratio on X/Y direction. The user can click

  to remove the last input digit and 

click 

to remove all the input digits. Click 

and 

to switch between 

the parameter’s X and Y scaling values. To change the corresponding parameter 

value, first click the key 

 before that. This method is also often used in 

many other similar situations. 


 Click the confirmation key to save the change 

Содержание A88

Страница 1: ...ation and Direction of the Control Panel 10 2 2 Instruction of Control Panel 11 2 3 Instruction of the Main Screen 12 2 4 Notes on Menu State 19 2 5 Flow Chart of Embroidery 20 2 6 Normal Embroidery R...

Страница 2: ...4 1 1 Setting X Y Scales 49 4 1 2 Setting of Rotate 51 4 1 3 Setting of Direction 51 4 1 4 Prior Mode 51 4 1 5 Rep Mode 51 4 1 6 Rep Prior 52 4 1 7 X Y Reps 52 4 1 8 X Y Interval 52 4 2 Setting of Co...

Страница 3: ...Design Operation Screens 65 6 2 Selecting a Design for Embroidery 68 6 3 Memory Design Preview 68 6 4 Sorting the designs 71 6 5 Copy the Memory Design 72 6 6 Deleting the memory design 73 6 7 Settin...

Страница 4: ...dle 92 7 2 4 Convert Needle Code 93 7 2 5 Insert Needle 93 7 2 6 Delete Needle 94 7 2 7 Move Needle 94 Chapter 8 Letter Design 95 8 1 Enter Create Letter Pattern Function 95 8 2 Enter Embroidery Lette...

Страница 5: ...Y Displacements 121 9 13 Clear Overall Stitches 121 9 14 Operation on AFC Sequin and Coiling Devices 122 9 15 Positioning Idling 122 9 15 1 Float forward given stitches 123 9 15 2 Float backward give...

Страница 6: ...Password 138 10 7 4 Factory Relieve the Password 138 10 7 5 The Factory Saves and Recovers Optimize Parameter 138 10 7 6 The Initialization Parameter of Machine 138 10 8 Validation of factory ID 140...

Страница 7: ...d parameter setting 153 12 4 Relative Operations of Special Embroidery 158 12 4 1 Shift between Lock Stitch Head and Special Head 158 12 4 2 M Axis Operation of Taping Embroidery 162 12 4 3 Operations...

Страница 8: ......

Страница 9: ...se the machine to humidity gas poisonous gas water and dust Forbidding Don t restore or operate in vibration which may cause trouble to the machine Notice Please abide all the warnings and safety requ...

Страница 10: ...increase insulating capability Notice Machine should be grounded The resistance should be no larger than 10 Operation direction Danger Don t operating the machine when there is any damage on the surf...

Страница 11: ...Coiling Taping and Zigzag Embroidery and C88 have the validation of factory ID but A88 have not Other operations or functions is same 1 3 Main Features 1 User Friendly Touch Screen Adoption of touch s...

Страница 12: ...olor Changing Order for Each Design Design will be saved along with its parameters color changing orders and needle bar colors System can memorize the operational details for each design Users can set...

Страница 13: ...put design color changing order patch sewing etc 11 Network Function A surveillance LAN can be built by using the connectors and linked to the factory LAN which realizes network management improve pro...

Страница 14: ...position etc 16 Multi Language Support Currently the system supports language shift among Chinese English Spanish and Turkish 17 Design Output Design can be output and saved into floppy disk or USB di...

Страница 15: ...ew one and save it to the memory card The newly generated design can be used for embroidering output or other operations 21 Letter Design There are altogether 28 letter bases Users can make groups and...

Страница 16: ...y functions coiling taping and Zigzag embroidery on the basis of BECS A88 system 28 Setting up B point Selected This function is specially designed for easy threading when thread breaks appear on gian...

Страница 17: ...Chapter 1 General Descriptions BECS A88 C88 computerized embroidery machine owner s manual 9 6 Stepping Precision minimum stepping precision is 0 1mm 7 Stitch range 0 1mm 12 7mm...

Страница 18: ...gh luminance LCD display and touch screen man machine interaction Operational Buttons Common actions can be realized by using operational buttons on the control panel Those actions include frame movin...

Страница 19: ...in Using the USB Disk Please pay close attention to electrostatic phenomenon Don t forget to discharge before plugging in out the USB disk USB disk features plug in direction Users should avoid pluggi...

Страница 20: ...ition High Needle Position Color changing Press this key and the current needle position will move towards the high needle position till the highest needle position Manual Frame Moving In operation th...

Страница 21: ...USB disk Chapter3 Parameter Setup Click it to enter the parameter setup screen which includes color changing order normal parameters such as scaling down up and repetition general parameters such as...

Страница 22: ...hine is currently in the preparation status and you can choose the design or set the parameters such as scaling and repetition Click the key and confirm and the machine will switch from the preparatio...

Страница 23: ...e low speed idling status Chapter2 Low speed Idling The machine is currently in low speed idling status When pulling the bar for normal embroidery the main shaft remains inactive and the frame advance...

Страница 24: ...ing or the color changing key on the panel to select the needle position before embroidery and then pull the bar to start embroidery When meeting the color changing code during embroidery the machine...

Страница 25: ...ically If it s set as manual start embroidery will start by pulling the bar Chapter2 Design Information Display the basic information of the selected design The current stitches X Y displacement and o...

Страница 26: ...ft hasn t reached the right position you need to turn the shaft to the 100 position manually by clicking The main shaft runs well The main shaft runs well in embroidering Assistant Operation Status Cl...

Страница 27: ...meters in Machine Apply screen Network Connection Success This icon is blue Current Needle Position The number represents the current actual needle position Current Color changing Times The initial va...

Страница 28: ...mbroiders based on the designs in its memory The following is the basic Flow Chart of Embroidery Input of Designs The user can input designs through network floppy disk or USB disk Only with blue it s...

Страница 29: ...ick in the main screen to enter it If the screen is opened but the current window stays at another function screen press the blue task switch key on the panel to enter the design management screen Onl...

Страница 30: ...to enter the parameters management screen Set the color changing order click and then needle color changing to enter the color changing screen Set patching embroidery click to enter the design managem...

Страница 31: ...esign s start point click to enter the assistant operation screen Note The origin point has to be set before saving the start point To set the origin point click to enter the Other Function Operations...

Страница 32: ...ion status Pull the bar and the machine will not run and a prompt will appear to ask the user to confirm embroidery Setting Off Set Point After embroidery confirmation if needed click to set off set p...

Страница 33: ...n the above picture and the status will switch among normal embroidery low speed idling and high speed idling Pull the Bar to Embroider Operation bar embroidery bar under the table Stop Status Pull th...

Страница 34: ...to exit trimming operation Manual Frame Moving When the machine stops press the keys to move the frame in the corresponding direction Press the next two keys at the same time to move the frame in the...

Страница 35: ...le to do color changing by pressing the color changing shortcut keys marked with Please note if the user wants to automatically save the order of the manual color changing yes for Store Manual Color i...

Страница 36: ...haft not in the right position will be replaced by main shaft in the right position Back to the origin In the main screen click and choose in the followed prompt Then the frame will return to the star...

Страница 37: ...ignated Low Position This function is intended for quilt embroidering Click in the main screen and then the option When clicking the needle will prick into the embroidery cloth and a prompt will appea...

Страница 38: ...tus the icon appears push the patching switch of machine head that will perform normal embroidery to the normal embroidering mode and push the patching switch of machine head that will not embroider t...

Страница 39: ...that will perform patching embroidery to go to the patching mode and then pull the operation bar to right and the machine head will start patching embroidery while other heads don t When the frame goe...

Страница 40: ...s pushed to up position it cannot stay at up position and the lamp is red which hints that this head is in patching mode In addition while thread breaking during embroidering the lamp is automatically...

Страница 41: ...key and then press key now the machine is in embroidery confirmation status is displayed Finally pull the embroidery bar to right to embroider which means the machine is in embroidery running status...

Страница 42: ...y disk and USB disk are both supported Users can save design data based on different types The system recognizes formats like DOS FDR and ZSK However FDR and ZSK files are read only Design formats lik...

Страница 43: ...w all the storage devices will be displayed Their information includes the icons words and numbers The icon is the device type Means USB disk and means floppy disk The words are the volume name of the...

Страница 44: ...n to the last page if the file list is more than one page The next page Turn to the next page if the file list is more than one page Preview of designs Display the selected file and its information Si...

Страница 45: ...d file and design Page information The current page number and total page number Icons of the objects for folder for files of DSB form for files of DST form Names of the objects Names of the files or...

Страница 46: ...ects the system is in single or multi selection mode In the single selection mode one object is selected for one time and selecting another object will automatically cancel the last selection Click th...

Страница 47: ...only in the multi selection mode 3 3 Design Preview Click and select the design in the disk management screen Design files and folders are shown by icon in the list One page of the list contains 16 it...

Страница 48: ...e design s information and color changing number will show in the information area Note More than one design is allowed to select for preview 3 4 Design input To input the design data in the disk to t...

Страница 49: ...nput design number and name for system saving The user inputs the design number and name The system provides the minimum available design number as the default value The customer can use the small pan...

Страница 50: ...r the modification click the modification confirmation key and the results will be save Click the confirmation key The system inputs the design data from the disk to the memory and displays the operat...

Страница 51: ...esigns intended for output and then click Input of the design name for disk saving The system uses the design name in system memory as the default design name in disk Click after input of the design n...

Страница 52: ...her level of folder Click to return to the highest level of folder and the screen will be refreshed 3 7 Formatting a Disk Select the disk device for formatting read 4 1 for reference Click the functio...

Страница 53: ...bar After formatting the system will display the prompt to show formatting success Click the returning key to return to the disk management screen Note the system will format the disk in DOS format 3...

Страница 54: ...user chooses to select a folder the system will delete all the files and sub folders in this folder If a file has the property of only read or disk write protection the file will not be able to delete...

Страница 55: ...pter 3 Disk Management BECS A88 C88 computerized embroidery machine owner s manual 47 Click to confirm The system will create the corresponding folder in the disk and refresh the current list of objec...

Страница 56: ...ers and color changing order which is entered by clicking in the main screen This system supports multi missions at the same time So it s possible to set or change the normal parameters and color chan...

Страница 57: ...apter will explain how to set the X Y Scales as an example and give the definitions of other parameters Read 4 1 1 as reference 4 1 1 Setting X Y Scales This parameter controls the scaling percentages...

Страница 58: ...Scales Click the number panel in the parameter setting window to change the scaling ratio on X Y direction The user can click to remove the last input digit and click to remove all the input digits C...

Страница 59: ...rameter 4 1 3 Setting of Direction Design direc tion Embro id ery shap e P F P P P F F F F F F F F P P P P P 4 1 4 Prior Mode There are two modes rotating prior to scaling and scaling prior to rotatin...

Страница 60: ...Y and Y prior to X X interval Yinterval X p rior Yp rior 4 1 7 X Y Reps X Reps of this parameter sets the number of rows in repetition and Y Reps of it sets the number of columns in repetition The ab...

Страница 61: ...g List of color block sequence numbers Display the sequence numbers of the color blocks in the design List of needle sequence numbers Display the needle sequence numbers corresponding to the color blo...

Страница 62: ...n the needle interchanging screen and set it Help Display the help menu Needle number selection area Select needle number here Cancel Cancel the color changing setting of this time and return Confirm...

Страница 63: ...changing order the user can click to move the list to place the intended item to the current operation position and then click the new needle number To insert a needle number in the color changing or...

Страница 64: ...hanging for the design Click in the main screen to enter the parameter setting screen Click in the parameter setting screen to enter the color changing setting screen Click to enter the needle color s...

Страница 65: ...lors Click in the main screen to enter the parameter setting screen Click in the parameter setting screen to enter the color changing screen Click to enter the needle color interchanging screen To int...

Страница 66: ...ng the embroidery parameters may change with design and embroidery method They cannot be set with passwords The machine application parameters are for administrators of the embroidery factories and ca...

Страница 67: ...ifferent parameter groups Turning pages of parameter groups Exit Exit the screen Help Display help menu Parameter changing Window Change the selected parameter value in this window Note z The number n...

Страница 68: ...t See Chapter 9 If you want to change the value of Needles which is D01 in machine parameters 1 click to find machine parameters 1 and select it Then all of its parameters will be shown in the paramet...

Страница 69: ...al Parameters BECS A88 C88 computerized embroidery machine owner s manual 61 Change the current parameter in the parameter changing window Click the keys to change the values Click the confirmation ke...

Страница 70: ...yclic Emb is set as Yes the cyclic embroidery function is enabled and the icon will appear in the main screen When this function is enabled after completing the designated design the machine will auto...

Страница 71: ...this function the user should set the parameter Store Manual Color as Yes Note the parameter value will automatically change into No at the end of one design embroidering 5 2 3 Brake Adjustment A Must...

Страница 72: ...reen Click and to check the effects of the parameter adjustment If the user is not satisfied with the effects he can press the swift key on the panel to return to the parameter setting screen where he...

Страница 73: ...gn Operation Screens Click in the screen to enter the memory design management screen The memory design management screen includes design image display area navigation and pagination area information...

Страница 74: ...on and pagination area It s for quick switching to the designated page of memory design list Information area Display the detailed information of the selected design and memory information Select desi...

Страница 75: ...selection is to switch between single and multi selection It is a preserved button and single selection by default And it cannot be changed Design preview Preview the design s details scale up down mo...

Страница 76: ...e system is in preparation status Click in the main screen to enter the memory design management screen Select the design in the memory design image area of the memory design management screen Click t...

Страница 77: ...al time information in low speed display Zoom in Zoom in the design picture in the design preview area Move upward Move upward the design picture in the design preview area Zoom out Zoom out the desig...

Страница 78: ...the memory design preview screen Help Display the help menu Click in the main screen to enter the memory design management screen Select a design in the memory design image area of the memory design m...

Страница 79: ...e current page will automatically switch to the first page after sorting This system supports the following sorting ways by design stitches width height name and color number The current sorting way i...

Страница 80: ...the main menu to enter the memory design management screen Select the design in the memory design image area of the memory design management screen Click More Functions in the memory design management...

Страница 81: ...up window and then click to confirm the input Click to carry out the copying operation and return Click to cancel the copying operation and return 6 6 Deleting the memory design This is to delete one...

Страница 82: ...hing between and The screen is similar to the memory design management screen in which the designs can also be sorted and previewed Click to carry out deleting and then return to the design operation...

Страница 83: ...mbroidery parameter setting screen will pop up Please read Chapter Five for reference If the selected design is not the current embroidering design the non embroidery parameter setting screen will pop...

Страница 84: ...ent screen Click More Functions to enter the design operation choosing screen Click Compile Paras Design to enter its operation screen If don t use the default values provided by the system click Desi...

Страница 85: ...en Then after embroidery confirmation pull the bar for embroidery The user can also edit the packed design into the common design by the editing function so as to check and embroider the design Click...

Страница 86: ...ter Four for reference Click and then set the color changing order of the current design in the packed design The setting screen is in accordance with color changing in Chapter Four Click to set more...

Страница 87: ...idery design Select a combined design Click the button on the main menu Click more functions to enter the memory design choosing operation screen Click Compile Paras Design to enter its operation scre...

Страница 88: ...roidering to the patching point the machine moves to the offset point which has to be set or move out according to the set distance After patching pull the bar and the machine will automatically retur...

Страница 89: ...quence number of the position to set patching point Stitch list Display the design stitches of the position Type list The stitch code type C color changing code S stop code Option list Patching option...

Страница 90: ...After setting the patching point the design will refresh and the result will show directly Click to move the list to the position for patching Then click which is after Add Applique to change it to If...

Страница 91: ...he design number and design name and change them Click X Adjust to input the new value and then click to confirm it Click Y Adjust to input the new value and then click to confirm it Click to adjust t...

Страница 92: ...to enter the design operation choosing screen Click Frame to Make Design to enter into operation screen Click to very between satin stitch and jump stitch Click the manual frame moving key to move the...

Страница 93: ...sign management screen Click More Functions to enter the design operation choosing screen Click Make True Design Range to enter its operation screen If don t use the default values click the design nu...

Страница 94: ...ion choosing screen Click to cancel the setting and return 6 16 Divide the Design Click in the main menu to enter the memory design management screen Select the design in the memory design image area...

Страница 95: ...ing and return 6 17 Combine Two Designs This function is to combine two designs into a new one The interval between the two designs is the distance from the end point of the first design to the start...

Страница 96: ...ing area and click to enter the screen for combining designs If More than two designs are selected there will be a prompt to tell you to reselect If you don t use the default values click the design n...

Страница 97: ...Clear all Memory Designs This function is to clear all the designs in the memory Be cautious to use it Click in the main menu to enter the memory design management screen Click More Functions to enter...

Страница 98: ...tart Editing Design Choose the design that will edit in the window of memory design management then click More Functions key choose the pattern click More Functions In choose operation of the memory d...

Страница 99: ...ration 7 2 1 Summarize Pattern preview window Doc um ent and view operation Needle c hec k orientation front panel Needle edit funtion key Needle inform ation Pattern preview window use for preview pa...

Страница 100: ...thus can see the all of the pattern If the pattern size is smaller than show scope of the screen then show the pattern with the actual size Enlarge the pattern to 450 to thus look into the detail of...

Страница 101: ...me one needle click key and can convert the type of that needle Include X Y position needle for move such as stain stitch jump stitch send sequin etc the needle code type can convert mutually Don t in...

Страница 102: ...stitches behind current stitch While flick mean keep opposite position of current stitch and all of the stitches behind it that means at the same time of move the current stitch absolute position of s...

Страница 103: ...Design You can through the letterform storage that saved in system to create pattern file based on letter 8 1 Enter Create Letter Pattern Function Click pattern management key on main screen enter int...

Страница 104: ...er Embroidery Letter Bunch and Basic Parameter After open the window of parameter input enter into letter input screen automatically The left of window is parameter list window the right is parameter...

Страница 105: ...r the angle of the each letter will change follows behind the position of round arc Letter bound rotate angle means rotate angle for whole letter bound Letter high zoom means increase or reduce letter...

Страница 106: ...show letter pattern Under general circumstance should set whole rank method of letter bound rotate angle letter space etc parameters key is under operation screen Pick out again the particular letter...

Страница 107: ...gram show the whole pattern in order to look into Move Move the letter pattern manifestation window to look into different part of the pattern Click this key can show or hide 5 direction keys that mov...

Страница 108: ...Online help of letter pattern adjust screen Adjust key of whole rank parameter If after you edit individual letter then again to adjust whole rank parameter the editor of the individual letter will be...

Страница 109: ...p arc rank letter bound by round arc method with up bend Down arc rank letter bound by round arc method with down bend Fix the letter direction When rank the letter bound by round arc method the lette...

Страница 110: ...hine owner s manual Angle follow when rank the letter bound by round arc method the letter angle change follows behind the position of round arc perpendicularity in arc Radian increase When rank the l...

Страница 111: ...adian reduces When rank the letter bound by round arc reduce the radian of reference round arc Whole anticlockwise rotate anticlockwise rotate for whole letter bound Whole clockwise rotate clockwise r...

Страница 112: ...k out such as The system default will pick out all letters After click select switch key pick out the first letter then click pick out the second depend on this kind to push After picking out the end...

Страница 113: ...ntre of letter rotate selected letter toward anticlockwise direction Such as Density increase Increase stain stitch density of the born letter pattern Such as Density reduces Reduce stain stitch densi...

Страница 114: ...idery letter bound can click this key to return back the previous screen to carry on the modification All of adjustment for individual letter in this window will disappear 8 4 Save Letter Pattern Afte...

Страница 115: ...hapter 8 Letter Design BECS A88 C88 computerized embroidery machine owner s manual 107 Click key to confirm keep successfully if do not need to continue to edit the letter pattern click key to withdra...

Страница 116: ...screen Click to enter the Assistant Operation screen Number Icon Name Description Reference Page Last page Turn to last page Next page Turn to next page Information area Show error messages Exit Exit...

Страница 117: ...for some machine status In this case those keys will show different and can t be pressed down Press keys c an not be operated Press keys c an be operated 9 1 Move Frame to Design s Start Point If a st...

Страница 118: ...r to Setting Frame Protection when Power off Chapter Ten the machine can save the start point of the current design at the embroidery preparation status or before embroidering Move the frame to the st...

Страница 119: ...function is to move frame to position the design at the center of frame software protection so as to embroider the design at the center of the frame See Setting the Frame s Software Protection Chapte...

Страница 120: ...to show the boundary information of a design Click in the main screen to enter the assistant operation screen Click Show the range of embroidery design The system will show the concerned information...

Страница 121: ...to confirm Click to confirm and the system will move the frame along the design boundary Click to cancel the operation 9 6 Embroider along the Design Range The system is able to calculate the design s...

Страница 122: ...n screen The main screen will show The user pulls bar to embroider the design range After finishing it the system will automatically come back to embroidery preparation status 9 7 Embroider one Cross...

Страница 123: ...creen Then the main screen will show And the user can pull the bar to embroider the cross After finishing it the machine will come back to preparation status 9 8 Embroider One Line The system can embr...

Страница 124: ...o the start point of the line and clicks to input the coordinates Input the line s second point s coordinates The system will ask the user to input the coordinates The user uses the manual frame movin...

Страница 125: ...ck in the main screen to enter the assistant operation screen Click Embroider the Design s Outline The system will calculate and wait for the user to confirm The system will calculate the outline data...

Страница 126: ...int Moreover the offset point is also necessary for frame to move out when patching The function can only be used under the embroidery confirmation status and before embroidering Click in the main scr...

Страница 127: ...s intended for quilt embroidering In embroidering the needle will stop and prick into the embroidery cloth to fix it After releasing the cloth move the frame to the designated position When the cloth...

Страница 128: ...wn to prick into the cloth Or click to cancel the operation Loosen the cloth move the frame and confirm Loosen the cloth and move the frame to the designated position and click to confirm the operatio...

Страница 129: ...X and Y displacements Click in the main screen to enter the assistant operation screen Click Clear X Y disp The system will set the X and Y values to 0 The user can check the values in the main screen...

Страница 130: ...n to enter the assistant operation screen Click Operate for special embroidery Operate according to the prompts 9 15 Positioning Idling According to the user s needs this function enables the frame to...

Страница 131: ...e main screen to enter the assistant operation screen Click Float forward given stitches Input the forward stitches needed The system enters the Machine Do Float screen and asks the user to input stit...

Страница 132: ...the next color changing code The other three functions are similar to this 9 16 Setting point B This function is selected and the user must customize This function is developed to solve the problem o...

Страница 133: ...g to move the frame to a proper position click to let system back to other screen Setting B point is complete If you want to clear the point B press clear B point 9 16 2 Notes 1 When frame moves to th...

Страница 134: ...slow moving switch frame will move back to B point If no action please check the machine 3 B point setting is as the image shows 1 If B point is above the line then frame will back to B after slow mov...

Страница 135: ...unction keys The screen is similar to that for assistant embroidery The words on the keys can help to explain their functions 10 1 Show Some Embroidery Information The user can get information of the...

Страница 136: ...dery or not origin point of the frame software limit and offset point Click to return You can also click to clear X Y displacement and overall stitches 10 2 Show Machine Statistics Information Click i...

Страница 137: ...en power off So after machine installation or maintenance it s necessary to set the frame zero point Click in the main screen to enter the Other functions screen Click Set the zero point of machine Ch...

Страница 138: ...tive 10 4 Frame Restoring after Power Off In case of frame having been moved after power off this operation can be used to restore the frame position before power off when the power is on again The pr...

Страница 139: ...ery range set in the software and limit the machine embroidering to this range Click in the main screen to enter the Other functions screen Click Set the Frame Software Range If have already establish...

Страница 140: ...ry frame input coordinate of right down corner of soft limit position Use the move frame key on panel to move the embroidery frame to confirmed right down corner point of soft limit position click to...

Страница 141: ...Functions BECS A88 C88 computerized embroidery machine owner s manual 133 Click the shift key to show English Turkey or English Espana Click the shift key can view the screen in English Turkish and S...

Страница 142: ...e setting of all parameters the roles of the customer are divided into the common user machine administrator and factory customer The purview of the common user is the lowest can only modify the embro...

Страница 143: ...tor relieve change the password Machine at a factory be placed in the release lock appearance also is to say that the customer can modify all parameters machine administrator can modify the password a...

Страница 144: ...imes and to input consistently then can establish successfully 10 7 1Machine Administrator Relieve Lock After machine administrator modify the password the machine is placed in lock appearance the com...

Страница 145: ...ecover the homologous machine parameter If the customer hopes to keep the parameter that establish already at present as long as click machine administrator save optimize parameter key the system can...

Страница 146: ...process here no longer give unnecessary details 10 7 4Factory Relieve the Password The method that the factory relieves the lock is similar to the method that administrator customer relieves the lock...

Страница 147: ...saved by factory the other parameters were initialized to default value that saved by system The factory password has already established and hasn t decrypt embroidery factory administrator password...

Страница 148: ...ices when machine is electrified Related errors and their solutions are listed below Error Description Cause Solution FC 01 Operation software and hardware is not consitent Operation software and hard...

Страница 149: ...ircuit and affirm them match Note If machine send out FC 06 error the menu on display can be used except or And if machine send out other error except FC 06 all the menu on diaplay can not be used 10...

Страница 150: ...function The light electricity coder examination The rotate speed of principal axis examination Turn to move the principal axis from 100 degrees to the certain angle Test bar switch Test limit switch...

Страница 151: ...s operation screen Click touch screen adjust key Typing in administrator password or factory password Click the centre of the cross in adjustment screen one by one If the screen image shows like follo...

Страница 152: ...aws the operation 10 13 Touch Screen Adjustment After using for a period of time the touch screen may not be as precise as it used to be which can be solved by adjusting the screen During the process...

Страница 153: ...mer should click the centre of these cross one by one in order the system will obtain these positions data to be the basis of adjustment Click key withdraws the operation System adjusts according to t...

Страница 154: ...th normal or special embroideries to create combined new designs A Scope This system applies to sequin embroidering control system which combines normal embroidering mechanism and sequin sending mecha...

Страница 155: ...t right sequin device usually sequin device is located in either first needle position or the last double sequin embroidery machine has sequin devices on both the first and the last needle position Us...

Страница 156: ...mum speed of normal embroidery should be higher than the speed limit of sequin embroidery 2 Automatic start or not When the setting is Yes system will start embroidering sequin automatically When the...

Страница 157: ...he screen select and then select sequin sending then all the devices will send out one sequin at the time you press the key presser foot should be down at first 2 Separated Operation Separated sequin...

Страница 158: ...s available Sequin sending order by the control panel is acceptable while valve operation is not available Thread break switch is embroidery switch When thread break switch is at the down side neither...

Страница 159: ...mal embroidery Mending stitches in machine parameter setting is ineffective in sequin mending 11 3 How to Act Sequin Embroidery Users should take the following steps 1 Use sequin design Design selecti...

Страница 160: ...arameters 2 Taping function Tape can be used as embroidery material It includes taping 1and taping 2 blind embroidery 3 Zigzag function Zigzag sewing lever swings to the right or left per stitch in re...

Страница 161: ...imming of the bottom thread trimming of both the upper and bottom threads 10 The nipple of Special embroidery can be raised and lowered automatically before manual frame shifting or embroidering 11 Zi...

Страница 162: ...cancel a digit and to cancel all the digits After input press the key to finish setting The following parameters can be set in direction of Machine application 4 2 C35 Speed for Sequin L 300 600 Pres...

Страница 163: ...he machine stops by pulling the bar Y N Press the key or in the right side of the screen for adjustment and then press to confirm The following parameters can be set in direction of Machine applicatio...

Страница 164: ...216 225 230 240 250 270 290 and 300 Select this parameter input required value by typing in certain digit Press the key to cancel a digit and to cancel all the digits After input press the key to fini...

Страница 165: ...9 Z Shift Control Angle 0 180 When the rotating angle is larger than the set value the Z axis will wing faster Press the key to cancel a digit and to cancel all the digits After input press the key to...

Страница 166: ...same as above Generally this parameter is managed by professional experts before leaving factory 21 D44 M Axis Work OFF Angle 0 90 In case of normal and sequin embroidery the M axis stops at the angle...

Страница 167: ...e owner s manual 159 1 is for special embroidery others are for non special embroideries Press certain key to change embroidering pattern Press to exit The key indicates the embroidering pattern press...

Страница 168: ...ernately Z3 embroidery Its feature is one lever swing every stitch Z4 embroidery Its feature is one lever swing every stitch and its lever swing direction is opposite to the one of Z3 Z5 embroidery It...

Страница 169: ...he key and then select to enter into color changing screen and then press the key special head to change special embroidery pattern Press relative icon to select the pattern you need if you don t want...

Страница 170: ...point meanwhile system will give the following dialogue window After tape operations are completed users can pull bar to close the window and shift the machine back to normal head to proceed normal e...

Страница 171: ...M axis to the Origin Point Press the key and click on the dialogue window to let the M axis rotate to the zero point click to exit 3 M axis rotated manually Press the key and click on the dialogue win...

Страница 172: ...ial Embroidery Debugging special embroidery mainly includes Zigzag swing to its origin and up down of clamp foot In the main screen click to enter into Other Functions screen after that click Sway Zig...

Страница 173: ...them as M axis E axis and clamp foot axis M axis rotates a certain degrees every stitch to trace the stitch which ensures cords or tapes always in front of needle movement E axis swings once every on...

Страница 174: ...ositioning 4 Servomotor driving with proximity switch for positioning 3 Clamp foot axis The working diagram of the clamp foot The clamp foot working height is the interval of the foot s movement with...

Страница 175: ...om point No proximity switch is taken for positioning And the controller by default takes that the foot is at the bottom position when turning on the machine 2 2 phase stepping motor separately drivin...

Страница 176: ...er point is set with a proximity switch to position The bottom point is set by parameters Both the upper and bottom points have the holding force 7 Pneumatic motor separately driving the embroidery he...

Страница 177: ...itioning OFF OFF No use Chart 3 DIP4 DIP5 DIP6 Composition Description of the clamp foot ON ON ON Manual ON ON OFF 2 phase stepping motor separately driving the embroidery heads without the holding fo...

Страница 178: ...e A05 Rep Mode Normal Normal part Not used A06 Rep Prior X Prior X prior Y prior A07 X Y Reps 1 1 1 99 A08 X Y Interval 0 0 0 0 999 9 999 9 Emb Parameters B01 Auto Origin Yes No Yes B02 To Do Cyclic E...

Страница 179: ...atching when patching B15 Emb Show Background Yes No Yes B16 Clamp Foot Min Height Adj 1 0 255 A88 machine has not it B17 Up Value When Jump Nocut Yes No Yes The same as above Machine Applications C01...

Страница 180: ...1000 C08 Shift Stitch Length mm 5 0 1 0 10 0 When the stitch length is longer than the set value the machine will lower the speed C09 Minimum Speed 400 250 300 350 600 C10 Jump Stitch Speed 400 750 4...

Страница 181: ...Para 1 0 30 The parameter is invalid when it s a servomotor When it s an electromagnetic motor increase this parameter value to avoid main shaft vibration during braking Usually it s set as 1 C25 Set...

Страница 182: ...The same as above C53 Spec Speed Down Ratio 2 1 4 The same as above C36 Ratio of Coil Emb 0 Sti L 0 3 Sti L The same as above C37 M Axis Stop to Origin Yes No Yes The same as above C54 Cord Emb Needle...

Страница 183: ...0 150 The parameter sets the rotation speed for lock stitch D05 Speed When Trimming 80 80 90 100 250 D06 Spin Rounds for Brake 1 1 2 2 for most machines 1 for miniature type and machines with servo co...

Страница 184: ...00 310 320 600 D19 AFC Use No No Yes D20 AFC Interval Time 3 0 15 D21 Sequin R On Off No Yes The first needle position D22 Sequin L On Off No Yes The highest needle position D23 R Sequin Motor Angle M...

Страница 185: ...Z Emb Swing Adj 0 0 5 The same as above D31 Rod Pos of Zigzag Left Left Right The same as above D39 Z Shift Control Angle 0 0 180 The same as above D40 Adj Clamp Foot Limit 179 0 250 The same as abov...

Страница 186: ...prefix is viewable suffix is 3 digits For instance DST will be displayed as 1 DST 6 Filename displayed in Chinese support 7 Sub directory operation support 8 Sub directory limit No limitation 9 File...

Страница 187: ...existed 14 Design not existed 15 Open design error 16 Error type combined design 17 Open FLASH media error 18 Design has created 19 No enough design mem 20 Directory is invalid 21 FLASH media write p...

Страница 188: ...is too big Can t process 55 Can not format the disk 56 Unsupport operation Lower monitor mistakes EC05 THE HOOK IS NOT OK EC07 HOOKING TIME IS OUT EC08 NOT SET E SET EC09 CANNOT RETURN EC10 CANNOT RE...

Страница 189: ...ror Information BECS A88 C88 computerized embroidery machine owner s manual 181 No Mistakes EC44 FILE FAT ERR EC45 FILE DIRECTORY ERR EC46 HAS BAD SECTORS EC95 Thread is broken press key EC101 Transfe...

Отзывы: