background image

Understanding the code (cont.)

This  robot  uses  some  timers  in  the  code  to  control  certain  functions. This  is  done  using  the  millis()  function  which 
counts  the  number  of  milliseconds  since  the  robot  was  turned  on.  We  will  briefly  look  at  how  the  unsigned  long 
variable 

sit

 is used to measure boredom in the robot.

In the [

Play

] tab, 

sit

 is set to equal the value reported by the 

millis()

 function whenever the robot takes a step. This 

resets the boredom timer because the difference between 

millis()

 and 

sit

 is reset to 0.

In  the 

loop()

  section  of  the  code,  the  difference  between 

millis()

  and 

sit

  are  compared  to  the  constant 

Boredom

The result is that if the robot does not take a step for 

Boredom

 milliseconds then the robot will become bored and sit 

down. Once this happens, the timer cannot be reset unless you make the robot look up at which point the variable 

sit


is set to equal the new value of 

millis()

 in the [

SitShakeLiedown

] part of the code and the difference is now 0 again.

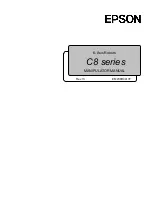
In  the  loop()  function,  the  program  constantly  reads  the  sensors  in  the  eye,  tracks  movement  with  the  head.  If  the 
puppy is not bored then it will follow your hand and walk / jump in play mode. If the puppy becomes bored then it will 
sit down. In this mode it will shake hands or lie down.

19

Содержание Playful Puppy

Страница 1: ...the express written consent of DAGU Hi tech Electronic Co Ltd The manufacturer and distributor cannot be held responsible for any damages occurred by mishandling mounting mistakes or misuse due to non...

Страница 2: ...Parts list Assembly instructions Wiring Instructions Installing the Software Controlling the robot Understanding the code Uploading via the ISP socket Burning the bootloader Trouble Shooting Controll...

Страница 3: ...ons in this manual exactly you will quickly assemble your Playful Puppy robot Before you start you must prepare the following tools Opened packages can not be returned Please check package contents be...

Страница 4: ...bracket 1 1pc M2 2 8 self tapping screw 16pcs M2 6 self tapping screw 16pcs with flange 16 17 M2 6 self tapping screw 12pcs M2 8 self tapping screw with flange 4pcs 18 M2 3 12 self tapping screw 2pcs...

Страница 5: ...check the length of your screws and spacers 7 4 x2 x2 2 2 2 7 14 17 18 14 14 x4 x4 Please note that servo mounts differently for left and right legs attach legs so knee bent at 90 5 Before you begin a...

Страница 6: ...ets in both clutch pieces so the poles alternate as shown 34 30 x2 5 Note position of hip servos and mount legs at 90 to body Pay careful attention to which bracket you use The hole patterns are diffe...

Страница 7: ...p 8 19 Step 9 Step 10 0mm 10mm 20mm 30mm 40mm 50mm 0 inch 2 inch 1 inch 22 13 23 26 21 25 2pcs 24 25 2pcs 9 31 15 11 2 6 30 x2 5 Install 8x magnets in both clutch pieces so the poles alternate as show...

Страница 8: ...mm 10mm 20mm 30mm 40mm 50mm 0 inch 2 inch 1 inch Ready for wiring 21 32 27 23 22 Step 13 36 29 Step 11 33 Step 12 28 8 Remove protective paper from adhesive strips and mount battery holder with velcro...

Страница 9: ...These are your analog signals from the compound eye D8 D8 Make sure the servo power selection jumper is toward the outer edge of the PCB This will power the leg servos directly from the battery When...

Страница 10: ...ont knee and hip servos as shown Make sure the knee and hip can both move freely over their entire range before tightening the cable tie Repeat the process for the rear legs Feed these cables through...

Страница 11: ...ller from DAGU Before we can upload the sample code we must select the correct board type and serial port This is done in theTools menu Select Arduino NG or older w ATmega8 as your board type The robo...

Страница 12: ...he robot turned on and put it on it s back so it cannot try to run away Before you upload the code it is always good practice to verify it first This will compile the code and check for any errors bef...

Страница 13: ...your hand gets too close the robot will back up If your hand is too far away but still in range then the robot will walk forward If you do not play with the puppy it will get bored and sit down While...

Страница 14: ...nal code if you make a mistake Below is a flowchart of the sample code A flow chart is not actual code it is more like a map showing blocks of code and the different paths the processor can follow wit...

Страница 15: ...tion runs only once when the program first runs This is where the servos are attached to their digital pins and initialized to their center positions By default all digital pins are configured as inpu...

Страница 16: ...o quickly it can overshoot and the head will tend to vibrate or constantly shake Too slow and the robot will loose it s lock on a moving object If you make changes to the code that affect how quickly...

Страница 17: ...sensors with the IR LEDs turned ON This reading is a combination of the ambient IR light plus the IR light from the LEDs being reflected from any nearby objects Then the LEDs are turned OFF and the s...

Страница 18: ...variables panscale and tiltscale are used to try and compensate for distance and the speed at which the program runs The constants LRscalefactor and UDscalefactor can be changed in the Constants h tab...

Страница 19: ...ion of the code the difference between millis and sit are compared to the constant Boredom The result is that if the robot does not take a step for Boredom milliseconds then the robot will become bore...

Страница 20: ...legs raise move and lower Negative values of LShift and RShift make the legs go backward instead of forward The Speed constant determines the number of milliseconds between steps in the gait Stepsize...

Страница 21: ...n the SitShakeLiedown tab determines the behavior of the puppy While in the sitting position the robot will still track movement with it s head If the head tracks movement towards either front leg the...

Страница 22: ...ion manual These instructions will explain how to use an Arduino or compatible board as the programmer Using the example code supplied with the Arduino IDE you can use another Arduino or Arduino compa...

Страница 23: ...rammer leave the board type as Arduino NG or older w ATmega8 as this is the configuration of the puppy robot Go to the Tools menu select programmer and choose your programmer type Arduino as ISP Then...

Страница 24: ...e procedure is very similar to uploading code via the ISP socket If you have not done so already configure an Arduino or compatible board as your programmer as explained on page 21 Once your programme...

Страница 25: ...port is recognized and the correct port is selected Try re instalingl the USB drivers Q The robot looks away from an object instead of towards it A Check that the Pan Tilt assembly has been assembled...

Страница 26: ...ted at 1A USB interface and ISP socket can be programmed with USB cable or ISP programmer ATmega8A processor 16MHz with 8K FLASH 1K SRAM and 512 Bytes EEPROM memory 8x digital I O pins with servos com...

Отзывы: