background image

Timer Recording

VCR

O

peration

27

26

Timer Recording

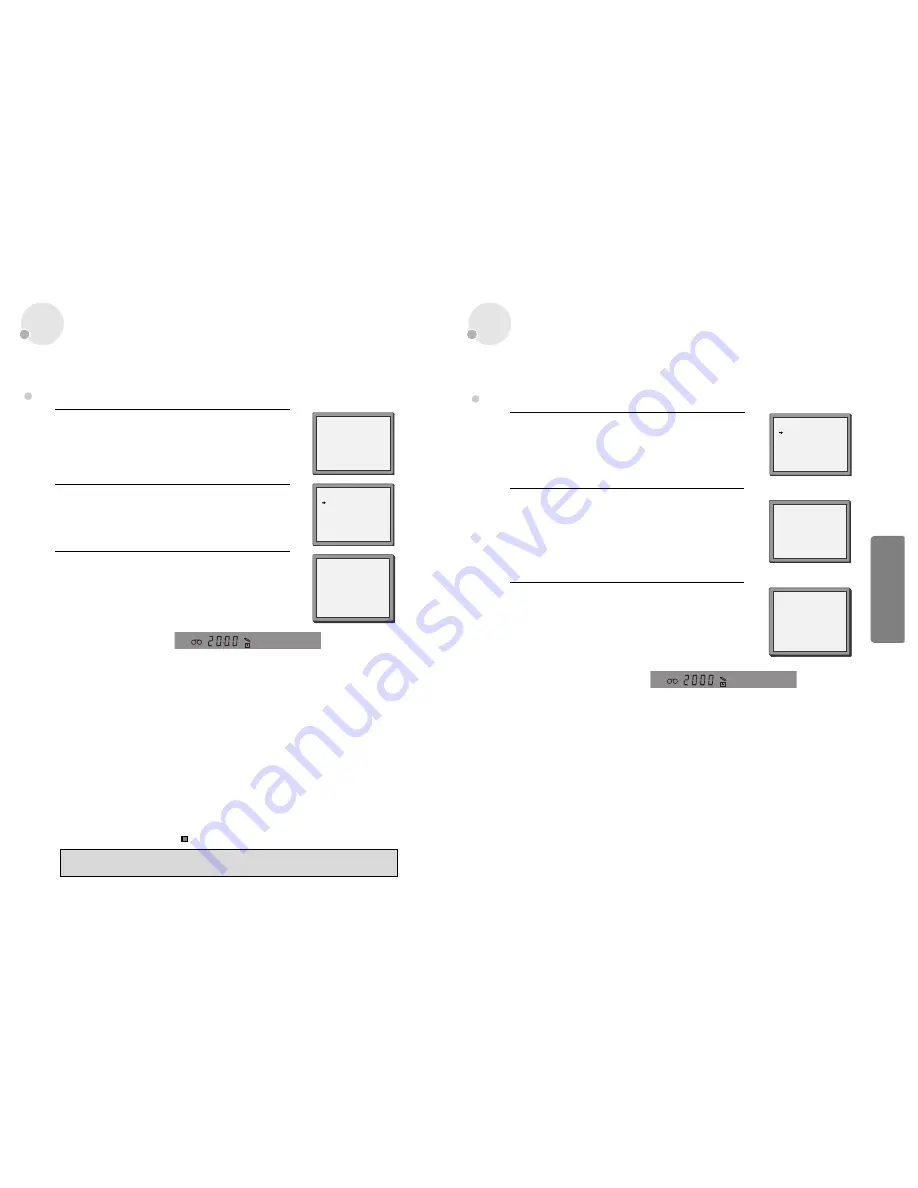
For timer recordings, clock, date, and stations must be set correctly. 

Load a cassette with its safety tab in place and with sufficient free space for the recording.

Call the player’s "SETUP", choose "TIMER PROGRAM".
Decide  if  you  want  to  record    "ONCE",  "WEEKLY"  or
"DAILY"...

... and confirm.

1

Type in one after the other: 

•  The programme location number;
•  the time the broadcast starts,
•  the time the broadcast ends, 
•  the day of the broadcast, if it is not today. 
•  Select LP if you wish to make a very long recording .
•  Switch off VPS/PDC here if you need to .

2

If you wish to make changes:
Move to the position you want to change using the  [

œ

œ

/

√  

]

buttons. Change the setting using the [PR+/- ] or [number]
buttons.
If  all  setting  are  ok,  press  [

œ

œ

or 

],  till  you  see  “OK  :

CONFIRM” in the bottom line.
Confirm.

3

Switch your player off.

• Wait a few seconds after typing a one-digit-number.

• If you have made a mistake, move to the position you want to change using the [

œ

œ

/

] buttons

and change the setting.

• If programme timings overlap, the machine will give a warning message. If you don’t adjust

the times, the machine will record the first programme completely then continue with the
second one.

• If there is no sufficient free space for the recording on the cassette the video switches

automatically to “LP” for double recording capacity. 

• The recorder will eject cassettes which have the safety tab removed.
• The player will be powered on and record the program at the set time.
• In case the player is powered on  after setting of timer recording, the player cannot record in

VCR mode but can record in DVD mode.  

PR+/-:SELECT(AV1/AV2)

0-9  :SETUP(PR)

/

:CORRECT   SETUP:END

PR

--

START TIME

--:--

END TIME

--:--

START DATE

--/--

TAPE SPEED

SP

VPS/PDC

ON

TIMER  PROGRAM (ONCE)

PR

01

START TIME

18:10

END TIME

20:30

START DATE

20/08(FRI)

TAPE SPEED

LP

VPS/PDC

ON

PR+/-:SELECT(AV1/AV2)

0-9 : SETUP (PR)

/

:CORRECT

OK:CONFIRM           SETUP:END

TIMER  PROGRAM  (ONCE)

HOW OFTEN DO YOU WANT

TO RECORD THIS PROGRAM?

PR+/-:SELECT
OK:CONFIRM       SETUP:END

ONCE

WEEKLY(ONCE A WEEK)

DAILY(MON-FRI)
DAILY(MON-SAT)
DAILY(MON-SUN)

Normal timer recording

For timer recordings, clock, date, and stations must be set correctly. 

Load a cassette with its safety tab in place and with sufficient free space for the recording.

Call the ShowView menu by pressing PROGRAM on the
remote control.

From your TV magazine, type in the number next to the
programme you want to record ... 

... and confirm. 

1

Decide if you want to record "ONCE", "WEEKLY" or "DAILY"...

... and confirm.

2

If you wish to make changes:
Move to the position you want to change using the [

œ

œ

/

]

buttons. 
Change the setting using the [

/

] or [number] buttons. If all

setting are ok, press [OK], till you see “OK: CONFIRM” in the
bottom line.
Confirm.

3

Switch your player off.

0-9:SHOWVIEW NUMBER

:CORRECT

OK:CONFIRM       SETUP:END

SHOWVIEW

83077----

HOW OFTEN DO YOU WANT

TO RECORD THIS PROGRAM?

PR+/-:SELECT
OK:CONFIRM       SETUP:END

TIMER  PROGRAM (ONCE)

PR

03

START TIME

21:20

END TIME

22:20

START DATE

12/08(SAT)

TAPE SPEED

SP

VPS/PDC

ON

PR+/-:SELECT (AV1/AV2)

0-9 : SETUP (PR)

/

:CORRECT

OK:CONFIRM              SETUP:END

ONCE

WEEKLY(ONCE A WEEK)

DAILY(MON-FRI)
DAILY(MON-SAT)
DAILY(MON-SUN)

Timer recording using ShowView

• VPS/PDC is a service provided by some stations to enable you to perform timer recordings

precisely even if the broadcaster delays the start time of the programme slightly. The time you
enter is the VPS/PDC time so must be correct. Not all stations offer VPS/PDC, in which case the
player will start at the time you enter and not the actual start time of the programme.
If you wish to start recording at a specific time without it being adjusted by the  VPS/PDC
system in the event of a delay, switch VPS/PDC off otherwise the player will not record.

• If you don’t have the ShowView numbers see next page  for the normal timer.
• If you have made a mistake, move back to the relevant position with the [

œ

œ  

] button and change

the setting.

• If there is no programme location displayed under “PR” in the change menu, the player doesn’t

yet know the location number for the programme you want. Type it in and this will be stored
for last recordings.

• If you wish to record from a satellite receiver, select under “PR” the satellite programme

location or AV (1/2) (depending on the connection with the antenna cable or the SCART-cable).
Leave the satellite tuner switched on and to the programme you want. 

• Should programming overlap, you get a warning.
• To cancel the recording press the  

button (stop) more than 5 seconds.

• ShowView is a trademark applied for by Gemstar Development Corp.. The ShowView system is

manufactured under license from Gemstar Development Corporation.

Содержание SF-9300E

Страница 1: ...in an equilateral triangle is intended to alert the user to the presence of important operating and servicing instructions in the literature accompanying the appliance WARNING TO REDUCE THE RISK OF FI...

Страница 2: ...pon or against them paying particular attention to cords at plugs convenience receptacles and the point where they exit from the unit PORTABLE CART WARNING symbol provided by RETAC 13 LIGHTNING For ad...

Страница 3: ...yer near strong magnetic materials it may affect image or voice poorly or damage recording Do not spill volatile liquids like insect spray over the player Do not leave rubber or plastic products in co...

Страница 4: ...n Use to rewind currently being played videotape or disc or to playback back rapidly 3 Playback PAUSE button Playback videotape or disc Press this button to pause a screen 4 FAST FORWARD button Use to...

Страница 5: ...this jack with amp or unit embedded with digital audio decoder Connection to ANTENNA Cable Connection to TV EURO AV1 Jack Main body Rear Panel Disposal of Used Electrical Electronic Equipment The mea...

Страница 6: ...ER button VCR TRACKING button SYSTEM button This button is not available for this set SETUP button DVD VCR MOVE SELECT in OSD VCR Channel Up Down button DVD TITLE PBC button DVD AUDIO LANGUAGE Select...

Страница 7: ...n also use a scart lead to improve picture and sound quality from your player Hi Fi Aerial Television Plug a scart to phone cable into the AV1 socket on the back panel and into the audio socket on any...

Страница 8: ...to the first player and press INPUT until AV1 appears on the front display 2 Insert the tape you wish to copy from into the second player Press the PLAY button on the second player 3 Press the RECORD...

Страница 9: ...t see its user manual In case of interference problems on CH 52 type in an other transmission channel between 21 and 69 using the number buttons Setting up the player If your video has the AV2 output...

Страница 10: ...SET VCR SETUP TAPE CONTROL PR SELECT OK CONFIRM SETUP END OSD On Screen Display ON OFF To Select DVD To Select VCR To Select Watch Modes or External Input Press VCR button on the remote control to cha...

Страница 11: ...oduct includes automatic Tracking function and enables users to enjoy clear picture without an additional operation Provided that the following problems can be solved by the manual adjustment which im...

Страница 12: ...ess STOP button Twice recording for 30 mins from current time 3 times recording for 1 hour 21 recording for 10 hours 22 returning to the status of Once Press 3 3 To stop Recording mode press STOP butt...

Страница 13: ...switched on To see the picture from your player press the input or AV Audio Video button on the TV To complete the set up of your video recorder when the auto set has not stored all of the channels or...

Страница 14: ...nd with sufficient free space for the recording Call the ShowView menu by pressing PROGRAM on the remote control From your TV magazine type in the number next to the programme you want to record and c...

Страница 15: ...aded TAPE CONTROL TAPE REMAIN E 240 01 27 TAPE REMAIN GO TO ZERO COUNTER RESET INDEX INDEX E 180 E 240 E 300 PR SELECT OK CONFIRM SETUP END PR SELECT OK CONFIRM SETUP END When you record a program the...

Страница 16: ...O ZERO 0 02 13 Reset the counter COUNTER RESET 0 00 00 You can play and record the program of 16 9 Wide Screen format with this player 16 9 Set Auto This video automatically detects the program format...

Страница 17: ...sound In addition to the normal mono sound track of VHS video recorders your player machine is equipped with a high quality Hi Fi sound system This means you can enjoy films with excellent stereo sou...

Страница 18: ...f all components when connecting or disconnecting cables To copy to your player from another video machine connect the two machines with a cable between their EURO AV SCART sockets and select as progr...

Страница 19: ...l Playback mode 3 For the case of VCD disc repeat playback starts only in PBC OFF mode DivX REPEAT TRACK REPEAT FOLDER REPEAT OFF VCD CD T R A C K D I S C O F F MP3 JPEG REPEAT TRACK REPEAT FOLDER R A...

Страница 20: ...c time press SEARCH button once Please enter the new time to be searched using the NUMBER buttons PLAY starts from the selected position 1 If you want to search with a track time press SEARCH button t...

Страница 21: ...0 00 57 TRACK REMAIN TRACK 01 20 0 05 57 DISC ELAPSED TRACK 01 20 0 00 57 DISC REMAIN TRACK 01 20 1 50 57 While in playing press DISPLAY button It shows the current playing time Each time you press D...

Страница 22: ...includes subtitle information every time the user presses SUBTITLE button English ENG French FRE Spanish SPA and OFF appear one by one A certain disc may not support audio select or subtitle select A...

Страница 23: ...rizontally or vertically If a disc includes multi angle information the user can watch a screen in multi angles The function is limited to a DVD disc supporting multi angle information Keep pressing A...

Страница 24: ...lay or Pause while pressing the PLAY PAUSE button SEARCH The SEARCH button and select the file MP3 JPG or the time MP3 you desired using the Number buttons STOP The STOP button Pass over to a next or...

Страница 25: ...f a recorded file have not been undergone the interleave it will output either the image or the sound In order to recognize the subtitle file automatically DivX file name and Subtitle file name must b...

Страница 26: ...disc When the frame number per a second is more than 30 it may not play it normally It will not support a DivX file coded with dts It will not support some GMC or Q Pel Quarter Pixel It will be availa...

Страница 27: ...Shona 8979 Yoruba 6976 Greek 7384 Italian 7782 Marathi 8379 Somali 9072 Chinese 6978 English 7387 Hebrew 7783 Malay 8381 Albanian 9085 Zulu 6979 Esperanto 7465 Japanese 7784 Maltese 8382 Serbian Tabl...

Страница 28: ...f a user selects 4 3 PS the user can watch only a center of the original scene of 16 9 If a user selects 4 3 LB the user can watch the original scene of 16 9 but the top and bottom of the screen look...

Страница 29: ...ng level Select the desired Parental level and press ENTER When PASSWORD appears on the screen input the password and press ENTER These 8 levels of parental control protect children from watching viol...

Страница 30: ...ering flexibility and economical performance as well as uncompromised sound quality Bitstream Digital audio data that is decoded into an analog signal for subsequent output to speakers Lt Rt It indica...

Страница 31: ...the tape quickly and easily LP Long Play an intermediate tape recording speed that combines most of the picture audio quality obtainable at the standard recording speed with some of the tape economy...

Страница 32: ...m the CHANNEL SETTING Power On does not work It does not work even in Power On A videotape is not inputted in On inputting a videotape the tape is re ejected A videotape is not ejected A channel on vi...

Страница 33: ...ile a DVD is playing The file name of MP3 CD R appears with strange letters Any MP3 CD R file isn t displayed Checks Symptom If a DVD is from overseas it may not be played Please check a DVD s region...

Страница 34: ...he OK ENTER button 5 Select the channel that needs to be moved and press the OK ENTER button 6 Press the OK ENTER button in order to select the PR number which you want to place the current selected c...

Страница 35: ...MANUAL DVD PLAYER VIDEO CASSETTE RECORDER SF 9300E Please read this manual carefully before connecting your DVD VCR and operating it for the first time Keep the manual in a safe place for future refer...

Отзывы: