background image

Deutsch - 9

Deutsch - 8

Stellen Sie den Bildschirm wieder auf die
in der Fabrik voreingestellten Display
Werte ein.  

ABRUFEN

Wählt die eigene horizontale Position  und
verticale Position und verticale Größe vom
Bildschirm automatisch.

AUTO
POSITION

Bilden Sie horizontale & vertikale
Frequenz und Polarität ab. 

STATUS

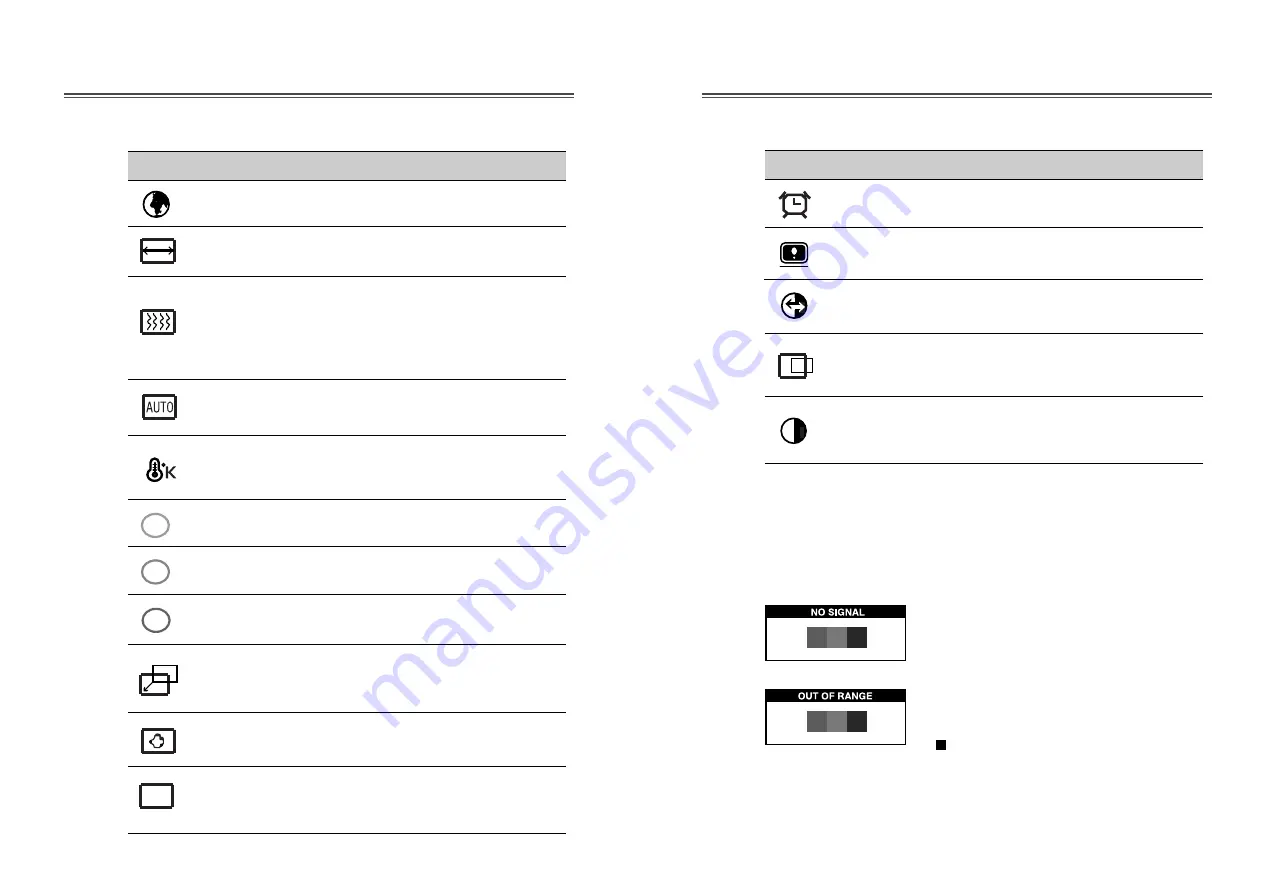
SYMBOL  KONTROLLE                     FUNKTION

OSD-
ANZEIGEDAUER

Stellen Sie das OSD-Menü.

Selbstdiagnose

Erfolgt keine Anzeige, wenn der Benutzer eine beliebige Taste
drückt, dann erscheint das Selbstdiagnose-Schirmbild.  Die
Selbstdiagnose kontrolliert, ob der Monitor kein Signal erhält
oder ob der Bereich veriassen wurde.

“No Signal” wird angezeigt, wenn der
Stecker (D-Sub) nicht angeschlossen oder
der Monitor auf DPMS-Betrieb
eingestellt ist.

“Out of Range” wird angezeigt wenn die
benutzte Frequenz unter-oder oberhalb des
normalen Bereichs liegt.

Normaler Bereich

(Nicht verflochten-Modus nur)

H : 30 - 62 KHz (1024 punkte Max)
V : 50 - 85 Hz    (768 punkte Max)

Stellen Sie die Bildschirm-Qualität ein.

SCHÄRFE

AUTO
BILDGR.

Stellen Sie die horizontale und verticale
Bild-Qualität und Grösse ein. 

Sprache für OSD auswählen.

SPRACHE

Stellen Sie die Breite (die horizontale
Länge) von dem Schirmbild ein.

H/V GRÖßE

Wählen Sie unterschiedliche voreingestellte
Farbtemperaturen oder stellen Sie eigene
kundenspezifische Farbparameter ein.

Schärfen Sie den Brennpunkt durch die
Ordnung vom begeleuchten Punkt und
stellen Sie bis das Schirm Bild fokal, hart
und scharf aussieht.  Stellen Sie 

CLOCK

FINE

wenn die 

CLOCK

Anordnung ein

klares Bild geschafft wird.

Stellen Sie die Rot-Farbe ein

Stellen Sie die Grün-Farbe ein.

STABILITÄT

FARBTEMPERATUR

ROT-REGELUNG

GRÜN-
REGELUNG

Stellen Sie die Blau-Farbe ein.

Richten Sie das Display horizontal (rechts
oder links) und vertikal (hoch oder runter)
aus.

Richten Sie das OSD Position horizontal
(rechts oder links) und vertikal (hoch oder
runter) aus.

BLAU-
REGELUNG

H. POSITION &   

V. POSITION 

SYMBOL  KONTROLLE                     FUNKTION

OSD Funktionen

OSD
POSITION

R

G

B

Stellen Sie den Bildkontrast, d.h. den
Unterschied zwischen hellen und dunklen
Bildschirmbereichen ein.   

KONTRAST

OSD

Содержание L510B

Страница 1: ...Model No L510B TFT LCD MONITOR USER S GUIDE http display dwe co kr...

Страница 2: ...rvice personnel 16 Unplug this monitor from the wall outlet and refer servicing to qualified service personnel under the following conditions a When the power cord or plug is damaged or frayed b If li...

Страница 3: ...r Peripherie betrieben wird da nur unter diesen Umst nden ein optimaler ergonomischer Betrieb des Ger tes sichergestellt ist Falls Sie dennoch Fragen haben auf die die Bedienungsanleitung keine hinrei...

Страница 4: ...a main disconnect device Disconnect the power cord before servicing The outlet must be installed near the monitor and must be easily accessible As an ENERGY STAR Partner Daewoo Electronics Co Ltd has...

Страница 5: ...ance from your monitor Please read this user s guide carefully before installing your monitor then keep it near your monitor for quick reference First please check that the contents of the box corresp...

Страница 6: ...nd Play compatibility Advanced microcircuitry makes setup and configuration fast and effortless The monitor features Advanced Color Controls for fine tuning to meet your own personal tastes or applica...

Страница 7: ...es from top menu to sub menu in the OSD window The button moves cursor to the left or high window in the OSD window This button decreases the value of any selected function The button moves cursor to...

Страница 8: ...noise displayed on the screen Perform the AUTO TRACKING Is the noise displayed on the screen yet Is the noise displayed on the screen yet Adjust the CLOCK FINE until the screen is cleared Yes Yes Yes...

Страница 9: ...Adjust the display image quality if the screen proceed to scaling up SHARPNESS AUTO TRACKING Adjust the horizontal vertical picture image quality and size Select language for OSD 6 languages LANGUAGE...

Страница 10: ...lish 10 VESA MODES MAC MODE Mode H Freq KHz V Freq Hz Remark Mode H Freq KHz V Freq Hz Remark Resolution dots Xlines Resolution dots Xlines Mode H Freq KHz V Freq Hz Remark Resolution dots Xlines IBM...

Страница 11: ...ected to the video card Check if the pins of D subconnector are not bent Check if the computer is in the power saving mode Check if power switch is in the on position Check if the power cord is correc...

Страница 12: ...S N 9978630700...

Страница 13: ...e comment optimiser ses performances Lisez toutes les sections du manuel attentivement avant d installer l cran et gardez le port e de main pour pouvoir y faire r f rence au besoin Assurez vous de la...

Страница 14: ...u d autodiagnostic Self Diagnosis afin de d terminer si votre moniteur fonctionne normalement s il re oit un signal ou si ce signal est en dehors de la gamme normale de fr quences Activez une fr quenc...

Страница 15: ...IT met OSD l affichage l cran hors fonction Cette touche se d place de sous menu menu de dessus dans la fen tre OSD La touche MENU met OSD en fonction Cette touche se d place de menu de dessus sous me...

Страница 16: ...O Le bruit est il affich sur l cran d j Le bruit est il affich sur l cran d j Le bruit est il affich sur l cran R glez CLOCK FINE jusqu ce que l cran soit effac Oui Oui Oui Oui Non Non Non Non Fin Pro...

Страница 17: ...768 point Max R gle la qualit d image d cran si l cran escalde NETTET R GLAGE AUTO R gle la qualit et la dimension verticale et horizontale S lectionne la langue du menu OSD 6 langages LANGUE R gle la...

Страница 18: ...10 40 C 50 104 F Le moniteur LCD a les modes Noninterlac sans papillotement seulement VGA 640 X 480 60Hz 31 5 60 Non entrelac VGA 640 X 480 73Hz 37 9 73 Non entrelac VGA 640 X 480 75Hz 37 5 75 Non ent...

Страница 19: ...eur et l cran sont ils sous tension Le c ble vid o est il correctement reli la carte vid o Les broches des connecteurs sont elles tordues L ordinateur fonctionne t il en mode conomie d nergie L cran e...

Страница 20: ...der Kontrolliste bereinstimmt TFT LCD monitor Netzkabel 15 polige D Sub Steckverbindung Benutzerhandbuch B rgschaftsbriefschein Wahlfrei Falls Teile fehlen oder besch digt sind informieren Sie bitte I...

Страница 21: ...igenden Aufgabe Der Monitor ist mit hochentwickelten Einstellelementen f r die Feinabstimmung nach Ihrem pers nlichen Geschmack oder nach den Erfordemissen Ihrer jeweiligen Anwendung ausgestattet Sie...

Страница 22: ...haltet das OSD Fenster Anzeige f r den eingeschalteten Bildschirm aus Diese Taste bewegt sich von dem Untermenue bis zu dem Obermenue des OSD Windows Bei keinem OSD schaltet die Taste MENU das OSD MEN...

Страница 23: ...lackern Stellen Sie auf AUTO BILDGR Hat der Bildschirm das Flackern noch Hat der Bildschirm das Flackern noch Regeln Sie den Bildschirm mit STABILIT T bis er klar wird Ja Ja Ja Ja Nein Nein Nein Nein...

Страница 24: ...e Max Stellen Sie die Bildschirm Qualit t ein SCH RFE AUTO BILDGR Stellen Sie die horizontale und verticale Bild Qualit t und Gr sse ein Sprache f r OSD ausw hlen SPRACHE Stellen Sie die Breite die ho...

Страница 25: ...utzt nur den Nicht verflochten Modus ohne Flimmern VGA 640 X 480 60Hz 31 5 60 Non interlaced VGA 640 X 480 73Hz 37 9 73 Non interlaced VGA 640 X 480 75Hz 37 5 75 Non interlaced SVGA 800 X 600 56Hz 35...

Страница 26: ...rollieren ob das Netzkabel ordnungsgem angeschlossen wurde Kontrollieren ob das Videokabel zum Anschlu an die Videokarte geeignet ist Die Bildschirmdarstellung mit Hilfe der Bedienelemente f r H V Gr...

Страница 27: ...ario cuidadosamente antes de instalar su monitor y despues guarde su manual cerca de su monitor para una r pida referencia Primero por favor revise que el contenido de la caja de cart n corresponda co...

Страница 28: ...figuraci n rapida y sencilla La caracteristica del monitor Control de Color avanzado por tono fino permite conocer su propio gusto personal o aplicaci n de requerimientos El uso de los controles en pa...

Страница 29: ...e a la ventana parada de OSD exhibici n de Pantalla Encendida Este bot n mueve del submenu al menu superior en la ventana OSD El bot n MENU vuelve a la ventana de OSD Este bot n mueve del menu superio...

Страница 30: ...amente Hace SEGUIMIENTO AUTOM Todav a est apareciendo el ruido en la imagen Est apareciendo el ruido en la imagen Todav a est apareciendo el ruido en la imagen Elimine el ruido usando AJUSTE MEJORADO...

Страница 31: ...sta la calidad de imagen S el procedimiento de la imagen para sibir la balanza NITIDEZ POSICI N OSD SEGUIMIENTO AUTOM Ajusta la calidad y el tama o horizontal y vertical Seleccione el idioma para OSD...

Страница 32: ...l LCD monitor usa el modo de non interaced sin vibraci n VGA 640 X 480 60Hz 31 5 60 No entrelazada VGA 640 X 480 73Hz 37 9 73 No entrelazada VGA 640 X 480 75Hz 37 5 75 No entrelazada SVGA 800 X 600 56...

Страница 33: ...si el cable de se al esta correctamente conectado a la tarjeta de video Revise si las puntas del conector D sub no estan doblados Revise si la computadora esta en el modo de ahorro de energ a Revise...

Отзывы: