EN
16
• Open the BATTERY DOOR. Insert the batteries into the battery compartment and make
sure the positive and negative (+ or -) sides of the batteries are in contact with the
corresponding terminals in the battery compartment. Replace the BATTERY DOOR .
• If a power cut occurs, the radio automatically switches to the battery power supply
and keeps the clock and timer settings.
• When replacing the battery, do not disconnect the power adaptor. Otherwise, all clock
and alarm settings will be lost.
CAUTIONS:
1. Do not mix old and new batteries.
2. Do not mix alkaline, standard (carbon-zinc) or rechargeable (nickel-cadmium)
batteries.
3. If the unit is not to be used for an extended period of time, remove the batteries.
Old or leaking batteries can cause damage to the unit and may void the warranty.
4. Do not dispose of batteries in fi re, batteries may explode or leak.
5. Batteries shall not be exposed to excessive heat such as sunshine, fi re or the like.
6. Replace all the batteries at the same time, no matter exhausted or not, every 2
years at the same time to avoid possible battery leakage.
7. Do not try to recharge batteries not intended to be recharged; they can overheat,
rupture and leak. (Follow battery manufacturer’s directions).
8. Only an adult should replace the batteries.
SETTING THE CLOCK TIME
In order for the clock to function properly, the clock has to be set before you use it for
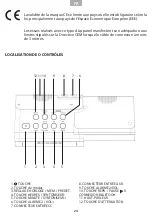
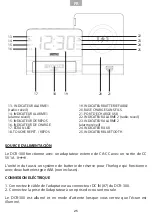
the fi rst time. After powering up the unit or press and hold CLOCK / MEM / PRESET
BUTTON (#3) at standby mode, the clock display will fl ash. To set the time, follow the
steps below:
1. Tap the HOUR/TUNER- (#4) AND MIN/TUNER+ (#5) repeatedly until the correct
time is displayed.
2. Press the CLOCK / MEM / PRESET BUTTON (#3) to confi rm the time.
ALARM OPERATION
The DCR-300 features a dual alarm clock.
To set the alarms:
1. In standby mode, press and hold the AL1 / VOL- BUTTON (#9) to enter the alarm 1
time setting mode.
2. The alarm time display will fl ash.
3. Tap the HOUR/TUNER- (#4) AND MIN/TUNER+ (#5) repeatedly until the correct
alarm time is displayed.
4. Tap the AL1 / VOL- BUTTON (#9) to confi rm.
5. Alarm 2 setting procedures are same as Alarm 1.


