background image


Cyclone Freedom Pro 22.2V Cordless Vacuum 

FLR00040 

User Manual 

IMPORTANT 

 RETAIN THESE INSTRUCTIONS FOR FUTURE REFERENCE 

Before the first time you use your Cordless Vacuum Cleaner 

Please read these operating instructions thoroughly and keep them in a safe place for future 
reference. 

Remove all packing materials and discard responsibly. 


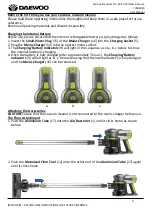
Charging the internal Battery 

Before use, please ensure that the internal rechargeable battery is fully charged as follows

1.


Insert the 

Small Power Plug

 (15) of the 

Mains Charger

 (16) into the

 Charging Socket 

(5). 

2.


Plug the 

Mains Charger

 (14) into the nearest mains socket. 

3.


The 

Charging/Battery Indicators

 (9) will light in the sequence as in a, b, c below to show 

the internal battery is charging.  

4.


Once the battery is fully charged (after approximately 5 hours), the 

Charging/Battery 

Indicators 

(9) will all 

light as in ‘c’ below

 showing that the internal battery is fully charged 

and the 

Mains Charger

 (16) can be removed. 


Attaching the Accessories  

CAUTION 

Ensure that the vacuum cleaner is not connected to the mains charger before use. 

The Floor Attachment 

1.


Push the 

Aluminium Tube

 (17) onto the 

Air/Dust Inlet

 (1) until it clicks home as shown 

below: 


2.


Push the 

Motorised


Floor Tool

 (12) onto the other end of the 

Aluminium Tube

 (17) again 

until it clicks home. 


a. 

b. 

c. 

Содержание Cyclone Freedom Pro

Страница 1: ...1 Cyclone Freedom Pro 22 2V Cordless Vacuum FLR00040 User Manual IMPORTANT RETAIN THESE INSTRUCTIONS FOR FUTURE REFERENCE ...

Страница 2: ...s to electrical appliances should only be performed by a qualified electrician Improper repairs may place user at serious risk Do not operate this appliance with a damaged plug or cord after a malfunction or after being dropped or damaged in any way Regular periodic checks should be carried out on the mains cable to ensure no damage is evident Should there be any signs of damage the appliance shou...

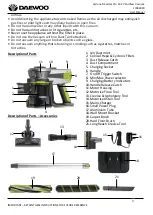
Страница 3: ...acuum any large or broken objects such as glass Do not vacuum anything that is burning or smoking such as cigarettes matches or hot ashes Description of Parts Description of Parts Accessories 10 1 Air Dust Inlet 2 Conical Hepa Cyclonic Filters 3 Dust Release Catch 4 Dust Compartment 5 Charging Socket 6 Handle 7 On Off Trigger Switch 8 Min Max Power selector 9 Charging Battery Indicators 10 Handle ...

Страница 4: ...et 5 2 Plug the Mains Charger 14 into the nearest mains socket 3 The Charging Battery Indicators 9 will light in the sequence as in a b c below to show the internal battery is charging 4 Once the battery is fully charged after approximately 5 hours the Charging Battery Indicators 9 will all light as in c below showing that the internal battery is fully charged and the Mains Charger 16 can be remov...

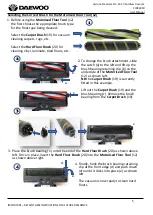
Страница 5: ... Select the Carpet Brush 19 for vacuum cleaning carpets rugs etc Select the Hard Floor Brush 20 for cleaning vinyl laminate tiled floors etc 1 2 a b 3 Place the brush bearing c onto the end of the Hard Floor Brush 20 as shown above left Once in place insert the Hard Floor Brush 20 into the Motorised Floor Tool 12 as shown above right c c 4 c 2 To change the brush attachment slide the catch a to th...

Страница 6: ...n the Motorised Floor Tool 12 and pull the cleaner back by the Handle 6 and start vacuum cleaning Press the On off Trigger Switch 7 again at the end of cleaning to switch the cleaner off 3 4 If the Aluminium Tube 17 is not required the Motorised Floor Tool 12 can be attached directly as shown right for cleaning hard to get at areas such as stairs car seats etc 4 2 During use press the Min Max Powe...

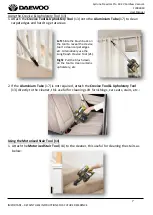
Страница 7: ...m Tube 17 is not required attach the Crevice Tool Upholstery Tool 13 directly to the cleaner this useful for cleaning soft furnishings car seats stairs etc Using the Motorised Stair Tool 14 1 Attach the Motorised Stair Tool 14 to the cleaner this useful for cleaning the stairs as below Left Slide the brush back on the tool to reveal the crevice tool to clean carpet edges etc Alternatively use the ...

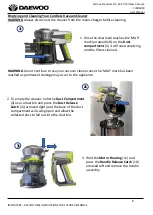
Страница 8: ...ft and remove the handle assembly 2 To empty the cleaner hold the Dust Compartment 4 over a dust bin and press the Dust Release Catch 3 arrowed right and the base of the dust compartment will swing open and allow the collected dust to fall out into the dust bin Emptying and Cleaning Your Cordless Vacuum Cleaner WARNING Always disconnect the cleaner from the mains charger before cleaning WARNING do...

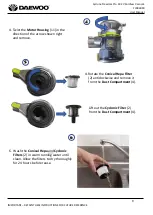
Страница 9: ... in the direction of the arrow shown right and remove 4 Rotate the Conical Hepa Filter 2 anticlockwise and remove it from the Dust Compartment 4 Lift out the Cyclonic Filter 2 from the Dust Compartment 4 6 Wash the Conical Hepa and Cyclonic Filters 2 in warm running water until clean Allow the filters to dry thoroughly for 24 hours before reuse 4 6 5 ...

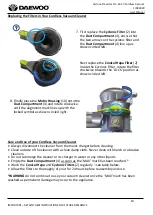
Страница 10: ...k lines up with the locked symbol as shown circled right Replacing the Filters in Your Cordless Vacuum Cleaner Care and Use of your Cordless Vacuum Cleaner Always disconnect the cleaner from the mains charger before cleaning Clean outside of the cleaner with a clean damp cloth Never clean with harsh or abrasive cleaners Do not submerge the cleaner or its charger in water or any other liquids Empty...

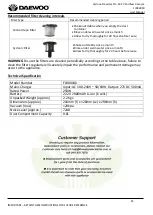
Страница 11: ...ance Technical Specification Model Number FLR00040 Mains Charger Input AC 100 240V 50 60Hz Output 27V DC 500mA Rated Power 250W Battery 22 2V 2000mAh Li Ion 6 cells Unpacked Weight approx 2 2 Kgs Dimensions approx 210mm l x 128mm w x 290mm h Vacuum max 20kpa Noise Level approx 72dB Dust Compartment Capacity 0 8L Shake out debris when you empty the dust container Rinse under warm water once a month...

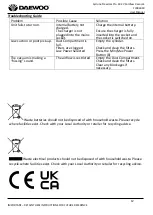
Страница 12: ...artment is full Filters are clogged Low Power Selected Empty the cylinder Check and clean the filters Press the Min Max Power Button 8 The vacuum is making a hissing sound The airflow is restricted Empty the Dust Compartment Check and clean the filters Clear any blockages if necessary Waste batteries should not be disposed of with household waste Please recycle where facilities exist Check with yo...

Страница 13: ...13 Cyclone Freedom Pro 22 2V Cordless Vacuum FLR00040 User Manual IMPORTANT RETAIN THESE INSTRUCTIONS FOR FUTURE REFERENCE ...

Отзывы: