background image

RECORDING

49

48

Recording from an External Input

Using DV, also known as i.LINK, you can connect a DV-equipped camcorder to the DVD RVCR using a
single DV cable for input and output of audio, video, data and control signals.
The i.LINK interface is also known as IEEE 1394-1995.
‘i.LINK’ and the ‘i.LINK’ logo are trademarks.

• The DVD RVCR is only compatible with DV-format (DVC-SD) camcorders. Digital satellite tuners

and Digital VHS video recorders are not compatible.

• You cannot connect more than one DV camcorder at a time to the DVD RVCR.
• You cannot control the DVD RVCR from external equipment connected via the DV IN jack (including

two DVD Recorders).

• It may not always be possible to control the connected camcorder via the DV IN jack.
• Audio input to the DV IN jack should be 32 or 48kHz (not 44.1kHz).
• Picture disturbance on the recording may occur if the source component pauses playback or plays an

unrecorded section of tape, or if the power fails in the source component, or if the DV cable becomes
disconnected.

What is DV?

Lock/Unlock Disc (DVD+RW)

If you want to protect a disc from accidental recording, editing, or
erasing, you can lock the disc. Later, if you change your mind, you
can unlock the disc.

1

Use [

] to go to the top menu.

2

Press [

] to display the Disc Information Menu.

3

Use [

œ

/

] to select ‘Lock/Unlock Disc’.

4

Press [ENTER] as shown on the screen.

5

You can see the current disc status (Locked or Unlocked).

6

You can change the disc status by selecting ‘Yes‘ and pressing [ENTER].

7

The ‘Changing Disc Status’ bar will appear. This process takes a few seconds.

8

After the process is finished the menu disappears automatically.
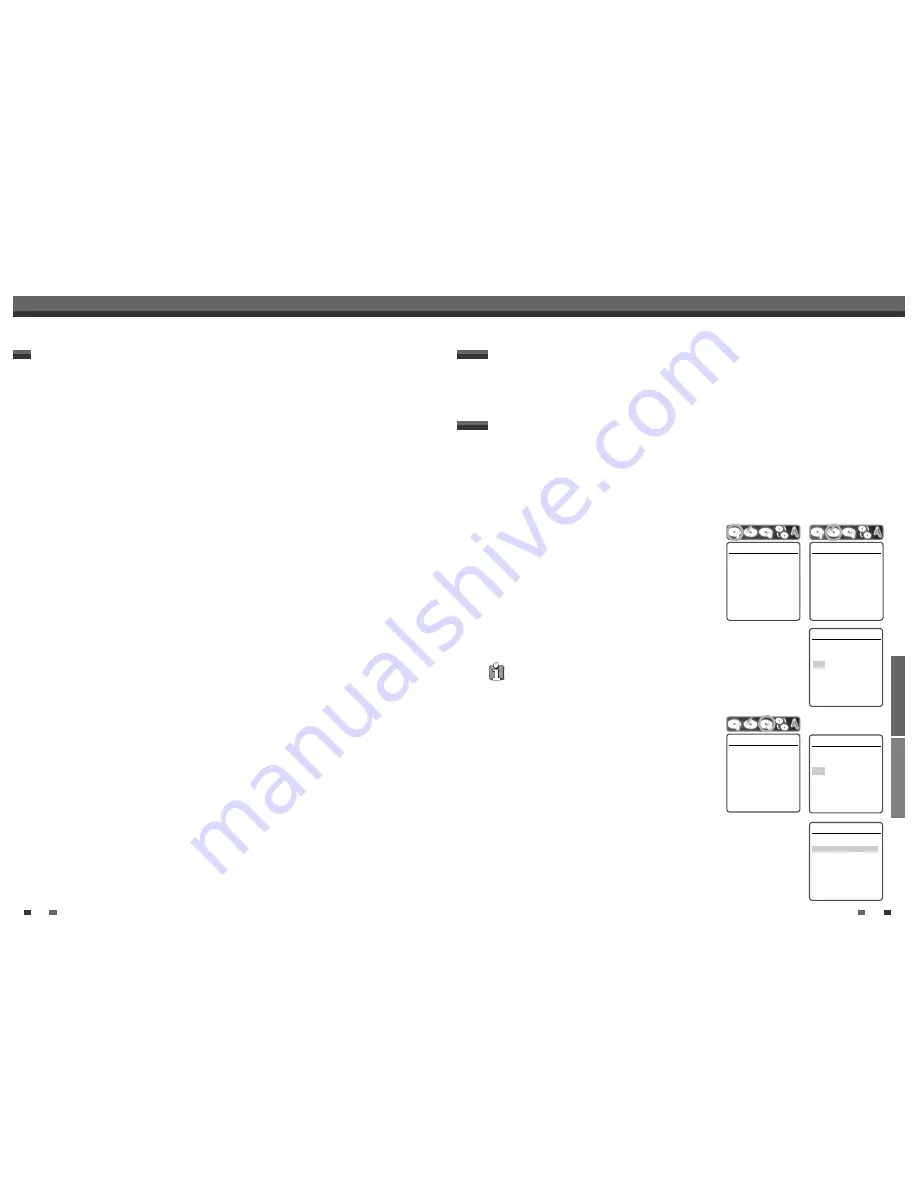
Lock/Unlock Disc

Press [Enter] to lock the

disc. This prevents future

disc operations or

recordings.

Instructions

Enter-Confirm

Lock/Unlock Disc

Disc is unlocked.

Do you want to lock it?

Yes

No

Instructions

Enter-Confirm   Move 

…†

Lock/Unlock Disc

Changing disc lock status.

Please wait a moment....

For recordable DVD media, such as DVD+R and DVD+RW discs, you can manage the disc using the Disc Menu.
The DVD+R Disc Menu allows you to rename your disc or finalize it so it will be compatible with most other
DVD players. 
The DVD+RW Disc Menu allows you to erase, lock, or unlock your disc. You can also make it compatible with
most other DVD players.

Information / Erase the disc  (DVD+RW)
1

Press [MENU] to go to Disc Menu mode.

2

In Disc Menu mode,  press [

] to move to the top menu.

3

Press [

] to display the Disc Menu.

4

The Disc Menu shows you disc information, such as disc type,
number of recordings, total titles, free space, etc.

5

Use [

œ

/

] to select the Disc Erase menu.

6

If you want to erase the whole disc, press [ENTER].

7

To confirm, select ‘Yes‘. To cancel, select ‘No‘. If you select ‘Yes‘ and press [ENTER],
all the contents of the disc will be lost.

• If you load a blank DVD+R(+RW) disc, it will be initialized (formatted to enable recording).
• Do not start recording until disc initialization is complete.
• If you load a DVD+RW that has already been used you can record a program immediately. 

DISC Initialize

Disc Menu

Information

Type

DVD+RW

Recordings

5

Total Title

00:57:57

Free Space

01:48:48

Finalized

-

Locked

No

Compatible

Yes

Instructions

Setup-Exit

Erase the disc

Erase the disc?

All recordings will be lost.

Yes

No

Instructions

Enter-Confirm   Move 

…†

• DVD+R  discs cannot be locked (unlocked) or erased.
• The 'Disc Menu' will not be available for recordable media created in order machine.

In order to be able to acess 'Disc Menu', the disc must be erased and created in this
recorder. To erase the disc, press [REC] and select 'YES' in 'Make Compatible' menu.

Erase the disc

Press [Enter] if you want

to erase the disc. All

existing recordings will

be cleared.

Instructions

Enter-Confirm

Editing

Editing

EDITING

Downloaded from 

www.Manualslib.com


manuals search engine


Содержание DF-7150D

Страница 1: ...DF 7150D P N 97P95600D0 7N DVD Recorder VCR DVD Recorder VCR User Manual...

Страница 2: ...x 2 hrs for it to reach room temperature Make sure the DVD Recorder VCR is placed at least 10 cm apart from other home appliances or obstacles to ensure sufficient ventilation The apparatus should not...

Страница 3: ...tions should be adhered to 4 FOLLOW INSTRUCTIONS All operating and use instructions should be followed 5 CLEANING Unplug this unit from the wall outlet before cleaning Do not use liquid cleaners or ae...

Страница 4: ...ic shock 16 OBJECT AND LIQUID ENTRY Never push objects of any kind into this unit through openings as they may touch dangerous voltage points or short out parts that could result in a fire or electric...

Страница 5: ...n a thousand times What is a DVD R Unlike a DVD RW disc a DVD R write once DVD can only be written to once If it is not finalized after a recording further recordings can be added to it Old recordings...

Страница 6: ...strictions on Video Recording You cannot record copy protected video using this DVD Recorder VCR Copy protected video includes DVD Video discs and some satellite broadcasts If copy protected material...

Страница 7: ...ndicates a DVD is playing with a Dolby Digital soundtrack 1 2 3 4 Identification of Controls STANDBY ON Turns the DVD Recorder VCR on and off Cassette Compartment VCR deck Insert a video cassette here...

Страница 8: ...ontrols Switches the DVD Recorder VCR input to Tuner AV AVF or DV Displays a disc s Title menu if available Selects Recording mode DVD HQ 1hr SP 2hrs EP 4hrs or SLP 6hrs VCR SP or LP Copies from DVD t...

Страница 9: ...om your TV and attach it to the RF IN FROM ANT jack on the rear panel of the DVD Recorder VCR Use the supplied RF cable to connect between the DVD Recorder VCR s OUT TO TV jack and the antenna input j...

Страница 10: ...to set the DVD Recorder VCR to Progressive Scan mode by pressing and holding P SCAN for 3 seconds or changing the Video Output in the Setup Menu see page 27 Progressive Scan does not work with the RF...

Страница 11: ...lect the desired language for the on screen menu using Press ENTER to confirm 3 Select the desired country using Press ENTER to confirm 4 Select the desired disc menu language using Press ENTER to con...

Страница 12: ...erview 1 Press SETUP The Setup menu appears 2 Use to select the desired category 3 While the desired category is selected press to move to the second level 4 Press ENTER to move to the third level 5 U...

Страница 13: ...Please set the clock Time 13 00 Date 02 Jan 2010 Sat Instructions Enter Confirm Setup Exit Move 22 9 Use to select Auto Search 10 Search the real channel number by pressing 11 Select Fine Tune You ca...

Страница 14: ...elect Auto Chapter Off 5min 10min 15min Initial Setup Adjust Channels 1 Follow steps 1 2 as shown under Manual Set 2 Use to select Adjust Channels 3 Press ENTER The Adjust Channels menu appears 4 Use...

Страница 15: ...Scan mode Video TV Aspect Auto Video Output Interlace Instructions Enter Confirm Setup Exit Move Select Picture Format 4 3 LB 4 3 PS 16 9 Auto Video TV Aspect Auto Video Output Interlace Instructions...

Страница 16: ...firm Setup Exit Move Select Dynamic Range Off Low High Set Parental Level The Parental Controls feature allows you to prevent DVDs from being played based on their ratings or to have certain discs pla...

Страница 17: ...Enter Confirm Master Password If you forget your password press 3 3 0 8 on the remote control and then press ENTER Set the new password to something other than 0000 Parental Country Code PleaseselectC...

Страница 18: ...low for detailed explanations of the on screen displays for each media type Temporary Feedback Icons Action prohibited or not available Displaying Disc Information Changing TV Channels Some discs may...

Страница 19: ...he disc remaining time OSD Menu Options for DVD DVD Playback DVD Playback 1 Press DVD to set the remote control to operate the DVD deck Turn the TV on and select the video input source connected to th...

Страница 20: ...e TV screen A B You can repeat a scene between two points A and B 1 Press PLAY PAUSE play to the start of the desired scene 2 Press A B to mark the start point 3 Use FF NEXT to search the end point 4...

Страница 21: ...automatically Notes on special playback features Horizontal lines noise bars will appear on the TV screen This is normal The audio is automatically muted during special playback modes so there is no...

Страница 22: ...VCR can display JPEG files on CD R RW 1 Insert your CD and close the tray The JPEG CD folder tree appears 2 If there are folders which contain JPEG files select the desired folder using and press ENTE...

Страница 23: ...ding time by 15 minutes DVD within the available space or 30 minutes VCR to a maximum of 10 hours The recording time is displayed on the front panel display One Touch Record OTR Total time and recorde...

Страница 24: ...dit Timer Media PR No PR 03 Date Jan 02 Sun Start 13 30 End 14 30 Mode HQ Repeat Once Delete Instructions Enter Save Setup Exit Timer Recording PR No Date Start End Mode PR03 01 02 13 30 14 30 HQ Inst...

Страница 25: ...uality 1 hr disc SP Standard Play 2 hrs disc EP Extended Play 4 hrs disc or SLP Super Long Play 6 hrs disc VCR SP Standard Play LP Long Play 2 times SP 5 Press REC once Recording will start The REC in...

Страница 26: ...structions Enter Confirm Lock Unlock Disc Disc is unlocked Do you want to lock it Yes No Instructions Enter Confirm Move Lock Unlock Disc Changing disc lock status Please wait a moment For recordable...

Страница 27: ...ke any previous title editing compatible with your DVD player Instructions Enter Confirm Make Compatible Make disc compatible with your DVD player Yes No Instructions Enter Confirm Move Make Compatibl...

Страница 28: ...select SAVE and press ENTER Record Option To set DVD R and DVD RW recording options 1 Follow steps 1 to 3 under Play Title 2 Select Record Options using and press ENTER 3 Select your preferred record...

Страница 29: ...Chapter 1 of 11 DVD Edit Title 1 of 2 Chapter 1 of 11 Edit Chapters Hide Chapter Change Index Picture Split Title Instructions Enter Confirm Setup Exit Move Choose the edit Function Add Delete Delete...

Страница 30: ...t via the DVD Recorder VCR Connect the component directly to your TV Use the Adjust Channels feature to restore channels Tighten connections or replace cable Try all Auto Set options see page 23 for d...

Страница 31: ...er 240 lines Standard recording DVD Specifications Laser system Semiconductor laser wavelength 650 nm Frequency response DVD PCM 48 kHz 8 Hz to 22 kHz CD 8 Hz to 20 kHz Video S N More than 60 dB Audio...

Отзывы: