Dacor Modernist Pro DOP48M96D Скачать руководство пользователя страница 7

Important Safety Instructions

Installation-Related Safety Instructions, cont.

English


7

The range should be installed/grounded/serviced by a qualified installer as instructed in this


manual.

Do not service/alter/replace the range or any part of it unless as instructed in this manual. All


other service should be done by a qualified technician.

Remove all tape and packing material.

Use only new, flexible connectors when installing the range.

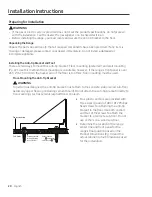
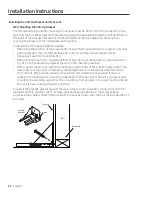
Ensure the anti-tip device is properly installed

 (Pg. 20)

.

Due to the size and weight of the range, have two or more people move the range.

After unpacking the product, remove all accessories, taking care with heavy pieces.

Verify that no parts came loose during shipping.

Ensure the range is correctly installed/adjusted by a qualified service technician or installer for


the type of gas (natural or LP) you will use. For the range to use LP gas, the installer must


replace all surface burner orifices with the provided LP orifice set, and reverse the GPR adapter.


These adjustments must be made per manufacturer instructions and local regulations. The


qualified agency performing this work shall be responsible for the gas conversion.

Installation of this range must conform with local codes or, in their absence , with the National


Fuel Gas Code, ANSI Z223.1/NFPA.54, latest edition. In Canada, installation must conform with


the current Natural Gas and Propane Installation Code, CAN/CGA-B149.1, or the current Propane


Installation Code, CAN/CGA-B149.2, and with local codes where applicable. This range has been


design-certified by UL according to ANSI Z21.1/CSA 1.1, latest edition. 

Loc

ation

 Safety

Install the range indoors away from weather/water/strong drafts.

If the range is near a window, do not hang paper blinds or long curtains that could be blown

over/onto the range.

The range must be installed within easy reach of a grounded, 3-prong outlet.

Wall coverings around the range must withstand heat up to 194 °F (90 °C).
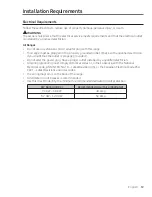
Select a level, sturdy floor that can support the range’s weight (48": 564 lbs.). Synthetic flooring

(e.g., linoleum) must withstand 180°F (82°C) without shrinking, warping, or discoloring. The

range must be separated from carpeting by a sheet of ¼" plywood or similar insulator.

The range needs sufficient space all around the chassis for its vents to properly exhaust heat

and fumes, thus ensuring safe operation.
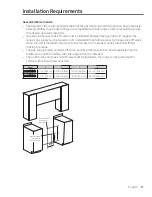
Avoid cabinet storage above the range; otherwise, allow at least 30 in. (76.2 cm) from cooking

surface to cabinet bottom; or install a range hood that projects outward at least 5 in. (12.7 cm)

beyond the cabinetry.

This section consists of general and specific safety instructions 

surrounding the 

range's 

installation.

WARNING

Read these instructions thoroughly t

o reduce risk of property damage, fire, personal injury, and 

death

, and to ensure proper installation.

Installation 

Safety

Содержание Modernist Pro DOP48M96D

Страница 1: ...Installation Instructions Modernist Pro Range DOP48M96D DOP36M94D Part No 112158 Rev G...

Страница 2: ...d All Instructions Before Using This Manual Appliance Symbols Used In This Manual About the Anti tip Device Installation Related Safety Instructions Product Specifications 10 What Is Included DOP48M96...

Страница 3: ...ure your range is installed properly by a qualified installer or technician Ensure the wall coverings near the range can withstand the heat generated by it Cabinet storage space above the range surfac...

Страница 4: ...d these instructions Keep this manual in a handy place for reference Symbols Used In This Manual These warning icons and symbols alert you to potentially unsafe conditions Follow them explicitly WARNI...

Страница 5: ...blow on the gas range shall be used only if the hood and range are designed and tested per the Standard for Domestic Gas Ranges ANSI Z21 1 CSA1 1 and listed by an independent testing lab for combinat...

Страница 6: ...ground circuit Use a dedicated 240 Vac 60 Hz 50 Amp breaker for the 48 Range and a 40 Amp breaker for the 36 Range A time delay fuse or circuit breaker should be used Plug only the range into this cir...

Страница 7: ...on In Canada installation must conform with the current Natural Gas and Propane Installation Code CAN CGA B149 1 or the current Propane Installation Code CAN CGA B149 2 and with local codes where appl...

Страница 8: ...s into the cooktop Select cookware that is designed for cooktops and that covers the grate Burner flames should stay fully under the cookware Do not use cookware that is much larger than the grate Tur...

Страница 9: ...power fails turn the oven off If the oven is not turned off and power returns the oven may begin to operate again Unattended food could catch fire or spoil Self Cleaning Oven Safety During self clean...

Страница 10: ...omes with brass and porcelain burner caps to suit customer preference Grates 3 Burner heads 6 and Burner caps 7 Griddle 1 Convection filter 3 Temp Probe 2 Glide racks 2 WOK ring 1 Anti tip bracket 1 W...

Страница 11: ...OP36M94D English 11 The range comes with brass and porcelain burner caps to suit customer preference Grates 2 Burner heads 4 and Burner caps 5 Wire rack 1 Convection filter 2 Temp Probe 1 Glide racks...

Страница 12: ...lare union adapter in NPT x in ID 135 degree elbow optional Lag bolt or in OD sleeve anchor Flare union adapter in NPT x in ID Tools Needed Flat blade screwdriver Phillips screwdriver Open end or adju...

Страница 13: ...acent surfaces CAUTION The range complies with the maximum allowable wood cabinet temperature of 194 F 90 C Ensure the adjacent wall covering countertops and cabinets can withstand such heat to avoid...

Страница 14: ...uct tolerances 1 16 1 6 mm DOP36M94D 35 7 8 91 1 cm wide DOP48M96D 47 7 8 121 6 cm 24 61 0 cm Cabinet face 29 7 8 75 9 cm Countertop height 36 3 16 91 9 cm min 37 1 2 95 3 cm max 3 8 min 1 0 cm flat c...

Страница 15: ...in to combustible side walls above range both sides Cutout with Optional Downdraft Vent Top View Standard Cutout with Range Hood 1 Vertical from range grate level to combustible overhead surface if in...

Страница 16: ...m 26 5 8 67 6 cm 5 1 2 13 9 cm 6 5 8 16 8 cm DOP36M94D rear Gas Inlet Shown with electrical access cover removed 1 Measurement with appliance legs adjusted to lowest height 2 The hole size for the ele...

Страница 17: ...the gas shut off valve when the unit is installed and access to the remote circuit breaker panel fuse box without moving the range The gas supply piping and shut off valve and the electrical junction...

Страница 18: ...ropane Gas 10 Water Column 11 Water Column NOTE The pressure regulator at the inlet of the cooktop manifold must stay in the supply line whether or not natural or LP gas is used Use only the range s r...

Страница 19: ...qualified electrician if you doubt that the outlet is properly grounded Do not alter the power plug Have a proper outlet installed by a qualified electrician All wiring grounding must comply with loc...

Страница 20: ...bracket directly to floor coverings such as ceramic asphalt tile or linoleum Floor covering Sub floor Screws attached through flooring into sub floor Installing the Anti tip Bracket and Foot There ar...

Страница 21: ...ood Floor 1 Ceramic stone other hard flooring over wood Drill 4 countersink holes to access the wood for drilling pilot holes 2 Drill 4 pilot holes in the wood with a drill bit 1 16 dia for 8 screws 1...

Страница 22: ...anti tip bracket based on the diagram on Pg 21 Push the bracket up against the wall in the mounting location With a pencil make a dot next to the notches on both sides of the bracket Determine if the...

Страница 23: ...OP36M94D DOP48M96D C 14 1 8 35 9 cm 3 1 2 8 9 cm Installation Instructions Preparing for Installation cont Removing the Oven Door WARNING Do not try to disengage the hinge catches with the door s remo...

Страница 24: ...No 70 Latest Edition For a copy write National Fire Protection Association Batterymarch Park Quincy MA 02269 Effective Jan 1 1996 the National Electrical Code requires that new construction use a 4 c...

Страница 25: ...n reinstall the bracket Installing a 3 wire Conduit Aluminum building wire may be used but must be rated for the correct amperage and voltage Connect wires according to Step 4 depending on the number...

Страница 26: ...ck openings Tighten the screws to 35 50 in lbs Any tighter may damage the wires Black White Gas Connection WARNING Turn off the gas supply valve and turn off power to the range at the circuit breaker...

Страница 27: ...trols then turn on the gas supply 6 With a soap and water solution check all lines and connections for leaks 7 Turn off the gas supply valve Regulator connection Gas line Final Installation Back of ra...

Страница 28: ...ottom of each hinge slips over the lower lip of each hinge receptacle NOTE Wire connector under the right side of the door should be connected 2 Lower the door to the fully opened position 3 Rotate th...

Страница 29: ...ong position may result in damage to the griddle included with the range The knobs for the center burners are marked with the maximum griddle settings NOTE When installing the knobs align the D shaped...

Страница 30: ...while another burner is on 1 Place the burner heads on the burner bases as shown at left The electrodes fit in the slot in the bottom of the heads The heads should be flat and parallel to the rangetop...

Страница 31: ...as shown at left The bottom of the head fits within the burner base 2 Turn the head until it drops into place Twist the head back and forth slightly to ensure it is properly seated 3 Put the burner c...

Страница 32: ...as shown Match the tabs on the bottom of the ring to the slots on the head Twist each ring back and forth slightly to verify it is properly seated Ridge on Bottom of Burner Cap 3 Put the burner caps...

Страница 33: ...he right grate is notched to help orient the grates correctly See the graphic below To correctly position the grates 1 Find the notch on the back of the right hand grate and orient the grate properly...

Страница 34: ...ge is installed properly the flame is steady and quiet with a sharp blue inner cone that varies in length depending on the burner size 10 Turn the control knob OFF 11 Repeat the ignition test for the...

Страница 35: ...ed with the anti tip bracket and foot as instructed Pgs 20 23 Was the gas supply inlet pressure measured to ensure it does not exceed the maximums stated in these instructions Pg 18 Is the range conne...

Страница 36: ...Dacor 14425 Clark Avenue City of Industry CA 91745 Phone 800 793 0093 Fax 626 403 3130 www dacor com DG68 00936A 00...

Отзывы: