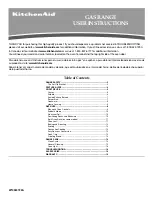
background image

14

Wiring Diagram

W

B

S4

S3

B

W

RESET HI-LIMIT

(250° F)

W

W

PLUG

W

BURNER TO BROIL

GAS IN

LET

GAS VA

LVE

W

W

BR

TO BAK

E BURNER

W

Y

W

B

B

GR

W

W

CORD

SUPPLY

B

W

BR

Y

CONVECTION

FAN MOTOR

41W, 120V

BAKE IGNITER

OVEN TEMPERATURE SEN

SOR

BR

BR

BROIL IGNITER

W

W

W

3-PRONG

1

2

3

4

CON

VECTIO

N FA

N SWITCH

OVEN LIGHT SWITCH

TRAN

SFO

RMER

HALOGEN OVEN LIGHT

OVEN 

ASSEMBL

Y (REF

.)

B

urner LEDs

120VAC from Burner Switches

B

AKE HSI

B

ROIL HSI

8

10

5

3

20W, 12VAC

W

Single Poin

Spa
rk Mo

du

le

RR BURNER IGNITOR,

IGNITOR,

RF BURNER

Single Poin

Spa
rk Mo

du

le

LF BURNER IGNITOR,

IGNITOR,

LR B

URNER

W

B

W

B

4
3
2
1

2

1

2

Controller Board

P7

P3

3

4

5

6

7

8

9

10

11

12

P6

P11

P9

P10

P8

P4

9

7

5

3

1

2

4
6
8

10

1

2

3

4

4
3
2
1

5

6

P5

1

2

3

P1

Return

+5VDC

Wiper

TEMP.

1

P2

SELEC

TOR SWITC

H

W

B

B

B

B

GR

B

W

Single Poin

Spa
rk Mo

du

le

S2

B

W

Single Poin

Spa
rk Mo

du

le

S1

W

W

W

B

B

R

B

B

B

B

B

LED

INDICATOR

RR

RF

INDICATOR

LED

LF

INDICATOR

LED

LR

INDICATOR

LED

B

W

B

B

B

B

W

W
B

B
W

B

B

W

W

W

OVEN CELL ON LED

BAKE/BROIL KNOB LED

B

R

WIRE COLOR CODE:

W-WHITE 

R-RED

Y-YELLOW

O-ORANGE

B-BLACK

BR-BROWN

BL-BLUE

GR-GREEN

V-VIOLET

Содержание Epicure ER30GSCH

Страница 1: ...ctions Epicure 30 Inch Gas Range Part No 106174 Rev H THIS APPLIANCE HAS BEEN TESTED IN ACCORDANCE WITH THE LATEST EDITION OF ANSI Z21 1 STANDARD FOR HOUSEHOLD GAS COOKING APPLIANCES For use with mode...

Страница 2: ...day Friday 6 00 a m to 5 00 p m Pacific Time Web site www Dacor com Be sure to have the model and serial number available when you call The model and serial number are on the model serial number label...

Страница 3: ...e prongs off the power cable plug and discard them Cut the power cable off and discard it separately from the old appliance WARNING WARNING NEVER use this appliance as a space heater to heat or warm t...

Страница 4: ...mage to the oven Only use the range for cooking tasks expected of a home appliance as outlined in the literature accompanying it This range is not intended for commercial use This range is certified f...

Страница 5: ...or remove the third ground prong from the power cord Use an adapter plug Use an extension cord Use a power cord that is frayed or damaged Connect to an electrical outlet with a ground fault interrupte...

Страница 6: ...Vac 60Hz 15 Amp 0 5 kW 4 0 Amp Electrical Supply Requirements IMPORTANT The above information is for reference only If the information above differs from the information on the product data label on t...

Страница 7: ...ocation requirements 4 Not applicable for cabinets more than a horizontal distance of 10 254mm from the edge of the range 1 Vertical to combustible surface from range grate level B A Non combustible s...

Страница 8: ...1 small 3 oven racks The following parts are are included with model ER30GI only They are for use with self rimming installations 3 Self rimming trim pieces left right rear 11 8 x 1 4 Torx screws 2 B...

Страница 9: ...brackets and the eleven 11 8 x 1 4 Torx screws included with the range Remove and discard the five 5 screws that hold the 2 backguard in place Slide the backguard up to remove Remove and discard the s...

Страница 10: ...l the bottom of the trim surrounding the cooktop is even with the countertop To adjust the height turn the foot on the bottom of each leg as shown below Use a level to make sure that the range does no...

Страница 11: ...e oven door to about a 15 angle from the vertical 3 position Hold the door with both hands just below the handle 4 Pull the door up and away from the oven Door Gripping Points Install the Anti Tip Bra...

Страница 12: ...r LP gas installations the LP gas tank must have its own high pressure regulator in addition to the pressure regulator installed on the range IMPORTANT The installed gas pressure regulator is pre set...

Страница 13: ...sure that the notch on the bottom of each hinge rests on top of the lower lip of each hinge receptacle before attempting to open the oven door Rotate the hinge locks toward the front of the range imme...

Страница 14: ...ont burner only Standard Burner Assembly right front right rear left rear STEP 1 Install dual burner ring on dual burner base Line up indentations on bottom of burner ring with pins on top of burner b...

Страница 15: ...ol knob and the oven ON indicator light should be illuminated Within 60 seconds the IR burner on the ceiling of the oven should ignite and begin to give off heat Turn the oven knob to the 11 OFF posit...

Страница 16: ...ingle Point Spark Module RR BURNER IGNITOR IGNITOR RF BURNER Single Point Spark Module LF BURNER IGNITOR IGNITOR LR BURNER W B W B 4 3 2 1 2 1 2 Controller Board P7 P3 3 4 5 6 7 8 9 10 11 12 P6 P11 P9...

Страница 17: ...15 Notes...

Страница 18: ...16 Notes...

Страница 19: ......

Страница 20: ...Dacor 600 Anton Blvd Suite 1000 Costa Mesa CA 92626 Phone 800 793 0093 Fax 626 403 3130 www Dacor com...

Отзывы: