Dacor EOR series Скачать руководство пользователя страница 10

8

Control Panel Settings

Setting the Clock

1.  press the 

CloCK

 key. the colon between the minutes 

and seconds on the time display will begin to flash.

2.  enter the current time on the number keypad before 

the colon stops flashing. For example: For 12:08, 

press 1-2-0-8 on the keypad. pressing the 

#

 key 

changes the 

am-Pm

 indicator.

3.  press 

start

.

 important

• 

The clock cannot be set during delay timed cooking, if one of 

the timers is in use or if self clean or Sabbath mode is active.

• 

After a power failure, the time on the display may flash, 

indicating that the time may not be correct.

• 

After pressing the clock key, you must enter the time and 

press 

start

 soon afterward. If you wait longer than six 

seconds between pressing keys, the display will go back to 

the original setting.

24/12 Hour Clock (Military Time)

the oven is set to 12-hour (non-military) time at the fac-

tory. 24 hour time is also known as military time.  

1:36 pm = 13:36 military time.

If you want to switch the clock to 24 hour 

time or switch from military back to regular 

time:

1.  press and hold the 

CloCK

 key for six seconds. the 

display will indicate the mode the clock is currently set 

to, 

12 Hr

 or 

24 Hr

.

2.  press the 

#

 key to change the clock mode. to leave 

the setting as is, do not touch any keys.

3.  press 

CanCel · seCure

 to return to the main dis-

play. if you have set the clock to 24 hour time, the 

keypad will allow you to enter military time when set-

ting the clock.

Setting the Temperature Scale

you can select the temperature scale (fahrenheit or cel-

sius) the oven uses to display the cooking temperature. 

the oven is preset at the factory to fahrenheit.

to change the temperature scale:

1.  press and hold the 

BroIl

 key (under 

uPPer oVen


on double ovens) for six seconds.

Operating Your Oven

2.  the display will indicate the temperature scale the 

control panel is currently set to, “

F

” or “

C

”.

3.  press the 

#

 key to change the temperature scale. to 

leave the setting as is, do not touch any keys.

4.  press 

CanCel · seCure

. the control panel will go 

back to the regular clock display, set to the new tem-

perature scale.

Turning the Control Panel 

“beep”

 Off/On

the control panel beeps any time you press any of the 

keys or when various error conditions exist. it also beeps 

when a timer is done counting down (page 15) or 

whenever the oven performs certain preset functions, for 

example, pre-heat is complete. the tone may be silenced 

so that it does not function under the above conditions. 

to turn the control panel “beep” off (or on):

1.  press and hold the 

start tIme

 key for six seconds, 

until “beep” appears on the display.

2.  press the 

#

 key repeatedly to switch between “

on

” 

and “

off

”.

3.  press 

CanCel · seCure

 when the desired mode 

appears on the display.

to change the control panel back to the previous mode, 

repeat the above steps.

Before You Cook...

• 

Dacor recommends turning the oven on for one hour 

at 500°f to burn off any residual oils used during the 

manufacturing process. any of these oils left on the 

inner parts can cause an undesirable smell the first 

few times the oven is used.

• 

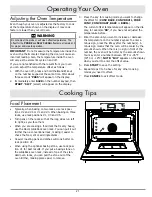
when you use your oven to bake or roast, it preheats 

automatically. the preheat cycle rapidly brings the 

oven chamber up to the proper cooking temperature. 

it takes several minutes to preheat the oven. preheat 

time depends on the temperature settings. the time 

may be longer depending on the type of electrical 

supply in your community. there is no preheat cycle 

for any of the broil modes.

• 

after you pull food out of the oven, it will continue to 

cook. this process is called “carry-over.” the larger 

the portion of food, the longer it will cook. it is best to 

let the meat rest after it comes out of the oven for 10 

to 15 minutes before carving. Doing so will allow the 

meat to retain its juices and make it easier to carve.

 caution

Do not allow acids (citrus juices, tomato sauces, etc.) to remain 

on the oven’s surfaces. The porcelain finish may stain or pit.

Содержание EOR series

Страница 1: ...varies Model EORD230 shown Ta b l e o f C o n t e n t s Important Safety Instructions 1 Getting to Know Your Oven 3 Operating Your Oven 8 Cooking Tips 21 Care and Cleaning 23 Part and Accessories 28...

Страница 2: ...2007 Dacor all rights reserved...

Страница 3: ...structions and warnings in this manual cannot cover all possible problems and condi tions that can occur Use common sense and caution when installing maintaining or operating this appliance Always con...

Страница 4: ...iolent steam explosion may result Smother any flames with a lid cookie sheet or flat tray Use baking soda or a foam extinguisher to extinguish flaming grease Be careful to avoid getting burned Keep fl...

Страница 5: ...tion cooking in both the upper and lower oven cham bers Other double ovens are equipped for convection cooking in only the upper oven chamber Getting to Know Your Oven The oven comes in three widths...

Страница 6: ...uring the self clean cycle The door latches for your safety There are very high temperatures inside the oven during the self clean cycle H Broil elements The broil elements are located on the ceiling...

Страница 7: ...5 Getting to Know Your Oven 1 2 3 4 5 6 A K L B C D E F B J D H G N M...

Страница 8: ...luding the current time once the clock is set the current cook settings and the cooking temperature See below for the symbols that appear on the display E Number keypad When you want to set the temper...

Страница 9: ...Control Panel Single Oven A B F H G G J K C D E 7 Getting to Know Your Oven Control Panel Double Oven with Upper and Lower Convection Oven Control Panel Double Oven with Convection Upper Oven Only...

Страница 10: ...to F or C 3 Press the key to change the temperature scale To leave the setting as is do not touch any keys 4 Press CANCEL SECURE The control panel will go back to the regular clock display set to the...

Страница 11: ...ightly left to right as you pull will make it easier to remove Racks You may use either rack type on any level warning To reduce the chance of burns position the oven racks when the oven is cool If yo...

Страница 12: ...ure Convection or one of the bake or roast modes PRE for preheating along with the current oven temperature will appear on the display until the oven reaches the set temperature Once the oven reaches...

Страница 13: ...s off the timers if they are in use 12 Hour Timer Feature Your oven is equipped with a feature that automatically turns it off after 12 hours of continuous use The 12 hour timer resets if you change t...

Страница 14: ...d Pies burn around the edges or are not done in the center Oven temperature too high Reduce oven temperature Dark heat absorbing pans used Use shiny reflective pans Oven and or rack over crowded Reduc...

Страница 15: ...e Convection allows you to use more oven capacity at once Use this mode for single rack baking multiple rack baking roast ing and preparation of complete meals Many foods such as pizzas cakes cookies...

Страница 16: ...erature The meat will continue to carry over Allow roasts to stand 15 to 20 minutes after roasting in order to make carving easier Roasting times always vary according to the size shape and quality of...

Страница 17: ...timer before time runs out Press the TIMER 1 or TIMER 2 key twice The timer will stop and the display will clear Press CLOCK to return to the main display Delay Timed Cooking Features If you want to s...

Страница 18: ...TART TIME key 7 Enter the time you want the oven to start on the keypad For 12 35 press 1 2 3 5 You may enter a time up to 22 hours and 59 minutes ahead of the present time Press the key to change AM...

Страница 19: ...perature enter it on the number keypad 3 Press START 4 Allow the oven to preheat Excessive browning may occur if the meat is placed in the oven during preheat mode when PRE appears on the display 5 On...

Страница 20: ...eheat 140 F NOTE The minimum safe internal cooking temperatures are subject to change There are changes in bacteria and the temperatures required to eradicate them For the most current information con...

Страница 21: ...rom the cooktop and allow it to cool Dip fruit into the simple syrup after it has cooled Preventing Tough Skins when Dehydrating You should water blanch items with tough skins such as grapes prunes da...

Страница 22: ...event of a power outage the oven will return to Sabbath mode at the temperature it was last set to when power is restored If one or both timers are running the oven cancels timer operation when Sabbat...

Страница 23: ...rature inside the oven with a thermometer Opening the door will cause an incorrect reading Also the temperature inside the oven will vary as the elements cycle on and off If you are not satisfied with...

Страница 24: ...rack and broil roast pan works best to allow air circulation around the food Dacor s roasting pan works particularly well and two of them will fit side by side in a 30 inch oven Cooking Tips High Alt...

Страница 25: ...maged or damage the oven Care and Cleaning How to Use the Self Clean Feature important On double ovens the control panel will only allow one oven chamber to be self cleaned at a time due to the amount...

Страница 26: ...gasket and around the door as instructed 2 Close the oven door 3 Press the SELF CLEAN key 4 Press the 2 3 or 4 key to select the desired self clean time 5 Press the START TIME key 6 Enter the desired...

Страница 27: ...ys wipe stainless steel silver colored surfaces with the grain To prevent scratching do not use abrasive cleaners or scrubbers on stainless steel surfaces Using a soft cloth clean metal surfaces with...

Страница 28: ...soft side of a sponge to scrub it and dry it with a lint free cloth Care and Cleaning Optional Baking Stone Wash the optional baking stone with hot water and scrub it clean before you use it for the f...

Страница 29: ...cement halogen light bulbs with your fingers Halogen bulbs are sensitive to the oils from your hand The oils from your hand will stick to the bulb and cause it to burn out faster than normal Care and...

Страница 30: ...rack 701598 012 ARGOK273 30 Inch GlideRack type oven rack 701598 022 ARGOK303 36 Inch GlideRack type oven rack 701598 032 ARGOK363 Large capacity roast broil pan with V shaped rack AORPVR Pizza baking...

Страница 31: ...itself after it has been on for 12 hours 12 hour timer is on Unit is set to turn off automatically after 12 hours of continuous use Turn off 12 hour timer See page 11 Oven does not self clean Oven do...

Страница 32: ...and stays on display for example U55 An error code having a letter with a number following it that appears and stays on the display indicates a problem that cannot be resolved by the customer Call for...

Страница 33: ...the responsibility of the purchaser What Is Not Covered Slight color variations may be noticed because of differences in painted parts kitchen lighting product placement and other factors this warrant...

Страница 34: ...32 Notes...

Страница 35: ...WARRANTY PROCESSING DEPT PO BOX 90070 CITY OF INDUSTRY CA 91715 9907 NO POSTAGE NECESSARY IF MAILED IN THE BUSINESS REPLY MAIL FIRST CLASSMAIL CITY OF INDUSTRY CA PERMIT NO 1600 POSTAGE WILL BE PAID B...

Страница 36: ...uilder B Magazine G Architect Designer C Appliance Dealer Showroom H Another Dacor Owner D Kitchen Dealer Showroom I Model Home E Home Show J Other 2 Where did you buy your Dacor appliances A Applianc...

Отзывы: