background image

27

Care and Cleaning

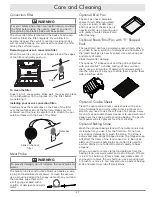
Convection Filter

 WARNING

For your safety and proper oven performance, re-install 

the filter before using the oven to cook. If you don’t, 

the spinning fan blades inside will be exposed.

The convection filter is located in the back of each oven 

chamber. Clean the filter regularly. If you allow it to 

become clogged, the oven’s convection cooking modes 

will not work properly. You also need to remove the filter 

during the self clean cycle.

Removing your oven’s convection filter:

When the oven is cool, put your fingers around the edges 

of the filter and gently push up.

To clean the filter:

Soak it in hot, soapy water. Rinse well. You may also place 

it in a dishwasher on the top rack. Dry the filter before 

re-installing it.

Installing your oven’s convection filter:

Carefully hook the metal clips on the back of the filter 

over the metal bar across the fan hole. Make sure it is 

centered over the hole. Be careful not to scratch the por-

celain surfaces with the back of the filter.

Meat Probe

 WARNING

To prevent damage, do not immerse the meat probe in 

water.

The meat probe is constructed of silicone handles, a wire, 

a plug and a stainless steel skewer. To clean the skewer, 

use a scouring pad and hot, soapy water. When you clean 

the handles, wipe them with 

a soft sponge soaked with a 

solution of detergent and warm 

water.

Optional Broil Pan

The broil pan has a porcelain 

enamel finish. When you clean 

it, use a solution of detergent 

and hot water. If the broil pan is 

heavily soiled, use a scouring pad 

with plenty of water. Rinse it well 

after cleaning.

Optional Roast/Broil Pan with “V” Shaped 

Rack

The roast/broil pan has a porcelain enamel finish. When 

you clean it, use a solution of detergent and hot water. If 

the roast/ broil pan is heavily soiled, use a scouring pad 

and plenty of water.
Rinse it well after cleaning.
The optional “V” Shaped rack and the grill are finished 

with an Excalibur™ nonstick coating. When you clean 

them, use a mild solution of detergent and warm water. 

Use the soft side of a sponge to scrub them and dry them 

with a lint-free cloth.

Optional Cookie Sheets

Clean the optional aluminum cookie sheets with a solu-

tion of detergent and warm water. Since aluminum can 

scratch, you need to use the soft side of a sponge. A way 

for you to keep cookie sheets cleaner is to use parchment 

paper over the cooking surface during baking. The parch-

ment paper will also prevent food from sticking.

Optional Baking Stone

Wash the optional baking stone with hot water and scrub 

it clean before you use it for the first time. Do not use 

any soap or detergents to wash the stone. The stone is 

porous and soap will get trapped inside. The trapped soap 

will affect the flavor of the food cooked on it. Do not be 

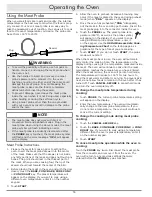
alarmed if the stone gets stains on it after it is used for 

a while. Stains do not affect the stone’s ability to bake 

properly.
When you need to remove large food particles from the 

baking stone, use warm water and a scrub brush. If there 

is a lot of oil build-up, it may smoke and create odors. If 

you need to remove the oily build up, use a scouring pad 

or brush to remove it. You may also use a paste of baking 

soda and water to scrub off small stains.


Clips on back of 

filter

Metal bar

Filter

1

2

3

4

5

6

Содержание Distinctive DR30D

Страница 1: ...R30DIH C Ta b l e o f C o n t e n t s Important Safety Instructions 1 Getting to Know Your Range 4 Setting Up Your Range 7 Operating the Cooktop 8 Operating the Oven 11 Care and Cleaning 23 Before You Call for Service 28 Warranty and Service 30 Warranty Card Back Cover Style varies Model DR30DI with optional black knobs shown ...

Страница 2: ... 2010 Dacor all rights reserved ...

Страница 3: ... practices that COULD result in severe personal injury or death CAUTION Hazards or unsafe practices that COULD result in minor personal injury or property damage WARNING WARNING NEVER cover any slots holes or passages anywhere on the range or cover an entire oven rack with materials such as aluminum foil Doing so blocks air flow through the range and may cause carbon monoxide poisoning Aluminum fo...

Страница 4: ...t operate the cooktop without the knobs and trim rings in place Never leave burners unattended at high heat settings Boil over causes smoking and greasy spill overs that may ignite Do not cover the burners and grates with anything except properly selected utensils Decorative covers may cause a fire hazard or damage to the range if a burner is accidentally turned on with the cover in place Turn the...

Страница 5: ...cause injury For your safety do not use the oven to cook without the convection filter installed When the filter is not installed the spinning fan blades at the back of the oven are exposed Do not leave children alone or unattended in the area around the range Do not allow children to play with the controls pull on the handle or touch other parts of the range Make sure individuals who use the rang...

Страница 6: ...n blades for safety purposes F Convection element The convection element heats the air that is blown into the oven chamber by the convection fan during the convection cooking process The convection filter covers it G Convection fan The convection fan blows heated air into the oven chamber during the con vection cooking process The convection filter covers it H Bake element Hidden below the floor o...

Страница 7: ... once the clock is set the current cook settings and the cooking temperature See below for the symbols that appear on the display U Number keypad The number keypad is used to set the temperature cook time or the clock See Operating the Oven V Delay timed cooking keys Use these keys to set the oven to turn on or off automatically at a later time See page 16 for instructions W TIMER keys Use the TIM...

Страница 8: ...ear About the Cooktop A Burner control knobs Use the knobs to turn on the burners and adjust the flame size The indicator above each knob illuminates when a burner is on B Trim rings Located behind each knob They prevent liquids from getting into the range s internal parts C Spill tray The spill tray catches any food that falls through the cooktop grates D Grates The porcelain coated cast iron gra...

Страница 9: ...burner cap on top of the burner ring Make sure it is centered on top 3 Set the inner SimmerSear burner cap on the center of the burner base Line up the ridge on the bottom of the cap with the pins on the center of the base Setting Up Your Range Standard Burner Assembly SimmerSear Burner Assembly Outer burner cap Ridge on bottom of burner cap Igniter hole Igniter on burner base Burner ring Burner r...

Страница 10: ...cooktop without the burners completely and properly assembled see page 7 The burner rings spread the flame evenly around the burner caps The burner rings must be properly seated for proper burner lighting and operation In the interest of safety always light the burner before putting the cooking utensil on the grate Turn the burner knob to the OFF position before removing the utensil Always check t...

Страница 11: ...r by the household ventilation system Eliminate any drafts or reduce the ventilation blower speed to reduce this type of problem To keep the burners operating properly keep the burner igniters burner rings and burner caps clean and dry See Care and Cleaning starting on page 23 Dirty or wet igniters will result in constant sparking even if there is a flame present Cooktop Tips For superior cooking ...

Страница 12: ...e control panel is currently set to F or C 3 Touch the key to change the temperature scale To leave the setting as is do not touch any keys 4 Touch CANCEL SECURE The control panel will go back to the regular clock display set to the new tem perature scale Turning the Control Panel Beep Off On The control panel beeps any time you touch any of the keys or when various error conditions exist It also ...

Страница 13: ...ngredients quickly and safely 1 Extend both rack guides completely as shown below 2 Align both sets of safety clips right and left on the back of the rack guides with the oven rack supports as shown 3 Insert the rack into the oven sliding the rack supports between the rear safety clips as shown As you slide the rack in hold the front of the rack up slightly until the front safety clips just clear ...

Страница 14: ...ear on the display until the oven reaches the set temperature Once the oven reaches the set temperature usually in 10 minutes it will beep and PRE will disappear Carefully place your food in the oven Excessive browning will occur if you put the food in too soon Turning Off Your Oven To turn the oven off touch the CANCEL SECURE key NOTE After you turn off the oven the cooling fans may continue to r...

Страница 15: ...apply to the cooktop The range ships from the factory with this feature enabled To disable or enable the 12 hour timer feature With the oven off touch and hold the TIMER 1 key for about ten seconds until the control panel beeps ON will appear on the display if the 12 hour timer is enabled Touch the SELF CLEAN key to disable or enable the 12 hour timer Touch CANCEL SECURE to save the changes and re...

Страница 16: ...ou to use more oven capacity at once Use this mode for single rack baking multiple rack baking roast ing and preparation of complete meals Many foods such as pizzas cakes cookies biscuits muffins rolls and frozen convenience foods can be successfully prepared on two or three racks at a time Pure Convection is also good for whole roasted duck lamb shoulder and short leg of lamb Operating the Oven M...

Страница 17: ...on roast mode is recommended to produce meats that are deliciously seared on the outside and succulently juicy on the inside in record time Foods that are exceptional when prepared in the convection roast mode include beef pork ham lamb turkey chicken and cornish hens Always roast meats fat side up in a shallow pan using a roasting rack Always use a pan that fits the size of the food being prepare...

Страница 18: ...automatically turn itself on or off at a later time you can use the delay timed fea tures WARNING Food safety is an important consideration when using the delay timed features To avoid potential sickness and the spoiling of food take the following steps Avoid using foods that will spoil while waiting for the oven to start cooking Typical foods to avoid include those containing eggs and dairy produ...

Страница 19: ... Using either key achieves the same result 9 Touch START 10 If you entered a START TIME the oven will start at the start time entered 11 If you entered a DURATION or STOP TIME the oven will cook until the time entered and then go into hold mode IMPORTANT The time required to preheat the oven must be included in the cook time For cooking temperatures 350 F and below add 20 minutes to the cook time ...

Страница 20: ...er keypad 3 Touch START Operating the Oven 4 Allow the oven to preheat Excessive browning may occur if the meat is placed in the oven during preheat mode when PRE appears on the display 5 Once the oven has preheated PRE disappears put the meat in the oven using pot holders Insert the meat probe plug into the connector inside the oven 6 Touch the PROBE key The preset probe tem perature 160 F as wel...

Страница 21: ...e Phone 800 535 4355 www fsis usda gov Dehydrating Defrosting Your range can be used to dehydrate or defrost foods at low heat settings in the Pure Convection mode WARNING To avoid food poisoning cook meats immediately after defrosting them To dehydrate or defrost foods 1 Adjust the racks to the appropriate level 2 Place the food on the center of the oven rack If you are dehydrating prepare food a...

Страница 22: ...u have a partially defrosted turkey rib roast or other large cut of meat you may continue to defrost it in your convection oven If wing tips and legs begin to dry out when you defrost poultry you may wrap the tips with aluminum foil If you are defrosting a small cut of meat lay it on a flat cookie sheet with a one inch rim to catch juices as the meat thaws Thick frozen casseroles such as lasagna w...

Страница 23: ... not satisfied with the results from your oven you can adjust the temperature offset as follows 1 With the oven off touch and hold the 0 and keys on the number keypad at the same time After about three seconds PASS will appear on the display 2 Immediately enter 6428 on the number keypad then START SLCt select will appear on the display 3 Touch the key for the cooking mode you want to change the of...

Страница 24: ...t to Pure Convection or convection bake mode For best results when baking on three racks use rack positions 1 3 and 5 with the oven set to Pure Convection mode Turn pans on the racks so that the long sides run left to right as you face them When you are cooking a food item that is very heavy use the Dacor GlideRack oven rack You can pull it out further than a conventional rack making it easier to ...

Страница 25: ... the oven to emit popping sounds during self cleaning These sounds are caused by the expansion and con traction of metal surfaces when the oven heats up and cools down Self clean mode will not function if the meat probe is connected How to Use the Self Clean Feature 1 Before self cleaning the oven remove the racks the convection filter all cookware pots pans forks etc the meat probe foil and any o...

Страница 26: ...is complete The door latch will release when the inside has cooled down The clean icon lock icon and ON will disap pear from the display Exercise caution because the oven will still be hot about 400 F at the time the door lock is released Reinstall the convection filter and oven racks before using your oven You may notice a powder ash residue in the bottom of the oven after self cleaning This is n...

Страница 27: ...dirt or grime deposited on the individual parts including the igniters 1 Use a firm tooth brush to gently clean completely around the igniter including all of the metal top and porcelain base Do not use water to clean the igniters If necessary use a small amount of rubbing alcohol to help dissolve grime 2 Examine the burner rings and the top of the SimmerSear burner head Remove anything stuck in t...

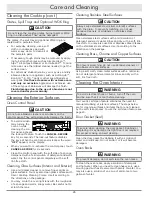
Страница 28: ...ys and Optional WOK Ring CAUTION Do not clean the cooktop grates burner parts or WOK ring in a dishwasher They will be damaged The grates the spill tray and optional WOK ring are coated with a porcelain finish For everyday cleaning use a soft cloth or nonabrasive pad with warm soapy water to clean all of the porcelain parts If necessary tough stains may be removed by apply ing full strength sprays...

Страница 29: ...with plenty of water Rinse it well after cleaning Optional Roast Broil Pan with V Shaped Rack The roast broil pan has a porcelain enamel finish When you clean it use a solution of detergent and hot water If the roast broil pan is heavily soiled use a scouring pad and plenty of water Rinse it well after cleaning The optional V Shaped rack and the grill are finished with an Excalibur nonstick coatin...

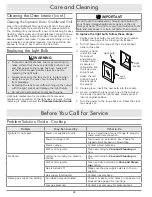
Страница 30: ...r than normal To replace the light bulb follow these steps 1 Replace the light bulb only with Dacor part number 100429 See page 21 for ordering information 2 Turn off power to the range at the circuit breaker panel or fuse box 3 Hold your hand under the lens for support and gently pry it loose using a spatula or table knife Pull the lens cover straight out 4 Grasp the old bulb and pull it straight...

Страница 31: ... of day not set Set time See Setting Up Your Range Power failure or power was turned off Reset time See Setting Up Your Range Time flashes on display Power failure or power was turned off Reset time See Setting Up Your Range continued Before You Call for Service Problem May Be Caused By What to Do Flame is distorted yellow or very large Burner ring or burner cap is dirty or clogged Clean and dry a...

Страница 32: ...ll not start Sabbath mode when meat probe is connected Disconnect and remove meat probe Oven door will not open Oven is set to self clean Check display If lock symbol appears on display oven door cannot be opened Wait for oven to complete self clean process or touch CANCEL SECURE Door will unlock once oven has cooled Error code appears and stays on display for example U55 An error code having a le...

Страница 33: ...e the responsibility of the purchaser What Is Not Covered Slight color variations may be noticed because of dif ferences in painted parts kitchen lighting product placement and other factors this warranty does not apply to color variation Service calls to educate the customer on proper use and care of the product Service fees for travel to islands and remote areas which include but not limited to ...

Страница 34: ...32 Notes ...
Страница 35: ... WARRANTY PROCESSING DEPT PO BOX 90070 CITY OF INDUSTRY CA 91715 9907 NO POSTAGE NECESSARY IF MAILED IN THE BUSINESS REPLY MAIL FIRST CLASSMAIL CITY OF INDUSTRY CA PERMIT NO 1600 POSTAGE WILL BE PAID BY ADDRESSEE ...

Страница 36: ... B Magazine G Architect Designer C Appliance Dealer Showroom H Another Dacor Owner D Kitchen Dealer Showroom I Model Home E Home Show J Other 2 Where did you buy your Dacor appliances A Appliance Dealer D Builder B Kitchen Dealer E Other C Builder Supplier 3 For what purpose was the product purchased A Replacement only C New Home B Part of a Remodel D Other 4 What is your household income A Under ...

Отзывы: