


2.
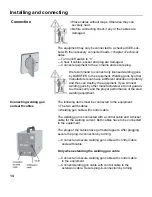
Installation
Caution! The stud welding equipment must be
switched off when doing the following works. Check
the position of the ON/OFF switch: OFF = “0”.
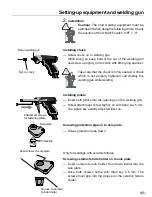
Installing chuck
— Screw chuck on to welding gun.
While doing so keep hold of the nut of the welding gun
and screw up tightly to the chuck with fitting ring spanner.
Take care that the chuck is firmly seated. A chuck
which is not properly tightened can destroy the
welding gun while welding.
Installing pillars
— Insert both pillars into the openings on the welding gun.
— Screw attachment screw slightly on with Allan key 5 mm.
The pillars are exactly adjusted later on.
Screwing protection pipe on to sole plate
— Screw protection pipe down
Only for weldings with ceramic ferrules:
Screwing ceramic ferrule holder on to sole plate
— Insert ceramic ferrule holder from down below into the
sole plate.
— Drive both screws home with Allan key 2,5 mm. The
screws must grip into the groove on the ceramic ferrule
holder.
Nut on welding gun
Nut on chuck
Attachment screws
for fastening pillars
Allen screws on sole plate
Groove on ceramic
ferrule holder
Sole plate
Protection
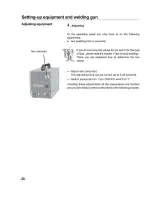
Setting-up equipment and welding gun
17


