background image

32

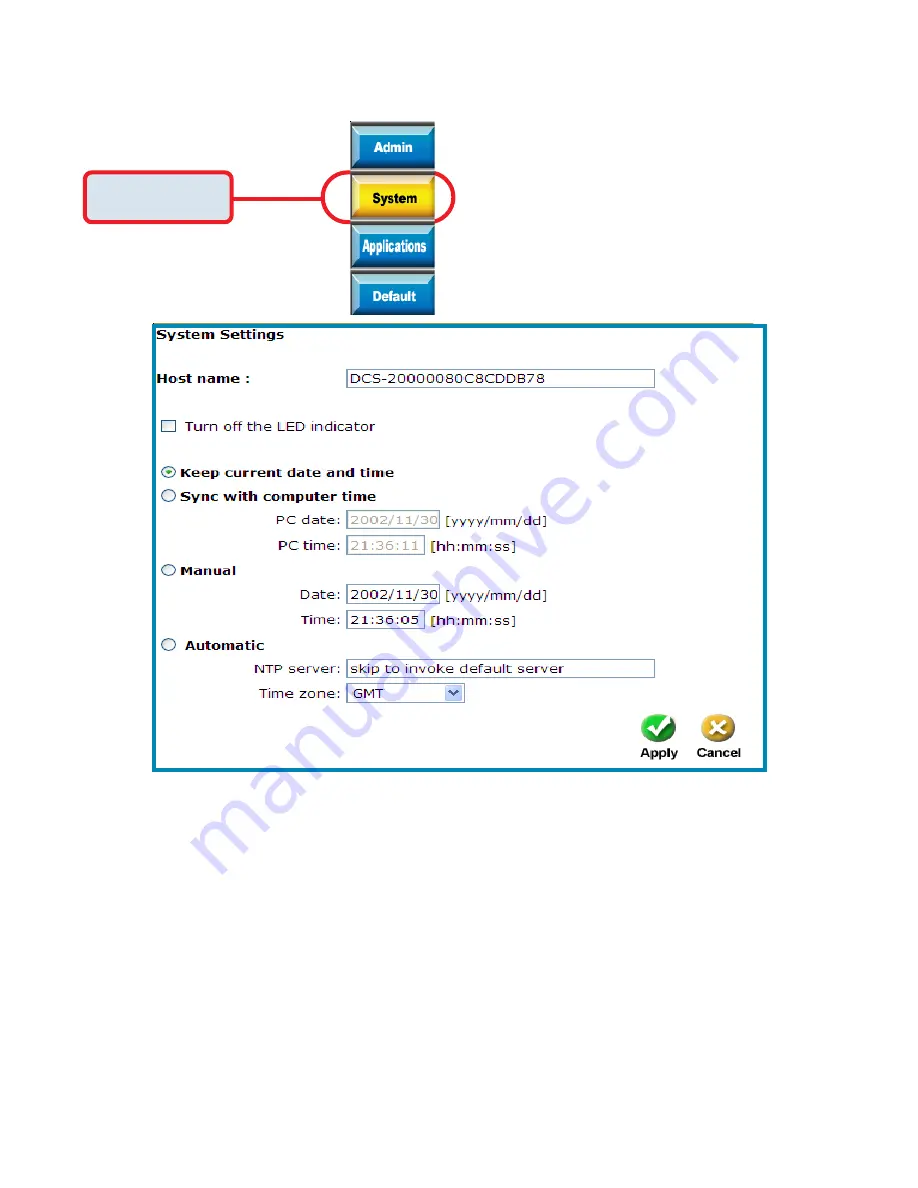
Configuration > Tools > System

Click on the 

System 

button to access the System


settings from the 

Tools 

menu

.

Click 

System

Host name -

The text will display as the title at the top of the
main page.

Turn off the LED indicator

 -

 Check this option to shut off the LED next to

the lens. It can prevent someone from
observing the operation of the Internet Camera.

Keep current date and
time -

Click to save the current date and time of DCS-
2000. An internal real-time clock maintains the
date and time even when the power of the
system is turned off.

Sync with computer time-

Synchronize the date and time of DCS-2000
with the local computer. The date and time of
the PC is displayed and updated in the DCS-
2000.

Содержание Securicam Network DCS-2000

Страница 1: ...D Link DCS 2000 Internet Camera Manual 12 13 2002 Building Networks for People ...

Страница 2: ...he DCS 2000 19 Firmware Upgrades 40 Using the Surveillance Software 42 Monitor Program 42 Playback Program 72 Appendix 87 Frequently Asked Questions 87 Troubleshooting 88 How to PING Your IP Address 90 Reset and Restore 91 I O Connector 92 Adjusting the Cameras Focus 95 Replacing the Lens 97 Technical Specifications 98 Contacting Technical Support 100 Warranty and Registration 101 ...

Страница 3: ...tact your reseller Usingapowersupplywithadifferentvoltagethantheoneincludedwiththe DCS 2000willcausedamageandvoidthewarrantyforthisproduct System Requirements Internet Explorer 5 x or higher t Web Browser CPU PentiumIII 500MHzorabove Memory Size 32 MB 64 MB recommended VGA card resolution 800 x 600 or above These are minimum requirements Please seeAppendix xxx for require ments for various modes o...

Страница 4: ...n may result in hazardous radiation exposure For your safety please do not detach the cover To avoid accident of electric shock please do not attempt to detach the cover of the unit or the DC power supply connector Customer should contact a qualified technician regarding any repair job Voltage Alert The voltage used must be the same as that specified on this unit Using this product with a higher v...

Страница 5: ... Variety of Platforms Supporting TCP IP networking SMTP e mail HTTP and other Internet related protocols the Internet Camera can be integrated easily into other Internet Intranet applications because of its standards based features Broad Range of Applications With today s high speed Internet services the Internet Camera can provide the ideal solution for live video images over the Intranet and Int...

Страница 6: ...nitor the image record the image to a hard drive and take snapshots Connection to External Devices Supporting auxiliary Input Output connectors you can connect the Internet Camera to a variety of external devices such as IR sensors switches and alarm relays Combined with programmable alarming facilities you can develop a variety of security applications that are triggered on alarm based events The...

Страница 7: ...supply power to the Internet Camera Reset Button Reset will be initiated when the reset button is pressed once and Power LED begins to flash The Ethernet cable included with the DCS 2000 Internet Camera is a Category 5 cable This is the recommended cable type when the camera is installed into a 100 Mbps Fast Ethernet network Ethernet Cable DC Power Connector I O Connector Reset Button Factory rese...

Страница 8: ...sed to connect the camera stand onto the Internet Camera by attaching the screw head on the camera stand into the Internet Camera Bottom Panel Socket for stand Power LED LED stands for Light Emitting Diode The Power LED is positioned on the right side of the Internet Camera lens As soon as the power adapter is connected to the Internet camera the power LED will flash red and green several times Th...

Страница 9: ...with a camera stand with a swivel ball screw head that can be attached to the Internet Camera bottom bracket cavity Attach the camera stand to the Internet Camera and station it for your application There is a hole located in the base of the camera stand allowing the Internet Camera to be mounted on the ceiling or any wall securely Connecting the Internet Camera to the Camera Stand When you have a...

Страница 10: ...s Web server is the program that allows the camera to access the Internet without an attached computer and permits users to view the video and audio remotely After running the IP Installer software program this built in Web server program along with your Internet browser is the only software needed to actually operate the DCS 2000 and view the camera remotely However it is necessary to install the...

Страница 11: ...a will begin blinking red and green When it stops the blinking cycle continue to hold in the reset button until a second cycle of blinking red and green lights indicates a second reset cyle has completed This will take approximately 5 7 seconds The installer will now show a MAC address for the DCS 2000 and an IP address This IP address may not be correct at this step in the installlation Highlight...

Страница 12: ...twork SystemAdminstrator or your Internet Service Provider Click Next Click Restart If you need to make any changes click Back to modify your camera settings To accept the settings click Restart Click the checkbox titled Use this IP whenever systems boots to avoid running this install application each time you boot up the DCS 2000 Only check this if you are sure the IP address being entered will n...

Страница 13: ...have now completed the Setup Wizard and are ready to use your camera Testing the DCS 2000 Internet Camera The window in the center of your browser is the camera image window You should now see a video image and hear the audio over your computer speak ers from the DCS 2000 If you are having problems please consult the Troubleshooting section of this manual Open your Internet browser and type in the...

Страница 14: ...defined users who have a User Name and User Password which is assigned by the Administrator The Administrator can release a public user name and password so that when remote users access the Internet Camera they will have the right to view the image transmitted by the Internet Camera When the Internet Camera is used for the first time it is highly recommended that the Administrator set the Adminis...

Страница 15: ...click on the Setup file on the CD included with the Internet Camera The Welcome screen appears Click Next Real time Monitoring Video Recording to hard disk High quality video High compression ratio Maximum to 16 cameras with different monitor layouts Smart playback Trigged event browsing Fast database searching Auto alarm in different ways Account password protection Scheduled recording for each c...

Страница 16: ...16 Please read the Software Licensing Agreement and click yes if you agree with the agreement Click No to exit Click Yes Enter your name and company information and click Next Click Next ...

Страница 17: ...17 Select the destination directory and click Next Click Next Select the Program Folder the software will be installed into and click Next Click Next ...

Страница 18: ...18 Click Next and the program will begin copying onto your hard drive Click Next Click Finish Click Finish to end the installation ...

Страница 19: ...ng the Internet Camera in two parts Using the DCS 2000 with an Internet browser and accessing the screens to control and monitor the camera Using the Surveillance Software with the DCS 2000 Using the DCS 2000 with an Internet browser Open your Internet Explorer Webbrowser and enter the IP address for your Internet Camera In the example this address is 192 168 0 146 Your address may differ If a win...

Страница 20: ... from the Home page on your computer monitor There are two buttons on the left side of the Home page Connection Type and Configuration Click on the Connection Type button to change settings related to the connection Home Page Screen Click Connection Type ...

Страница 21: ...ext connection If the network environment is changed or users want to let the web browser automatically detect the protocol select UDP manually and click Save to change the setting and return Home to reconnect with the new setting Options UDP Protocol Quality real time performance compared to TCP Some packet loss due to network burst traffic and images may be obscure TCP Protocol Packet loss is le...

Страница 22: ...n the Home page There are 5 tabs across the top of the Configuration screen controlling different elements the DCS 2000 can configure The Advanced tab is the default screen in Configuration and Network is the default screen under Advanced Click Configuration ...

Страница 23: ...e if the destination is in the same subnet The default value is 255 255 255 0 Default router The gateway used to forward frames to destinations in a different subnet Invalid router setting will fail in transmission to destinations in different subnet Primary DNS Primary domain name server who translates names to IP addresses Secondary DNS Secondary domain name server to backup the primary one SMTP...

Страница 24: ...ork protected by firewall a data connection for FTP may be prohibited Passive mode FTP can bypass the rule and succeed to upload snapshots If the passive mode is selected the DCS 2000 can automatically attempt for an active mode if the external FTP server does not support passive mode 2nd FTP server The domain name or IP address of the external FTP server 2nd FTP user name Granted user name on the...

Страница 25: ... can be other than default port 5003 to cooperate with the port opened by the firewall Improve audio quality in low bandwidth environment In a low network bandwidth environment users can check this option to improving audio quality by sacrificing some real time synchronization Click Apply to make changes effective Some invalid settings may cause system failure to respond Change the configuration o...

Страница 26: ...r or monochrome video display Size There are three options for two video sizes Half is a quarter size of Normal Half x 2 has the same video size as Normal but has worse quality However it consumes less network bandwidth Power line frequency for fluorescent light The fluorescent light will flash according to the power line frequency and depends on the local utility Change the frequency setting to e...

Страница 27: ...ate Fix bit rate and Fix quality in the Video configuration page are related to the performance My priority is real time motion images To achieve a real time visual effect the network bandwidth should be large enough to transmit 20 image frames per second fps or more If you are on a broadband network over 1 Mbps you can fix the bit rate to 1000Kbps or 1200Kbps or fix the quality to achieve the max...

Страница 28: ...y priority is clear identification for each image To have the best video quality you should fix the quality to detailed or excellent and tune the maximum frame rate to suit for your network bandwidth If you get some broken pictures in a slow network you can choose TCP protocol in Connection type for more accurate transmission but the received images may have certain time delay Note that any slow c...

Страница 29: ...he mouse to drag the window frame to resize or the title bar to move Clicking on the x at the upper right corner of the window can delete the window Remember to save to validate the changes Save Click on this button to save the related settings regarding to the window A graphic bar will rise or fall depending on the image variation Agreen bar means the image variation is under monitoring level and...

Страница 30: ... show at the top of the window Sensitivity Sets the measurable difference between two sequential images that would indicate motion Percentage Decides the space ratio of motioned objects over the monitored window Higher sensitivity and small percentage will make any motion more easily detected ...

Страница 31: ...sword field This password is used to identify the administrator Then add an account with User name and User Password for your friends in the Add user section You can provide twenty accounts for your valuable customers or friends Each account identifies the access right rather than the real visitor That allows multiple visitors share the same account of different level An option to Permit to access...

Страница 32: ... off the LED next to the lens It can prevent someone from observing the operation of the Internet Camera Keep current date and time Click to save the current date and time of DCS 2000 An internal real time clock maintains the date and time even when the power of the system is turned off Sync with computer time Synchronize the date and time of DCS 2000 with the local computer The date and time of t...

Страница 33: ...rts up It will fail if the assigned timeserver cannot be reached NTP server Assign the IP address or domain name of the timeserver Leaving the text box blank will let DCS 2000 connect to default timeservers Time zone Used to adjust the hour of timeservers for local settings Click on Apply to validate changes Click Applications Configuration Tools Applications Click on the Applications button to ac...

Страница 34: ...34 Configuration Tools Applications Continued ...

Страница 35: ...external voltage input for level trigger while rising falling is for edge trigger There are three windows shown for the name you defined for motion detection Undefined will show instead of the window title if motion detection is not setup yet In such a case clicking on the Motion detection in the note will direct you to the Configuration page for Motion detection Trigger action There are four opti...

Страница 36: ...ternal FTP server with the file name depending on the next option It can be used to refresh the captured image stored in the external web server to build creative homepages FTP put snapshots with date and time suffix If the suffix is added the captured date and time can be easily differentiated from the snapshot file name in either sequential or event operation For instance video 20020102030405 jp...

Страница 37: ...rom the Tools menu Click Apply on the screen to restore the factory default settings This means any changes made will be lost and the system will be reset to the initial status when shipped from the factory After confirmation the system will restart and require the Installer software program to setup the DCS 2000 ...

Страница 38: ...portant settings that are currently set for the DCS 200 Firmware Version number Mac Address IP Address Subnet Mask Default router address Primary DNS address Secondary DNS Address Click on the Log button to access a system log of system activity from the Status menu The content of the log file reveals useful inforamtion about the current configuration and connection logged after the DCS 2000 boots...

Страница 39: ... Click on the Help tab to access descriptions of the particular function you need help with The help screen is organized in the order of the tabs and then each menu item under that tab Configuration Help ...

Страница 40: ...Wizard located on the CD enclosed with the DCS 2000 Power on the DCS 2000 and connect it to the Ethernet port The Wizard will ask for the IP Address of your camera and for your adminstrator password The Upgrade Wizard will attempt to find the DCS 2000 If it cannot an error message indicating this will appear If the Upgrade Wizard finds the Internet Camera the following screen asks for the file nam...

Страница 41: ...es the upgrade begins The progress of the upgrade is displayed on the this screen Warning The download firmware procedure cannot be interrupted If the power or network connections are broken during the download procedure it might possibly cause serious damage to the Internet Camera Click Yes Click Exit The upgrade has been completed ...

Страница 42: ...e password should be at least 6 characters in length A successful message box will show if you set the root password successfully An Authentication dialog will appear Enter root login for the first time and enter a password You will see the Monitor program on your display Installation of the Surveillance Software is detailed in an earlier section of this manual titled Installation of the Surveilla...

Страница 43: ...alling global settings configuration and backup Tips are provided when you move the mouse cursor on them Channel area This area displays the status of each video channel including connection recording selected and alert information Video area In this area you can see the video of accessible channel and some convenient controls Misc Functions ChannelArea Video Area LayoutArea Recording Settings s H...

Страница 44: ...l control Alert Message Display the last alert messages Using the Surveillance Software continued Logging In You need to login to use the Surveillance Software system There are two privileges in the account password system the root administrator and the general user If you have the root privilege you have the right to do the following items Run the configuration tool Change the recording schedule ...

Страница 45: ...inistrator privilege you can run the Configuration The message Before configuration all recordings will be stopped will appear to warn you that any recording that is occuring will stop when you access Camera Configurations Home Camera Configuration Screen Function setting buttons Camera selections Local Settings Setup Page ...

Страница 46: ...ton The program will try to connect to the DCS 2000 If the connection succeeds the root password of the remote DCS 2000 camera is required If you provide the correct password the camera will be inserted in the list Delete This operation deletes the camera from the camera list Password Changes the local root password Stop Provides a way to stop the network connection when the connection elapses for...

Страница 47: ...s turned on it will be shown as a green rectangle in monitoring screen If you just want to see the motion window when alerted you can also turn on the alert window separately The alert window will be shown in red rectangle when an alert occurs Alert Settings Some special actions can be performed such as generating an alert sound or starting recording when motion is detected or a digital input is t...

Страница 48: ... the configuration will be saved and will validate immediately Global Settings Click on the Global Settings item from the Function Menu Snapshot directory the directory for storing the snapshot data Recording directory the directory for storing the recorded video data ...

Страница 49: ...Set the proxy and IP filters Reserved space Indicates how many bytes should be reserved on the hard disk If the recording data exceed disk capacity the new video data will replace the oldest data Modulation Mode For selecting the input signal format NTSC or PAL Alert Sound Select sound to play when for an alert Display options In each video frame there are two status bars which contain Camera loca...

Страница 50: ...amera to the video area and apply other features if you have the the privileges There is a unique light signal above each camera s number It indicates the status of the camera Off Camera is not connected Green The green light means the camera is connected Red The red light indicates the camera is both connected and in recording mode Blink If motion detection is enabled and there an alert occurred ...

Страница 51: ...d be the video area and release the mouse button In each layout one video channel is corresponding to one and only one video box in the video area Therefore the drag and drop from channel number to video box also can be treated as exchange of videos in video box that is if the video of channel 1 is displayed at video box A and the video of channel 2 is displayed at video box B when you drag channe...

Страница 52: ...d drop to where you want to locate the video If the destination video box is empty then video in the source video box will be shown on destination video box and the source video box will be empty If the destination video box contains video of some channel then the videos in the source and destination video box will be exchanged Channel number Droppable Areas ...

Страница 53: ...ons in each layout are saved for the next time the layout is selected for monitoring When you want to view one individual camera you can double click on the video in the video area The layout is now changed to the view of single video whose size is twice the original one You can click the up or down button to view different cameras and clicking the Back button will switch to the previous selected ...

Страница 54: ...ing to the scheduler settings DI DO Control Only one user with root privilege can access the DI DO control at the same time Refer to the following figure to control You can do some low level controls such as manual DI DO control Telnet Control Digital Input is High Set Digital Output to Low Channel Number Set Digital Output to High Input Command Telnet messages Connect Disconnect ...

Страница 55: ...ccurred at 03 47 25 PM on motion window 2 and motion window 3 Backup The Backup function will help you to archive the recorded data according to the location and size you selected in Global Settings You can duplicate the backup data to a removable device such as CD ROM ZIP disk DVD RAM or tape manually After the backup starts you cannot configure the camera or change any settings You can cancel th...

Страница 56: ...ettings Stop Alert Sound Whenever alert occurrs the alert sound will start to play You can press this button to stop the alert sound and see the alert messages Scheduling The Scheduling helps you to schedule the recoding time of the output from the DCS 2000 You can easily specify the time of recording via both our graphic user interface and time period selection Features include Easy to use graphi...

Страница 57: ...ists two components Year selector and Set year button Their function is to change the year that is being scheduled Section 6 is the camera selection area it provides the IP addresses and location information for your reference Their is an editing schedule space for saving a temporary schedule Sections 7 and 8 consists of Begin time selector End time selector Period selector Addition button and Era...

Страница 58: ...ge the year concurrently If you change the year with the Date time selector the current year setting will also be changed The following is the camera selector Camera Edit Space The Camera selector contains two kind of items The first one is designed for helping edit the schedule and is at row 1 of the selector as shown above If you want to make a schedule that does not belong to any camera you can...

Страница 59: ...ea Note that users must choose save or refresh themselves Save The button is for applying the changes for the current schedule Save As To save the current schedule record file to another file name this button will perform this Refresh The scheduling tool will load the old data from the schedule record file The current changes will be lost Schedule with Time Lines There are four time lines Hour uni...

Страница 60: ... different from what was intended Scheduling example Click on 10 00 from the Hour time line The next time unit is 10 05 If you click the left mouse button on the Hour time line as the time information 10 00 then the recording time is 5 Minutes recording record within half day 5 Minutes recording record 5 Minutes recording record within 20 Minutes 5 Minutes recording record within 1 Hour ...

Страница 61: ... of point 1 in Month time line 00 00 12 00 include lower bound exclude upper bound is marked although only in 1 10 1 15 the recording is valid Using Mouse buttons in the Scheduler The scheduler tool is designed for a two button mouse In this manual we use left mouse button and right mouse button to distinguish them When you click or double click the left mouse button over the time line the time li...

Страница 62: ...cursor to remind you of the time at the mouse cursor position Marked Make Serial Selections If you want to mark unmark a series of time units the following steps demonstrate the method 1 Press and hold the left mouse button 2 Note the time information from the tips and move the mouse to the target time Marked ...

Страница 63: ...e right mouse button in the above steps the scheduler tool draw a green bar in the time line and finally clear the records in the unmarked region Week Time Line Selected week Selected day Cursor Date time information Left scroll area Right scroll area ...

Страница 64: ... time and the earlier date will be shown in the week time line and vice versa When a left mouse button click occurs at an upper time line area the week day indicator the current date selection is changed and the change also effects all other time lines Selected day Cursor Time information of current cursor Scroll to left area Scroll to right area Marking Unmarking the Recording Time The one click ...

Страница 65: ...minutes and it s also the smallest unit of time in the scheduling tool The operating method is the same as the other three time lines Scrolling and Switching Time in the Hour Time Line The scrolling unit of Hour time line is one hour Moving the mouse cursor to the left most part of the time line will scroll the time line to earlier time and vice versa The selection unit of this time line is one da...

Страница 66: ...period with the begin time and the end time picker you can click the Add button or Erase button to add or clear the scheduling information within the time period Remember that only if you click on the Apply button the scheduling changes will be written back to the data file This means the scheduling is valid only if you Apply the changes Add Erase Select period Once Every Hour Every Day Every Week...

Страница 67: ...67 Once ...

Страница 68: ...68 Every hour If this option is selected only the selection of minutes is valid And within the whole year every minute that meet the setting will be marked The situation is shown below ...

Страница 69: ...69 Every day If you select this option only the selections of hour and minute is valid The time that meets the selection will be marked within the year The result shown below is an example ...

Страница 70: ...eek The functionality is similar to other options The scheduler tool will check the dates for their day of week and apply the time mark to every week within the year Only the day of week hour and minute are valid ...

Страница 71: ...71 Every month In this option only the date exclude the month and year hour and minute are valid Therefore the result is as follows ...

Страница 72: ...clude Powerful play control tool Play Stop Pause Step forward Fast play from x1 to x16 Slow play from 1 to 16 Convenient display adjustment tool Zoom in from 1 1 to 2 25 1 Zoom out from 1 1 to 1 2 Full screen Flexible searching range adjustment tool User input from full range to 1 second Zoom in from full range to 10 seconds Zoom out up to full range Page searching Full range Various exporting too...

Страница 73: ... account can log in to Playback To change the password of the root account pleaserefer to the section of this manual titled Logging In in the main section Using the Surveillance Software Display Area Histogram Area Control Area Pull Bar Area Status Area Upon completion of the installation of the Surveillance Software you can run the Monitor program from Start Program Files D Link Surveillance Syst...

Страница 74: ...pt the page control The Page Control Tool is located on the right bottom corner of the display area when the program is operating in the preview mode These control tools include location selector period selector playback method selector jog dial display adjustment tool exporting tool and system control tool Status Area The Status Area is located at the bottom of the main window It tells you about ...

Страница 75: ...of time in that period You can click or pull the indicator on the pull bar to the point you want to see And the current displaying video will halt and start to play the video sequence from the point you choose If the video sequence has been paused the display area will show the point you select without playing The Pull Bar will only function under the normal display mode Settings After the main wi...

Страница 76: ... AVI compression mode Unlike the exporting of bitmap files only 16 bits of color depth are used to export the AVI file During the AVI compression mode selection you can select one of the compression methods that your computer supports to export the AVI file Alert window settings There are three alert windows you can activate during using the monitor program In the playback program you can choose w...

Страница 77: ...layback method selector to Time Period Double click on one of the nine frames in the display area under the preview mode Under the single frame mode you can use all the tools the playback program provided except the Page Control In this mode the two labels under the pull bar show the start and end time of the period individually as shown below Histogram Area The Histogram Area in the single frame ...

Страница 78: ... the events via not only the time information and the alert percentage but also the real video preview playing With it you can easily tell the different Alert situations Under the Preview Mode the Pull Bar Transducer button in Exporting Toolbox and the Display Adjustment Toolbox are all disabled The two labels under the pull bar show the displayed event number and the total event count individuall...

Страница 79: ... mouse with the left button still pressed If you click on the left button without dragging it the display area will show the event page closest to the point you select The dark region means there is no video sequence existed in that interval If you click on those regions nothing will happen except a warning dialog Using Tools in Playback Location Selector The location selector is a control that le...

Страница 80: ...period selector will change to the previous correct start and end time and a warning message will be displayed Playback Method Selector Full Range If you select this method the database will be displayed from the beginning to the end of this location Any change in the period selector will take no effect unless you change this selector to Time Period Time Period If you change the playback method to...

Страница 81: ...he settings dialog The alert area selector will be changed to alert window zero when you change the location selector to another one Play Control Speed Indicator Pause Play Step Forward Stop For the play control a jog dial is used to provide the easiest way to control the displaying video sequence Except the Play button all other buttons can control the displaying frame in the normal display mode ...

Страница 82: ...e speed indicator To increase playing speed move the indicator in the clockwise direction And to decrease playing speed move it in the counterclockwise direction The current speed you set will be shown in the second column of status area Display Adjustment Toolbox Using the Display Adjustment Toolbox you can change the displaying video sequence to the size you want to see in the normal display mod...

Страница 83: ...at any time when the program is under the normal display mode Searching Range Adjustment Toolbox The Searching Range Adjustment Toolbox provides you a faster way to change the range of the displayed time period By using this toolbox you can browse the database of one location from any 10 second interval over its entire range Below is the Searching Range Adjustment Toolbox with its own three elemen...

Страница 84: ... Toolbox You can check the database through the the Playback program and also export the database to other media Using the ExportingToolbox you can export the database to other more portable formats such as AVI file bitmap file or paper Then you may use windows media player or other program to browse the exporting data Under the normal display mode you can use all the exporting tools And under the...

Страница 85: ...rmat to normal size please refer to the Camera Configurations section see Page 45 Snapshot When you click on the Snapshot button one time the program will export a bitmap In the normal display mode the exporting bitmap is the image shown in the display area And in the Preview Mode it is the image that you selected through the Frame Selection Indicator The size of the bitmap will be the same as tha...

Страница 86: ...in root password again Settings The settings dialog will pop up when you click the Settings button For more information about setting this program see the Settings section above Exit The playback program will terminate when you click on the Exit button If the AVI exporting procedure is running this procedure will be stopped first System Control Toolbox The System Control Toolbox provides basic ope...

Страница 87: ...verall performance of the transmission speed will slow down when many users are logged on Q What algorithm is used to compress the digital image A The Internet Camera utilizes H 263 MPEG4 Short Header Mode image compression technology providing high quality images MPEG is a standard for image compression and can be applied to various web browser and application software without the need to install...

Страница 88: ...rrect the possible problem you need to first disconnect the Internet Camera from the network Then run the PING utility follow the instructions in the Appendix How to Ping Your IP Address In Windows 95 98 2000 and Windows NT check that the IP Address of the Internet Camera is within the same subnet as your workstation Click Start Setting Control Panel and the Network icon Select TCP IP from the Net...

Страница 89: ...th any web server you may have running on your network A3 The default router setting might be a possible reason Check that the configuration of the router settings allow the Internet Camera to be accessed outside your local LAN Q Why does a series of broad vertical white line appear through out the image A It could be that the CMOS sensor has become overloaded when it has been exposed to bright li...

Страница 90: ...contrast hue and light frequency Please refer to the Configuration section for detail information How to PING Your IP Address The PING Packet Internet Groper command can determine whether a specific IP address is accessible by sending a packet to the specific address and waiting for a reply It can also provide a very useful tool to confirm if the IP address conflicts with Internet Camera over the ...

Страница 91: ...ms after reset restore the factory settings and install again RESET Poke a paperclip or a small tool to click on the button RESTORE 1 Poke the tool to press on the button continuously 2 Wait for self diagnostic to run twice 3 Withdraw the wrench as soon as the second self diagnostic starts Reset and Restore Restoring the factory defaults will result in the loss of any previous settings Reset or re...

Страница 92: ...he external device The I O connector provides the physical interface for digital output DO and digital input DI that is used for connecting a diversity of external alarm devices to the Internet Camera such as IR Sensors and alarm relays The digital input is used for connecting external alarm devices and once triggered images will be taken and e mailed I O Terminal Block 1 DI INPUT Max 50mA 12VDC 2...

Страница 93: ...93 Time Zone Table GMT stands for Greenwich Mean Time which is the global time that all time zones are measured from ...

Страница 94: ...94 ...

Страница 95: ...djust the focus of the lens you will need to turn the lens slowly either clockwise or counter clockwise until the desired image appears DO NOT over turn the lens in either direction as it will be out of focus Unless you want to substitute the lens DO NOT unscrew more than 1 0mm apart from the Fixed Lens Assembly To help you get the best image quality keep in mind that while adjusting the DCS 2000 ...

Страница 96: ...CS 2000 section for further details Warning Direct exposure to sunlight may cause permanent damage to the CMOS sensor Therefore do not expose the Internet Camera s lens directly to sunlight When operation is required in glaring light envi ronment it is recommended to use an iris lens The Internet Camera is designed for indoor usage and if your appli cation requires prolonged exposure to sunlight a...

Страница 97: ...ructions below to replace the supplied lens with any C or CS type lens 1 Unscrew the Internet Camera lens 2 When using a C lens attach the new lens to a CS C adapter 3 Screw the new lens onto the Internet Camera If appropriate adjust the iris according to the prevailing light conditions 4 Refer to Adjusting the Internet Camera Focus on the previous page 5 Refresh the web browser and monitor the re...

Страница 98: ...gorithm supported H 263 MPEG 4 Short header mode Features Three adjustable image size and quality Intelligent motion detection windows with flexible bit rate Audio 24Kbps Video resolution Up to 30 fps at 160x120 Up to 30 fps at 320x240 General I O 1 opto isolated sensor input max 12VDC 50mA 1 relay output max 24VDC 1A 125VAC 0 5A Technical Specifications Security Administrator and user group prote...

Страница 99: ... 60 1 15000 second Standard CS mount type lens 6mm F1 8 Power 12VDC 1 2A external power supply Weight About 240g Dimension 135mm L x89mm W x57mm H Viewing system requirement Protocol Standard Internet TCP IP suite Operating system Microsoft Windows XP 2000 ME or 98SE Browser Internet Explorer 5 x or above Technical Specifications continued ...

Страница 100: ...customers can contact D Link technical support through our web site or by phone D Link Technical Support over the Telephone 877 453 5465 24 hours a day seven days a week D Link Technical Support over the Internet http support dlink com When contacting technical support please provide the following information Serial number of the unit Model number or product name Software type and version number C...

Страница 101: ...he applicable documentation from the date of original retail purchase of the Software for a period of ninety 90 days Warranty Period provided that the Software is properly installed on approved hardware and operated as contemplated in its documentation D Link further warrants that during the Warranty Period the magnetic media on which D Link delivers the Software will be free of physical defects D...

Страница 102: ...perty of D Link Products should be fully insured by the customer and shipped to D Link Systems Inc 53 Discovery Drive Irvine CA 92618 D Link will not be held responsible for any packages that are lost in transit to D Link The repaired or replaced packages will be shipped via UPS Ground or any common carrier selected by D Link with shipping charges prepaid Expedited shipping is available if shippin...

Страница 103: ... equipment does cause harmful interference to radio or television reception which can be determined by turning the equipment off and on the user is encouraged to try to correct the interference by one or more of the following measures Reorient or relocate the receiving antenna Increase the separation between the equipment and receiver Connect the equipment into an outlet on a circuit different fro...

Отзывы: