manualshive.com logo in svg
background image

Connecting the DFL-1600

3

06

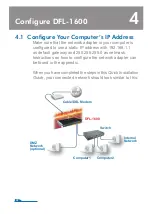
3.1  Connecting Firewall to Your Network

A

.   First, connect the power cord to the receptor at the back panel of 

the DFL-1600 and then plug the other end of the power cord to a 

wall outlet or power strip. Then powered on the DFL-1600 using 

the on/off switch. Now  the Power LED will turn ON to indicate 

proper operation. After the power LED turns on, you need to wait 

1-2 minutes for the DFL-1600 to boot up completely.


B

.  Connect an Ethernet cable from the DFL-1600 to your Cable/

DSL modem. If the Cable/DSL modem is powered on, wait for 

the WAN1 LED on the DFL-1600 to light up to show a proper 

connection. Otherwise, turn off your Cable/DSL modem, connect 

the Ethernet cable from the DFL-1600 to your Cable/DSL 

modem, and turn on the Cable/DSL modem. Some Cable/DSL 

modems may not have an on/off switch and will require you to 

unplug the power adapter.


Note:


The default management IP address of the DFL-1600 is 
192.168.1.1. If you have are using a router that uses DHCP, 

there may be a conflict if the router uses the same IP address as 

the DFL-1600. If this is the case, either disconnect the DFL-1600 
from the router and change the management IP address of the 
DFL-1600, or change the DHCP settings on your router.
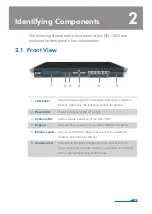
 

C

.  Insert an Ethernet cable to the LAN1 port on the front panel of 

the DFL-1600 and connect it to a port on your network hub or 

switch. The LED light above the Ethernet port on the DFL-1600 

will illuminate to indicate proper connection 


D

.  

Connecting the computer that you will use to configure the 

       DFL-1600 to the network hub or switch.

Содержание NetDefend DFL-1600

Страница 1: ...ork Security Firewall This Quick Guide will guide you through the installation Process You are only moments away from using your new D Link Network Security Product Building Networks for Peopl e DFL 1...

Страница 2: ...bute definition 5 3 Connecting the DFL 1600 3 1 Setting up Firewall to your Network 6 4 Configure DFL 1600 4 1 Configure your Computer s IP 7 4 2 Using the Setup Wizard 8 5 Appendix 5 1 How to Configu...

Страница 3: ...ately for replacement One 1 DFL 1600 NetDefend Network Security Firewall One 1 Power Cord One 1 Console Cable RS 232 cable One 1 Ethernet CAT5 UTP Straight Through Cable One 1 Ethernet CAT5 UTP Cross...

Страница 4: ...operation messages and various status of the DFL 1600 See the following section for details Power indication of the DFL 1600 System status indication of the DFL 1600 Operation keys used in conjunction...

Страница 5: ...y within five seconds after power on the LCD will display two options 1 Start Firewall If you select this option the system will start using the configuration saved inside the device 2 Reset Firewall...

Страница 6: ...atus Information Item Model name System Status CPU Load Connections Total BPS Total PPS Date Time Uptime Mem IDS Sigs WAN1 WAN2 DMZ LAN1 LAN2 LAN3 Core Version Description Display the device model nam...

Страница 7: ...Disable 4 LAN1 Static IP 192 168 1 1 24 Disable 5 LAN2 Static IP 192 168 2 1 24 Disable 6 LAN3 Static IP 192 168 3 1 24 Disable 2 3 LED Indicators Status Solid green Light off Solid green Light off B...

Страница 8: ...ernet cable from the DFL 1600 to your Cable DSL modem and turn on the Cable DSL modem Some Cable DSL modems may not have an on off switch and will require you to unplug the power adapter Note The defa...

Страница 9: ...fault gateway and 255 255 255 0 as netmask Instructions on how to configure the network adapter can be found in the appendix When you have completed the steps in this Quick Installation Guide your con...

Страница 10: ...ated with Configuration Version 1 Once you complete configuration and save activate the setting the Startup Wizard button will be removed automatically from the toolbar while you login WebGUI next tim...

Страница 11: ...nistrator password First Enter the username that you want to use for the admin account Enter the password that you want to use for the admin account DFL 1600 Quick Installation Guide This wizard will...

Страница 12: ...2 Step 3 Set up time and date Click Set time and date button for setting device 10 Click Next Select the appropriate date Enter the appropriate time Click OK DFL 1600 Quick Installation Guide...

Страница 13: ...one Step 5 Select WAN interface Select the appropriate timezone Enter the appropriate dayligt saving time settings Select the WAN interface that you want to use 11 Click Next Click Next DFL 1600 Quick...

Страница 14: ...unsure of which setting to select please contact your Internet Service Provider Step 7 1 WAN Interface Type is Static IP If you selected Static IP you have to fill out the IP address information prov...

Страница 15: ...be left blank unless your ISP informs you otherwise Enter Username Password and the PPTP Server IP address provided by your ISP DHCP If your ISProvider is using DHCP you should select the DHCP radio...

Страница 16: ...u want to use the built in DHCP Server in the DFL 1600 choose Enable DHCP Server in this screen You then need to specify a range of IP addresses to hand out to the DHCP clients This range is entered i...

Страница 17: ...ed specify which NTP Servers that should be used to syncronize the firewall time Syslog Servers If enabled specify where the firewall should log you can specify up to two Syslog recievers Click Activa...

Страница 18: ...16 Step 11 Confirmation Confirm the changes committed to the configuration file and it has been saved now Click Close DFL 1600 Quick Installation Guide...

Страница 19: ...igure the network adapter manually to the correct IP address Go to Start right click on My Network Places select Properties Right click on the Network Connection of the Ethernet adapter connecting to...

Страница 20: ...Select Use the following IP address Set IP address to 192 168 1 30 Subnet mask to 255 255 255 0 and Default gateway to 192 168 1 1 Click OK Go to the Apple Menu Click on Network and Select System Pre...

Страница 21: ...168 1 30 Subnet Mask to 255 255 255 0 and Router to 192 168 1 1 Click on Apply Now Select Built in Ethernet in the show pull down menu Select Manually in the Configure pull down menu 19 DFL 1600 Quic...

Страница 22: ...he user will be required to correct the interference at his own expense CE Mark Warning This is a Class A product In a domestic environment this product may cause radio interference in which case the...

Страница 23: ...alla classeA Se utilizzato in ambiente domestico il prodotto pu causare interferenze radio nel cui caso possibile che l utente debba assumere provvedimenti adeguati VCCI Warning BSMI Warning VCCI War...

Отзывы: