background image

62

Networking Basics

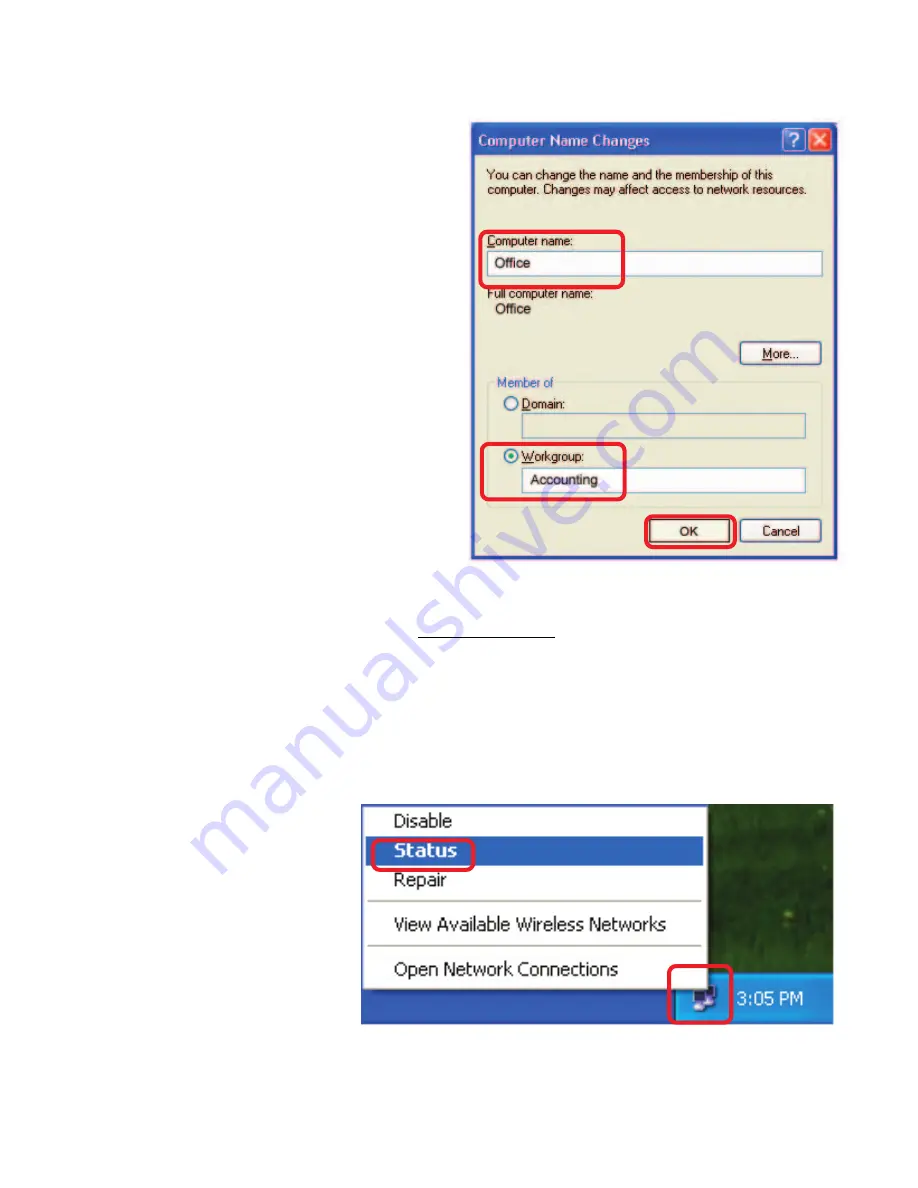
How to assign a Name to your Computer

In this window, enter the
Computer name.

Select  Workgroup and enter
the name of the Workgroup.

All computers on your network
must have the same
Workgroup name.

Click OK.

How to find your IP Address in Windows XP

The adapter-equipped computers in your network must be in the same IP ad-
dress range.To verify the IP address of the adapter, please do the following:

Right-click  on the
Local Area Con-
nection
  icon  in
the task bar.

Click on Status.

(continued)

Содержание Epress EtherNetwork DP-301P+

Страница 1: ...Manual Building Networks for People Pocket Size Print Server D Link DP 301P ...

Страница 2: ...18 TCP IP Printing for Windows 2000 26 TCP IP Printing for Windows 98SE Me 34 Unix Linux Printing 45 Setting up AppleTalk or LPR Printing in MAC OS X 46 Setting up AppleTalk Printing in MAC OS 9 51 Networking Basics 54 Technical Specifications 66 Contacting Technical Support 67 Warranty 68 Registration 71 Appendix DP 301P Printer Compatibility List 72 ...

Страница 3: ... of the above items are missing please contact your reseller System Requirements A computer with an installed Ethernet adapter Windows XP 2000 NT4 Me 98SE Apple Mac OS withAppleTalk Linux NetWare 5 x Native NDS Internet Explorer 6 0 or Netscape Navigator version 6 0 or above with JavaScript enabled Printer must support required Operating System ...

Страница 4: ...feature that allows users to easily configure and manage multiple print queues through TCP IP The DP 301P also supports Telnet as an alternative method to configure the unit The DP 301P improves network printing services in the following ways Introduction The DP 301P manages print file traffic This provides workload relief to your file servers and allows the file servers full capacity to be used f...

Страница 5: ...R LPD HP UX Sun OS Solaris SCO UnixWare IBMAIX Windows NT 2000 Windows 95 98SE Me Windows XP NetWare 5 x NDPS LPR Remote Printing NetBEUI Windows NT 2000 XP Windows 95 98SE Me Windows for Workgroups Microsoft LAN Manager IBM LAN Server AppleTalk Mac OS EtherTalk Windows based setup and administration software PS Admin is supplied with the print server making configuration and management quick and ...

Страница 6: ...ect or negotiate the transmission speed of the network Use this port to connect to your network router Power DC Power Connector The DC power input connector is located on the print server s rear panel LEDIndicators The back panel of the print server features three LED indicators ACT Lights up to indicate activity on the network LPT Lights up to indicate printing activity 1 Lights up to indicate th...

Страница 7: ...e front panel of the print server features the parallel port connector Plug this connector directly into the parallel port on your network printer There is no need for a parallel port cable between the print server and your network printer ...

Страница 8: ...l the DP 301P parallel port connector into the parallel port on the network printer 5 Using an Ethernet CAT5 cable connect the DP 301P to the network 4 Confirm that your network is operating normally 3 When you have confirmed proper operation of the printer switch its power OFF 2 Confirm proper operation of the printers to be connected to the DP 301P 1 Power ON Self Test Every DP 301P has been fac...

Страница 9: ...e indicator test A normal no fault result is signaled by three flashes of the LPT indicator and the start of normal print server operation If any error condition is found during the circuit tests testing will halt with the LPT indicator continuously signaling the particular error according to the following table Circuit Tests In the event of a Firmware Reload Required error at startup proceed acco...

Страница 10: ...l The compatibility list is not comprehensive Even if it is not included in the list your printer may be compatible with the DP 301P Below is a sample network using the DP 301P The DP 301P has a built in Web based management feature that allows users to easily configure and manage multiple print queues through TCP IP ...

Страница 11: ...h five links on the top of this main screen Home Configuration Network Tools and Help Open your Web browser and type http 192 168 0 10 in the address box and press Enter This set of numbers is the default IP address of your print server Please note that the PC s IPaddress must correspond with the Print Server s IP address in the same segment for the two devices to communicate Using the Web Configu...

Страница 12: ...rint server MAC Address The MAC address of the Ethernet port IPAddress The IP address of the print server Up Time The length of time the print server has been up Using the Web Configuration continued Home The Home tab displays the system information providing general information regarding the print server Click on the Refresh button to acquire the most updated information Once a printer is connect...

Страница 13: ... A brief description for the parallel port optional Speed Select high or low printer port speed PJL Printer This feature is used to support the Hewlett Packard PJL Printer Job Language standard for bi directional printing Using the Web Configuration continued Configuration The Configuration window will display the settings required to configure the DP 301P Print Server Consult your printer s manua...

Страница 14: ...14 Network Using the Web Configuration continued ...

Страница 15: ...el Font Group Enter the font group Save Click Save to save the changes TCP IP Protocol Network continued Using the Web Configuration continued BOOTP Bootstrap Protocol can provide an IP address to the print server DHCP Dynamic Host Configuration Protocol automati cally assigns an IP address to the print server SNMP Community 1 3 Simple Network Management Protocol is a set of protocols for managing...

Страница 16: ...er defined settings and you will need to reconfigure the print server To print a test page click Test Print Test Using the Web Configuration continued Tools WARNING Clicking YES in this screen will result in a complete factory reset You will lose all the configuration settings you have made and you will need to reconfigure the settings ...

Страница 17: ...ccess D Link s support website D Link s support website will provide the most up to date information on your DP 301P Print Server Please check the website regularly for product and firmware updates Using the Web Configuration continued Help ...

Страница 18: ... subnet as the Print Server s IP address for the two devices to communicate For example if your print server s IP address is 192 168 0 10 with a subnet mask of 255 255 255 0 then your computer s IP address should be 192 168 0 x where x is a value between 1 254 excluding 10 See Networking Basics Assigning a Static IP Address in this manual to find out how to change an IP address D LinkDP 301U http ...

Страница 19: ...19 TCP IP Printing for Windows XP continued At the Configuration window write down the Port Name for future reference You will need this information later in the configuration process ...

Страница 20: ...elect TCP IP Protocol at the Network window the screen below appears We recommend that you keep the default settings as shown If you need to make changes make sure to click Save after you have made the changes You may wish to make a note of the IP address ...

Страница 21: ...21 Go to Start Settings Printers and Faxes Add a Printer Click Next TCP IP Printing for Windows XP continued ...

Страница 22: ...or Windows XP continued Select Local Printer Click Next Select Create a new port At the pull down menu highlight Standard TCP IP Port Click Next Click Next DeselectAutomatically detect and install my Plug and Play printer ...

Страница 23: ...23 TCP IP Printing for Windows XP continued Type in the IP address of the print server i e 192 168 0 10 The Port Name will automatically be filled in Select Standard Click Next Click Finish ...

Страница 24: ...Click Next Click Next TCP IP Printing for Windows XP continued Highlight the printer as shown If the desired printer is not on the list click Have Disk and insert the printer driver disk that came with your printer to install the printer drivers Click Next ...

Страница 25: ...25 Click Finish TCP IP Printing for Windows XP continued Epson Stylus COLOR 740 ESC P2 Epson Stylus ...

Страница 26: ...d Press Enter Note The PC s IP address must be in the same subnet as the print server s IP address for the two devices to communicate For example if your print server s IP address is 192 168 0 10 with a subnet mask of 255 255 255 0 then your computer s IP address should be 192 168 0 x where x is a value between 1 254 excluding 10 http 192 168 0 10 ...

Страница 27: ...27 TCP IP Printing for Windows 2000 continued At the Configuration window write down the Port Name for future reference You will need this information later in the configuration process ...

Страница 28: ...select TCP IP Protocol at the Network window the screen below appears We recommend that you keep the default settings as shown If you need to make changes make sure to click Save after you have made the changes You may wish to make a note of the IP address ...

Страница 29: ...29 Go to Start Settings Printers Double click on the Add Printer icon Click Next TCP IP Printing for Windows 2000 continued ...

Страница 30: ...30 TCP IP Printing for Windows 2000 continued Select Local Printer Click Next Select Create a new port at the pull down menu highlight Standard TCP IP Port Click Next ...

Страница 31: ...ting for Windows 2000 continued Click Next Click Next Type in the IP address of the print server in the Printer Name or IP Address field The Port Name field will automatically be filled in Select Standard Click Next ...

Страница 32: ...h Click Next At this screen you can input a name for the printer Click Next Highlight the printer as shown If the desired printer is not on the list click Have Disk and insert the printer driver disk that came with your printer to install the printer drivers ...

Страница 33: ...P Printing for Windows 2000 continued Click Next Select Yes to print a test page Click Next Click Finish The printer is now ready for printing with Windows 2000 on your network Select Do not share this printer ...

Страница 34: ...ld Press Enter Note The PC s IP address must be in the same subnet as the print server s IP address for the two devices to communicate For example if your print server s IP address is 192 168 0 10 with a subnet mask of 255 255 255 0 then your computer s IP address should be 192 168 0 x where x is a value between 1 254 excluding 10 http 192 168 0 10 ...

Страница 35: ...ing for Windows 98SE Me continued At the Configuration window write down the Port Name for future reference You will need this information later in the configuration process The Port Name shown here is only an example ...

Страница 36: ... the screen below appears We recommend that you keep the default settings as shown If you need to make changes make sure to click Save after you have made the changes You may wish to make a note of the IP address TCP IP Printing for Windows 98SE Me continued ...

Страница 37: ...37 TCP IP Printing for Windows 98SE Me continued ClickAdd Highlight Client ClickAdd Go to Start Settings Control Panel Double click on Network The screen shown at the right will appear ...

Страница 38: ...ck Have Disk Click OK to accept the location of the file 2 3 1 4 1 2 3 Highlight lpr inf 4 Click OK Insert the DP 301P CD ROM into your CD ROM drive Select the letter representing the CD ROM drive on your computer from the pull down menu Double click on the folder lpr ...

Страница 39: ...39 TCP IP Printing for Windows 98SE Me continued Click OK You should now be back to the Network Properties Page Highlight LPR for TCP IP Printing Click Properties ...

Страница 40: ... and IP address will be displayed The Port Name at right is just an example Click OK Type in the IP address of the DP 301P Make sure the Port Name is accu rate The Port Name at right is just an example Click OK Click Add Port PS 116688 P1 192 168 0 10 PS 116688 P1 ...

Страница 41: ...41 Click OK Windows will ask for a restart Click Yes TCP IP Printing for Windows 98SE Me continued ...

Страница 42: ...oted click on Start Settings Printers Add Printer When the Add Printer Wizard screen appears click Next Select Network Printer Click Next Type in the path if you know it or click Browse TCP IP Printing for Windows 98SE Me continued ...

Страница 43: ...e IP address of the DP 301P and the Port Name The Port Name shown at right is just an example Select Yes or No to answer the question Do you print from MS DOS based pro grams Click Next Click Next Click Next Highlight the printer as shown If the desired printer is not on the list click Have Disk and insert the printer driver disk that came with your printer to install the printer drivers PS 116688...

Страница 44: ...44 TCP IP Printing for Windows 98SE Me continued Select Yes to print a test page Click Finish Go to Start Settings Printers Check to see that your printer is installed ...

Страница 45: ...45 Unix Linux Printing Please refer to the PS Admin Manual on the CD included with your DP 301P purchase for information on setting up the print server in Unix Linux ...

Страница 46: ...nces window and click Network With Mac OS X you can useAppleTalk or LPR printers using IPprotocols for printing through print servers Follow the instructions below to set up the print server After attaching the print server to your network using the directions provided in the Quick Installation Guide change the IP address of your Macintosh to access the print server s Web configuration ...

Страница 47: ...102 168 0 x where x is any number be tween 1 and 254 except 10 which is the IP address of the print server The IP addresses and subnet mask shown here are examples only Setting up Apple Talk or LPR Printing in Mac OS X continued Select the AppleTalk tab in this window and check Make AppleTalk Active ...

Страница 48: ...48 Setting up Apple Talk or LPR Printing in Mac OS X continued To print open a document and select File Print from the menu Select Edit Printer List from the Printer dialogbox Click Add Printer ...

Страница 49: ...t Name shown here is an example only Click on the port to which the PostScript printer is connected In this example AppleTalk has been selected PS 1123D6 U1 Laserwriter Then select the printer model from the dialog box displayed here Click Add Printer and the printer port configuration is complete Select the printer port just configured in the print window Click Print to print your document PS 112...

Страница 50: ...ield In the Queue Name field type in the Port Name of the post script printer that is connected to the print server The Port Name illustrated here is only an example Select the printer model from the dialog box Select the printer model from the dialog box ClickAdd Close all print center windows select the printer port that was just selected Click Print to print the document Click Add and the proce...

Страница 51: ...nters in your AppleTalk zone The port names shown in this manual are examples only Setting up the print server for AppleTalk Printing To set up your print server so that it can be used forAppleTalk printing Note Mac OS printing is supported for PostScript printers only If your AppleTalk network is divided into AppleTalk zones you will have to specify which zone the print server should be in You sh...

Страница 52: ...ou are using the LaserWriter 8 To choose a printer connected to your print server as your Mac OS workstation s default printer Open the chooser by selecting Chooser from the Apple menu Select the LaserWriter 8 icon on the left Make sure that AppleTalk is set to Active A list of all networked PostScript printers will be displayed Double click the name of the printer port you wish to use The printer...

Страница 53: ...u wish to access this setting in the future you can use the Setup button in the Chooser window The selected printer will become your computer s default printer You may need to choose Page Setup in any applications you have open Select the appropriate printer description file for your printer Click Open If your printer is not listed click Generic to use a generic printer description EpsonStylusCOLO...

Страница 54: ...sh a network at home or work using Microsoft Windows XP Note Please refer to websites such as http www homenethelp com and http www microsoft com windows2000 for information about networking computers using Windows 2000 Me or 98SE Go to Start Control Panel Network Connections When this screen appears click Next ...

Страница 55: ...inued Please follow all the instructions in this window Click Next In this window select the best description of your computer If your computer connects to the Internet through a gateway router select the second option as shown ...

Страница 56: ...56 Networking Basics Enter a Computer description and a Computer name optional Click Next Enter a Workgroup name All computers on your network should have the same Workgroup name Click Next continued ...

Страница 57: ...Basics Please wait while the Network Setup Wizard applies the changes When the changes are complete click Next Please wait while the Network Setup Wizard configures the computer This may take a few minutes continued ...

Страница 58: ...tion In this example Create a Network Setup Disk has been selected You will run this disk on each of the computers on your network Insert a disk into the Floppy Disk Drive in this case drive A Format the disk if you wish and click Next Click Next continued ...

Страница 59: ...es the files Please read the information under Here s how in the screen below After you com plete the Network Setup Wizard you will use the Network Setup Disk to run the Network Setup Wizard once on each of the computers on your network To con tinue click Next continued ...

Страница 60: ...lick Yes to re start the computer You have completed configuring this computer Next you will need to run the Net work Setup Disk on all the other computers on your network After running the Network Setup Disk on all your computers your new wireless network will be ready to use continued ...

Страница 61: ...e directions in Windows XP Click Start in the lower left corner of the screen Right click My Computer Select Properties and click Select the Computer Name tab in the System Properties window You may enter a Computer Description optional To rename the computer and join a domain click Change continued ...

Страница 62: ... All computers on your network must have the same Workgroup name Click OK How to find your IPAddress in Windows XP The adapter equipped computers in your network must be in the same IP ad dress range To verify the IP address of the adapter please do the following Right click on the Local Area Con nection icon in the task bar Click on Status continued ...

Страница 63: ... routers will automatically assign IP addresses to the com puters on the network using DHCP Dynamic Host Configuration Protocol technology If you are using a DHCP capable gateway router you will not need to assign static IP addresses If you are not using a DHCP capable gateway router or you need to assign a static IP address please follow these instructions Go to Start Double click Control Panel ...

Страница 64: ...64 Networking Basics continued Assigning a Static IPAddress in Windows XP 2000 Double click Network Connections Double click Properties Right click LocalArea Connections ...

Страница 65: ...k must be the same for all the computers on the network Networking Basics continued Assigning a Static IPAddress in Windows XP 2000 Input your DNS server addresses Note If you are entering a DNS server you must enter the IP address of the default gateway The DNS server information will be supplied by your ISP Internet Service Provider Click OK Click Internet Protocol TCP IP Click Properties Select...

Страница 66: ... AppleTalk EtherTalk LPR TCP IPProtocols Supported BOOTP SNMP Telnet TFTP FTP LPD RARP DHCP Management and Diagnostics Standard SNMP MIBs MIB II RFC1213 Diagnostic LED Indicators Pw Lk Act LPT Environmental and Physical Power Supply External power supply providing 5V DC 2 5A Dimensions 3 54 x 2 20 x 1 02 90mm x 56mm x 26mm Weight approx 4 27 oz 121g Operating Temperature 32 to122 F 0 to 50 C Stora...

Страница 67: ...e 877 453 5465 24 hours a day seven days a week D Link Technical Support over the Internet http support dlink com email support dlink com Tech Support for customers within Canada D Link Technical Support over the Telephone 800 361 5265 Monday to Friday 8 30am to 9 00pm EST D Link Technical Support over the Internet http support dlink ca email support dlink ca When contacting technical support plea...

Страница 68: ...tware portion of the product Software will substantially conform to D Link s then current functional specifications for the Software as set forth in the applicable documentation from the date of original retail purchase of the Software for a period of ninety 90 days Warranty Period provided that the Software is properly installed on approved hardware and operated as contemplated in its documentati...

Страница 69: ... have been subjected to abuse accident alteration modification tampering negligence misuse faulty installation lack of reasonable care repair or service in any way that is not contemplated in the documentation for the product or if the model or serial number has been altered tampered with defaced or removed Initial installation installation and removal of the product for repair and shipping costs ...

Страница 70: ...ause harmful interference to radio communication However there is no guarantee that interference will not occur in a particular installation If this equipment does cause harmful interference to radio or television reception which can be determined by turning the equipment off and on the user is encouraged to try to correct the interference by one or more of the following measures Reorient or reloc...

Страница 71: ...71 Register your D Link product online at http support dlink com register Registration ...

Страница 72: ...s C60 Epson LQ 100 Epson LQ 300 Epson LQ 550 570 Epson LQ 1070C Epson LQ 2070 2170C Epson EPL N2000 N2010 Appendix The Fujitsu Printer Fuji 10V 14V Fuji DL 700 Fuji DL 3800 The HP Printer Plotter HP Portable HP LaserJet III HP LaserJet 4P 4L 4V HP LaserJet 5L HP LaserJet 6P 6L HP LaserJet 1100 1100A HP LaserJet 1200 HP LaserJet 2100 2100M HP LaserJet 2200 HP LaserColorJet 8500 HP DeskJet 400 420 H...

Страница 73: ... SC 1275 Lexmark Optra SE 3455 Lexmark Optra T614 Lexmark Optra W810 Lexmark Z53 The NEC Printer NEC P2200 NEC P3200 NEC P5300 NEC P6300 NEC P7300 Other Printers Brother HL 1260 CD T120 Citizen GSX 230 Futek 84 OKIML 391 OKIdata OL 400 Olivetti JP450 Panasonic 2023 Panasonic KX P1624 Printtec PR856C Star NX 2420 Tektronix Phraser 350 Other printers from the brands listed above may also be supporte...

Отзывы: