background image


D-Link EasySmart Switch User Manual


3

3


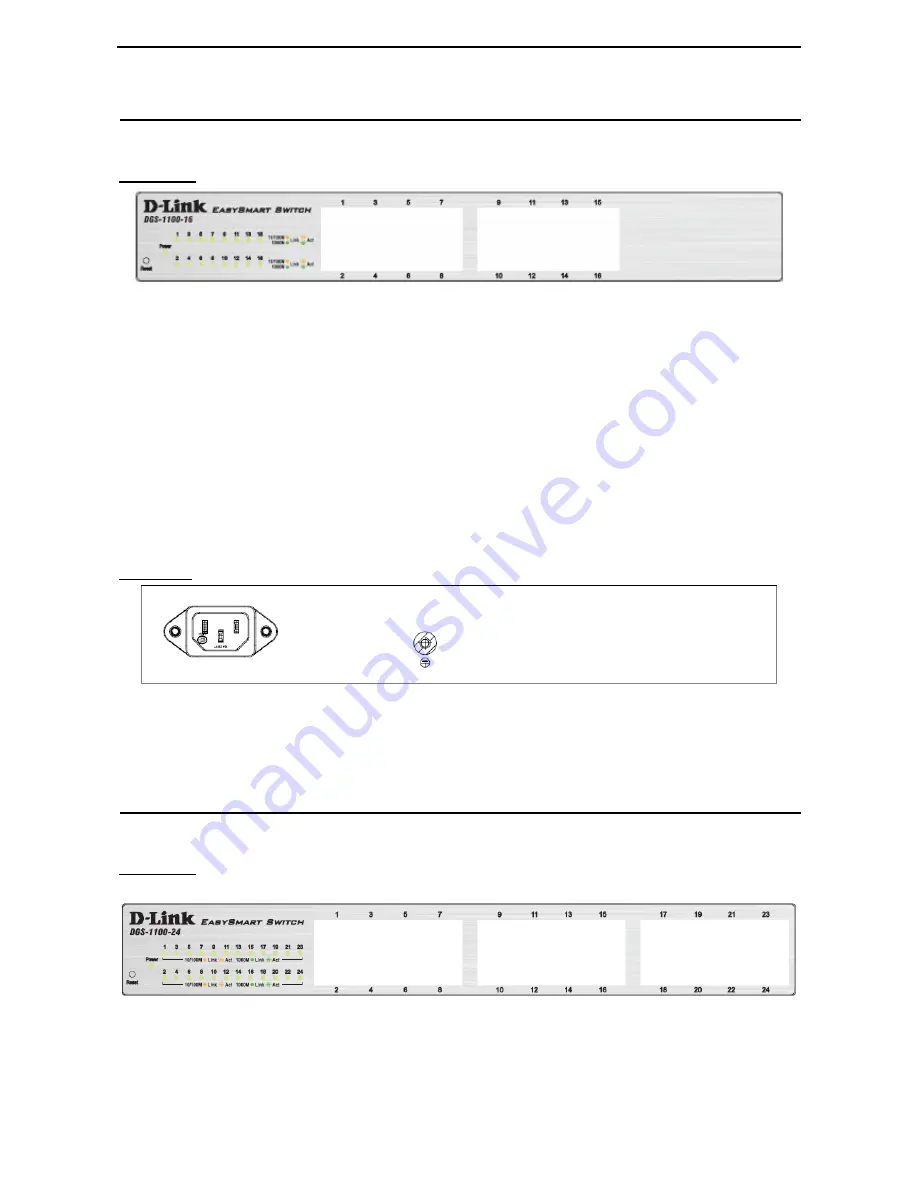
DGS-1100-16 

16-Port 10/100/1000Mpbs EasySmart Switch 


Front Panel 


Figure 3 

DGS-1100-16 Front Panel 


Power LED:

 The Power LED lights up when the Switch is connected to a power source. 

Link/Act/Speed LED (Ports 1-16):


Flashing: Indicates a network link through the corresponding port.  

Blinking: Indicates that the Switch is either sending or receiving data to the port.  

Green: Indicates that the port is running at 1000M. 

Amber: Indicates that the port is running at 10/100M. 

Light off: No link. 


Reset:

 By pressing the Reset button for 5 seconds


the Switch will change back to the default configuration 

and all changes will be lost. 


Rear Panel 


Figure 4– DGS-1100-16 Rear Panel 


Power:

 The power port is where to connect the AC power cord. 


DGS-1100-24 

24-Port 10/100/1000Mpbs EasySmart Switch  


Front Panel 


Figure 5 – DGS-1100-24 Front Panel 


Power LED: 

The Power LED lights up when the Switch is connected to a power source. 

Link/Act/Speed LED (Ports 1-24):


Flashing: Indicates a network link through the corresponding port.  

Содержание EasySmart DGS-1100-08

Страница 1: ...D G S 1 1 0 0 0 8 1 6 2 4 Ma n u a l E a s y S m a r t S w i t c h V e r 1 0 2...

Страница 2: ...tallation 5 Desktop or Shelf Installation 5 Rack Installation 6 Wall mount 7 Step 3 Plugging in the AC Power Cord 7 Power Failure 7 Grounding the Switch 8 3 Getting Started 9 Management Options 9 Usin...

Страница 3: ...ures Cable Diagnostics 28 VLAN 802 1Q VLAN 29 VLAN 802 1Q Management VLAN 31 VLAN Port Base VLAN 31 QoS 802 1p Default Priority 32 QoS Storm Control 33 QoS Bandwidth Control 33 Security MAC Address Ta...

Страница 4: ...In this guide the term Switch first letter capitalized refers to the EasySmart Switch and switch first letter lower case refers to other Ethernet switches Some technologies refer to terms switch bridg...

Страница 5: ...is received the switch wakes and works immediately Connecting to EEE compliant devices such as PCs and servers the network can save energy without compromising any performance While connecting to lega...

Страница 6: ...hat the port is running at 1000M Amber Indicates that the port is running at 10 100M Light off No link Reset By pressing the Reset button for 5 seconds the Switch will change back to the default confi...

Страница 7: ...ates that the port is running at 1000M Amber Indicates that the port is running at 10 100M Light off No link Reset Press the reset button for 5 seconds to reset the Switch back to the default settings...

Страница 8: ...16 24 One D Link EasySmart Switch One AC power cord Four rubber feet Screws and two mounting brackets One accessory kit for a ground screw One Multi lingual Getting Started Guide One CD with User Manu...

Страница 9: ...e consideration should be given to installing the equipment in an environment compatible with the maximum ambient temperature Tma specified by the manufacturer B Reduced Air Flow Installation of the e...

Страница 10: ...w anchors Step 3 Hook the mounting holes of the switch back on the screws Mounting on a wood wall Step 1 Drive the T3 x 15L screws into a wood wall Step 2 Hook the mounting holes of the switch back on...

Страница 11: ...pends on the proximity of the switch to proper grounding facilities A screwdriver not included in the accessory kit The following steps let you connect the switch to a protective ground Step 1 Verify...

Страница 12: ...ient choice By using the SmartConsole Utility you do not need to change the IP address of your PC and it is easier to initialize multiple EasySmart Switches Please refer to the following installation...

Страница 13: ...ry default IP address is 10 90 90 90 with a subnet mask of 255 0 0 0 and a default gateway of 0 0 0 0 The web configuration can also be accessed through the SmartConsole Utility Open the SmartConsole...

Страница 14: ...to the same L2 network segment of your PC and use the SmartConsole Utility to discover the Smart Switches Option 2 Follow these steps to install the SmartConsole Utility manually 1 Insert the Utility...

Страница 15: ...gs at the left Figure 16 SmartConsole Utility SmartConsole Settings The SmartConsole Settings at the left has five icons Utility Settings Log Trap File and Help Utility Settings Click this icon to lau...

Страница 16: ...ge Click Clear Log to clear all log entries Click OK to exit Figure 18 SmartConsole Log Trap Click this icon to launch the Trap window Click View Trap to show the events of the SmartConsole Utility an...

Страница 17: ...setting file Help Click this icon to launch the SmartConsole Info window Figure 21 SmartConsole Help Device Configuration The Device Configuration in the SmartConsole Utility has five icons Device Se...

Страница 18: ...ord Manager Select a switch from the Device List Click on this icon to launch the Device Password Manager window Here you can enter a new password and confirm it Figure 23 SmartConsole Device Password...

Страница 19: ...P Refresh Web Access Select a switch from the Device List Click this icon to launch your internet browser eg The Internet Explorer Here you can configure the Switch through the Web based Management ut...

Страница 20: ...Protocol version Displays the software version of the Utility Product Name Displays the device product name System Name Displays the appointed device system name DHCP Specify if the device gets the I...

Страница 21: ...nagement By choosing different functions in the Function Tree you can change all the settings in the Main Configuration Screen The main configuration screen will show the current status of your Switch...

Страница 22: ...grade and Configuration Backup Restore Figure 32 Tool Menu Reboot Device Provide a safe way to reboot the system Click Reboot to restart the switch Figure 33 Tool Menu Reboot Device Reset System Provi...

Страница 23: ...aved to a file not including the password and if necessary you can restore configuration settings from the file Figure 36 Tool Menu Configure Backup and Restore Backup or restore the configuration fil...

Страница 24: ...as firmware hardware and IP address It also offers an overall status of common software features Port Mirroring Click Setting L2 Features Port Mirroring By default this feature is disabled Storm Contr...

Страница 25: ...ault gateway before using the default or previously entered settings By default the IP setting is static mode with IP address is 10 90 90 90 and subnet mask is 255 0 0 0 System Information By entering...

Страница 26: ...ports is Auto NOTE Be sure to adjust port speed settings appropriately after changing connected cable media types Link Status Reporting Down indicates the port is disconnected Flow Control You can ena...

Страница 27: ...ng The Trunking function allows the switch to combine two or four ports together to increase bandwidth Select the Trunking Groups choose the Members to be grouped together and then click Apply to acti...

Страница 28: ...get Port Click all to include all ports into port mirroring Both transmit and receive mode Duplicate both the data transmitted from and data sent to the source port and forwards all the data to the as...

Страница 29: ...disable the Loop Detection Recover Time The default is 60 seconds From Port The beginning of a consecutive group of ports may be configured starting with the selected port To Port The ending of a con...

Страница 30: ...veillance VLAN and set the priority By default the priority is high 3 D Link Cameras can be recognized and placed into the VLAN dynamically For other brands of camera or storages servers manual settin...

Страница 31: ...the security of voice traffic are guaranteed The Voice VLAN function will check the source MAC address VLAN ID on the incoming packets If it matches specified MAC address VLAN ID the packets will pass...

Страница 32: ...usage groups such as e mail or multicast groups multimedia applications such as video conferencing and therefore help to simplify network management by allowing users to move devices to a new VLAN wi...

Страница 33: ...witch User Manual 30 Figure 52 VLAN 802 1Q VLAN Default Setting Figure 53 VLAN 802 1Q VLAN Add VID Figure 54 VLAN 802 1Q VLAN Assign PVID Rename Click to rename the VLAN group Delete VID Click to dele...

Страница 34: ...d to decide which VLAN can access the switch Figure 56 VLAN 802 1Q Management VLAN NOTE When 802 1Q Management VLAN is enabled the 802 1Q VLAN should be enabled first VLAN Port Base VLAN Port Based VL...

Страница 35: ...ority QoS is an implementation of the IEEE 802 1p standard that allows network administrators to reserve bandwidth for important functions that require a larger bandwidth or that might have a higher p...

Страница 36: ...ority QoS Storm Control The Storm Control feature provides the ability to control the receive rate of broadcast multicast and unknown unicast packets Once a packet storm has been detected the Switch w...

Страница 37: ...his drop down menu allows you to specify that the selected port will have no bandwidth limit Enabled disables the limit Rate This drop down menu allows you to select data rate from 64Kbps to 512Mbps C...

Страница 38: ...elete to remove one entry or click Delete all to clear the list You can also copy a learned MAC address from Dynamic Forwarding Table please refer to Security MAC Address Table Dynamic Forwarding Tabl...

Страница 39: ...D Link EasySmart Switch User Manual 36 Figure 62 Security Dynamic Forwarding Table...

Страница 40: ...ed twisted pair UTP cabling outfitting your network with a powerful 1000 Mbps capable backbone server connection which will create a flexible foundation for the next generation of network technology p...

Страница 41: ...pter DGS 1100 16 24 AC input 100 240 VAC 50 60Hz internal universal power supply Acoustic Value DGS 1100 08 16 24 0dB Fan less Operation Temperature 0 40 C Storage Temperature 10 70 C Operation Humidi...

Страница 42: ...nt in a rack should be such that the amount of air flow required for safe operation of the equipment is not compromised C Mechanical Loading Mounting of the equipment in the rack should be such that a...

Страница 43: ......

Страница 44: ......

Отзывы: