background image


Configuración del router (continuación) 


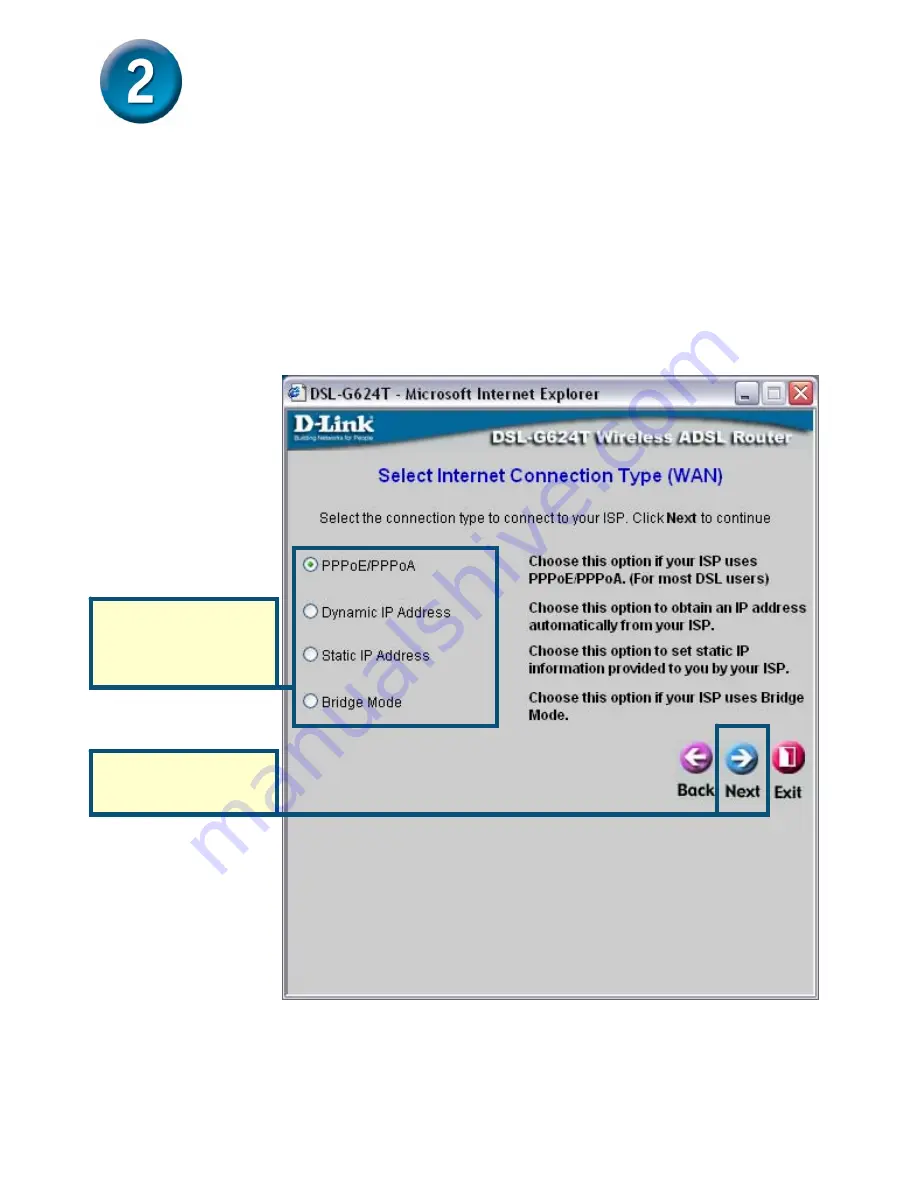
Ahora debe establecer el tipo de conexión a internet (

Set Internet Connection Type

) para la 

interfaz WAN. El proveedor de servicios internet le ha suministrado esta información. Si no sabe 

qué tipo de conexión ha de usar, salga del asistente de instalación y consúltelo con su proveedor. 

El menú del asistente de configuración, que aparece al hacer clic en el botón 

Next

, depende del 

tipo de conexión que haya seleccionado. Los tipos de conexión disponibles en el menú del 

asistente de configuración son PPPoE/PPPoA, dirección IP dinámica (

Dynamic IP Address

), 

dirección IP estática (

Static IP Address

) y modo bridge (

Bridge Mode

).  Siga las instrucciones 

que figuran a continuación para el tipo de conexión que esté usando. 


Haga clic en


Next

Seleccione 

el 

tipo 

de conexión

 de su 

servicio ADSL. 


48

Содержание DSL-G624T

Страница 1: ...DSL Router The DSL G624T acts as a DHCP server and will assign all the necessary IP address information on your network See below in this Quick Installation Guide or the Manual on the CD ROM for setting each network adapter to automatically obtain an IP address Check Your Package Contents Using a power adapter with a different voltage rating will damage and void the warranty for this product If an...

Страница 2: ...ck panel of the DSL G624T then plug the other end of the power adapter to a wall outlet or power strip On the front of the device the Power LED will turn ON to indicate proper operation B Insert one end of the Ethernet cable into an Ethernet LAN port on the back panel of the DSL G624T and the other end of the cable to an Ethernet Adapter or available Ethernet port on your computer C Insert the ADS...

Страница 3: ...f your computer so that it is a DHCP Client If you are using Windows XP and do not know how to change your network settings skip ahead to Appendix and read the instructions provided You may also read the User Manual for instructions on changing IP settings for computers running Windows operating systems To connect to the network make sure the network adapter in your computer is configured properly...

Страница 4: ... your ADSL Internet Service Provider ISP To begin using the Setup Wizard click on the Run Wizard button in the middle of the web page A pop up menu will appear This pop up menu is the Setup Wizard The Setup Wizard procedure consists of three general steps 1 Choose your time zone Please see the user manual for information on setting up wireless operation 2 Set Internet connection 3 Save Restart Cli...

Страница 5: ...ry of the steps required to complete the setup Click the Next button to begin setup Click Next Now configure the Time Zone used for the Router s system clock Select the appropriate time zone setting for your location Click Next Select the Time Zone in which you are located 5 ...

Страница 6: ...zard and contact your ISP for the information The Setup wizard menu that appears when you click the Next button depends on what connection type you select The connection types available in the Setup Wizard menu are PPPoE PPPoA Dynamic IP Address Static IP Address and Bridge Mode Follow the instructions below for the type of connection you are using Click Next Select the Connection Type used for yo...

Страница 7: ...our service Click Next when you are ready to continue the Setup Completed menu Type the Username and Password for your ISP account Click the Next button Skip ahead to the Set Wireless LAN menu Select the Connection Type used for your ADSL service Change the VPI and VCI numbers as instructed by your ISP by Typing in the new values The Set Wireless LAN Connection window is for the wireless side of y...

Страница 8: ... address of the network adapter in your computer You can also manually type in the MAC address 8 What is a MAC address Each network adapter has a discrete Media Access Control MAC address Note that some computers and peripherals may already include built in network adapters Click the Next button Skip ahead to the Setup Completed menu Some ISP s store the MAC address of your computer s Ethernet add...

Страница 9: ...he new values Click Next when you are ready to continue the Setup Completed menu Change the VPI and VCI numbers as instructed by your ISP by Typing in the new values Type the IP addresses for the WAN IP Address WAN Subnet Mask ISP Gateway Address and Primary Secondary DNS Server Select the Connection Type as instructed by your ISP Click the Next button Skip ahead to the Setup Completed menu 9 For ...

Страница 10: ... the VPI number and VCI number type in the new values Click Next when you are ready to continue the Setup Completed menu Click the Next button Skip ahead to the Setup Completed menu Click the Next button Skip ahead to the Setup Completed menu Change the VPI and VCI numbers as instructed by your ISP by Typing in the new values Select the Connection Type as instructed by your ISP 10 ...

Страница 11: ...o save the new settings and restart the Router It will take about two minutes to restart the Router Click Restart While the Router is restarting DO NOT TURN OFF THE ROUTER Click the Exit button when the message appears informing you that the device has rebooted successfully You can now launch your web browser to access the Internet 11 ...

Страница 12: ... Windows XP Use the following steps to configure a computer running Windows XP to be a DHCP client 1 From the Start menu on your desktop go to Settings then click on Network Connections 2 In the Network Connections window right click on LAN Local Area Connection then click Properties Right click on the Local Area Connection icon and Select the Properties option from the pull down menu 12 ...

Страница 13: ...ollowing items by clicking on it once Click on the Properties button Properties Click 4 Select Obtain an IP address automatically by clicking once in the circle Click the OK button Select in the Internet Protocol TCP IP Properties window Obtain an IP address automatically Your computer is now ready to use the Router s DHCP server 13 ...

Страница 14: ...K Ireland Technical Support over the Telephone 08456 12 0003 United Kingdom 44 8456 12 0003 Ireland Lines Open 8 00am 10 00pm Mon Fri 10 00am 7 00pm Sat Sun D Link UK Ireland Technical Support over the Internet http www dlink co uk ftp ftp dlink co uk For Customers within Canada D Link Canada Technical Support over the Telephone 1 800 361 5265 Canada Monday to Friday 7 30 am to 3 00 am ET Saturday...

Страница 15: ...on PPPoE Informazione importante riguardante la registrazione in internet Per gli utenti che sottoscrivono un abbonamento Internet broadband limitato o a pagamento per il traffico dati effettuato Nelle impostazioni della configurazione WAN c è un parametro chiamato Maximum idle timer Questo parametro controlla i secondi di inattività prima di chiudere la connessione ad Internet L impostazione di d...

Страница 16: ...s die Verbindung manuell aktivieren Connect on Demand Bei einer Verbindungsanfrage aus Ihrem LAN baut der Router die Verbindung zum Internet automatisch auf DSL Produkte siehe auch Hinweis O Maximum Idle Time On Demand Bei einer Verbindungsanfrage aus Ihrem LAN baut der Router die Verbindung zum Internet automatisch auf Wird dieser Funktion nicht aktiviert dann bleibt das Gerat standig mit dem Int...

Страница 17: ...finden Sie weitere Informationen zur automatischen Zuweisung von IP Adressen Lieferumfang überprüfen Sollte eines dieser Teile fehlen wenden Sie sich an Ihren Fachhändler 2005 D Link Europe Ltd Alle Rechte vorbehalten Marken und eingetragene Marken sind Eigentum ihrer jeweiligen Inhaber Änderungen vorbehalten DSL G624T Wireless ADSL Router Dieses Produkt kann mit jedem aktuellen Webbrowser eingeri...

Страница 18: ...uf der Rückseite des DSL G624T und schließen Sie das Netzteil danach an eine Steckdose an Auf der Vorderseite des Geräts leuchtet die LED Betriebsanzeige und zeigt damit den ordnungsgemäßen Betrieb an E Verbinden Sie das eine Ende des Ethernetkabels mit dem Ethernet LAN Anschluss auf der Rückseite des DSL G624T und das andere Ende mit einem externen Ethernet Adapter oder einem freien Ethernet Ansc...

Страница 19: ...n als DHCP Client konfiguriert sein Falls Sie Windows XP verwenden und nicht wissen wie Sie Ihre Netzwerkeinstellungen ändern können fahren Sie mit den Anweisungen im Anhang fort Weitere Informationen zur Änderung der IP Einstellungen bei Computern mit Windows Betriebssystemen finden Sie auch im englischen Benutzerhandbuch Um eine Verbindung mit einem Netzwerk herzustellen muss die Netzwerkkarte d...

Страница 20: ...u starten klicken Sie in der Mitte der Webseite auf die Schaltfläche Run Wizard Assistent starten Ein Popup Menü wird angezeigt Dieses Popup Menü ist der Setup Assistent Der Konfigurationsvorgang besteht aus drei Schritten 4 Wählen Sie Ihre Zeitzone Informationen zur Einrichtung des drahtlosen Betriebes finden Sie im Benutzerhandbuch 5 Konfigurieren Sie die Internetverbindung 6 Speichern Sie die E...

Страница 21: ...lichen Schritte Klicken Sie auf die Schaltfläche Next Weiter um die Konfiguration zu starten Klicken Sie auf Next Weiter Stellen Sie nun die Zeitzone für die Systemuhr des Routers ein Wählen Sie die für Ihren Standort zutreffende Zeitzone Klicken Sie auf Next Weiter Wählen Sie die Zeitzone in der Sie sich befinden 19 ...

Страница 22: ...Sie sich an Ihren Internetdienstanbieter Wenn Sie auf Next Weiter klicken wird ein Menü des Setup Assistenten angezeigt Dieses variiert je nach gewählter Verbindung Im Menü können Sie zwischen folgenden Verbindungen wählen PPPoE PPPoA Dynamic IP Address Dynamische IP Adresse Static IP Address Statische IP Adresse und Bridge Mode Bridge Modus Folgen Sie den nachstehend aufgeführten Schritten entspr...

Страница 23: ...gen Mit Hilfe des Fensters Set Wireless LAN Connection Konfigurieren der drahtlosen LAN Verbindung stellen Sie die drahtlose Kommunikation mit Ihrem Router ein Legen Sie im Feld SSID einen Namen für Ihr drahtloses Netzwerk fest und wählen Sie aus der Auswahlliste Channel Kanal den für Ihre drahtlose Verbindung zu verwendenden Kanal aus Klicken Sie auf Next Weiter Springen Sie zum Menü Setup Comple...

Страница 24: ...es Computers automatisch zu kopieren Sie können die MAC Adresse auch manuell eingeben Was ist eine MAC Adresse Jede Netzwerkkarte hat eine eindeutige Media Access Control MAC Adresse Bitte beachten Sie dass einige Computer und Peripheriegeräte bereits über eingebaute Netzwerkkarten verfügen Manche Internetdienstanbieter speichern die MAC Adresse Ihrer Netzwerkkarte auf ihrem DHCP Server Dies kann ...

Страница 25: ...m zum Menü Setup Completed Setup abgeschlossen zu gelangen Geben Sie die neuen VPI und VCI Werte ein die Sie von Ihrem Internetdienstanbieter erhalten haben Geben Sie die IP Adressen für die WAN IP Address IP Adresse die WAN Subnet Mask Subnetzmaske die ISP Gateway Address Gateway Adresse Ihres Internetdienstanbieters und die Adresse für den Primary Secondary DNS Server primären sekundären DNS Ser...

Страница 26: ...VCI Werte zu ändern geben Sie diese ein Klicken Sie auf Next Weiter um zum Menü Setup Completed Setup abgeschlossen zu gelangen Klicken Sie auf Next Weiter Fahren Sie mit dem Menü Setup Completed Setup abgeschlossen fort Geben Sie die neuen VPI und VCI Werte ein die Sie von Ihrem Internetdienstanbieter erhalten haben Wählen Sie über Connection Type den Verbindungstyp gemäß der Angaben Ihres Intern...

Страница 27: ...stellungen zu speichern und den Router neu zu starten Der Neustart dauert etwa zwei Minuten Klicken Sie auf Restart Neustart SCHALTEN SIE DEN ROUTER NICHT AUS während er neu startet Nach der Anzeige Device has rebooted successfully Gerät wurde erfolgreich neugestartet klicken Sie auf Exit Verlassen Sie können jetzt Ihren Webbrowser starten um auf das Internet zuzugreifen 25 ...

Страница 28: ...ie die folgenden Schritte aus um einen Computer mit Windows XP als DHCP Client zu konfigurieren 5 Klicken Sie auf dem Desktop im Menü Start auf Einstellungen und anschließend auf Netzwerkverbindungen 6 Klicken Sie im Dialogfeld Netzwerkverbindungen mit der rechten Maustaste auf LAN Verbindung und anschließend auf Eigenschaften Klicken Sie mit der rechten Maustaste auf das Symbol LAN Verbindung und...

Страница 29: ... Sie es dazu einmal an Klicken Sie auf die Schaltfläche Eigenschaften Klicken Sie auf Eigenschaften 8 Wählen Sie IP Adresse automatisch beziehen indem Sie einmal auf das Kästchen klicken Klicken Sie auf die Schaltfläche OK Select in the Internet Protocol TCP IP Properties window Obtain an IP address automatically Der Computer ist nun so konfiguriert dass der DHCP Server des Routers verwendet wird ...

Страница 30: ...port dlink de Telefon 49 1805 2787 0 12 Min aus dem Festnetz der Deutschen Telekom Telefonische technische Unterstützung erhalten Sie Montags bis Freitags von 09 00 bis 17 30 Uhr Unterstützung erhalten Sie auch bei der Premiumhotline für D Link Produkte unter der Rufnummer 09001 475767 Montag bis Freitag von 6 22 Uhr und am Wochenende von 11 18 Uhr 1 75 Min aus dem Festnetz der Deutschen Telekom W...

Страница 31: ...nir automatiquement une adresse IP Vérifier le contenu de l emballage Contactez votre revendeur si l un des éléments ci dessus est manquant 2005 D Link Systems Inc Tous droits réservés Les marques ou marques déposées sont la propriété de leurs détenteurs respectifs Les logiciels et caractéristiques techniques sont sujets à changement sans préavis DSL G624T Routeur sans fil ADSL Ce produit peut êtr...

Страница 32: ...tation sur le panneau arrière du DSL G624T puis l autre extrémité de l adaptateur secteur à une prise murale ou une plaquette de connexion Si le branchement s est bien passé le voyant de diagnostic alimentation s allume à l avant de l appareil H Insérer une extrémité du câble Ethernet dans un port Ethernet LAN sur le panneau arrière du DSL G624T et l autre extrémité dans un adaptateur Ethernet ou ...

Страница 33: ...CP Si vous utilisez Windows XP et ne savez pas comment changer vos paramètres réseau rendez vous directement à l annexe et lisez les instructions Vous pouvez également consulter le Manuel de l utilisateur où vous trouverez des instructions pour changer modifier les réglages IP sur les ordinateurs utilisant les systèmes d exploitation Windows Pour vous connecter au réseau assurez vous que la carte ...

Страница 34: ...sseur d accès à Internet ADSL Pour utiliser Setup Wizard cliquez sur le bouton Run Wizard au milieu de la page Internet Un menu contextuel apparaît Ce menu est l assistant de configuration Setup Wizard La procédure de Setup Wizard comprend trois étapes principales 7 Choisissez votre fuseau horaire Veuillez consulter le manuel de l utilisateur pour d avantage d information sur le paramétrage des fo...

Страница 35: ...la configuration Cliquez sur le bouton Next suivant pour commencer Cliquez sur Next Configurez maintenant le Fuseau Horaire utilisé pour l horloge système du routeur Choisissez le fuseau horaire qui correspond à votre emplacement Cliquez sur Next Choisissez le Fuseau horaire dans lequel vous vous trouvez 33 ...

Страница 36: ...FAI Le menu de Setup wizard qui apparaît lorsque vous cliquez sur le bouton Next dépend du type de connexion que vous avez sélectionné Les types de connexion disponibles dans le menu du Setup Wizard menu sont PPPoE PPPoA Adresse IP dynamique Adresse IP statique et Pont de connexion Bridge Mode Suivez les instructions ci dessous en fonction du type de connexion que vous utilisez Cliquez sur Next Ch...

Страница 37: ...ur Next quand vous êtes prêt à passé au menu Setup Completed Configuration terminée Cliquez sur le bouton Next pour passer au menu Set Wireless LAN Tapez le nom d utilisateur et le mot de passe correspondant à votre compte chez votre FAI Changez les numéros VPI et VCI selon les instructions de votre FAI en tapant les nouvelles valeurs Choisissez le Type de connexion utilisé pour vos services ADSL ...

Страница 38: ... automatiquement l adresse MAC de la carte réseau dans votre ordinateur Vous pouvez également taper l adresse MAC manuellement Qu est ce qu une adresse MAC Chaque carte réseau dispose d une adresse de contrôle d accès au support ou adresse MAC Notez que certains ordinateurs et périphériques disposent déjà d une carte réseau intégrée Cliquez sur le bouton Next pour passer au menu Setup completed Ce...

Страница 39: ...leurs Cliquez sur Next quand vous êtes prêt à passé au menu Setup Completed 37 Changez les numéros VPI et VCI selon les instructions de votre FAI en tapant les nouvelles valeurs Tapez les adresses IP correspondant à l adresse IP du WAN au masque du sous réseau WAN à l adresse de passerelle de votre FAI et au serveur DNS primaire secondaire Choisissez le type de connexion selon les instructions de ...

Страница 40: ...éros VPI et VCI tapez les nouvelles valeurs Cliquez sur Next quand vous êtes prêt à passer au menu Setup Completed C Sk lick the Next button ip ahead to the Setup Completed menu Cliquez sur le bouton Next pour passer au menu Setup completed Changez les numéros VPI et VCI selon les instructions de votre FAI en tapant les nouvelles valeurs Choisissez le type de connexion selon les instructions de vo...

Страница 41: ...trer les nouveaux réglages et redémarrer le routeur Le redémarrage du routeur prend environ deux minutes Cliquez sur Restart NE PAS ÉTEINDRE LE ROUTEUR pendant le redémarrage Cliquez sur le bouton Exit quand vous voyez apparaître le message indiquant que le redémarrage de l appareil a réussi Vous pouvez maintenant lancer votre navigateur pour accéder à Internet 39 ...

Страница 42: ...es étapes suivantes vont permettront de configurer un ordinateur sous Windows XP pour en faire un client DHCP 9 Dans le menu Démarrer de votre bureau allez dans Paramètres et cliquez sur connexions réseau 10 Dans la fenêtre Connexions réseau cliquez avec le bouton droit sur Connexion au réseau local LAN puis sur Propriétés Cliquez avec le bouton droit sur l icône Connexion au réseau local et chois...

Страница 43: ...e connexion en cliquant une seule fois Cliquez sur le bouton Propriétés Propriétés Cliquez sur 12 Choisissez Obtenir une adresse IP automatiquement en cliquant une fois dans le cercle Cliquez sur le bouton OK Choisissez dans la fenêtre Propriétés de Protocole Internet Obtenir une adresse IP automatiquement Votre ordinateur est maintenant prêt à utiliser le serveur DHCP du routeur 41 ...

Страница 44: ...rt technique destiné aux clients établis en France Assistance technique D Link par téléphone 0 820 0803 03 Assistance technique D Link sur internet http www dlink fr e mail support dlink fr Support technique destiné aux clients établis au Canada Assistance technique D Link par téléphone 800 361 5265 Lun Ven 7h30 à 21h00 HNE Assistance technique D Link sur internet http support dlink ca e mail supp...

Страница 45: ...ía de instalación rápida o en el Manual que se encuentra en el CD ROM figuran las instrucciones para configurar cada adaptador de red de forma que obtenga automáticamente una dirección IP Comprobación del contenido del paquete DSL G624T con antena y soporte El uso de una fuente de alimentación con distinto voltaje puede ser perjudicial y anular la garantía de este producto CD ROM contiene Manual d...

Страница 46: ...nel trasero del DSL G624T Después conecte el otro extremo del adaptador de alimentación a una base de pared o regleta de alimentación El LED de alimentación situado en el panel frontal del dispositivo se iluminará para indicar que la operación se ha realizado correctamente K Introduzca un extremo del cable Ethernet en el puerto Ethernet LAN del panel trasero del DSL G624T y el otro extremo del cab...

Страница 47: ...etros de red IP de su ordenador a fin de que sea un cliente DHCP Si está usando Windows XP y no sabe cómo modificar los parámetros de red consulte las instrucciones que figuran en el Apéndice En el Manual del usuario también encontrará indicaciones sobre cómo modificar los parámetros IP en ordenadores con sistemas operativos Windows Antes de conectarlo a la red asegúrese de que el adaptador de red...

Страница 48: ...a empezar a usar el asistente de instalación haga clic en el botón Run Wizard que se encuentra en el centro de la página web Se mostrará un menú emergente Este menú es el asistente de configuración El proceso de configuración con el asistente consiste fundamentalmente en tres puntos 10 Determinar la zona horaria 11 Definir la conexión a internet 12 Guardar y reiniciar Consulte en el Manual del usu...

Страница 49: ...ios para completar la configuración Haga clic en el botón Next para iniciar la configuración Haga clic en Next Configure la zona horaria Time Zone que usará el reloj del router Seleccione la zona horaria apropiada a su localización Haga clic en Next Seleccione la zona horaria correspondiente al lugar en que se encuentra 47 ...

Страница 50: ... su proveedor El menú del asistente de configuración que aparece al hacer clic en el botón Next depende del tipo de conexión que haya seleccionado Los tipos de conexión disponibles en el menú del asistente de configuración son PPPoE PPPoA dirección IP dinámica Dynamic IP Address dirección IP estática Static IP Address y modo bridge Bridge Mode Siga las instrucciones que figuran a continuación para...

Страница 51: ...ype usado para la encapsulación Haga clic en Next cuando esté listo para continuar con el menú Setup Completed Haga clic en el botón Next para pasar al menú Setup Wireless LAN Escriba el nombre de usuario y la clave de acceso de su cuenta con el ISP Modifique los números VPI y VCI que le haya indicado su ISP Escriba los nuevos valores Seleccione el tipo de conexión de su servicio ADSL La ventana S...

Страница 52: ...irección MAC del adaptador de red en el ordenador También puede escribir manualmente la dirección MAC 50 Qué es una dirección MAC Cada adaptador de red tiene una única dirección MAC Media Access Control control de acceso a medios Algunos ordenadores y periféricos pueden disponer de adaptadores de red integrados Haga clic en el botón Next para pasar al menú Setup Completed Algunos ISP guardan la di...

Страница 53: ...scriba los nuevos valores Haga clic en Next cuando esté listo para continuar con el menú Setup Completed 51 Modifique los números VPI y VCI que le haya indicado su ISP Escriba los nuevos valores Escriba las direcciones IP para la dirección IP WAN IP Address la máscara de subred WAN Subnet Mask la dirección gateway ISP ISP Gateway Address y el servidor DNS primario secundario Primary Secondary DNS ...

Страница 54: ...ambie el número VPI y el número VCI escriba los nuevos valores Haga clic en Next cuando esté listo para continuar con el menú Setup Completed Click the Next button Skip ahead to the Setup Completed menu Haga clic en el botón Next para pasar al menú Setup Completed Modifique los números VPI y VCI que le haya indicado su ISP Escriba los nuevos valores Seleccione el tipo de conexión indicado por su I...

Страница 55: ...los nuevos parámetros y reiniciar el router El router tardará unos dos minutos en reiniciarse Haga clic en Restart Mientras el router se está reiniciando NO APAGUE EL ROUTER Haga clic en el botón Exit cuando aparezca un mensaje en el que se le indique que el dispositivo se ha reiniciado correctamente Ahora puede abrir el navegador web para acceder a internet 53 ...

Страница 56: ...ra configurar un ordenador con Windows XP a fin de que sea un cliente DHCP 13 En el menú Start del escritorio vaya a Settings y haga clic en Network Connections 14 En la ventana Network Connections haga clic con el botón de la derecha en LAN Local Area Connection conexión de área local y luego haga clic en Properties Haga clic con el botón de la derecha en el icono de Local Area Connection y selec...

Страница 57: ...lowing items Haga clic en el botón Properties Properties Haga clic en 16 Haga clic en el círculo que figura junto a Obtain an IP address automatically Haga clic en el botón OK Seleccione entana Internet Protocol TCP IP Properties Obtain an IP address automatically en la v El ordenador está listo para usar el servidor DHCP del router 55 ...

Страница 58: ...nte el periodo de garantía del producto Los clientes españoles pueden ponerse en contacto con la asistencia técnica de D Link a través de nuestro sitio web o por teléfono Asistencia Técnica de D Link por teléfono 902 304545 de lunes a viernes desde las 9 00 hasta las14 00 y de las 15 00 hasta las 18 00 Asistencia Técnica de D Link a través de Internet http www dlink es email soporte dlink es 56 ...

Страница 59: ...ositivi della rete Consultare il presente manuale rapido d installazione o il manuale utente contenuto nel CD ROM per configurare i singoli adattatori di rete in modo che ottengano automaticamente un indirizzo IP Contenuto del pacchetto DSL G624T con antenna e supporto L utilizzo di un alimentatore con voltaggio differente danneggia il dispositivo e compromette la validità della garanzia CD Rom co...

Страница 60: ...atore al relativo connettore posto sul pannello posteriore del dispositivo DSL G624T e alla presa di corrente Il LED Power sul pannello frontale del dispositivo si accende per indicare il corretto funzionamento N Collegare le due estremità di un cavo Ethernet alla porta Ethernet LAN posta sul pannello posteriore del dispositivo DSL G624T e all adattatore porta Ethernet del computer O Collegare le ...

Страница 61: ...opzione Ottieni automaticamente un indirizzo IP Le istruzioni per modificare le impostazioni IP in ambiente Windows XP sono contenute nell appendice del presente manuale Il Manuale Utente fornisce le indicazioni per modificare la configurazione IP di computer dotati di sistema operativo Windows Per instaurare una connessione di rete l adattatore del computer deve essere configurato correttamente L...

Страница 62: ...net Service Provider ISP Per utilizzare il programma Setup Wizard cliccare sul pulsante Run Wizard al centro della pagina web Il sistema visualizza il menu del programma Setup Wizard La procedura di configurazione proposta dal programma è costituita da tre passi 13 Selezione del fuso orario 14 Configurazione della connessione Internet 15 Salvataggio e riavvio Per la configurazione delle impostazio...

Страница 63: ...azione Cliccare sul pulsante Next per avviare la procedura Cliccare su Next Nel campo Time Zone specificare il fuso orario utilizzato dall orologio di sistema del router Selezionare il valore appropriato in base all ubicazione geografica Cliccare su Next Utilizzare il campo Time Zone per specificare il fuso orario 61 ...

Страница 64: ...ndo sul pulsante Next il sistema visualizza un nuovo menu che dipende dal tipo di connessione selezionata I tipi di connessione supportati dal programma Setup Wizard sono PPPoE PPPoA Dynamic IP Address Static IP Address e Bridge Mode Seguire le istruzioni riportate in seguito in base al tipo di connessione utilizzata Nel campo Connection Type specificare il tipo di connessione utilizzata per il se...

Страница 65: ...ifico del servizio Cliccare su Next per passare al menu Setup Completed Compilare i campi Username e Password con i valori relativi all account fornito dall ISP Cliccare sul pulsante Next per passare al menu Set Wireless LAN Nel campo Connection Type specificare il tipo di connessione per il servizio ADSL Modificare i campi VPI e VCI inserendo i valori numerici forniti dall ISP Il menu Set Wireles...

Страница 66: ...erire manualmente il valore dell indirizzo MAC Cos è l indirizzo MAC Ogni adattatore di rete è identificato da un indirizzo MAC Media Access Control È necessario ricordare che alcuni computer o periferiche dispongono di adattatori di rete incorporati Cliccare sul pulsante Next per passare al menu Setup Completed Alcuni ISP memorizzano sul proprio server DHCP l indirizzo MAC corrispondente all indi...

Страница 67: ...nserendo i valori corretti forniti dall ISP Cliccare su Next per passare al menu Setup Completed Modificare i campi VPI e VCI inserendo i valori forniti dall ISP Inserire le impostazioni IP nei campi WAN IP Address WAN Subnet Mask ISP Gateway Address e Primary Secondary DNS Server Nel campo Connection Type specificare il tipo di connessione seguendo le istruzioni fornite dall ISP Cliccare sul puls...

Страница 68: ...sario modificare i parametri VPI e VCI inserendo i valori corretti Cliccare su Next per passare al campo Setup Completed Modificare i campi VPI e VCI inserendo i valori forniti dall ISP Click the Next button S Setup pleted kip ahead to the Com menu Nel campo Connection Type specificare il tipo di connessione utilizzando le informazioni fornite dall ISP Cliccare sul pulsante Next per passare al men...

Страница 69: ...Restart per salvare le nuove impostazioni e riavviare il Router L operazione potrebbe richiedere qualche minuto Cliccare su Restart NON SPEGNERE il Router durante il riavvio Quando il sistema visualizza il messaggio device has rebooted successfully cliccare sul pulsante Exit A questo punto è possibile lanciare il browser per accedere a Internet 67 ...

Страница 70: ...e i seguenti passi per configurare come client DHCP un computer con sistema operativo Windows XP 17 Dal menu Start del desktop selezionare Impostazioni e cliccare su Connessioni di rete 18 Nella finestra Connessioni di rete cliccare col tasto destro del mouse su Rete Locale Connessione alla Rete Locale e selezionare Proprietà Col tasto destro del mouse cliccare sull icona Connessione alla Rete Loc...

Страница 71: ...uenti componenti Cliccare sul pulsante Proprietà Cliccare su Proprietà 20 Selezionare l opzione Ottieni automaticamente un indirizzo IP Cliccare sul pulsante OK Selezionare Ottieni automaticamente un indirizzo IP nella finestra Protocollo Internet Il computer è pronto per utilizzare il server DHCP del router Il computer è pronto per utilizzare il server DHCP del router 69 ...

Страница 72: ...to D Link Supporto tecnico per i clienti residenti in Italia D Link Mediterraneo S r L Via N Bonnet 6 B 20154 Milano Supporto Tecnico dal lunedì al venerdì dalle ore 9 00 alle ore 19 00 con orario continuato Telefono 02 39607160 URL http www dlink it supporto html Email tech dlink it 70 ...

Отзывы: