background image

DSL-504T DSL Router User’s Guide


50 

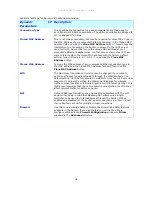
Use the Router for DHCP 

To use the built-in DHCP server, click to select the DHCP Server option if it is not already selected. The 
IP Address Pool settings can be adjusted. The Starting IP Address is the lowest available IP address 

(default = 10.1.1.2). If you change the IP address of the Router this will change automatically to be 1 

more that the IP address of the Router. The Ending IP Address is the highest IP address number in the 
pool. Type in the Lease Time in the entry field provided. This is the amount of time in seconds that a 
workstation is allowed to reserve an IP address in the pool if the workstation is disconnected from the 

network or powered off.  

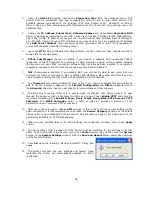
Disable the DHCP Server 

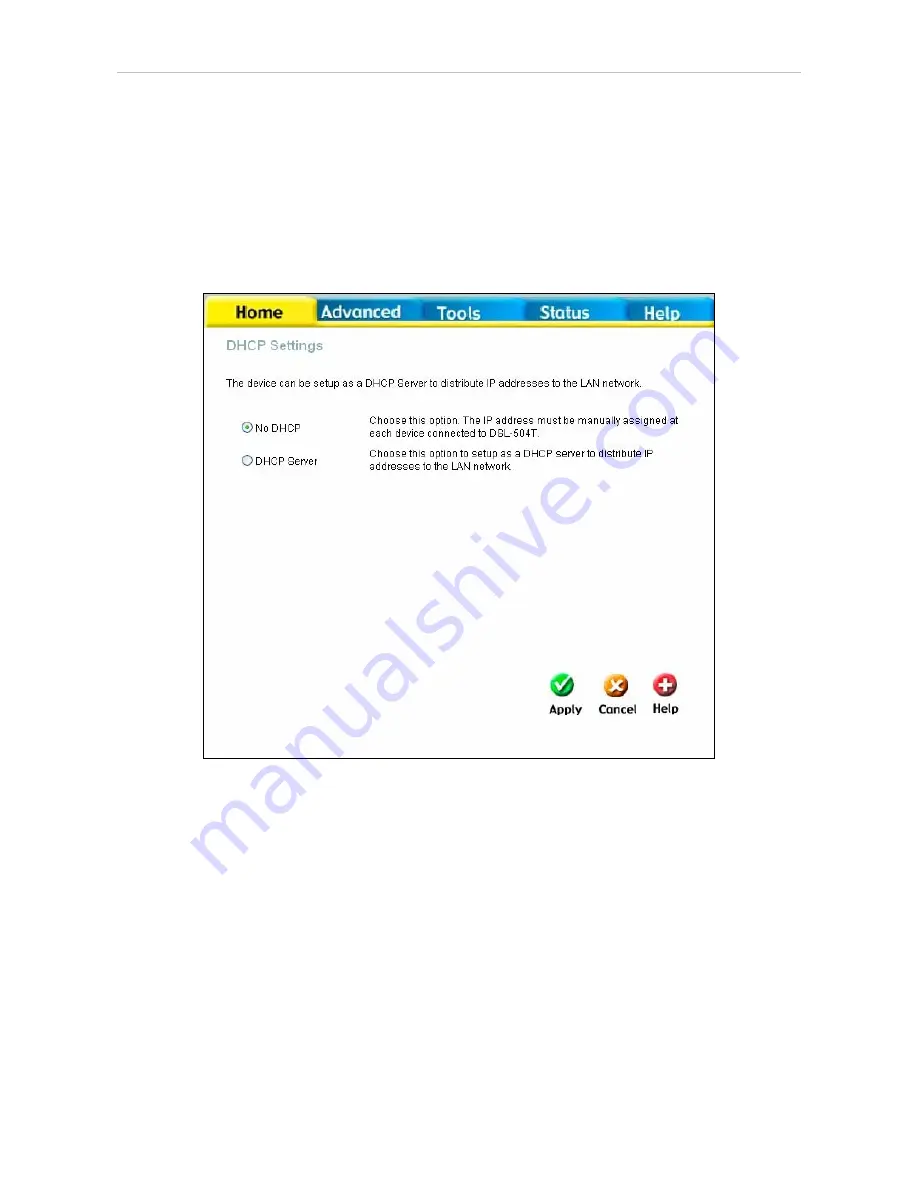
To disable DHCP, click to select the No DHCP option and click on the Apply button. 


DHCP Settings menu with DHCP turned off 

Содержание DSL-504T

Страница 1: ...DSL 504T ADSL Router User Guide January 2007 ...

Страница 2: ...quipment generates uses and can radiate radio frequency energy and if not installed and used in accordance with this user s guide may cause harmful interference to radio communications Operation of this equipment in a residential area is likely to cause harmful interference in which case the user will be required to correct the interference at his own expense CE Mark Warning This is a Class A prod...

Страница 3: ...y Reset Button 7 Network Connections 8 BASIC ROUTER CONFIGURATION 10 D Link Click n Connect Utility 10 Configuring IP Settings on Your Computer 16 Access the Configuration Manager 22 Login to Home Page 22 Configure the Router 23 Wizard 24 WAN 32 Bridge Mode 32 Dynamic IP Address 34 Static IP Address 37 PPPoE PPPoA 40 ATM Settings Traffic Shaping 44 ATM VC Settings 46 PPTP Connection 47 LAN 48 DHCP...

Страница 4: ...LS 82 Admin 82 Change System Password 82 Remote Web Management and Remote Telnet Access 83 Time 84 Remotelog 86 System 87 Save and Reboot 87 Save or Load Configuration File 87 Restore Factory Default Settings 88 Firmware 89 Miscellaneous 90 Test 91 STATUS 92 Device Info 92 DHCP Clients 93 Log 94 Statistics 95 ADSL 96 HELP 97 TECHNICAL SPECIFICATIONS 98 IP ADDRESS SETUP 100 IP CONCEPTS 102 MICROFIL...

Страница 5: ...stall the hardware connect the cables to the device and connect the power adapter 3 Check the IP settings on your computer and change them if necessary so the computer can access the web based software built into the Router 4 Use the web based management software to configure the device to suit the requirements of your ADSL service and private network Setup Wizard Many users will be able to config...

Страница 6: ...ork best with more recently released browsers such as Microsoft Internet Explorer version 6 or Netscape Navigator version 6 2 3 or later versions The web browser must have JavaScript enabled JavaScript is enabled by default on many browsers Make sure JavaScript has not been disabled by other software such as virus protection or web user security packages that may be running on your computer Ethern...

Страница 7: ... Dynamic IP Address 1483 Bridged IP LLC or 1483 Bridged IP VC Mux Default PPPoE PPPoA PPPoE LLC VPI Most users will not be required to change this setting The Virtual Path Identifier VPI is used in conjunction with the Virtual Channel Identifier VCI to identify the data path between your ADSL service provider s network and your computer If you are setting up the Router for multiple virtual connect...

Страница 8: ...or the DSL 504T This is the subnet mask used by the DSL 504T and will be used throughout your LAN The default subnet mask is 255 0 0 0 This can be changed later Information you will need about your LAN or computer Ethernet NIC If your computer has an Ethernet NIC you can connect the DSL 504T to this Ethernet port using an Ethernet cable You can also use the Ethernet ports on the DSL 504T to connec...

Страница 9: ...r and DHCP Dynamic Host Configuration Protocol improve administration efficiency and improve security for your private network The advanced security enhancements packet filtering and port redirection can help protect your network from potentially devastating intrusions by malicious agents from outside your network What is ADSL Asymmetric Digital Subscriber Line ADSL is an access technology that ut...

Страница 10: ... data path to a particular network destination that will remain in the routing table and never age out If you wish to define a specific route that will always be used for data traffic from your LAN to a specific destination within your LAN for example to another router or a server or outside your network to a ISP defined default gateway for instance Default Routing This allows you to choose a defa...

Страница 11: ... to Point Protocol PPP compliant RFC 1877 Automatic IP assignment compliant RFC 1994 Challenge Handshake Authentication Protocol compliant Supports RFC 2131 and RFC 2132 DHCP functions including automatic assignment of IP address subnet mask and default gateway and provision of DNS server address for all hosts RFC 2364 PPP over ATM compliant PPPoA compliant RFC 2516 PPP over Ethernet compliant PPP...

Страница 12: ...powered off this remains dark Status Lights steady green during power on self test POST Once the connection status has been settled the light will blink green If the indicator lights steady green after the POST the system has failed and the device should be rebooted ADSL Link Act Steady green light indicates a valid ADSL connection This will light after the ADSL negotiation process has been settle...

Страница 13: ...le included with the Router into the ADSL port and then connect the cable to your telephone line 2 Insert one end of the Ethernet cable into the Ethernet LAN port on the back panel of the Router and the other end of the cable to an Ethernet Adapter or available Ethernet port on your computer ADSL Port Use the ADSL cable to connect to the your telephone line RJ 11 port Ethernet Port Use the Etherne...

Страница 14: ... including the default IP address 10 1 1 1 depress the reset button on the right side panel with a ballpoint pen paper clip or similar object for a few seconds The device will restart with default settings Reset To manually reset depress button with the power on for at least seven seconds ...

Страница 15: ...ust be used with the power adapter included with the device To power on the Router 1 Connect the power adapter shipped with the Router to the power receptacle on the back panel of the device 2 Plug the power adapter to a suitable electrical wall outlet or power strip 3 The Power LED on the front of the Router will light green indicating it is powered on Factory Reset Button The Router may be reset...

Страница 16: ...ed to computers or Ethernet devices through the 10BASE TX Ethernet ports on the rear panel Any connection to an Ethernet concentrating device such as a switch or hub must operate at a speed of 10 100 Mbps only When connecting the Router to any Ethernet device that is capable of operating at speeds higher than 10Mbps be sure that the device has auto negotiation NWay enabled for the connecting port ...

Страница 17: ...as shown in the diagram below Computer to Router Connection You can connect the Router directly to a 10 100BASE TX Ethernet adapter card NIC installed on a PC using the Ethernet cable provided as shown in this diagram If you wish to reserve the uplink port on the switch or hub for another device connect to any on the other MDI X ports 1x 2x etc with a crossed cable ...

Страница 18: ...s step by step to configure your router for Internet access for the first time Please see the next section for more information about this utility The second method is to use your Web browser to access the built in web server pages used to set up the Router To use this method your computer s network adapter must be configured to Obtain an IP address automatically that is you must set the IP networ...

Страница 19: ...DSL 504T DSL Router User s Guide 11 Click the start installation button Click the NEXT button ...

Страница 20: ...DSL 504T DSL Router User s Guide 12 Click the NEXT button Click the NEXT button ...

Страница 21: ...e wait as the Router physical connectivity status is checked When the Router is finished the first Internet Settings window opens Please choose your Country and Internet Service Provider from the drop down menus and then click the NEXT button ...

Страница 22: ...rnet Settings including Country Internet Service Provider Protocol Encapsulation VPI VCI and MTU If you are unsure of these settings please consult your ISP Click the NEXT button Please enter the correct information for Username Password and Confirm Password and then click the NEXT button ...

Страница 23: ...504T DSL Router User s Guide 15 Please wait as the settings are saved and diagnostics are performed If successful the following window will open Click the FINISH button to complete the installation process ...

Страница 24: ...that you must change the PVC settings used for the ADSL connection Your service provider should provide all the information you need to configure the WAN connection Configuring IP Settings on Your Computer In order to configure your system to receive IP settings from the Router it must first have the TCP IP protocol installed If you have an Ethernet port on your computer it probably already has TC...

Страница 25: ...e the following steps to configure a computer running Windows XP to be a DHCP client 1 From the Start menu on your desktop go to Settings then click on Network Connections 2 In the Network Connections window right click on LAN Local Area Connection then click Properties ...

Страница 26: ...s menu highlight Internet Protocol TCP IP under This connection uses the following items by clicking on it once Click on the Properties button 4 Select Obtain an IP address automatically by clicking once in the circle Click the OK button Your computer is now ready to use the Router s DHCP server ...

Страница 27: ...onnection icon and then select Properties 3 In the Local Area Connection Properties dialog box select Internet Protocol TCP IP and then click Properties 4 In the Internet Protocol TCP IP Properties dialog box click the button labeled Obtain an IP address automatically 5 Double click OK to confirm and save your changes and then close the Control Panel Your computer is now ready to use the Router s ...

Страница 28: ...tion Windows 95 98 3 If TCP IP does not display as an installed component click Add The Select Network Component Type dialog box displays 4 Select Protocol and then click Add The Select Network Protocol dialog box displays 5 Click on Microsoft in the Manufacturers list box and then click TCP IP in the Network Protocols list box 6 Click OK to return to the Network dialog box and then click OK again...

Страница 29: ...col dialog box select TCP IP and then click OK You may be prompted to install files from your Windows NT installation CD or other media Follow the instructions to install the files 7 After all files are installed a window displays to inform you that a TCP IP service called DHCP can be set up to dynamically assign IP information 8 Click Yes to continue and then click OK if prompted to restart your ...

Страница 30: ...u can access this Internet Options menu using the Tools pull down menu in Internet Explorer Login to Home Page To use the web based management software launch a suitable web browser and direct it to the IP address of the Router Type in http followed by the default IP address 10 1 1 1 in the address bar of the browser The URL in the address bar should read http 10 1 1 1 A dialog box prompts for the...

Страница 31: ...iguration and management of the Router is done using the web based management interface pictured in the above example The various menus accessed by clicking on one of the directory tabs Home Advanced Tools Status and Help Each tab displays menu buttons located in the left hand panel of the web interface The table below lists the menus for each directory in the web manager Click on one of the five ...

Страница 32: ...Next button to proceed You may stop using the Setup Wizard at any time by clicking the Exit button If you exit the wizard you will return to the first page without saving any of the settings changed during the process The first window of the Setup Wizard lists the basic steps in the process These steps are as follows 1 Set the system time 2 Configure the connection to the Internet 3 Save the new c...

Страница 33: ...5 Using the Setup Wizard Choose Time Zone Set the system time of the Router Choose the time zone you are in from the pull down menu and click Next If you wish to return to the previous menu during the setup process click the Back button ...

Страница 34: ...The connection types available for Multi mode are PPPoE PPPoA Dynamic IP Address Static IP Address and Bridge Mode Each connection type has different settings that are configured in the next Setup Wizard window Select the Connection Type specific to your service and click Next to go to the next Setup Wizard window Follow the instructions below for the type of connection you have selected ...

Страница 35: ...ype from the drop down menu The available PPP connection and encapsulation types are PPPoE LLC PPPoA LLC and PPPoA VC Mux 3 If you are instructed to change the VPI or VCI number type in the correct setting in the available entry fields Most users will not need to change these settings The Internet connection cannot function if these values are incorrect 4 Click Next to go to the Setup Completed po...

Страница 36: ... function if these values are incorrect 3 You may want to copy the MAC address of your Ethernet adapter to the Router Some ISPs record the unique MAC address of your computer s Ethernet adapter when you first access their network This can prevent the Router which has a different MAC address from being allowed access to the ISPs network and the Internet To clone the MAC address of your computer s E...

Страница 37: ... Gateway Address Primary DNS Address and Secondary DNS Server IP Address as instructed by your ISP For IPoA connections it may also be necessary to change the ARP Server Address IPoA connection users who have not been given this information should leave the field blank 3 If you are instructed to change the VPI or VCI number type in the correct setting in the available entry fields Most users will ...

Страница 38: ...ode connection and encapsulation types are 1483 Bridged IP LLC and 1483 Bridged IP VC Mux 2 If you are instructed to change the VPI or VCI number type in the correct setting in the available entry fields Most users will not need to change these settings The Internet connection cannot function if these values are incorrect 3 Click Next to go to the Setup Completed window ...

Страница 39: ... correctly click the Restart button to save the new configuration settings and restart the Router If you need to change settings from a previous window click the Back button Do not turn the Router off while it is restarting After the Router is finished restarting you are now ready to continue to configure the Router as desired You may want to test the WAN connection by accessing the Internet with ...

Страница 40: ...WAN LAN DHCP DNS and Dynamic DNS settings directly from the Home directory To access the WAN Settings window click on the WAN link button on the left side of the first window that appears when you successfully access the web manager Bridge Mode The WAN Settings window is also used to configure the Router for multiple virtual connections Multiple PVCs WAN Settings window Bridge Mode ...

Страница 41: ...in the values assigned for your account Leave the PVC and Virtual Circuit setting at the default Pcv0 and Enabled values for now This can be used later if you are configuring multiple virtual circuits for your ADSL service For more information on ATM VC Settings see the table on page 46 below 3 Under the Bridge Mode heading choose the Connection Type from the pull down menu This defines both the c...

Страница 42: ...to the service provider Typically the IP address assigned has a long lease time so it will likely be the same address each time the Router requests an IP address To configure a Dynamic IP Address connection perform the steps listed below Some of the settings do not need to be changed the first time the device is set up but can be changed later if you choose See the table below for a description of...

Страница 43: ...able to use more than one computer for Internet connections NAT is enabled and disabled system wide therefore if you are using multiple virtual connections NAT will disabled on all connections 7 The Firewall should remain enabled for most users If you choose to disable this you will not be able to use the features configured in the Firewall Configuration and Filters windows located in the Advanced...

Страница 44: ...ernet adapter type in the MAC address in the Cloned MAC Address field and then click this Clone MAC Address button MTU The Maximum Transmission Unit size may be changed if you want to optimize efficiency for uploading data through the WAN interface The default setting 1400 bytes should be suitable for most users Some user may want to adjust the setting to optimize performance for wireless traffic ...

Страница 45: ...e the device is set up but can be changed later if you choose See the table below for a description of all the settings available in this window WAN Settings window Static IP To configure a Static IP type connection for the WAN follow these steps 1 Choose the Static IP Address option from the WAN Settings pull down menu 2 Under the ATM VC Settings at the top of the window should not be changed unl...

Страница 46: ...led and disabled system wide therefore if you are using multiple virtual connections NAT will be disabled on all connections 8 The Firewall should remain enabled for most users If you choose to disable this you will not be able to use the features configured in the Firewall Configuration and Filters window located in the Advanced directory See the next chapter for more details on these windows 9 P...

Страница 47: ...address from your ISP Secondary DNS Address This is the second choice for a DNS server Get this IP address from your ISP MTU The Maximum Transmission Unit size may be changed if you want to optimize efficiency for uploading data through the WAN interface The default setting 1400 bytes should be suitable for most users Some user may want to adjust the setting to optimize performance for wireless tr...

Страница 48: ...PPoE PPPoA and Connection Setting heading in the WAN settings menu This area is contained within the red square in the example to the right An enlarged view of this section can be seen on the next page followed by step by step instructions on how to configure WAN settings for a PPPoE or PPPoA connection WAN Settings window PPPoE PPPoA entire menu Note Most users with PPPoE PPPoA connections only n...

Страница 49: ...if you are instructed to change the VPI or VCI values type in the values assigned for your account Leave the PVC and Virtual Circuit setting at the default Pcv0 and Enabled values for now This can be used later if you are configuring multiple virtual circuits for your ADSL service For more information on ATM VC Settings see the table on page 46 below 3 Under the PPPoE PPPoA heading type the User N...

Страница 50: ...Typically the globally IP settings i e IP address for the WAN interface for a PPPoA or PPPoA connection will use Dynamic IP assignment from the ISP Some accounts may be assigned a specific global IP address If you have been give an IP address for you PPPoE PPPoA connection select the Static IP option from the IP Control pull down menu This menu can be used to configure the WAN port as an Unnumbere...

Страница 51: ...ou are using the Router on a network with one or more alternative gateway routers you may prefer to disable this if you will use another router as the primary gateway PPPoE PassThrough This feature enables the Router to allow a dial up or separate bridged PPP connection to an individual PC In this instance the Router will serve as a bridge NAT Network Address Translation may be enabled or disabled...

Страница 52: ...M Settings Traffic Shaping The ATM settings in the WAN Settings windows for the different connection types can be used to adjust QoS parameters for ADSL clients This may not be available to all ADSL accounts ATM Settings for WAN connection ...

Страница 53: ...e usually used in circumstances where very low packet loss and very low Cell Delay Variable CDV are desirable VBR nt Real time Variable Bit Rate This models bursty traffic with specified peak and sustainable rates Please note that when VBR rt is specified both PCR and SCR are required by ATM standards VBR nrt Non real time Variable Bit Rate usually used when network traffic is characterized by bur...

Страница 54: ...u want to configure Since most users will use only a single connection the default setting Pvc0 can be used for any changes made to the WAN settings VPI The Virtual Path Identifier is used with the VCI to define a dedicated circuit on the ATM network portion of the connection to the Internet and WAN Most users will not need to change this setting VCI The Virtual Channel Identifier is used with the...

Страница 55: ...IP address is used to provide access to resources outside your IP subnet or ISP s network Type the gateway IP address given to you by your ISP Route Mask Type the subnet mask supplied by your ISP PPTP Account This is just like a username used to identify the PPTP client PPTP Password This works like a PPP connection password to verify the identity of the client that is trying to establish a connec...

Страница 56: ...ol used for DHCP must be compatible with the IP address of the Router The IP addresses available in the DHCP IP address pool will change automatically if you change the IP address of the Router See the next section for information on DHCP setup To access the Management IP window click the LAN button in the Home directory Management IP window To change the LAN IP Address or Subnet Mask type in the ...

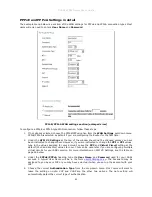
Страница 57: ...on under Save Settings and Reboot the System The Router will save the new settings and restart Upon restarting the Router will automatically establish the WAN connection The DHCP server is enabled by default for the Router s Ethernet LAN interface DHCP service will supply IP settings to workstations configured to automatically obtain IP settings that are connected to the Router though the Ethernet...

Страница 58: ...Router this will change automatically to be 1 more that the IP address of the Router The Ending IP Address is the highest IP address number in the pool Type in the Lease Time in the entry field provided This is the amount of time in seconds that a workstation is allowed to reserve an IP address in the pool if the workstation is disconnected from the network or powered off Disable the DHCP Server T...

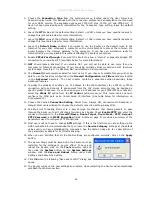
Страница 59: ...ser Discovered DNS server Only or Disable DNS Relay If you have not been given specific DNS server IP addresses or if the Router is not pre configured with DNS server information select the Auto Discover option for DNS relay Auto discovery DNS instructs the Router to automatically obtain the DNS IP address from the ISP through DHCP If your WAN connection uses a Static IP address auto discovery for...

Страница 60: ...he host can be located from the Internet if the public IP address changes DDNS requires that an account be setup with one of the supported DDNS providers Dynamic DNS Configuration menu Enter the required DDNS information and click Apply to set this information in the Router Note DDNS requires that an account be setup with one of the supported DDNS servers prior to engaging it on the router This fu...

Страница 61: ...ttings click the Tools tab You will be presented first with the Administrator Settings window This window is described in the next chapter To save the current configuration click System to open the System Settings window and then click the Save and Reboot button System Settings menu To save the settings you have configured click the Save and Reboot button under Save Settings and Reboot the System ...

Страница 62: ...one through your telecommunications services provider Extended LAN operations employing multiple virtual connections require ADSL routers or modems at the remote site for a successful connection Contact your ISP or telecommunications service provider if you are interested in setting up multiple virtual connections After the necessary arrangements have been made to use the Router with multiple virt...

Страница 63: ...n their network To add a new virtual connection 1 Select the new PVC to configure from the pull down menu 2 Enter the values for the VPI and VCI given to you by your service provider 3 To activate the VC select Enabled from the Virtual Circuit pull down menu 4 Configure the WAN Settings and Connection Type as desired In the example below a new VC Pvc1 has been added using the WAN Settings window T...

Страница 64: ...DSL 504T DSL Router User s Guide 56 ...

Страница 65: ...Home Click the Home tab to access windows for Setup Wizard WAN Settings LAN Management IP Configuration DHCP Settings for LAN Setup DNS Configuration and Dynamic DNS Configuration See the previous chapter for a description of the Home directory windows Advanced Click the Advanced tab to access windows for UPnP Virtual Server LAN Clients SNMP Management Filters Bridge Filters Static Routing Table D...

Страница 66: ...P and DNS service can also be used if available on the network UPnP also allows supported devices to leave a network automatically without adverse effects to the device or other devices on the network UPnP can be supported by diverse networking media including Ethernet Firewire phone line and power line networking UPnP menu To enable UPnP for any available connection click to check the Enable UPnP...

Страница 67: ...P port redirection is used to direct inbound traffic to the specified servers or workstations on your private network Port redirection can also be used to direct potentially hazardous packets to a proxy server outside your firewall For example you can configure the Router to direct HTTP packets to a designated HTTP server in the DMZ You can define a set of instructions for a specific incoming port...

Страница 68: ...3 IMAP IRC Lotus and Remotely Possible User Use this to set up custom TCP UDP port rules To configure a new port forwarding rule for any of the pre configured rules follow these steps 1 Select the WAN connection you want to use for the new rule from the Connection pull down menu 2 Select a LAN IP from the available client IP addresses listed in the pull down menu or create a New IP by clicking the...

Страница 69: ...gure a range of ports for forwarding Type the lowest numbered port in the range in the Port Start space Type the highest numbered port in the Port End space For a single port just enter the same number in both spaces 5 Type a number for the Port Map in the space provided 6 Click the Apply button to create the new rule The new rule will appear listed in the table of custom port forwarding rules ...

Страница 70: ...dresses will only be listed if DHCP is enabled on the Router LAN Clients menu To add a static IP address to the list of available IP addresses type an IP address that falls within the range a available IP addresses and click on the Add button In the example above available addresses range from 1 0 0 1 to 223 255 255 254 Any addresses added will appear in the list of Static Addresses available for ...

Страница 71: ...ble or disable SNMP Agent Enable SNMP Traps Click to select enable or disable SNMP Traps Community Use this edit client community for server SNMP access Name Edit community Name Access Right Access Right may choose ReadOnly or ReadWrite Traps The management agent can send an event notification to the management system to identify the occurrence of conditions such as threshold that exceeds a predet...

Страница 72: ...e filter rules Filters menu To modify any previously created filter rule click on the note pad icon in the right hand column of the Filter List for the set you want to configure Adjust the settings as desired and click the Apply button to put the new settings into effect First determine the direction of the traffic you want the rule to filter To filter WAN to LAN traffic select the Inbound Filter ...

Страница 73: ...the Destination IP address resides also depends on if you are configuring an Inbound or Outbound filter rule You can opt to indicate a Single IP an IP Range or Any IP from the pull down menu Source Port The Source Port is the TCP UDP port on either the LAN or WAN depending on if you are configuring an Outbound or Inbound Filter rule Select one of the following options from the pull down menu to de...

Страница 74: ... rules without loosing the rules that have been configured Bridge Filters menu To add a bridge filter rule check Enable Bridge Filters type in a Source MAC a Destination MAC or both in the entry fields you may opt to limit filtering to only the Ethernet and click the Apply button To remove a bridge filter from the table in the bottom half of the window click the corresponding trashcan icon Remembe...

Страница 75: ...ton and type in the Gateway s IP address Click Apply to enter the new static route in the table below The route becomes active immediately upon creation To add a static route to a specific destination IP on the WAN click the Connection radio button and choose a connection from the pull down menu then enter a Destination IP address and Netmask Click Apply to enter the new static route in the table ...

Страница 76: ...ed to various types of security risks If you use the DMZ take measures such as client based virus protection to protect the remaining client PCs on your LAN from possible contamination through the DMZ DMZ menu To designate a DMZ IP address select the Enabled radio button type in the IP Address of the server or device on your LAN and click the Apply button To remove DMZ status from the designated I...

Страница 77: ...DSL 504T DSL Router User s Guide 69 Parental Control Use Parental Controls to deny access to specified websites or websites containing specified words in the URL Parental Control window ...

Страница 78: ...e may be beneficial to parents wanting to stop their kids from accessing certain websites or for companies who want their employees to stop surfing the Internet on company time To configure this screen for URL blocking enter the website s address or a keyword into the URL field and click Add button then click Apply to save this configuration into the Routers memory Configured URL blocking entries ...

Страница 79: ...pes of protection DoS Port Scan that can be enabled on the Router as well as filtering for specific packet types sometimes used by hackers You can choose to Enable or Disable protection against a customized basket of attack and scan types To enable DoS Protection or Port Scan Protection select the Enable radio button for the protection type and click in the selection boxes for the various types of...

Страница 80: ...revent legitimate users of a service from using that service Examples include attempts to flood a network thereby preventing legitimate network traffic attempts to disrupt connections between two machines thereby preventing access to a service attempts to prevent a particular individual from accessing a service or attempts to disrupt service to a specific system or person Port scan protection is d...

Страница 81: ...own menu select the Protocol RIPv1 and RIPv1 Compatible and Direction In Out or Both and click Apply The RIPv1 Compatible option will transmit RIPv2 broadcast packets and receive both RIP v1 and RIP v2 packets The direction configuration refers to the RIP request Select In to allow RIP requests from other devices Select Out to instruct the Router to make RIP requests for routing tables from other ...

Страница 82: ...slation NAT may be disabled on the Router This should only be disabled if there are specific reasons to do so When NAT is disabled on the Router it is not possible to allow more that one computer or server any single IP address on the LAN to access the Internet unless some form of NAT is provided by another system NAT can be enabled or disabled system wide If you are using multiple connections Mul...

Страница 83: ...of some commonly used Internet applications If you plan to change QoS or traffic parameters contact your ISP or network services provider for information on what types of adjustment are available or possible for your account Your ISP may not support the class of service you want to use ATM VC Setting menu To configure an existing PVC configuration set click the corresponding notepad icon in the ri...

Страница 84: ...the lowest The QoS menu is also used to configure bandwidth for the Ethernet ports and port mapping for the Ethernet ports and the wireless interface QoS can also be configured by IP Type of Service IP ToS application specific video voice data or be user defined QoS Configuration menu No QoS The IGMP Proxy Snooping is Disabled by default This setting will not allow IGMP Internet Group Management P...

Страница 85: ... mapping and priority can be used is an ADSL account with two PVCs virtual connections where one PVC is dedicated to VoIP traffic The highest priority 1 is set for a single Ethernet port that is mapped to the VoIP dedicated PVC The three remaining Ethernet ports and wireless traffic are mapped to the other PVC and assigned a lower priority It may also be useful to set a bandwidth limit for the low...

Страница 86: ... select the PVC to associate with the corresponding action and choose a maximum bandwidth Auto 64 to 768 and classification for this combination Then select the means of classification using the Classified by pull down menu The choices are Disable ToS Application and User Define IP QoS Disabled Configure IP QoS according to the class chosen and click Apply to implement the scheme as configured See...

Страница 87: ...ghted priority and eight levels of priority The weight in percentage and a priority range that will determine the mechanism by which the four hardware determined priority levels are mapped For example if you assign 100 and a range of 0 to 7 to priority level 1 then the remaining priority levels 2 to 4 will only forward packets when priority level 1 is empty when there are no packets to forward Som...

Страница 88: ... with an application type For example if you assign a weight of 100 to Priority 1 with an application type of Voice then the other 3 priority queues 2 to 4 will not be allowed to forward packets until all of the Voice packets have been sent from the priority 1 queue Select Application from the Classified by drop down menu to display the IP QoS by Application menu IP QoS by Application menu Video a...

Страница 89: ...this pointer you can then specify a Value in hexadecimal and a Mask in hexadecimal for the router to match when examining packets crossing the specified priority queue It is recommended that you not enter a QoS scheme of this type unless you fully understand Offsets pointers masks and IP headers User Defined IP QoS menu Select User Define from the Classified by drop down menu to display the User D...

Страница 90: ...the system password used to access the web manager to save or load Router configuration settings and to restore default settings The functions in this and the other Tools windows are described below Admin Administrator Settings menu Change System Password Under the Administrator heading type the New Password and Confirm Password to be certain you have typed it correctly Click the Apply button to a...

Страница 91: ...Settings window is also used to enable remote Telnet management and remote web management access to the Router To enable remote management of the Router select the State Enabled radio button for either Remote Web Management or Remote Telnet Management and type the IP Address and Netmask of the remote network or system used for management Click the Apply button to activate remote management from th...

Страница 92: ...ntain current date and time including SNTP Time menu To configure system time on the Router select the method used to maintain time The options available include SNTP using your computer s system clock default or set the time and date manually Click the Apply button to set the system time ...

Страница 93: ... User s Guide 85 Time menu SNTP If you opt to use SNTP you must select the desired Time Zone enable or disable Daylight Saving Time and enter the SNTP server URL or IP address Click the Apply button to set the system time ...

Страница 94: ...d Warning Type in the IP address of a receiver for the log message in the Add an IP Address field and click on the Add button Log message receivers that are added appear listed in the Select a logging destination pull down menu These may be used at any time for other types of log messages To remove a log message receiver from the list select it and click on the Remove button Click the Apply button...

Страница 95: ...t configuration click the Save and Reboot button on the window pictured here Save or Load Configuration File Once you have configured the Router to your satisfaction it is a good idea to back up the configuration file to your computer To save the current configuration settings to your computer click the System button in the Tools directory to display the System Settings window Click the Save butto...

Страница 96: ...prompted and the process is completed automatically The Router will reboot and begin operating with the configuration settings that have just been loaded Restore Factory Default Settings To reset the Router to its factory default settings click the Restore button You will be prompted to confirm your decision to reset the Router The Router will reboot with the factory default settings including IP ...

Страница 97: ...test firmware for the device Note that the device configuration settings may return to the factory default settings so make sure you save the configuration settings with the System Settings window described above Firmware Upgrade To upgrade firmware type in the name and path of the file or click on the Browse button to search for the file Click the Apply button to begin copying the file The file w...

Страница 98: ...ctory to view the Miscellaneous Configuration window This window is also used to enable IGMP forwarding IGMP Proxy Miscellaneous Configuration menu Ping Test The Ping test functions on the WAN and LAN interfaces Type the IP address you want to check in the space provided and click the Ping button Read the Ping test result in the space immediately below ...

Страница 99: ...indow when working with your ISP to troubleshoot problems Diagnostic Test menu Select the Virtual Circuit and click the test button A message will appear informing you if the loop test succeeded or failed The diagnostics utility will run a series of test to check whether the device s connections are up and working This takes only a few seconds The program reports whether the test passed or failed ...

Страница 100: ...read only windows to view system information and monitor performance Device Information menu Device Info Use this window to quickly view basic current information about the LAN and WAN interfaces and device information including Firmware Version and MAC address ...

Страница 101: ...DSL 504T DSL Router User s Guide 93 DHCP Clients DHCP clients are listed by MAC address IP address and host name DHCP Clients list ...

Страница 102: ...al event log data Use the navigation buttons to view or scroll log pages You may also save a simple text file containing the log to your computer Click the Save Log button and follow the prompts to save the file View Log menu Click Clear Log delete the current log information ...

Страница 103: ...Use this window to monitor traffic on the Ethernet or ADSL Internet connection Select the interface for which you want to view packet statistics and the information will appear below Traffic Statistics menu Click Refresh to view traffic information ...

Страница 104: ...DSL 504T DSL Router User s Guide 96 ADSL Use this window to view status information and the Test page for troubleshooting the ADSL connection ADSL Status menu ...

Страница 105: ...DSL 504T DSL Router User s Guide 97 Help The Help tab will give basic information referring to various windows located in the Router Help menu ...

Страница 106: ...994 CHAP RFC 1334 PAP RFC 2364 PPP over ATM RFC 1631 NAT RFC 1877 Automatic IP assignment RFC 2516 PPP over Ethernet Supports RFC 2131 and RFC 2132 DHCP Compatible with all T1 413 issue 2 full rate DMT over analog POTS and CO DSLAM equipment Supports ATM Forum UNI V3 1 PVC Protocols TCP IP UDP RIP 1 RIP 2 IGMP DHCP BOOTP ARP AAL5 Data Transfer Rate G dmt full rate Downstream up to 8 Mbps Upstream ...

Страница 107: ...V 240V AC 50 60Hz Output 12V AC 1 2A Power Consumption 12 Watts max Operating Temperature 0 to 40 C 32 104 F Humidity 5 to 95 non condensing Dimensions 180 x 141 x 30 mm Weight 332 g EMI CE Class B FCC Class B Part 15 Safety CSA International Reliability Mean Time Between Failure MTBF min 4 years ...

Страница 108: ...tive by default Manual IP Address Assignment Manually configuring IP settings for the LAN means you must manually set an IP address subnet mask and IP address of the default gateway the Router s IP address on each networked computer The example listed below describes IP configuration for computers running Windows 95 or Windows 98 Regardless of what operating system is used on each workstation the ...

Страница 109: ... easier to remember an IP scheme that use a different address for the Router Or you may be installing the Router on a network that has already established the IP settings Changing the IP address is a simple matter and can be done using the web manager see LAN IP Address in Chapter 5 If you are incorporating the Router into a LAN with an existing IP structure be sure to disable the DHCP function Al...

Страница 110: ...sses easy to understand the originators of IP adopted a system of representation called dotted decimal or dotted quad notation Below are examples of IP addresses written in this format 201 202 203 204 189 21 241 56 125 87 0 1 Each of the four values in an IP address is the ordinary decimal base 10 representation of a value that a computer can handle using eight bits binary digits 1s and 0s The dot...

Страница 111: ...e physical network a single Ethernet LAN for example or a WAN link The host portion must be different for each IP device or to be more precise each IP capable port or interface connected directly to that network The network portion of an IP address will be referred to in this manual as a network number the host portion will be referred to as a host number To connect to the Internet or to any priva...

Страница 112: ...ass Subnet Mask Class A 255 0 0 0 Class B 255 255 0 0 Class C 255 255 255 0 Subnet mask settings other than those listed above add significance to the interpretation of bits in the IP address The bits of the subnet mask correspond directly to the bits of the IP address Any bit an a subnet mask that is to correspond to a net ID bit in the IP address must be set to 1 ...

Страница 113: ... need to use any type of filter device Follow the instructions given to you by your ADSL service provider about where and how you should connect the Router to the ADSL line Microfilters Unless you are instructed to use a line splitter see below it will be necessary to install a microfilter low pass filter device for each telephone or telephone device answering machines Faxes etc that shares the li...

Страница 114: ...The splitter has three RJ 11 ports used to connect to the wall jack the Router and if desired a telephone or telephone device The connection ports are typically labeled as follows Line This port connects to the wall jack ADSL This port connects to the Router Phone This port connects to a telephone or other telephone device The diagram below illustrates the proper use of the splitter Line Splitter ...

Страница 115: ...iago Chile S A TEL 56 2 232 3185 FAX 56 2 232 0923 URL www dlink cl E MAIL ccasassu dlink cl tsilva dlink cl China D Link China 15th Floor Science Technology Tower No 11 Baishiqiao Road Haidan District 100081 Beijing China TEL 86 10 68467106 FAX 86 10 68467110 URL www dlink com cn E MAIL liweii digitalchina com cn Denmark D Link Denmark Naverland Denmark Naverland 2 DK 2600 Glostrup Copenhagen Den...

Отзывы: