background image

DSL-2730B User Manual


4.4.6.2  Outbound IP Filtering 

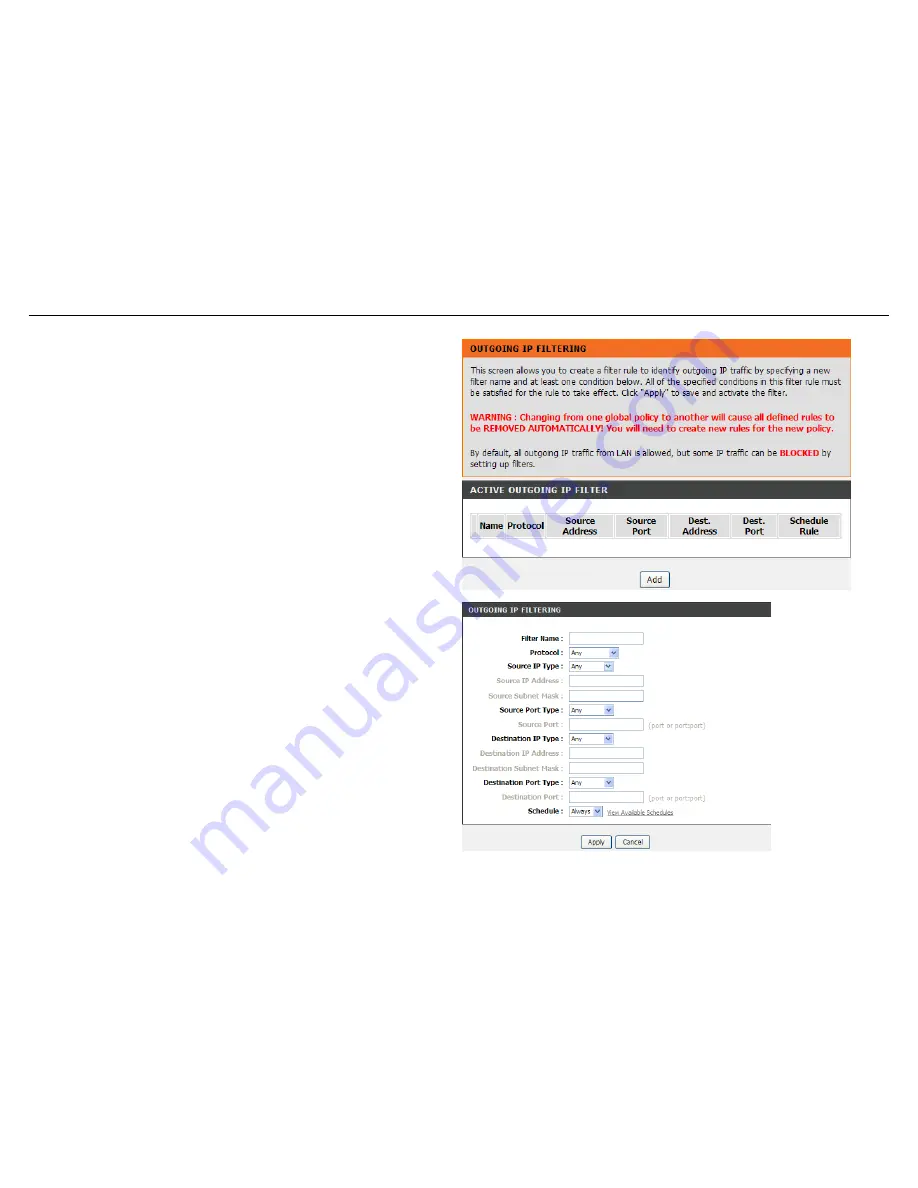
By default, all outgoing IP traffic from the LAN is allowed. The outbound filter 
allows you to create a filter rule to block outgoing IP traffic by specifying a filter 
name and at least one condition. 
In the 

Filtering Options

 page, click 

Outbound IP Filtering

. The page shown in 

the following figure appears. 


Click 

Add

 to add an outbound IP filter. The page shown in the following figure 

appears. 
Enter the 

Filter Name

 and specify at least one of the following criteria: protocol, 

source/destination IP address, subnet mask, and source/destination port. Click 

Apply

 to save the settings. 

The 

ACTIVE OUTGOING IP FILTER 

shows detailed information about each 

created outbound IP filter. 


51 

Содержание DSL-4730B

Страница 1: ...DSL 2730B User Manual ...

Страница 2: ...ving antenna Increase the separation between the equipment and receiver Connect the equipment into an outlet on a circuit different from that to which the receiver is connected Consult the dealer or an experienced radio TV technician for help This device complies with Part 15 of the FCC Rules Operation is subject to the following two conditions 1 This device may not cause harmful interference and ...

Страница 3: ...work 29 4 3 5 Time and Date 31 4 3 6 Logout 32 4 4 Advanced 33 4 4 1 Wireless Settings 33 4 4 2 Port Forwarding 41 4 4 3 Port Triggering 43 4 4 4 DMZ 45 4 4 5 Parental Control 45 4 4 6 Filtering Options 49 4 4 7 DNS 53 4 4 8 Dynamic DNS 54 4 4 9 Multicast 55 4 4 10 Network Tools 56 4 4 11 Routing 67 4 4 12 RIP 70 4 4 13 MultiNat 70 4 4 14 Schedules 71 4 4 15 Logout 72 4 5 Maintenance 73 4 5 1 Syst...

Страница 4: ... normally Do not cover these heat dissipation holes Do not put this device close to a place where a heat source exists or high temperature occurs Avoid the device from direct sunshine Do not put this device close to a place where it is over damp or watery Do not spill any fluid on this device Do not connect this device to any PCs or electronic products unless our customer engineer or your broadban...

Страница 5: ...ted through the WLAN interface On The connection of WLAN interface is normal WLAN Green Off The WLAN connection is not established Off Initial self test is failed Blinks The device is detecting itself DSL Green On Initial self test of the unit has passed Off The device is under the Bridge mode DSL connection is not present or the power is off Green On IP is connected and no traffic is detected Int...

Страница 6: ... computers or Ethernet devices WLAN Button to enable or disable WLAN RESET Reset to the factory defaults To restore factory defaults keep the device powered on and push a paper clip into the hole Press down the button for one second and then release ON OFF Power on or off POWER Interface that connects to the power adapter The power adapter output is 12 V DC A WPS on the side panel WPS button to se...

Страница 7: ...e DSL interface Simple web based status page displays a snapshot of system configuration and links to the configuration pages Downloadable flash software updates Support for up to 8 permanent virtual circuits PVC Support for up to 8 PPPoE sessions Support RIP v1 RIP v2 WLAN with high speed data transfer rates of up to 130 Mbps compatible with IEEE 802 11b g n 2 4GHz compliant equipment Optimized L...

Страница 8: ... DSL Router If this is the first time that you set up a wireless network device read the following information The access point can be placed on a shelf or desktop ideally you should be able to see the LED indicators in the front as you may need to view them for troubleshooting Designed to go up to 100 meters indoors and up to 300 meters outdoors wireless LAN lets you access your network from anyw...

Страница 9: ...oming line to the Line port of the splitter The spliiter has three ports LINE Connect to a wall phone jack RJ 11 jack Modem Connect to the Line interface of the router PHONE Connect to a telephone set 2 Connect the LAN port of the router to the network interface card NIC of the PC through an Ethernet cable MDI MDIX 3 Plug the power adapter to the wall outlet and then connect the other end of it to...

Страница 10: ...up 4 1 Preparation Before Login Before accessing the Routerre the communication between PC and Router is normal Check the communication as follows Configure the IP address of the PC as 192 168 1 X 2 254 net mask as 255 255 255 0 gateway address as 192 168 1 1 for customized version configure them according to the actual version Enter arp a in the DOS window to check whether the PC can read the MAC...

Страница 11: ...8 1 1 DSL router default IP address in the address bar The login page appears Step 3 Enter a user name and the password The default username and password of the super user are admin and admin The username and password of the common user are user and user You need not enter the username and password again if you select the option Remember my password It is recommended to change these default values...

Страница 12: ...ed to the Internet Your physical WAN device can be Ethernet DSL or both Technical information about the properties of your Internet connection is provided by your Internet service provider ISP For example your ISP should inform you whether you are connected to the Internet using a static or dynamic IP address or the protocol such as PPPoA or PPPoE that you use to communicate over the Internet Choo...

Страница 13: ...e the device Click Next to continue Change the password for logging in to the device The default password is admin To secure your network modify the password timely Note Confirm password must be the same as the new password To ignore the step click Skip 10 ...

Страница 14: ... down lists select Others Protocol The protocol connection type of the interface You can select PPPoE PPPoA Dynamic IP Static IP or Bridge Connection Type You can select it from the drop down list according to the uplink equipment You can select LLC or VC Mux VPI The virtual path identifier of the WAN interface provided by your ISP The range is 0 to 255 VCI The virtual channel identifier for the W...

Страница 15: ...DSL 2730B User Manual If the Protocol is PPPoE or PPPoA the page shown in either of the two figures appears 12 ...

Страница 16: ...DSL 2730B User Manual Set the user name and password as provided by your ISP 13 ...

Страница 17: ...al If the Protocol is Static IP the page shown in the figure appears Enter the IP Address Subnet Mask Default Gateway and Primary DNS Server If the Protocol is Dynamic IP or Bridge the page shown in the figure appears 14 ...

Страница 18: ...DSL 2730B User Manual After proper configuration click Next 15 ...

Страница 19: ...e with each other It must be unique to identify separated wireless network For security you should change the default SSID to a special ID Visibility Status You can select visible or invisible Security Level In order to protect your network from hackers and unauthorized users it is highly recommended you choose one of the following wireless network security settings WPA Pre Shared Key Please set i...

Страница 20: ... 2730B User Manual The page shown in the right figure appears In this page you can view the configuration information You can check weather the configurations match the information provided by your ISP 17 ...

Страница 21: ...DSL 2730B User Manual 4 3 2 Internet Setup Choose Setup Internet Setup The page as shown in the right figure appears In this page you can configure the WAN interface of the device 18 ...

Страница 22: ...annel between two points in an ATM network ranging from 32 to 65535 0 to 31 is reserved for local management of ATM traffic Service Category You can select from the drop down list Protocol You can select from the drop down list QoS scheduler You can select one of the item between Strict Priority and Weighted Fair Queuing Encapsulati on Mode Select the method of encapsulation provided by your ISP Y...

Страница 23: ...DSL 2730B User Manual Click Next the page shown in the following figure appears 20 ...

Страница 24: ...st modify this function to access network successfully PPP IP extension If this function is enabled the WAN IP address obtained by the router through built in dial up can be directly assigned to the PC being attached to the router at this time the router connects to only one PC From the aspect of the PC user the PC dials up to obtain an IP addres But actually the dial up is done by the router If t...

Страница 25: ...enter the information in the field WAN IP Address Enter the IP address of the WAN interface provided by your ISP WAN Subnet Mask Enter the subnet mask concerned to the IP address of the WAN interface provided by your ISP Default Gateway Enter the default gateway Obtain DNS info automatically from WAN interface You can get DNS server information from the selected WAN interface Use the following Sta...

Страница 26: ...DSL 2730B User Manual After proper settings click Next 23 ...

Страница 27: ...ction setup wizard and WPS setup wizard There are two ways to setup your wireless connection You can use the Wireless Connection Setup Wizard or you can manually configure the connection Choose Setup Wireless Connection The Wireless Connection page shown in the following figure appears 24 ...

Страница 28: ...ireless Connection page Click Wireless Connection Setup Wizard the page shown in the following figure appears If you select Use WPA encryption instead of WEP and Manually assign a network key click Next the page shown in the following figure appears 25 ...

Страница 29: ...lly assign a network key click Next the page shown in the following figure appears After you enter the network key the page shown in the following figure appears you can confirm the wireless settings in this page Click Save to save the settings 26 ...

Страница 30: ...to click Next the page shown in the following figure appears When PIN is used users are only allowed to enter no more than eight digits in the field Select Manual click Next the page shown in the following figure appears It displays the current wireless settings and you can manually enter the settings in the wireless device that s to be added in the wireless network 27 ...

Страница 31: ...reless Connection Setup It will redirect to 4 4 1 Wireless Settings 4 3 3 4 WPS Reset to Unconfigured 28 d In Wireless Connection page Click Reset to Unconfigured the page shown in the following figure appears Once the Reset to Unconfigured button is clicked the wireless settings will be reset to factory default other settings will remain unchange ...

Страница 32: ...vice is the base address used for DHCP To use the device for DHCP on your LAN the IP address pool used for DHCP must be compatible with the IP address of the device The IP address available in the DHCP IP address pool changes automatically if you change the IP address of the device You can also enable the secondary LAN IP address The two LAN IP addresses must be in different networks Choose Setup ...

Страница 33: ...ol can contain up to 253 IP addresses Click Apply to save the settings In the Local Network page you can assign IP addresses on the LAN to specific individual computers based on their MAC addresses Click Add to add static DHCP optional The page shown in the following figure appears Select Enable to reserve the IP address for the designated PC with the configured MAC address The Computer Name helps...

Страница 34: ...e time zone that you are in and the network time protocol NTP server You can also configure daylight saving to automatically adjust the time when needed Select Automatically synchronize with Internet time servers Select the specific time server and the time zone from the corresponding drop down lists Select Enable manual Daylight Saving overwrite automatic rule if necessary Set the daylight as you...

Страница 35: ...DSL 2730B User Manual 4 3 6 Logout Choose Setup Logout The page shown in the following figure appears In this page you can log out of the configuration page 32 ...

Страница 36: ...erformance and troubleshoot 4 4 1 Wireless Settings This function is used to modify the standard 802 11 wireless radio settings It is recommended not to change the default settings because incorrect settings may impair the performance of your wireless radio The default settings provide the best wireless radio performance in most environments Choose ADVANCED Wireless Settings The page shown in the ...

Страница 37: ...e in order to communicate on the network If you decide to change the wireless network name from the default setting enter your new wireless network name in this field Visibility Status You can select Visible or Invisible Country Select the country from the drop down list Wireless Channel Select the wireless channel from the pull down menu It is different for different countries 802 11 Mode Select ...

Страница 38: ...ou encounter inconsistent data flow only minor reduction of the default value 2347 is recommended If a network packet is smaller than the preset RTS threshold size the RTS CTS mechanism will not be enabled The Router sends Request to Send RTS frames to a particular receiving station and negotiates the sending of a data frame After receiving an RTS the wireless station responds with a Clear to Send...

Страница 39: ...less network name in this field Visibility Status You can select Visible or Invisible User Isolation When many clients connect to the same access point they can access each other If you want to disable the access between clients which connect the same access point you can select On to enable this service Disable WMM Advertise You can select On or Off from the drop down list Enable Wireless Multica...

Страница 40: ...the Wireless Settings page click MAC Filtering the page shown in the following figure appears In this page you can allow or deny users access the wireless router based on their MAC address Click Add the page shown in the following figure appears 37 ...

Страница 41: ...ngs page click Security Settings The page shown in the following figure appears Select the SSID that you want to configure from the drop down list Select the encryption type from the Security Mode drop down list You can select None WEP WPA Personal and WPA Enterprise 38 ...

Страница 42: ...e data portion of each frame transmitted from the wireless adapter using one of the predefined keys The router offers 64 or 128 bit encryption with four keys available Select Encryption Strength from the drop down menu 128 bit is stronger than 64 bit Enter the key into the Network Key field 1 4 Key length is outlined at the bottom of the window Click Apply Save to save the settings 39 ...

Страница 43: ...hown in the following figure appears If you select WPA Enterprise the page shown in the following figure appears You can only use WPA enterprise if you have set up RADIUS server This is the WPA WPA2 authentication with RADIUS server instead of pre shared key 40 ...

Страница 44: ...ransfers or SMTP and POP3 for e mail The device accepts remote requests for these services at your global IP address It uses the specified TCP or UDP protocol and port number and redirects these requests to the server on your LAN with the LAN IP address you specify Note that the specified private IP address must be within the available range of the subnet where the device is in Choose ADVANCED Por...

Страница 45: ... application or enter a name in the Custom Server field Enter an IP address in the Server IP Address field to appoint the corresponding PC to receive forwarded packets The Ports show the ports that you want to open on the device The TCP UDP means the protocol type of the opened ports 42 ...

Страница 46: ...te parties to access Application rules dynamically open the firewall ports when an application on the LAN initiates a TCP UDP connection to a remote party using the trigger ports The device allows the remote party from the WAN side to establish new connections back to the application on the LAN side using the firewall ports A maximum of 32 entries can be configured Choose ADVANCED Port Triggering ...

Страница 47: ...rigger settings will populate the table below If the application you want to setup isn t listed click the Custom application radio button and type in a name for the trigger in the Custom application field Configure the Trigger Port Start Trigger Port End Trigger Protocol Open Port Start Open Port End and Open Protocol settings for the port trigger you want to configure When you have finished click...

Страница 48: ... protection to protect the remaining client PCs on your LAN from possible contamination through DMZ Choose ADVANCED DMZ The page shown in the following figure appears Click Apply to save the settings 4 4 5 Parental Control Choose ADVANCED Parental Control The Parent Control page shown in the following figure appears This page provides two useful tools for restricting the Internet access Block Webs...

Страница 49: ...e click Block Website The page shown in the following figure appears Click Add The page shown in the following page appears Enter the website in the URL field Select the Schedule from drop down list or select Manual Schedule and select the corresponding time and days 46 ...

Страница 50: ...k Apply to add the website to the BLOCK WEBSITE table The page shown in the following figure appears 4 4 5 2 Block MAC Address In the Parent Control page click Block MAC Address The page shown in the following figure appears 47 ...

Страница 51: ... page shown in the following figure appears Enter the use name and MAC address and select the corresponding time and days Click Apply to add the MAC address to the BLOCK MAC ADDRESS table The page shown in the following figure appears 48 ...

Страница 52: ...ptions Choose ADVANCED Filtering Options The Filtering Options page shown in the following figure appears 4 4 6 1 Inbound IP Filtering In the Filtering Options page click Inbound IP Filtering The page shown in the following figure appears 49 ...

Страница 53: ...ter Name and specify at least one of the following criteria protocol source destination IP address subnet mask and source destination port Click Apply to save the settings The ACTIVE INBOUND FILTER shows detailed information about each created inbound IP filter Note The settings only apply when the firewall is enabled 50 ...

Страница 54: ...ering Options page click Outbound IP Filtering The page shown in the following figure appears Click Add to add an outbound IP filter The page shown in the following figure appears Enter the Filter Name and specify at least one of the following criteria protocol source destination IP address subnet mask and source destination port Click Apply to save the settings The ACTIVE OUTGOING IP FILTER shows...

Страница 55: ...the Filtering Options page click Bridge Filtering The page shown in the following figure appears This page is used to configure bridge parameters In this page you can change the settings or view some information of the bridge and its attached ports 52 ...

Страница 56: ...ame www example com might be translated to 198 105 232 4 The DNS system is in fact its own network If one DNS server does not know how to translate a particular domain name it asks another one and so on until the correct IP address is returned Choose ADVANCED DNS The page shown in the folllowin g figure appears DNS SERVER CONFIGURATION If you are using the device for DHCP service on the LAN or if ...

Страница 57: ...web server or VPN server on your LAN DDNS ensures that the host can be located from the Internet even if the public IP address changes DDNS requires that an account be set up with one of the supported DDNS service providers DyndDNS org or dlinkddns com Choose ADVANCED Dynamic DNS The page shown in the following page appears Click Add to add dynamic DNS The page shown in the following figure appear...

Страница 58: ...onds and must be less than the query interval Last Member Query Interval 1 10s The last member query interval is the amount of time in seconds that the IGMP router waits to receive a response to a Group Specific Query message The last member query interval is also the amount of time in seconds between successive Group Specific Query messages Robustness Value The robustness variable is a way of ind...

Страница 59: ...DSL 2730B User Manual 4 4 10 Network Tools Choose ADVANCED Network Tools The page shown in the following figure appears 56 ...

Страница 60: ...2730B User Manual In the NETWORK TOOLS page you can configure port mapping IGMP quality of service queue QoS classification UPnP ADSL settings SNMP TR 069 and certificates through clicking the navigation 57 ...

Страница 61: ... Manual 4 4 10 1 Port Mapping Choose ADVANCED Network Tools and click Port Mapping The page shown in the following figure appears In this page you can bind the WAN interface and the LAN interface to the same group 58 ...

Страница 62: ...group name Step 2 Select the WAN interface for your new group Step 3 Select LAN interfaces from the Available Interface list and click the arrow button to add them to the grouped interface list in order to create the required mapping of the ports The group name must be unique Step 4 Enter the option information of DHCP vendor IDs Step 5 Click Apply to save the settings 59 ...

Страница 63: ...le IGMP Snooping the multicast data transmits through the specific LAN port which has received the request report 4 4 10 3 Quality of Service Choose ADVANCED Network Tools and click Quality of Service The page shown in the following figure appears In this page you can enable disable the QoS Click Save Apply to take the setting effect 60 ...

Страница 64: ...l 4 4 10 4 Queue Config Choose ADVANCED Network Tools and click Queue Config The page shown in the following figure appears Click Add The page shown in the following figure appears Click Save Apply to save the settings 61 ...

Страница 65: ...730B User Manual 4 4 10 5 QoS Classification Choose ADVANCED Network Tools and click QoS Classification the page shown in the following figure appears This page allows you to config various classification 62 ...

Страница 66: ...DSL 2730B User Manual Click Add The page shown in the following figure appears 63 ...

Страница 67: ...our device in the network If you are concerned about UPnP security you can disable it Block ICMP ping should be enabled so that the device does not respond to malicious Internet requests Click Apply to save the settings 4 4 10 7 ADSL Choose ADVANCED Network Tools and click ADSL Settings The page shown in the following figure appears In this page you can select the DSL modulation Normally you can k...

Страница 68: ...age you can set SNMP parameters Read Community The network administrator must use this password to read the information of this device Set Community The network administrator must use this password to configure the information of this device Trap Manager IP The trap information is sent to this host Click Apply to save the settings 65 ...

Страница 69: ...auto configuration provision collection and diagnostics to this device In this page you may configure the parameters such as the ACS URL ACS password and connection request user name After finishing setting click Apply to save and apply the settings 4 4 10 10 Certificates Choose ADVANCED Network Tools and click Certificates The Certificates page shown in the following figure appears In this page y...

Страница 70: ...The page shown in the following page appears 4 4 11 1 Static Route Choose ADVANCED Routing and click Static Route The page shown in the following figure appears This page is used to configure the routing information In this page you can add or delete IP routes 67 ...

Страница 71: ... address Use Gateway IP Address The gateway IP address of the router Use Interface The interface name of the router output port You can click Use Gateway IP Address or Use Interface Click Apply to save the settings 4 4 11 2 Default Gateway Choose ADVANCED Routing and click Default Gateway The page shown in the following figure appears Select the WAN interface as your default gateway Click Apply to...

Страница 72: ...olicy Routing Choose ADVANCED Routing and click policy Routing The page shown in the following figure appears The policy route binds one WAN connection and one LAN interface Click Add the page shown in the following figure appears 69 ...

Страница 73: ...settings 4 4 13 MultiNat Network address translation NAT is the process of modifying network address information in IP packet headers while in transit across a traffic routing device for the purpose of remapping a given address space into another The packets which source IP address match between internalStart and internalEnd in the NAT table come to the router the router changes source IP of this ...

Страница 74: ...ars In this page please select the proper type select the proper Use interface and configure the other parameters in this page After finishing setting click Apply to save the settings 4 4 14 Schedules Choose ADVANCED Schedules The page shown in the following figure appears 71 ...

Страница 75: ...dd schedule rule The page shown in the following figure appears Click Apply to save the settings 4 4 15 Logout Choose ADVANCED Logout The page shown in the following figure appears In this page you can log out of the configuration page 72 ...

Страница 76: ... page are described as follows Reboot Reboot the device Backup Settings Save the settings to the local hard drive Select a location on your computer to back up the file You can name the configuration file Update settings Click Browse to select the configuration file of device and click Update Settings to begin restoring the device configuration Restore Default Settings Reset the device to default ...

Страница 77: ...as follows Step 1 Click Browse to search the file Step 2 Click Update Firmware to update the configuration file The device loads the file and reboots automatically Notice Do not turn off your device or press the reset button while this procedure is in progress 4 5 3 Access Controls Choose MAINTENANCE Access Controls The Access Controls page shown in the following figure appears The page contains A...

Страница 78: ...our network Ensure that you remember the new password or write it down and keep it in a safe and separate location for future reference If you forget the password you need to reset the device to the factory default settings and all configuration settings of the device are lost Select the Username from the drop down list You can select admin support or user Enter the current and new passwords and c...

Страница 79: ... remote host For example if telnet service is enabled and port is 23 the remote host can access the device by telnet through port 23 Normally you need not change the settings Select the management services that you want to enable or disable on the LAN or WAN interface Click Apply to apply the settings Note If you disable HTTP service you cannot access the configuration page of the device any more ...

Страница 80: ...own in the following figure appears In this page you can test the device This page is used to test the connection to your local network the connection to your DSL service provider and the connection to your Internet service provider Click Rerun Diagnostics Test to run diagnostics 77 ...

Страница 81: ...al and Debugging In this page you can enable or disable the system log function The procedure for logging the events is as follows Step 1 Select Enable Log check box Step 2 Select the display mode from the Mode drop down list Step 3 Enter the Server IP Address and Server UDP Port if the Mode is set to Both or Remote Step 4 Click Apply to apply the settings Step 5 Click View System Log to view the ...

Страница 82: ...DSL 2730B User Manual 79 4 6 Status You can view the system information and monitor performance ...

Страница 83: ...Info Choose STATUS Device Info The page shown in the following figure appears The page displays the summary of the device status including the system information Internet information wireless information and local network information 80 ...

Страница 84: ...ppears The page displays authenticated wireless stations and their statuses 4 6 3 DHCP Clients Choose STATUS DHCP Clients The page shown in the following page appears This page displays all client devices that obtain IP addresses from the device You can view the host name IP address MAC address and time expired s 81 ...

Страница 85: ...DSL 2730B User Manual 4 6 4 Logs Choose STATUS Logs The page shown in the following figure appears This page lists the system log Click Refresh to refresh the system log shown in the table 82 ...

Страница 86: ...cs The page shown in the following figure appears This page displays the statistics of the network and data transfer This information helps technicians to identify if the device is functioning properly The information does not affect the function of the device 83 ...

Страница 87: ... The page shown in the following figure appears The table shows a list of destination routes commonly accessed by the network 4 6 7 Logout Choose STATUS Logout The page shown in the following figure appears In this page you can log out of the configuration page 84 ...

Страница 88: ...ure that the following information is entered correctly User name and password Why does the web configuration page of the device fail to be accessed Choose start Run from the desktop Enter Ping 192 168 1 1 the default IP address of the device in the DOS window If the web configuration page still cannot be accessed check the following configuration The type of the network cable The connection betwe...

Отзывы: