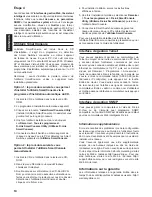
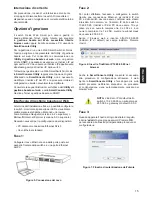
D-Link DGS-1210-28P Скачать руководство пользователя страница 7

  7

D

E

U

T

S

C

H

Schritt 4

Bevor  Sie  jedoch  das 

webbasierte  Management


verwenden,  gibt  Ihnen  der  Assistent 

(Smart  Wizard)


Anleitungen zur schnellen Konfiguration einiger Funktionen, 

wie  zum  Einrichten  von  Kennwörtern 

(Password 

Settings)

,  den  SNMP-Einstellungen 

(SNMP  Settings) 

und  den  Systemeinstellungen 

(System  Settings)

.  Wenn 

Sie  keine  Änderungen  geplant  haben,  klicken  Sie  auf 

Exit 

(Beenden)

,  um  den  Assistenten  zu  beenden  und 

auf  die  webbasierte  Management-Benutzeroberfläche 

zuzugreifen. Genaue Beschreibungen der Funktionen des 

Assistenten finden Sie in der Einführung zum Smart Wizard 

im Benutzerhandbuch.

SmartConsole

Das Dienstprogramm SmartConsole befindet sich auf der 

Installations-CD und ist ein Programm zur Suche von Smart 

Switches mit dem gleichen L2-Netzwerksegment, mit dem 

Ihr PC verbunden ist. Dieses Tool läuft nur auf Computern 

mit dem Betriebssystem Windows 2000, Windows XP oder 

Windows Vista x64/86. Sie können SmartConsole auf zwei 

Arten installieren: über das Installationsprogramm auf der 

Installations-CD oder manuell.

Hinweis:  Falls  auf  Ihrem  Computer  bereits  eine  Version 

von  SmartConsole  installiert  ist,  müssen  Sie  diese 

deinstallieren,  bevor  Sie  die  neueste  Version  von 

SmartConsole installieren können.

1. Option: Führen Sie die folgenden 

Schritte durch, um SmartConsole über 

das auf der Installations-CD vorhandene 

Installationsprogramm zu installieren.

1. Legen Sie die CD in das CD-ROM-Laufwerk ein.
2. Das Installationsprogramm wird automatisch geöffnet.
3. Klicken Sie auf die Schaltfläche

 Install SmartConsole 

Utility (SmartConsole installieren)

. Der daraufhin 

angezeigte Installationsassistent wird Sie durch den 

Installationsvorgang führen. 

4. Nachdem Sie SmartConsole erfolgreich installiert 

haben, können Sie das Dienstprogramm über 

Start 

> Programs (Programme) > D-Link SmartConsole 

Utility 

öffnen.

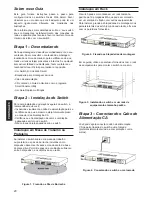
5. Schließen Sie den Smart Switch an das gleiche L2-

Netzwerksegment Ihres PC an, und führen Sie mit 

SmartConsole

 eine Suche nach Smart Switches 

durch.

2. Option: Führen Sie die folgenden Schritte 

durch, um das Dienstprogramm SmartConsole 

manuell zu installieren.

1. Legen Sie die CD in das CD-ROM-Laufwerk ein.
2. Wählen Sie die Option Computer vom Startmenü auf 

dem Windows Desktop.

3. Doppelklicken Sie auf Ihr CD-ROM/DVD-ROM-

Laufwerk, um das autorun-Menü zu starten, oder 

klicken Sie mit der rechten Maustaste auf das 

Laufwerk, um den Ordner zu öffnen. Wählen Sie das 

SmartConsole-Dienstprogramm und doppelklicken Sie 

auf die .exe Datei.

4. Befolgen Sie die Installationsanweisungen auf dem 

Bildschirm.

5. Klicken Sie nach Abschluss der Installation zum Starten 

des Dienstprogramms SmartConsole auf 

Start -> 

Programs (Programme) -> SmartConsole Utility

.

6. Schließen Sie den Smart Switch an das gleiche L2-

Netzwerksegment Ihres PC an, und führen Sie mit 

SmartConsole

 eine Suche nach Smart Switches durch.

Weitere  Informationen  zu  den  Funktionen  von 

SmartConsole  finden  Sie  im  Benutzerhandbuch  in  der 

Einführung zu SmartConsole.

Das Telnet-Management

Zugriff  auf  den  Switch  ist  auch  über  Telnet  mithilfe  der 

Eingabeaufforderungsfunktion  Ihres  PCs  möglich.  Dazu 

müssen  Sie  zunächst  sicherstellen,  dass  über  den 

Ethernet-Port des Switches und Ihrem PC eine Verbindung 

besteht.  Klicken  Sie  dann  auf  Ihrem  Computer  auf  Start 

>  Programme  >  Zubehör>  Eingabeaufforderung.  Sobald 

das  Console-Fenster  geöffnet  ist,  geben  Sie  den  Befehl 

telnet  10.90.90.90  (abhängig  von  der  konfigurierten  IP-

Adresse)  ein  und  drücken  Sie  auf  die  Eingabetaste  auf 

Ihrer  Tastatur.  Damit  wird  das  Hauptfenster  der  Console 

für die Befehlszeilen-Schnittstelle geöffnet. Geben Sie dort 

“admin” als standardmäßig vorgegebenen Benutzernamen 

und als Kennwort für den Switch ein und drücken Sie auf 

die Eingabetaste. 

Das SNMP-basierte Management

Die  Verwaltung  des  Switches  ist  auch  mit  D-View  von 

D-Link oder jedem SNMP-kompatiblen Programm möglich. 

Die  SNMP-Funktion  ist  jedoch  standardmäßig  für  Web 

Smart Switches von D-Link deaktiviert. 

Ergänzende Hinweise

Falls  es  bei  der  Konfiguration  des  Netzwerks  Probleme 

gibt, schlagen Sie am besten zuerst im Benutzerhandbuch 

nach.  Es  enthält  zusätzliche  Richtlinien,  Abbildungen, 

Erklärungen  und  Beispiele,  die  Sie  bei  Aufbau  und 

Inbetriebnahme Ihres Netzwerks unterstützen.
Weitere  Hilfe  erhalten  Sie  im  Internet  oder  bei 

unseren  Niederlassungen,  die  auf  der  Rückseite  des 

Benutzerhandbuchs  aufgelistet  sind.  Für  weitere 

Informationen  zu  den  Produkten  von  D-Link  sowie 

Marketing-Informationen besuchen Sie die Website http://

www.dlink.eu. Bei Support-Fragen gehen Sie ebenfalls auf 

diese Website http://support.dlink.com.tw. Hier werden Sie 

dann auf die entsprechende lokale D-Link-Seite geleitet.

Garantiebestimmungen

Informationen zur eingeschränkten Garantie auf
Lebenszeit für Produkte von D-Link finden Sie unter
http://warranty.dlink.com/

Содержание DGS-1210-28P

Страница 1: ...so available on CD and D Link Website Getting Started Guide Erste Schritte Guide de d marrage Guida introduttiva Gu a de introducci n Guia inicial Petunjuk Pemasangan Getting Started Guide For D Link...

Страница 2: ...inspect the power cord to see that it is secured fully to the AC power connector Make sure that there is proper heat dissipation and adequate ventilation around the switch Do not place heavy objects...

Страница 3: ...eb browser such as Netscape Navigator version 6 2 and higher or Microsoft Internet Explorer version 5 0 and higher You need the following equipment to begin the web configuration of your device A PC w...

Страница 4: ...u or right click on the Drive to open the folder Select SmartConsole Utility and double click on the exe file 4 Follow the on screen instructions to install the utility 5 Upon completion go to Start P...

Страница 5: ...gewissern Sie sich dass das Stromkabel unbesch digt ist und achten Sie auf den festen Sitz der Steckverbindungen Sorgen Sie f r eine funktionierende W rmeableitung und eine ausreichende Bel ftung in d...

Страница 6: ...Anzeigen berwachen und Statistiken grafisch ber einen Webbrowser anzeigen lassen z B mit Netscape Navigator Version 6 2 und h her oder Microsoft Internet Explorer Version 5 0 und h her Sie ben tigen d...

Страница 7: ...tarten oder klicken Sie mit der rechten Maustaste auf das Laufwerk um den Ordner zu ffnen W hlen Sie das SmartConsole Dienstprogramm und doppelklicken Sie auf die exe Datei 4 Befolgen Sie die Installa...

Страница 8: ...don d alimentation et assurez vous qu il est parfaitement reli au connecteur d alimentation secteur V rifiez que le switch pr sente une dissipation de chaleur adapt e et qu il est entour d un espace s...

Страница 9: ...eb Netscape Navigator version 6 2 ou sup rieure ou Microsoft Internet Explorer version 5 0 ou sup rieure par exemple Pour commencer la configuration Web de votre unit vous avez besoin des l ments suiv...

Страница 10: ...et double cliquez sur le fichier exe 4 Pour installer l utilitaire suivez les instructions affich es l cran 5 Une fois l installation termin e s lectionnez D marrer Tous les programmes D Link SmartCon...

Страница 11: ...e de alimentaci n para comprobar que est correctamente conectado al conector de alimentaci n AC Se asegure de que alrededor del switch el calor se disipa correctamente y se ventila adecuadamente No si...

Страница 12: ...por medio de un navegador web como Netscape Navigator versi n 6 2 o superior o Microsoft Internet Explorer versi n 5 0 o superior Para realizar la configuraci n web del dispositivo necesita el equipo...

Страница 13: ...a abrir la carpeta Seleccione la utilidad SmartConsole y haga doble clic en el archivo exe 4 Siga las instrucciones que aparecen en la pantalla para instalar la utilidad 5 Tras completarlo vaya a Inic...

Страница 14: ...Verificare che attorno allo switch ci sia lo spazio sufficiente per un adeguata ventilazione e dissipazione del calore Non posizionare oggetti pesanti sopra lo switch Installazione su un ripiano o una...

Страница 15: ...alizzare graficamente le statistiche utilizzando un browser come Netscape Navigator versione 6 2 o superiore o Microsoft Internet Explorer versione 5 0 o superiore Requisiti necessari per la configura...

Страница 16: ...enu di esecuzione automatica o fare clic con il pulsante destro del mouse sull unit per aprire la cartella Selezionare SmartConsole Utility e fare doppio clic sul file exe 4 Seguire le istruzioni visu...

Страница 17: ...17 PYCC D Link Web Smart 1 D Link Web Smart SmartConsole 2 1 19 EIA 2 3 3 4...

Страница 18: ...ity IP Web Smart Web Based Management Utility SmartConsole Utility Telnet SNMP Web Web Netscape Navigator 6 2 Microsoft Internet Explorer 5 0 Web RJ 45 Ethernet Ethernet 1 Ethernet Ethernet 5 Ethernet...

Страница 19: ...martConsole 4 SmartConsole D Link SmartConsole Utility 5 Smart 2 SmartConsole Utility Smart 2 SmartConsole 1 CD ROM 2 Windows 3 CDRom DVD Rom SmartConsole exe 4 5 D Link SmartConsole Utility SmartCons...

Страница 20: ...para se certificar se de que o mesmo esteja totalmente preso ao conector de alimenta o CA Certifique que h dissipa o de calor e ventila o adequadas em torno do switch N o coloque objetos pesados sob...

Страница 21: ...e LEDs e exibir estat sticas graficamente utilizando um navegador web como o Netscape Navigator vers o 6 2 e superior ou Microsoft Internet Explorer vers o 5 0 e superior Voc necessita dos seguintes e...

Страница 22: ...na unidade para abrir a pasta Selecione o Utilit rio SmartConsole e clique duas vezes no ficheiro exe 4 Siga as instru es na tela para instalar o utilit rio 5 Ao concluir v para Iniciar Programas D Li...

Страница 23: ...23 D Link 1 D Link SmartConsole Utility program 2 AC 1 EIA 19 2 3 3 AC AC 4...

Страница 24: ...Utility IP Web Based Management Utility SmartConsole Utility Telnet SNMP Based Web based LED Netscape Navigator 6 2 Microsoft Internet Explorer 5 0 Web RJ 45 1 5 2 IP IP 10 90 90 90 IP 10 x y z x y 0...

Страница 25: ...y 5 L2 SmartConsole Utility 2 SmartConsole Utility 1 Utility 2 Windows 3 CD ROM DVD ROM SmartConsole exe 4 Utility 5 D Link SmartConsole Utility SmartConsole Utility 6 L2 SmartConsole Utility SmartCon...

Страница 26: ...power untuk melihat apakah kabel power sudah terpasang dengan benar ke colokan listrik Pastikan ada ruang untuk pelepasan panas dan ventilasi yang cukup disekitar switch Jangan menaruh benda yang bera...

Страница 27: ...ara in band menggunakan Telnet Pengguna juga dapat memilih Web based Management yang dapat diakses melalui sebuah browser web atau dari PC mana saja melalui SmartConsole Utility Jika anda hanya ingin...

Страница 28: ...da Drive untuk membuka folder Pilih SmartConsole Utility dan klik dua kali pada file exe 4 Ikuti langkah langkah yang tertera pada layar untuk memasang Utility 5 Setelah selesai pergi ke Start Program...

Страница 29: ...29 D Link D Link CD SmartConsole EIA 19...

Страница 30: ...sole IP Telnet SNMP Web Web LED Netscape Navigator 6 2 Microsoft Internet Explorer 5 0 RJ 45 5 PC IP 10 90 90 90 IP PC 10 x y z x y 0 254 z 1 254 255 0 0 0 W e b http 10 90 90 90 IP Enter 6 Web IP 10...

Страница 31: ...Install SmartConsole Utility 4 D Link SmartConsole Utility SmartConsole 5 SmartConsole 1 CD CD ROM 2 Windows 3 CD ROM DVD ROM autorun SmartConsole exe 4 5 D Link SmartConsole Utility SmartConsole 6 Sm...

Страница 32: ...32 D Link Web 1 D Link Web 2 4 SmartConsole Utility 2 1 EIA 19 2 3 3 AC 4...

Страница 33: ...IP WEB SmartConsole Utility Telnet SNMP Web Web Netscape Navigator 6 2 Microsoft Internet Explorer 5 0 Web RJ 45 1 5 2 IP IP 10 90 90 90 IP 10 x y z x y 0 254 z 1 254 Web http 10 90 90 90 IP Enter 6 W...

Страница 34: ...4 D Link SmartConsole Utility 5 Web L2 SmartConsole Utility 2 SmartConsole Utility 1 2 Windows 3 G D Link SmartConsole Utility D link SmartConsole Utility exe G 4 Utility 5 D Link SmartConsole Utility...

Страница 35: ...ings if any To reduce the risk of bodily injury electrical shock fire and damage to the device and other equipment observe the following precautions Power Sources Observe and follow service markings D...

Страница 36: ...y local Modificar o alterar el dispositivo Retirar la identificaci n del producto u otras notificaciones incluyendo las notificaciones de copyright y marcado de patente si fuera el caso Para reducir e...

Страница 37: ...n erkl rer herved at utstyret er i samsvar med de grunnleggende krav og vrige relevante krav i direktiv 1999 5 EF Instale la fuente de alimentaci n antes de proporcionar alimentaci n a la misma Descon...

Страница 38: ...ener m s informaci n acerca de nuestros productos y embalajes ecol gicos visite el sitio www dlinkgreen com La presenza di questo simbolo sul prodotto o sulla confezione del prodotto indica che in con...

Страница 39: ...ssigt ansvarlige produkter og emballage p www dlinkgreen com T m symboli tuotteen pakkauksessa tarkoittaa ett paikallisten lakien ja s nn sten mukaisesti t t tuotetta ei pid h vitt yleisen kotitalousj...

Страница 40: ...icense applies to most of the Free Software Foundation s software and to any other program whose authors commit to using it Some other Free Software Foundation software is covered by the GNU Library G...

Страница 41: ...ange or b Accompany it with a written offer valid for at least three years to give any third party for a charge no more than your cost of physically performing source distribution a complete machine r...

Страница 42: ...DATA BEING RENDERED INACCURATE OR LOSSES SUSTAINED BY YOU OR THIRD PARTIES OR A FAILURE OF THE PROGRAM TO OPERATE WITH ANY OTHER PROGRAMS EVEN IF SUCH HOLDER OR OTHER PARTY HAS BEEN ADVISED OF THE POS...

Страница 43: ...43 NOTES...

Страница 44: ...44 NOTES...

Страница 45: ...45 NOTES...

Страница 46: ...46 NOTES...

Страница 47: ...47 NOTES...

Страница 48: ...Ver 2 04 WW 2012 10 26 290726001210286...

Отзывы: