background image

12

D-Link DCS-2330L User Manual

Section 1: Product Overview

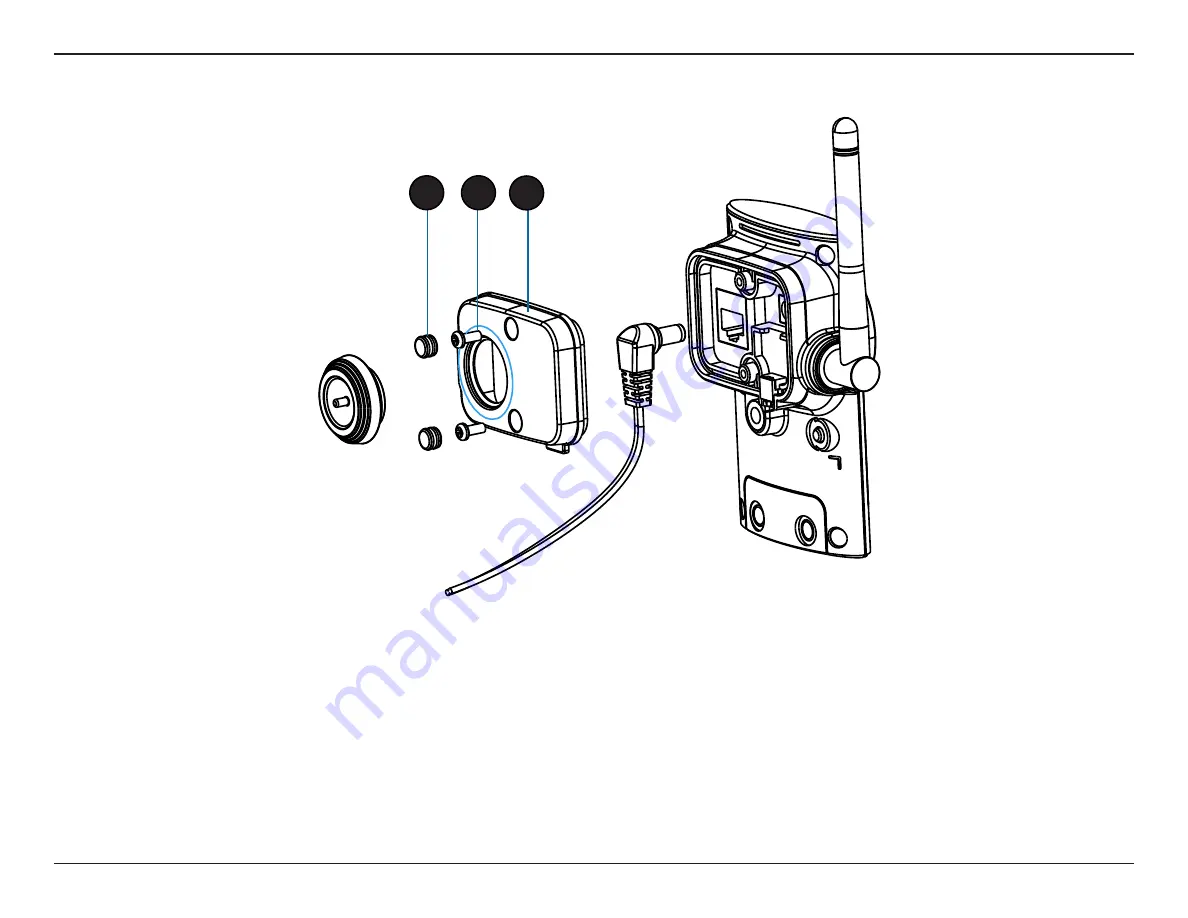
Reattaching the Top Panel

Step 1: 

Seat the protective panel, ensuring a tight fit with the inlaid rubber seal.

Step 2:

Replace the two screws. Ensure that the screws are tightened firmly.

Step 3: 

Firmly replace the protective rubber screw coverings.

Note: 

To ensure that the camera stays weatherproof, users are advised to ensure that all the rubber seals are secured firmly in place.

3

2

1

Содержание DCS-2330L

Страница 1: ...User Manual HD Wireless Outdoor Cloud Camera Version 1 01 04 22 2014 DCS 2330L...

Страница 2: ...scription 1 00 December 12 2013 DCS 2330L Revision A1 with firmware version 1 00 1 01 April 22 2014 DCS 2330L Revision A1 with firmware version 1 01 Trademarks D Link and the D Link logo are trademark...

Страница 3: ...Panel 14 Installation 16 Zero Configuration Setup 16 Camera Installation Wizard 19 Windows Users 19 Mac Users 20 Manual Hardware Installation 21 mydlink 22 Configuration 23 Using the Configuration In...

Страница 4: ...please contact your reseller Note Using a power supply with a different voltage than the one included with your product will cause damage and void the warranty for this product DCS 2330L HD Wireless...

Страница 5: ...C Notebook over your local network or through the Internet via a web browser The simple installation and intuitive web based interface offer easy integration with your Ethernet Fast Ethernet or 802 11...

Страница 6: ...he world Many applications exist including industrial and public monitoring of homes offices banks hospitals child care centers and amusement parks Remote Monitoring Utility The D ViewCam application...

Страница 7: ...nd switches between color and infrared accordingly 3 Microphone Records audio from the surrounding area 4 PIR Passive Infrared sensor for motion detection 5 IR LED Infrared LED illuminates the camera...

Страница 8: ...the MicroSD Card slot and reset button 4 Weatherproof Screw Covering Weatherproof protective covering for enclosure screws 5 Power Cable Receptacle Connects to the included DC 5 V power adapter 6 WPS...

Страница 9: ...d to the included DC 5 V power adapter 2 RJ45 Ethernet Port RJ45 connector for Ethernet 3 Reset Button Use a paperclip or similar tool to press and hold the recessed button for 10 seconds to reset the...

Страница 10: ...t surface Step 2 Carefully pry out the two protective rubber screw coverings using a thin flat blade Step 3 Undo the two screws using a Philips 00 Screwdriver Step 4 Lift off the protective panel Note...

Страница 11: ...e weatherproof cable connection cover Step 4 Attach the weatherproof cable connection cover to the new Ethernet cable Step 5 Plug the new Ethernet cable into the RJ45 connector Step 6 Follow the steps...

Страница 12: ...nsuring a tight fit with the inlaid rubber seal Step 2 Replace the two screws Ensure that the screws are tightened firmly Step 3 Firmly replace the protective rubber screw coverings Note To ensure tha...

Страница 13: ...Lift off the protective panel If you need to install an SD Memory Card please skip to Installing an SD Memory Card on page 14 Using the Reset Button Step 1 Follow the steps outlined in Removing the B...

Страница 14: ...Firmly replace the protective rubber screw coverings Note To ensure that the camera stays weatherproof users are advised to ensure that all the rubber seals are secured firmly in place Installing an...

Страница 15: ...ease refer to your router s User Manual The DCS 2330L will automatically create a wireless connection to your router While connecting the status LED will flash When the connection process is complete...

Страница 16: ...ourmydlink enabledCloudRouterandZeroConfigurationwillautomaticallyconfigureyourDCS 2330L and automatically add the camera to your mydlink account After the short time it takes to do this you can remot...

Страница 17: ...gured details Make a note of the details and click Yes to add the camera to your account Check Your mydlink Account Open a web browser and login to your mydlink account The mydlink page will check for...

Страница 18: ...a to your router wirelessly you can simply disconnecttheEthernetcableandmovethecameratoitsintendedlocation your router s wireless settings have been automatically transferred to the camera and no furt...

Страница 19: ...ourCloudCameratogothroughtheSetupWizard whichwillguideyoustep by stepthroughtheinstallation process from connecting your hardware to configuring your camera and registering it with your mydlink accoun...

Страница 20: ...e Within 20 30 seconds the Setup Wizard will open which will guide you step by step through the installation process from connecting your hardware to configuring your camera and registering it with yo...

Страница 21: ...ps Note In order to use the mydlink features of this product you will need to go through the Camera Setup Wizard Connect the Ethernet Cable Carefully remove the rubber seal on the back of the DCS 2330...

Страница 22: ...emotely access your camera from the www mydlink com website After signing in to your mydlink account you will see a screen similar to the following For more details on using your camera with mydlink g...

Страница 23: ...uilt in Web configuration utility is designed to allow you to easily access and configure your DCS 2330L At the end of the wizard enter the IP address of your camera into a web browser such as Mozilla...

Страница 24: ...motion feature for your camera must be enabled Recording Indicator When a recording is in progress this indicator will change color Control Pad This control pad can be used to electronically pan tilt...

Страница 25: ...Set a Storage Folder Listen Stop Audio In from microphone This window indicates the total field of view FOV of the camera The red box indicates the visible region of interest ROI You may select the i...

Страница 26: ...may click Manual Internet Connection Setup to manually configure your Network Camera and skip to Network Setup on page 32 To quickly configure your Network Camera s motion detection settings click Mot...

Страница 27: ...Connection Setup Wizard This wizard will guide you through a step by step process to configure your new D Link Camera and connect the camera to the internet Click Next to continue Note Select DHCP if...

Страница 28: ...o continue Select Static IP if your Internet Service Provider has provided you with connection settings or if you wish to set a static address within your home network Enter the correct configuration...

Страница 29: ...at all events will be triggered as scheduled Click Next to continue If you have selected DHCP you will see a summary of your settings includingthecamera sIPaddress Pleasewritedownallofthisinformation...

Страница 30: ...cify the detection sensitivity and adjust the camera s ability to detect movement You may specify whether the camera should capture a snapshot or a video clip when motion is detected Please see Motion...

Страница 31: ...choose not to receive notifications or to receive notifications via e mail or FTP Please enter the relevant information for your e mail or FTP account Click Next to continue Step 4 You have completed...

Страница 32: ...omatically If you choose DHCP you do not need to fill out the IP address settings You may obtain a static or fixed IP address and other network information from your network administrator for your cam...

Страница 33: ...ideo mjpg where is the number of the stream You may use a PC with a secure browser to connect to the HTTPS port of the camera The default port number is 443 Depending on your network security requirem...

Страница 34: ...y policy to ensure a consistent Quality of Service during busy periods If the Network Camera is connected to a router that itself implements QoS the router s settings will override the QoS settings of...

Страница 35: ...he wireless access point you wish to use Use the drop down box to select the mode of the wireless network you wish to connect to Infrastructure is normally used to connect to an access point or router...

Страница 36: ...save your changes Enable DDNS Server Address Host Name User Name Password Timeout Status Select this checkbox to enable the DDNS function Select your Dynamic DNS provider from the pull down menu or e...

Страница 37: ...he camera image to draw a mask area Right clicking on the camera image brings up the following menu options Disable All Disables all mask areas Enable All Enables all mask areas Reset All Clears all m...

Страница 38: ...reate 3 different custom exposure modes The Max Gain setting will allow you to control the maximum amount of gain to apply to brighten the picture This setting controls the amount of noise reduction t...

Страница 39: ...e video to 4 3 standard or 16 9 widescreen Set the video codec to be used to JPEG or H 264 Frame size determines the total capture resolution and View window area determines the Live Video viewing win...

Страница 40: ...h utilization is desired regardless of the video quality choose Constant bit rate and select the desired bandwidth The bps will affect the bit rate of the video recorded by the camera Higher bit rates...

Страница 41: ...e This selects which video profile to use You may select a value between 0 and 64 0 is the slowest and 64 is the fastest Use these buttons to move to a specific part of the viewing area which you can...

Страница 42: ...eset name will appear in the list followed by the dwell time to view that preset for You can rearrange your presets in the sequence by selecting a preset in the sequence then clicking the arrow button...

Страница 43: ...magesthatwouldindicatemotion Please enter a value between 0 and 100 Specifies the amount of motion in the window being monitored that is required to initiate an alert If this is set to 100 motion is d...

Страница 44: ...d the trigger by option under SD recording Video Clip or Snapshot should also be selected Enable Sound Detection Detection Level Select this box to enable the sound detection feature of your camera Sp...

Страница 45: ...Select your time zone from the drop down menu Select this to enable Daylight Saving Time Select this option to allow your camera to configure the Daylight Saving settings automatically Selecting this...

Страница 46: ...t devices When an event is triggered a specified action will be performed You can configure the Network Camera to send snapshots or videos to your e mail address or FTP site ex Motion detection Period...

Страница 47: ...ons Server Media Event Recording 1 To add a new item event server or media click Add A screen will appear and allow you to update the fields accordingly 2 To delete the selected item from the pull dow...

Страница 48: ...uration for the target e mail server account Enter the configuration for the target FTP server account Specify a network storage device Only one network storage device is supported Use the camera s on...

Страница 49: ...onpage39formoreinformation on video profiles Set the number of pre event images to take Pre event images are images taken before the main event snapshot is taken Set the number of post event images to...

Страница 50: ...mation on video profiles This sets how many seconds to record before the main event video clip starts You can record up to 4 seconds of pre event video Set the maximum length of video to record for yo...

Страница 51: ...rity will be executed first Select the delay time before checking the next event It is being used for both events of motion detection and digital input trigger Specify the input type that triggers the...

Страница 52: ...volume between 1MB and 2TB for recording space The recording data will replace the oldest record when the total recording size exceeds this value For example if each recording file is 6MB and the tota...

Страница 53: ...ng Time of each file for recording File Name Prefix If this is selected files will be separated based on the file size you specify If this is selected files will be separated based on the maximum leng...

Страница 54: ...ture video folders If the picture files are stored on the SD card click on the picture folder and choose the picture file you would like to view If video files are stored on the SD card click on the v...

Страница 55: ...needed Day mode enables the IR Cut Filter Night mode disables the IR Cut Filter Set up the Day Night mode using a schedule The camera will enter Day mode at the starting time and return to Night mode...

Страница 56: ...ection Create Certificate Method Status Note Enable the HTTPS service Choose the way the certificate should be created Three options are available Create a self signed certificate automatically Create...

Страница 57: ...nges made Note A total of seven lists can be configured for both columns The ending IP Address of the devices such as a computer that have permission to access the video of the camera Remove the custo...

Страница 58: ...s account Add new user account The user name for the new account The password for the new account All the existing user accounts will be displayed here You may delete accounts included in the list but...

Страница 59: ...ou may save your current camera configuration as a file on your computer Locate a pre saved configuration by clicking Browse and then restore the pre defined settings to your camera by clicking Load C...

Страница 60: ...nload and save the latest firmware version from the D Link Support Page to your local hard drive Locate the file on your local hard drive by clicking the Browse button Select the file and click the Up...

Страница 61: ...61 D Link DCS 2330L User Manual Section 3 Configuration Status Device Info This page displays detailed information about your device and network connection...

Страница 62: ...330L User Manual Section 3 Configuration This page displays the log information of your camera You may download the information by clicking Download You may also click Clear to delete the saved log in...

Страница 63: ...63 D Link DCS 2330L User Manual Section 3 Configuration This page provides helpful information regarding camera operation Help...

Страница 64: ...zones Configurable shutter speed brightness saturation contrast and sharpness Video Compression Simultaneous H 264 MJPEG format compression H 264 multicast streaming JPEG for still images Video Resolu...

Страница 65: ...indows 8 7 Vista XP system Pocket PC or mobile phone mydlink mobile app for iOS and Android mobile devices D ViewCam System Requirements Operating System Microsoft Windows 8 7 Vista XP Web Browser Int...

Страница 66: ...66 D Link DCS 2330L User Manual Appendix A Technical Specifications Dimensions 105 146 8 66 85 45 7 8 1 188 8 lc 8464 DCS 2330L...

Отзывы: