background image

31

D-Link DCS-2210L/UPA User Manual

Section 4: Configuration

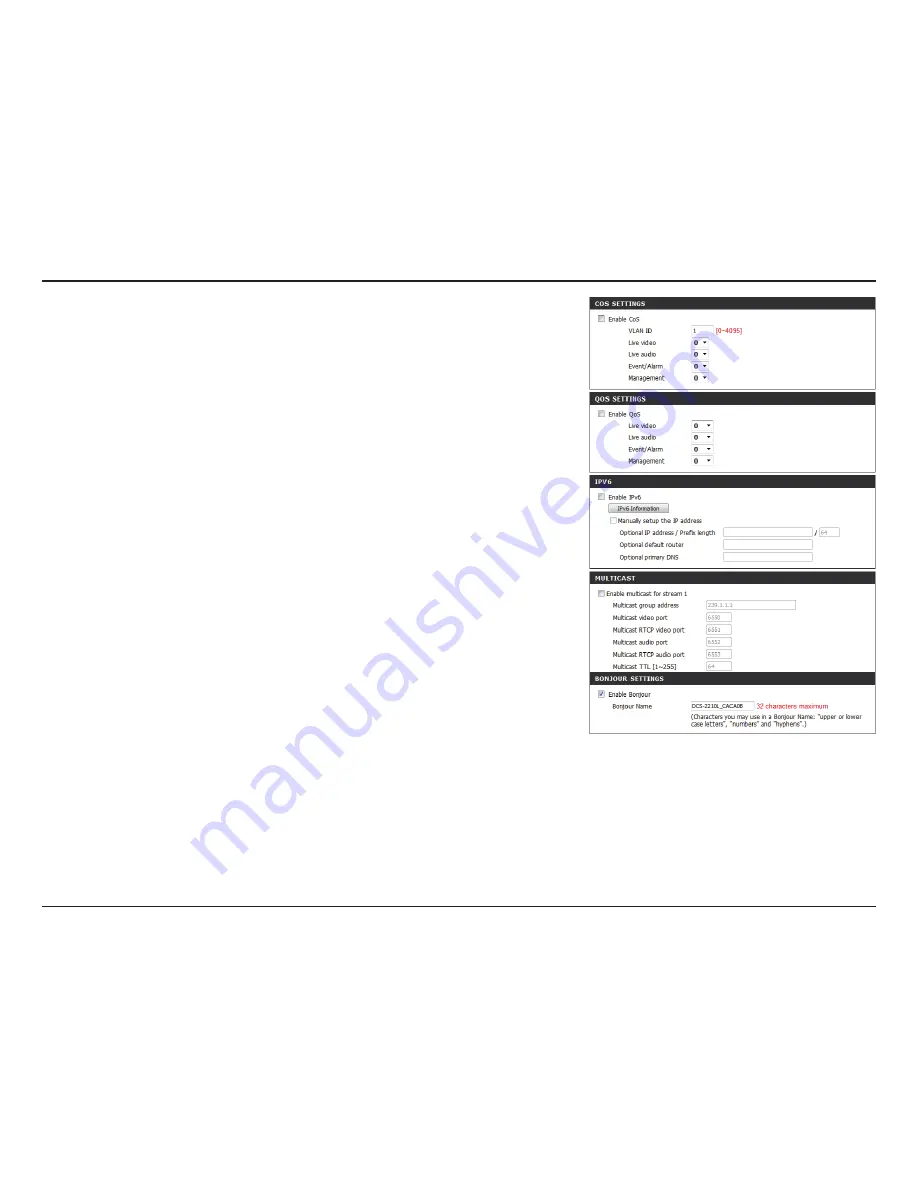
Enable CoS:

Enable QoS:

Enable IPV6:

Enable Multicast for stream:

Enable Bonjour:

Enabling the Class of Service setting implements a 

best-effort policy without making any bandwidth 

reservations.

Enabling QoS allows you to specify a traffic priority 

policy to ensure a consistent Quality of Service during 

busy periods. If the DCS-2210L is connected to a router 

that itself implements QoS, the router's settings will 

override the QoS settings of the camera.

Enable the IPv6 setting to use the IPv6 protocol. Enabling 

the option allows you to manually set up the address, 

specify an optional IP address, specify an optional router 

and an optional primary DNS.

The DCS-2210L allows you to multicast each of the 

available streams via group address and specify the TTL 

value for each stream. Enter the port and TTL settings 

you wish to use if you do not want to use the defaults.

Enable Bonjour to broadcast to network devices 

(such as iPhones) using this protocol. You can enter a 

custom Bonjour Name for the router in the text box for 

identification.

Содержание DCS-2210L/UPA

Страница 1: ...User Manual Full HD PoE Day Night Network Camera Version 1 00 11 11 2014 DCS 2210L UPA...

Страница 2: ...ion Manual Revisions Revision Date Description 1 0 October 21 2014 Version A1 with firmware version 1 00 Trademarks D Link and the D Link logo are trademarks or registered trademarks of D Link Corpora...

Страница 3: ...ion 17 Mount the Camera 18 mydlink 19 Configuration 20 Using the Configuration Interface 20 Live Video 21 Setup 23 Setup Wizard 23 Network Setup 29 Dynamic DNS 32 Image Setup 33 Audio and Video 35 Pre...

Страница 4: ...Manual Section 1 Product Overview Product Overview Package Contents If any of the above items are missing please contact your reseller DCS 2210L Full HD PoE Day Night Network Camera CAT5 Ethernet cab...

Страница 5: ...100 Ethernet Broadband Internet connection Web based Configuration Utility Requirements Computer with the following Windows XP Vista 7 8 Linux based or Mac with OS X 10 6 or higher An installed Ethern...

Страница 6: ...ndings are To make things convenient support for Power over Ethernet PoE means you won t have to worry about available power outlets when setting up your camera on location Unlike a standard webcam th...

Страница 7: ...D ViewCam application adds enhanced features and functionality for the DCS 2210L and allows administrators to configure and access the DCS 2210L from a remote site via Intranet or Internet Other feat...

Страница 8: ...nate the camera s field of view at night 3 PIR Sensor Passive Infrared sensor for motion detection 4 Camera Lens Records video of the surrounding area 5 Light Sensor The light sensor helps switch the...

Страница 9: ...r Audio output 3 Reset Button Press and hold this button for 10 seconds to reset the camera 4 Power Connector Connects to the DC 5 V power adapter not included in package 5 DI DO Connector I O connect...

Страница 10: ...10 D Link DCS 2210L UPA User Manual Section 1 Product Overview Side View 1 microSD Card Slot Insert a microSD card for Local storage for storing recorded image and video 1...

Страница 11: ...enabled Cloud Router and Zero Configuration will automatically configure your DCS 2210L and automatically add the camera to your mydlink account You can now remotely access your camera from the mydlin...

Страница 12: ...cally configured details Make a note of the details and click OK to add the camera to your account Check Your mydlink Account Fromanycomputer openawebbrowser gotohttp www mydlink comandlog into your a...

Страница 13: ...ur camera has been added to your mydlink account You can now view your camera on the mydlink Live View tab Your camera is now set up and you can skip to mydlink on page 19 to learn more about the mydl...

Страница 14: ...our Cloud Camera to go through the Setup Wizard which will guide you step by step through the installation process from connecting your hardware to configuring your camera and registering it with your...

Страница 15: ...CD drive On the desktop open your CD drive and double click on the SetupWizard file Within 20 30 seconds the SetupWizard will open which will guide you step by step through the installation process f...

Страница 16: ...ick Done Your DCS 2210L camera is now set up Log on to your mydlink account and explore the exciting benefits available to you Your camera is now set up and you can skip to mydlink on page 19 to learn...

Страница 17: ...you will need to go through the Camera Setup Wizard Connect the Ethernet Cable If using a Power over Ethernet PoE connection Connect the included Ethernet cable to the Ethernet port located on the ba...

Страница 18: ...the holes first insert the plastic anchors and then the screws 3 Place the mounting base over the screw that is mounted on the wall Make sure to fit the screw heads over the big holes and slide it do...

Страница 19: ...to remotely access your camera from the www mydlink com website After signing in to your mydlink account you will see a screen similar to the following For more details on using your camera with mydli...

Страница 20: ...built in web configuration utility is designed to allow you to easily access and configure your DCS 2210L At the end of the wizard enter the IP address of your camera into a web browser such as Mozil...

Страница 21: ...video motion feature for your camera must be enabled Recording Indicator When a recording is in progress this indicator will change color Control Pad This control pad can be used to electronically pa...

Страница 22: ...le 2 Video Profile 3 Full screen mode Taking a Snapshot Record a Video Clip Set a Storage Folder Listen Stop Audio In from microphone Start Stop Audio Out to speaker Start Stop Digital Output This win...

Страница 23: ...you may click Manual Internet Connection Setup to manually configure your DCS 2210L and skip to Network Setup on page 29 To quickly configure your DCS 2210L s motion detection settings click Motion D...

Страница 24: ...t Connection Setup Wizard This wizard will guide you through a step by step process to configure your new D Link Camera and connect the camera to the Internet Click Next to continue Note Select DHCP i...

Страница 25: ...Enter the correct configuration information and click Next to continue If you are using PPPoE select Enable PPPoE and enter your User Name and Password otherwise click Next to continue If you have a...

Страница 26: ...that all events will be triggered as scheduled Click Next to continue If you have selected DHCP you will see a summary of your settings including the camera s IP address Please write down all of this...

Страница 27: ...and adjust the camera s ability to detect movement You may specify whether the camera should capture a snapshot or a video clip when motion is detected Please see the Motion Detection section on Motio...

Страница 28: ...y choose not to receive notifications or to receive notifications via e mail or FTP Please enter the relevant information for your e mail or FTP account Click Next to continue Step 4 You have complete...

Страница 29: ...camera to obtain an IP address automatically If you choose DHCP you do not need to fill out the IP address settings You may obtain a static or fixed IP address and other network information from your...

Страница 30: ...E Enter the username and password for your PPPoE account Re enter your password in the Confirm Password field You may obtain this information from your ISP The default port number is 80 The default na...

Страница 31: ...the router s settings will override the QoS settings of the camera EnabletheIPv6settingtousetheIPv6protocol Enabling the option allows you to manually set up the address specify an optional IP addres...

Страница 32: ...to save your changes Enable DDNS Server Address Host Name User Name Password Timeout Status Select this checkbox to enable the DDNS function Select your Dynamic DNS provider from the pull down menu or...

Страница 33: ...e to draw a mask area Right clicking on the camera image brings up the following menu options Disable All Disables all mask areas Enable All Enables all mask areas Reset All Clears all mask areas Clic...

Страница 34: ...create 3 different custom exposure modes The Max Gain setting will allow you to control the maximum amount of gain to apply to brighten the picture This setting controls the amount of noise reduction...

Страница 35: ...d or 16 9 widescreen Set the video codec to be used to MJPEG or H 264 JPEG can be selected for image mode Frame size determines the total capture resolution and View window area determines the Live Vi...

Страница 36: ...o quality choose Constant bit rate and select the desired bandwidth The bps will affect the bit rate of the video recorded by the camera Higher bit rates result in higher video quality Select the imag...

Страница 37: ...nce This selects which video profile to use You may select a value between 1 and 10 0 is the slowest and 10 is the fastest Use these buttons to move to a specific part of the viewing area which you ca...

Страница 38: ...The preset name will appear in the list followed by the dwell time to view that preset for You can rearrange your presets in the sequence by selecting a preset in the sequence then clicking the arrow...

Страница 39: ...difference between two sequential images that would indicate motion Please enter a value between 0 and 100 Specifies the amount of motion in the window being monitored that is required to initiate an...

Страница 40: ...ttings Select your time zone from the drop down menu Select this to enable Daylight Saving Time Select this option to allow your camera to configure the Daylight Saving settings automatically Selectin...

Страница 41: ...l input devices When an event is triggered a specified action will be performed You can configure the DCS 2210L to send snapshots or videos to your e mail address or FTP site To start plotting an even...

Страница 42: ...tions Server Media Event Recording 1 To add a new item event server or media click Add A screen will appear and allow you to update the fields accordingly 2 To delete the selected item from the pull d...

Страница 43: ...t e mail server account Enter the configuration for the target FTP server account Specify a network storage device Only one network storage device is supported Use the camera s onboard SD card storage...

Страница 44: ...n Audio and Video on page 35 for more information on video profiles Set the number of pre event images to take Pre event imagesareimagestakenbeforethemaineventsnapshot is taken Set the number of post...

Страница 45: ...more information on video profiles This sets how many seconds to record before the main event video clip starts You can record up to 4 seconds of pre event video Set the maximum length of video to rec...

Страница 46: ...iority will be executed first Select the delay time before checking the next event It is being used for events of motion detection digital input and PIR triggers Motion is detected during live video m...

Страница 47: ...UPA User Manual Section 4 Configuration Trigger D O Server Select to trigger the digital output for a specific number of seconds when an event occurs Specify the location where the event information...

Страница 48: ...t a HDD volume between 200 MB and 2 TB for recording space The recording data will replace the oldest record when the total recording size exceeds this value For example if each recording file is 6MB...

Страница 49: ...ding Time of each file for recording File Name Prefix If this is selected files will be separated based on the file size you specify If this is selected files will be separated based on the maximum le...

Страница 50: ...icture video folders If the picture files are stored on the SD card click on the picture folder and choose the picture file you would like to view If video files are stored on the SD card click on the...

Страница 51: ...ces and once triggered images will be taken and e mailed After making any changes click the Save Settings button to save your changes Digital Input Output Select D I or D O Mode The camera will send a...

Страница 52: ...elect the desired sensitivity level from the drop down menu Day mode enables the IR Cut Filter Night mode disables the IR Cut Filter SetuptheDay Nightmodeusingaschedule Thecamera will enter Day mode a...

Страница 53: ...tion Note Enable the HTTPS service Choose the way the certificate should be created Three options are available Create a self signed certificate automatically Create a self signed certificate manually...

Страница 54: ...seven lists can be configured for both columns TheendingIPAddressofthedevices suchasacomputer that have permission to access the video of the camera Click Add to save the changes made Remove the custo...

Страница 55: ...ntication Encryption Password Select this to enable SNMPv1 and 2 Enter a name for the read community of your SNMP server Enter a name for the write community of your SNMP server Select this to enable...

Страница 56: ...t Click Add to save the account The user name for the new account The password for the new account All the existing user accounts will be displayed here You may delete accounts included in the list bu...

Страница 57: ...ot You may save your current camera configuration as a file on your computer Locate a pre saved configuration by clicking Browse and then restore the pre defined settings to your camera by clicking Lo...

Страница 58: ...ownload and save the latest firmware version from the D Link Support Page to your local hard drive Locate the file on your local hard drive by clicking the Browse button Select the file and click the...

Страница 59: ...59 D Link DCS 2210L UPA User Manual Section 4 Configuration Status This page displays detailed information about your device and network connection Device Info...

Страница 60: ...0L UPA User Manual Section 4 Configuration This page displays the log information of your camera You may download the information by clicking Download You may also click Clear to delete the saved log...

Страница 61: ...61 D Link DCS 2210L UPA User Manual Section 4 Configuration This page provides helpful information regarding camera operation Help...

Страница 62: ...external relay a diode must be connected in parallel with the load for protection against voltage transients Max loading is 100 mA 2 Digital In DI A switch from DI to DC 5 V activated by setting NO o...

Страница 63: ...rightness saturation contrast and sharpness Video Compression Simultaneous H 264 MJPEG format compression H 264 multicast streaming JPEG for still images Video Resolution 16 9 Up to 30 fps at 1920 x 1...

Страница 64: ...ve to local hard drive or NAS via web browser Configuration interface accessible via web browser Mobile Support mydlink mobile app for iOS and Android mobile devices D ViewCam System Requirements Oper...

Страница 65: ...65 D Link DCS 2210L UPA User Manual Appendix B Technical Specifications Dimensions...

Страница 66: ...nstallation If this equipment does cause harmful interference to radio or television reception which can be determined by turning the equipment off and on the user is encouraged to try to correct the...

Страница 67: ...mation applicable to products purchased outside the United States please contact the corresponding local D Link office Industry Canada Notice This device complies with RSS 210 of the Industry Canada R...

Отзывы: