background image

13

D-Link DCS-1100/1130 User Manual

Section 3 - Installation

Hardware Installation

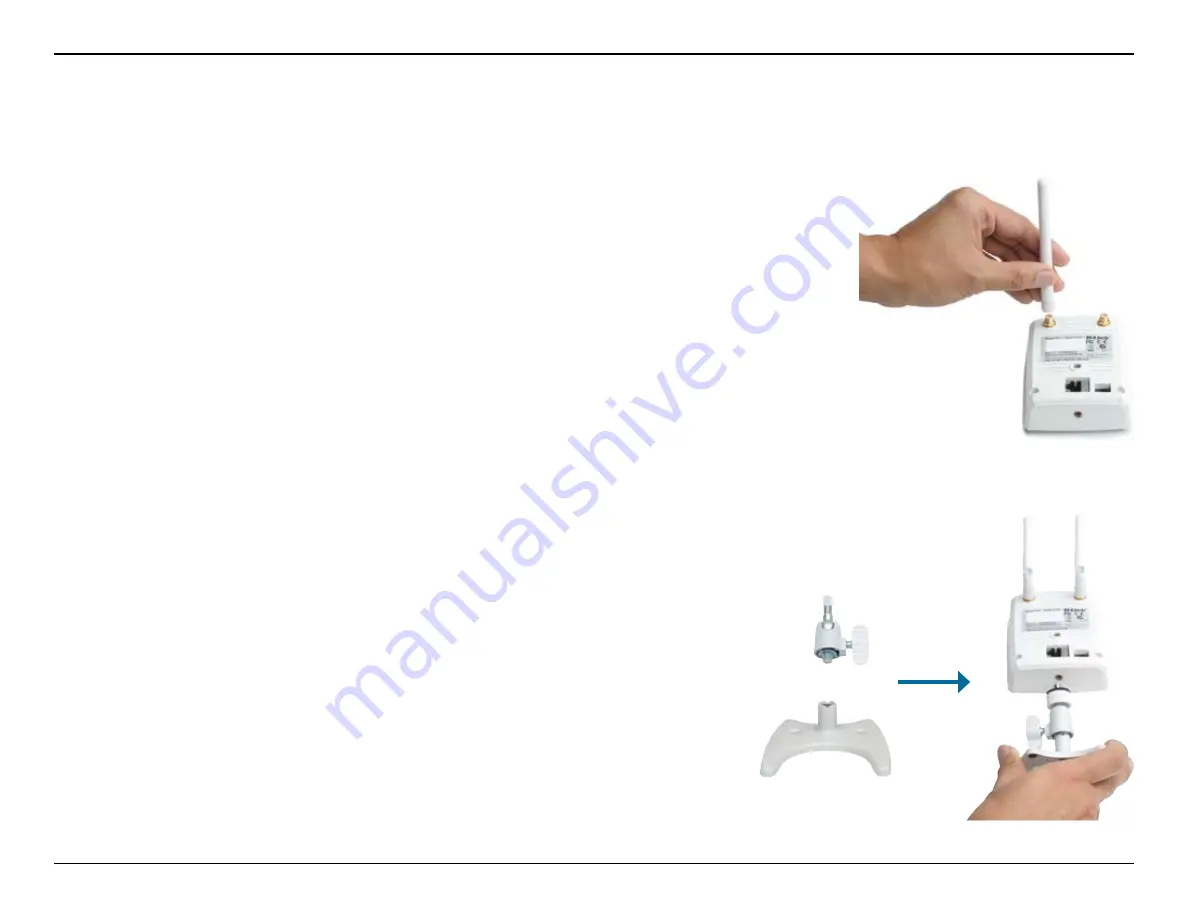
Attach the Antennas (DCS-1130 only)

Screw the wireless antennas onto the antenna connectors.  

Connect the Camera to the Camera Base

1. Screw the two camera base pieces together.

2. Screw the camera base into the mounting point on either the back  

or the bottom of the camera and tighten the collar.

You can adjust the angle and pivot of the camera by loosening the 

wheel and retightening it after moving it to the desired position.

Содержание DCS-1100

Страница 1: ......

Страница 2: ...ortal provides detailed information on usage and configuration of your product with www mydlink com page 7 Section 3 Installation describes how to install the camera on your network page 12 Section 4...

Страница 3: ...ion Manual Revisions Trademarks D Link and the D Link logo are trademarks or registered trademarks of D Link Corporation or its subsidiaries in the United States or other countries All other company o...

Страница 4: ...mera Base 13 Connect the Ethernet Cable 14 Connect the Power Adapter 14 Connecting to a Wireless Network Using WPS DCS 1130 15 Using the Configuration Menu 16 Web based Configuration Utility 17 Live V...

Страница 5: ...DCS 1100 1130 User Manual Table of Contents Appendix A Installing the DCS 1100 1130 on a Router Without UPnP 43 Appendix B Technical Specifications 49 Contacting Technical Support 51 Warranty 52 Regis...

Страница 6: ...with remote monitoring and motion detection features for a complete and cost effective home security solution Product Overview Remotely monitor your home or office over the Internet Web based Recordi...

Страница 7: ...standard Web browser administrators can configure and manage the Network Camera directly from its own Web page via the Intranet or Internet This means you can access your DCS 1100 1130 anytime from a...

Страница 8: ...CAT5 Ethernet Cable Camera Base and Mounting Kit Quick Installation Guide CD ROM Package Contents Note Using a power supply with a different voltage rating than the one included with the DCS 1100 113...

Страница 9: ...ActiveX controls enabled Web based Configuration Utility Requirements Computer with the following Windows based operating system An installed Ethernet adapter Browser Requirements Internet Explorer 6...

Страница 10: ...when pressed for 10 seconds WPS Button DCS 1130 Allows you to connect to a WPS router Focus ring Turning the ring will allow you to focus the camera Camera microphone Picks up sound from the surround...

Страница 11: ...view Back Power jack Connects to the power adapter Ethernet port Connects to a PC or network through an Ethernet connection Antenna connectors DCS 1130 Connects to the wireless antennas Camera base mo...

Страница 12: ...al After registering your DCS 1100 1130 camera with a mydlink account in the Camera Installation Wizard You will be able to remotely access your camera from the www mydlink com website After signing i...

Страница 13: ...tly cannot be accessed remotely If your camera is offline try the following Check to make sure that the Internet connection to your camera is working properly Try restarting your Internet router Check...

Страница 14: ...n the Live Video tab will be selected by default If the camera is available a Live Video feed will be displayed Video will be shown at VGA resolution 640x480 if viewing your camera from a PC on the sa...

Страница 15: ...dlink Portal Camera Settings The Camera Settings tab allows you to access your camera s configuration interface To open your camera s configuration interface click Camera web page and enter the passwo...

Страница 16: ...camera s configuration interface Clicking on the Show Password checkbox will either show or hide the password Clicking on the Password will open a window for you to log in to your camera s configurati...

Страница 17: ...M drive to start the autorun program The CD ROM will open the Camera Installation Wizard Simply click Start to go through the Installation Wizard which will help you through the entire installation pr...

Страница 18: ...antenna connectors Connect the Camera to the Camera Base 1 Screw the two camera base pieces together 2 Screw the camera base into the mounting point on either the back or the bottom of the camera and...

Страница 19: ...the cable to an available LAN port on your router or broadband modem Attach the power adapter to the power jack located on the back of the DCS 1100 1130 and connect the power adapter to a power outle...

Страница 20: ...n on your router within 60 seconds The WPS button is usually on the front or side of your router On some routers you may need to log in to the web interface and then click on an onscreen button to act...

Страница 21: ...ur DCS 1100 1130 At the end of the wizard click Go To Camera or enter the IP address of your camera into a web browser such as Internet Explorer To log in use the User name admin and the password you...

Страница 22: ...D Link DCS 1100 1130 User Manual Section 4 Configuration Web based Configuration Utility Use the following sections to set up and configure your network camera LIVE VIDEO SETUP MAINTENANCE STATUS HEL...

Страница 23: ...rage Folder button Set Storage Folder You can change the folder where the video recordings will be saved Start Stop Audio This button toggles the built in microphone on and off allowing you to hear au...

Страница 24: ...motion detection and snapshots Simply follow the instructions given in each step of the wizard to quickly set up your camera Alternatively you can manually set up your Internet connection by clicking...

Страница 25: ...the IP address information for your camera IP Address Enter the IP address the camera should use Subnet Mask Enter the subnet mask that the camera should use Default Gateway Enter the default gateway...

Страница 26: ...set to 554 You may change the port number if using multiple cameras Note You MUST also set up your router gateway for Port Forwarding Mapping this will enable remote viewing of your camera via the Int...

Страница 27: ...oc mode select the channel of the wireless network you wish to connect to or select Auto Authentication Select the authentication you use on your wireless network Open Shared WEP WPA PSK or WPA2 PSK E...

Страница 28: ...update your DDNS server every time it receives a different IP address Depending on the service this update may take a few hours Enable DDNS Check this checkbox to enable the DDNS function of the came...

Страница 29: ...e camera sensor s setting to avoid the image flickering under certain light sources such as florescent lights This is set to 60Hz by default White balance You can change the white balance of the camer...

Страница 30: ...ill provide better quality video When the Encode Type is set to MJPEG you cannot change the bps setting Also available bps settings may change depending on what the Encode Type Sensor Output Resolutio...

Страница 31: ...when Night Mode is enabled and the camera is viewing a low light scene Light Source Here you can set the kind of lighting used in the area your camera is monitoring to improve the image quality of th...

Страница 32: ...nsitivity This setting adjusts how sensitive the camera will be to motion where 100 will be the most sensitive setting and 0 will be the least sensitive setting Drawing Mode This will allow you to dra...

Страница 33: ...ng Offset This will set the Daylight Saving adjustment that will be used Daylight Saving Date This will set the beginning and ending dates of the Daylight Saving period Synchronize with NTP Server Che...

Страница 34: ...ba drive for verification Server Enter the name or the IP of the server where your Samba drive is located Shared Folder Enter the name of your shared folder Test Click this button to make a connection...

Страница 35: ...aved Event Based Event based recording will allow you to record video when specific events happen Motion detection triggered recording Enabling this option will set the camera to record video when mot...

Страница 36: ...whenever motion is detected Continuous FTP only This will set the camera to take snapshots continuously at intervals specified in FTP Server Interval below You can only save to an FTP server when taki...

Страница 37: ...he username or login name for your e mail account Password Enter the password for your e mail account SMTP Mail Server Enter the SMTP server for your e mail account Sender E mail Address Enter the e m...

Страница 38: ...Enter the file path to the location on the FTP server you want to send snapshots to Filename Prefix Enter the prefix you want to attach to your snapshot files Port Enter the port used by the FTP serve...

Страница 39: ...new admin password again for verification After entering the new password again click on the Save button to save your changes Add User Account The admin can create user accounts to allow others to lo...

Страница 40: ...a Name Enter the name of your camera Enable OSD This will enable the information bar On Screen Display OSD to appear when viewing video Label This is the text label that will appear on the OSD Show ti...

Страница 41: ...o save the current configuration to a hard drive Load From Local Hard Drive To load a saved configuration click on the Browse button to select a configuration file from your hard drive Then click the...

Страница 42: ...the latest firmware to your computer s hard drive Click on Browse select the firmware file then click the Upload button While the firmware is being upgraded do not turn off your computer or camera and...

Страница 43: ...38 D Link DCS 1100 1130 User Manual Section 4 Configuration Status This screen shows you various information about your camera and its current settings Status Device Info...

Страница 44: ...0 User Manual Section 4 Configuration The log shows you a list of events that have happened recently You can download the log by clicking the Download button or you can empty the log by clicking the C...

Страница 45: ...40 D Link DCS 1100 1130 User Manual Section 4 Configuration Help The Help screen provides you with support information about the DCS 1100 1130 for your reference...

Страница 46: ...ss simply go through the Camera Installation Wizard included on the Installation CD that came in your package You can also download the wizard from the following websites DCS 1100 http dcs 1100 mydlin...

Страница 47: ...here another way to access my camera remotely over the Internet Yes you can access your camera over the Internet through the following URL after successfully installing your camera through the Camera...

Страница 48: ...ish to connect or if you do not want to use DMZ follow these steps to allow multiple remote access to your cameras 1 Identify your camera on the network 2 Assign a local IP address and port for your c...

Страница 49: ...local IP address is required to configure your camera and to view your camera within your local network You may use the default camera IP address of 192 168 0 20 If you wish to use a different IP addr...

Страница 50: ...run a Web server or your ISP blocks access on port 80 you MUST open a second port and designate a new Web server port 800 801 802 etc Similarly if port 554 is not available you will need to open a di...

Страница 51: ...to clarify the configuration process Note Because a dynamic WAN IP address can change from time to time depending on your ISP you may want to obtain a Static IP address from your ISP A Static IP addre...

Страница 52: ...a s IP address in the private local IP field Select TCP under Traffic Type Enter the HTTP port your camera is set to use in the Start and End settings Note If you are using more than one camera you wi...

Страница 53: ...3gpp For example if your camera s IP is 192 168 0 35 and you set the RTSP port to 100 rtsp 192 168 0 35 100 3gpp To access your camera from a computer on your local home network simply enter the local...

Страница 54: ...Supports Full Duplex operation MDI MDIX auto negotiation 802 3x Flow Control support for Full Duplex mode Wireless Connectivity DCS 1130 only 802 11 n g Wireless with WEP WPA WPA2 Security WPS Support...

Страница 55: ...240VAC 50 60Hz Output 5VDC 2 5A Powered by an external power adapter Maximum power consumption DCS 1100 4W DCS 1130 6 3W Dimensions WxDxH 120 0mm x 81 5mm x 38 0mm without bracket and stand Weight DC...

Страница 56: ...ardware Revision located on the label on the bottom of the Network Camera e g rev A1 Serial Number s n number located on the label on the bottom of the Network Camera You can find software updates and...

Страница 57: ...nder this Limited Warranty will be at D Link s option to repair or replace the defective Hardware during the Warranty Period at no charge to the original owner or to refund the actual purchase price p...

Страница 58: ...ensee for the non conforming Software will be refunded by D Link provided that the non conforming Software and all copies thereof is first returned to D Link The license granted respecting any Softwar...

Страница 59: ...nd return shipping charges for any product that is not packaged and shipped in accordance with the foregoing requirements or that is determined by D Link not to be defective or non conforming What Is...

Страница 60: ...OLE REMEDY FOR A BREACH OF THE FOREGOING LIMITED WARRANTY IS REPAIR REPLACEMENT OR REFUND OF THE DEFECTIVE OR NONCONFORMING PRODUCT THE MAXIMUM LIABILITY OF D LINK UNDER THIS WARRANTY IS LIMITED TO TH...

Страница 61: ...er Connect the equipment into an outlet on a circuit different from that to which the receiver is connected Consult the dealer or an experienced radio TV technician for help FCC Caution Any changes or...

Страница 62: ...ce and 2 this device must accept any interference received including interference that may cause undesired operation IMPORTANT NOTE Radiation Exposure Statement This equipment complies with IC radiati...

Страница 63: ...pendix E Registration 58 D Link DCS 1100 1130 User Manual Version 1 3 March 03 2009 Product registration is entirely voluntary and failure to register will not diminish your warranty rights Registrati...

Отзывы: