background image

Click on “Modify” button to display the modification page as below, where user will be able to 

modify CVID member list translation rule of any specific ports. Simply use the dropdown list 

to choose the desired option and click “Apply” to save the settings.

3.2.3

DSL Profile Configuration

3.2.3.1

Profile

3.2.3.1.1 Line Profile 

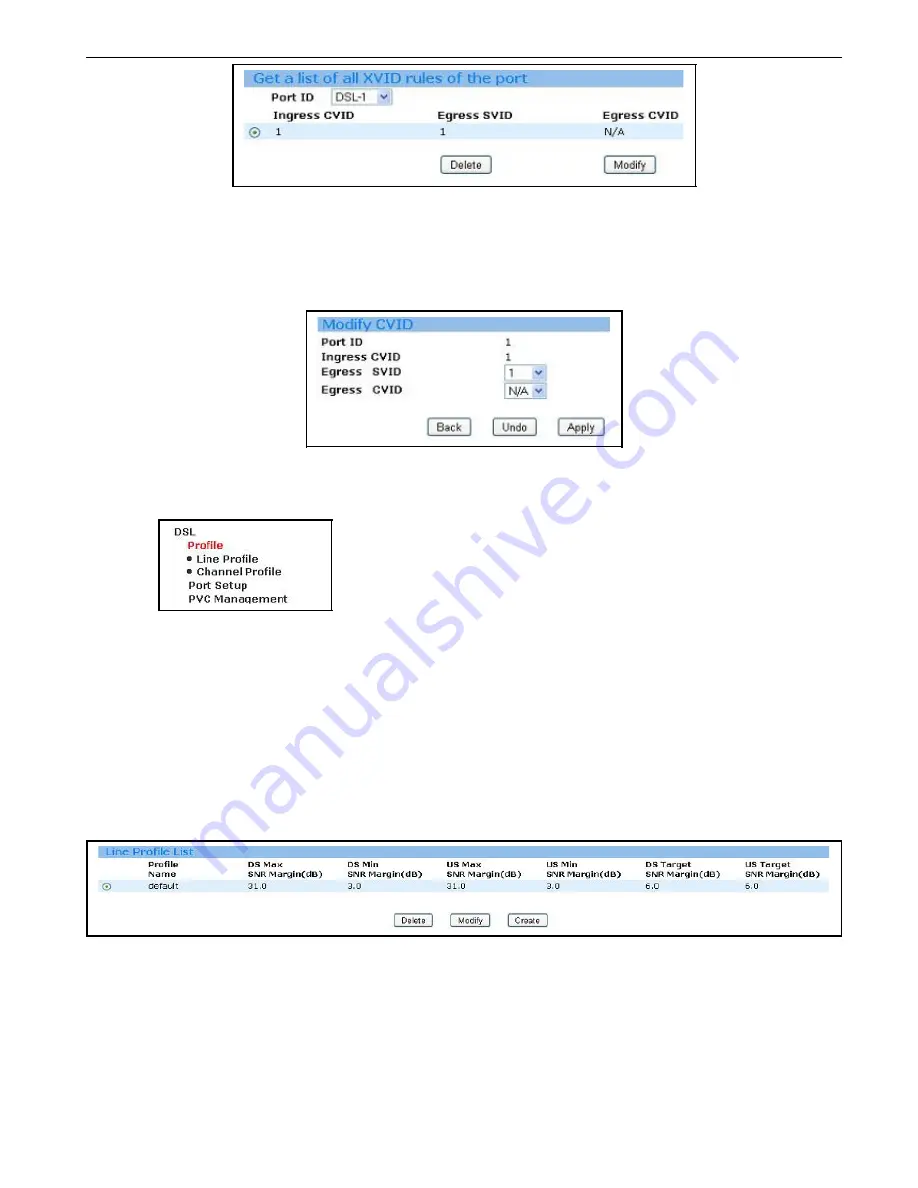
This page displays the Line profiles and allows the user to manage the DSL line profiles. 

Each DSL port has a unique profile assigned to it at any given time. User can configure 

multiple profiles, including profiles for troubleshooting. User can configure many DSL ports 

with the same profile; instead of configure the settings of each DSL port one-by-one. 

Click “Line Profile” under DSL Profile of the Configuration menu to display the following page. 

For the creation or modification, simply enter the desired values to the corresponding fields 

and click “Apply” to save the changes.

Note:

 Default profile cannot be modified.

22

Содержание DAS-3224

Страница 1: ...DAS 3224 3248 User Manual Version 1 0 RECYCLABLE ...

Страница 2: ...AMENDMENT HISTORY Version Date Description V1 0 May 2014 New release 2 ...

Страница 3: ...5 Firmware Update 15 3 1 6MANAGEMENT USERS 16 3 1 7SYSTEM LOG 17 3 1 7 1 Syslog Sender Config 17 3 1 7 2 Syslog Log 18 3 1 8 Image List Selection 18 3 2CONFIGURATION 19 3 2 1 Ethernet 19 3 2 1 1 Interface Setup 19 3 2 1 2Management IP 20 3 2 2 Bridge Features 20 3 2 2 1 Bridge Configuration 20 3 2 2 2 XVID 21 3 2 3 DSL Profile Configuration 22 3 2 3 1 Profile 22 3 2 3 1 1 Line Profile 22 3 2 3 1 2...

Страница 4: ...tion 41 3 3 4 3 2 Timer Information 42 3 3 5 DLI Setup 42 3 3 6 SNTP 43 3 3 6 1 TimeZone 43 3 3 7 STP RSTP 45 3 3 7 1 STP RSTP Info 45 3 3 7 2 STP RSTP Port 45 3 3 8 802 1x 46 3 3 8 1 Server List 46 3 3 8 2 Port List 47 3 4STATUS 47 3 4 1 Bridge 47 3 4 1 2 Forwarding Database 48 3 4 2 DSL 48 3 4 2 1 Line Status 48 3 4 2 2 Channel Status 49 3 4 3 Ethernet Status 49 3 5MAINTENANCE 50 3 5 1 Ethernet ...

Страница 5: ...rest on the power cord and do not locate the product where the power cord can be stepped on Do not touch exposed connections components or wiring when power is present 6 To reduce the risk of fire or any other malfunction and damages to the DAS 3224 3248 use the cables and power adapter provided in the package 7 Following installation and the final configuration the product must comply with the ap...

Страница 6: ...t and most advanced broadband technology for residential and business customers DAS 3224 3248 IP DSLAM promises to deliver downstream up to 25 Mbps and upstream up to 1 Mbps traffic on short copper loops DAS 3224 3248 is designed to support the wide deployment of triple play features and offers the user many advanced services such as voice high speed data and video on demand Another benefit of DAS...

Страница 7: ...IP Ether Type and port λ Packet size 64 bytes to 1522 bytes λ IGMPv1 v2 v3 snooping and proxy λ PPPoE Intermediate Agent λ DHCP L2 Relay TR101 Appendix B λ IEEE 802 1x λ STP 802 1D RSTP 802 1W λ SNTP Client λ SysLog Client ADSL ADSL2 ADSL2 Interface λ ADSL ADSL2 ADSL2 Downstream DMT data rate of 32 kbps up to 25 Mbps Upstream DMT data rate of 32 kbps up to 1 Mbps λ Comply with the ITU G 992 1 G DM...

Страница 8: ...ports or One port is for uplink and another one for downlink stacking port 2 1 3 Electrical Ethernet Port UP1 and UP2 RJ45 Two automatic MDI MDI X 1000 100 10 BASE T Ports Two uplink ports or One port is for uplink and another one for downlink stacking port 8 Pin Signal Name 1 Transmit Data plus TD1 2 Receive Data minus RD1 3 Transmit Data plus TD2 4 Transmit Data plus TD3 5 Receive Data minus RD3...

Страница 9: ... 37 DSL PSTN 12 R 13 DSL PSTN 13 T 38 DSL PSTN 13 R 14 DSL PSTN 14 T 39 DSL PSTN 14 R 15 DSL PSTN 15 T 40 DSL PSTN 15 R 16 DSL PSTN 16 T 41 DSL PSTN 16 R 17 DSL PSTN 17 T 42 DSL PSTN 17 R 18 DSL PSTN 18 T 43 DSL PSTN 18 R 19 DSL PSTN 19 T 44 DSL PSTN 19 R 20 DSL PSTN 20 T 45 DSL PSTN 20 R 21 DSL PSTN 21 T 46 DSL PSTN 21 R 22 DSL PSTN 22 T 47 DSL PSTN 22 R 23 DSL PSTN 23 T 48 DSL PSTN 23 R 24 DSL P...

Страница 10: ...maged With AC power supply With DC power supply 10 DAS 3224 3248 ADSL2 IP DSLAM AC Power Cord Using a power supply with a different voltage rating will damage and void the warranty for this product DAS 3224 3248 ADSL2 IP DSLAM Using a power supply with a different voltage rating will damage and void the warranty for this product ...

Страница 11: ...g topics from the menu on the left hand side of the main window System the System section lets you carry out system commands like Firmware Update System Reboot Save Config and Recall Config Configuration information about the current configuration of various system features with options to change the basic configuration Advanced information about the current configuration of various system feature...

Страница 12: ... Configuration Backup Restore Firmware Update Management Users System Log and Image List Selection They will be introduced in the following sections 3 1 1 System Information This page simply shows the basic information of the device User will be able to enter the desired information for the device and click on Apply to save the settings 12 ...

Страница 13: ...Complex Programmable Logic Device LinuxVersion Version of embedded Linux CPSwVersion Version of Control Plan software CPSwVersion build Time built of Control Plan software DP Version Software version information System Time Time of the device Time Zone Setting the time to the desired time zone DST Daylight Saving Time 3 1 2 System Reboot Click System Reboot under the System Menu to display the pag...

Страница 14: ...he following confirmation message window is displayed 3 1 4 Backup Restore In the Backup Restore page as shown below user will be able to restore or backup the configuration Click on the Browse button to choose the configuration file desired and click Restore to apply the changes Note You need to reboot the system to last configuration after restore the configuration file As for saving the current...

Страница 15: ...u click Firmware Update The following page will be displayed 2 Use the button to browse and select the file Click 3 The image file is uploaded to the RAM first and then moved to the flash non volatile memory A progress bar will show the updating progress When the progress is finished a pop up window will be shown as below 15 ...

Страница 16: ...ht cause the device to malfunction 3 1 6 Management Users This page allows the user to delete modify and create user accounts for managing the DAS 3224 3248 Click Management Users under System menu to display the following pages To delete an account Simply select the specific account and click the Delete button to delete Note Delete default user is not allowed To modify an account Select the speci...

Страница 17: ...elected Root is administrator can use All of system function Guest is guest can check read only of system function 3 1 7 System Log It records the messages generated from the system stores them and analyzes them 3 1 7 1 Syslog Sender Config This page allows the user to create or delete syslog send server Click Syslog Sender Config under System Log of the System menu to display the following image ...

Страница 18: ...re system event log User will be able to check the event history under this section User can click Reload to refresh the page for updated events or click Reset to clear the past events To display the following page simply click Syslog Log of the System Log under the System menu 3 1 8 Image List Selection This page allows the user to display repository image version and to change repository User ca...

Страница 19: ...he specific Ethernet Interfaces Click the Interface Setup of the Ethernet under Configuration menu to display the page Simply select the desired Interface and click Modify to enter the modification page Fill in the desired data for the corresponding fields and click Apply to save the changes 19 ...

Страница 20: ...h1 or eth2 then press Create button to save the settings 3 2 2 Bridge Features 3 2 2 1 Bridge Configuration This page allows the user to modify the Bridge information for the each DSL port Simply select the desired DSL port and click Modify to enter the modification page Once the modification page displayed enter the desired information to the corresponding fields and click Modify to save the sett...

Страница 21: ... the default Service VLAN ID Valid values 1 4093 Default Priority Set 802 1p value for the port valid value 0 7 Default Priority Mode Untagged mean no 802 1p priority tag traffic All forward any 802 1p priority tag traffic Learning Mode The state of learning on this bridge port which is used to learn VLAN ID Valid values disable enable Port Type Type of the port User or TLS Transparent Line Servic...

Страница 22: ...s the user to manage the DSL line profiles Each DSL port has a unique profile assigned to it at any given time User can configure multiple profiles including profiles for troubleshooting User can configure many DSL ports with the same profile instead of configure the settings of each DSL port one by one Click Line Profile under DSL Profile of the Configuration menu to display the following page Fo...

Страница 23: ... of the Configuration menu to display the following page and allow user to manage them For the creation or modification simply enter the desired values to the corresponding fields and click Apply to save the changes Note Default profile cannot be modified 23 ...

Страница 24: ...3 2 3 2 Port Setup 3 2 3 2 1 Interface The Line interface page allows user to disable enable each DSL port 24 ...

Страница 25: ...25 ...

Страница 26: ... any specific Line Profile simply select the corresponding option button and click Apply to change 3 2 3 2 3 Channel Setup This page allows the user to display the profile mapping information as well as let the user to apply other channel profile to specified DSL port Click Channel Profile under DSL of the Configuration menu to display the following page To modify any specific Channel Profile simp...

Страница 27: ...3 2 3 3 PVC Management The VC management interface provides the modification of the virtual channel and encapsulation type 27 ...

Страница 28: ...Modify 3 2 4 VLAN 3 2 4 1 VLAN Setup This page allows the user to create modify and delete the information of the VLANs Click VLAN Setup of VLAN under the Configuration menu to display the page below 28 ...

Страница 29: ...ect on the desired VLAN and click on the Modify button to display the creation or modification page Then enter the desired information to the corresponding fields and click Apply to save the changes Create Modify 2 2 4 2 VLAN Attachment This page allows the user to attach any specific VLAN ID to the bridge port Click VLAN 29 ...

Страница 30: ...ect the desired VLAN ID and click on the Modify button to display the modification page Choose the desired option from the dropdown list and check the desired checkbox and then click on the Apply to save the settings 3 2 5 QoS In this page user can configure Quality of Service QoS policies for classification 30 ...

Страница 31: ...on the desired Ingress ID and click on the Modify button to display the creation or modification page Then enter the desired information to the corresponding fields and click Create or Modify to save the changes accordingly Modify Create 3 2 5 1 2 Policer Attachment In this page user can attach detach a policer to from the port ID 31 ...

Страница 32: ...Attach a policer to a port ID 3 2 5 2 Egress 3 2 5 2 1 Contract Setup Modify Create 32 ...

Страница 33: ...View button to view the detail of the profile Create 3 2 5 2 3 PQBlock Setup This page allows user to create a priority queue block Simply choose the bridge port and desired profile name and press Apply button to apply the settings 33 ...

Страница 34: ...ay the page below First click Create PBV Group ID then it will increase the PBV ID value automatic Then use the dropdown list to select which PBV ID to modify Next click the Create or Modify button to edit the rule for that specific PBV ID as the page below Finally select the desired option and click Apply to make the changes Field Description PBV ID PBV Group Index Valid values 1 15 EtherType Eth...

Страница 35: ...ic bridge ports Simply select which bridge port to modify first by choosing the option in the dropdown list Then click Attach button to display the attaching page as below Again simply use the dropdown list to select the desired PBV ID to attach and click Apply to save the settings 3 3 Advanced 3 3 1 Protocol Enable 3 3 1 1 Protocol Setup This page allows the user to get a list of all DFC accelera...

Страница 36: ...P and DHCP packet as below Simply use the dropdown list to select the desired options to enable and click Apply to create the Filter Group 3 3 1 2 Protocol Attachment Then attach any specific group ID by clicking on the Protocol Attachment page Simply check the desired option from the checkbox and click Apply to save the settings 36 ...

Страница 37: ...3 3 2 SNMP 3 3 2 1 SNMP HOST Setup This page allows the user to create the SNMP HOST List Click SNMP HOST Setup of SNMP under the Advanced menu to display the page below 37 ...

Страница 38: ...user to create the SNMP TrapHost List Click SNMP TrapHost Setup of SNMP under the Advanced menu to display the page below To add a new TrapHost Address simply click the Create button to enter the creation page as below Enter the desired value into the corresponding fields and click Apply to save the settings 3 3 4 IGMP 3 3 4 1 IGMP ACL Setup This page allows the user to create the IGMP ACL List Cl...

Страница 39: ...the creation page as below Enter the desired value into the corresponding fields and click Apply to save the settings 3 3 4 2 IGMP Group List 3 3 4 2 1 Group List This page allows the user to create the IGMP Group List Click Group List of IGMP Group List under the Advanced menu to display the page below 39 ...

Страница 40: ...To add a new Group member simply click the Edit button to enter the creation page as below Enter the desired value into the corresponding fields and click Apply to save the settings 40 ...

Страница 41: ...ation 3 3 4 3 1 General Information This page shows all the general information of the IGMP Click General Information in the IGMP Information of IGMP under the Advanced menu to display the page below To modify the general information click the Modify button to enter the modification page as below Simply select the desired option from the dropdown list and click Apply to save the settings 41 ...

Страница 42: ...ication page as below Simply select the desired option from the dropdown list and click Apply to save the settings 3 3 5 DLI Setup This page allows the user to setup the DLI Click DLI Setup under the advanced menu to display the page below Simply select the Subpot mode and Trusted Ports for the desired Bridge Port then give it the Circuit ID and Remote ID by entering the desired values into the co...

Страница 43: ...3 3 6 SNTP This page displays the SNTP server IP address and the status Click the SNTP under the Advanced menu to display the page below 3 3 6 1 TimeZone 43 ...

Страница 44: ...s below Simply enter the desired values into the fields and click Apply to save the settings To enable or disable the SNTP click the Modify button to enter the modification page as below Simply select the desired option from the dropdown list and click Apply to save the settings 44 ...

Страница 45: ... to display the page below To modify the STP Info click the Modify button to enter the modification page as below Simply enter the desired information and click Apply to save the settings 3 3 7 2 STP RSTP Port This page displays the general information of the STP Click the STP Info of STP RSTP under the Advanced menu to display the page below 45 ...

Страница 46: ...settings 3 3 8 802 1x 3 3 8 1 Server List This page displays the list of existing server information Click the Server List of 802 1X under the Advanced menu to display the page below To create a new 802 1X server click the Create button to enter the creation page as below Simply enter the desired values into the fields and click Apply to save the settings 46 ...

Страница 47: ...s the list of 802 1X port status Click the Port List of 802 1X under the Advanced menu to display the page below To modify the port status simply select the desired options and click Apply to save the settings 3 4 Status 3 4 1 Bridge 47 ...

Страница 48: ...Simply enter the matching criteria into the blank and click Search to sort 3 4 2 DSL 3 4 2 1 Line Status This page allows the user to choose and show the DSL line status of any specific DSL ports Click Line Status in DSL of the Status menu to display the following page To show the Line Status of particular bridge port simply select the corresponding option from the dropdown list to display it 48 ...

Страница 49: ...how the Channel Status of particular bridge port simply select the corresponding option from the dropdown list to display it 3 4 3 Ethernet Status This page allows the user to check the Ethernet Interface Status information Click Ethernet of the Status menu to display the following page To extract the most current status of the Ethernet interface simply click Refresh to display the most current st...

Страница 50: ...resent the page below Simply select the desired ETH interface name from the dropdown list to display the information 3 5 2 Bridge Statistics This page shows all the bridge statistics Click Bridge Statistics under Maintenance menu to present the page below Simply select the desired Bridge port ID from the dropdown list to display the information 50 ...

Страница 51: ...rent status 15 Minute Line Report This page displays the DSL Statistics Report of every 15 minutes of the current day Click 15 Minute Report of DSL Statistics under Maintenance menu to display the following page Simply select the desired Bridge Port ID as well as the Interval ID to display particular 15 Minutes Report of the current day Click Refresh to display the most current status 51 ...

Страница 52: ...vals Click 1 Day Report of DSL Statistics under Maintenance menu to display the following page Simply select the desired Bridge Port ID as well as the Interval ID to display report of the current day Click Refresh to display the most current status 3 5 4 Ing Policer Statistics 52 ...

Страница 53: ...e page below Simply select the desired Bridge Port ID from the dropdown list to display the information 3 4 5 2 IGMP Port Statistics This page shows all the IGMP Port Statistics Click IGMP Port Statistics of IGMP Statistics under Maintenance menu to present the page below 3 5 5 3 IGMP VLAN Statistics This page shows all the IGMP VLAN Statistics Click VLAN Member Statistics of IGMP 53 ...

Страница 54: ... below Simply select the desired Bridge Port ID from the dropdown list to display the information 3 5 6 DHCP Relay Statistics This page displays the DHCP relay statistics Click DHCP Relay Statistics under Maintenance menu to display the following page 54 ...

Отзывы: