background image

39

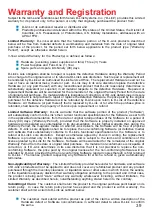
Subject to the terms and conditions set forth herein, D-Link Systems, Inc. (“D-Link”) provides this Limited

warranty for its product only to the person or entity that originally purchased the product from:

D-Link or its authorized reseller or distributor and

Products purchased and delivered within the fifty states of the United States, the District of

Columbia, U.S. Possessions or Protectorates, U.S. Military Installations, addresses with an

APO or FPO.

Limited Warranty:


D-Link warrants that the hardware portion of the D-Link products described

below will be free from material defects in workmanship and materials from the date of original retail

purchase of the product, for the period set forth below applicable to the product type (“Warranty

Period”), except as otherwise stated herein.

3-Year Limited Warranty for the Product(s) is defined as follows:

Hardware (excluding power supplies and fans) Three (3) Years
Power Supplies and Fans One (1) Year
Spare parts and spare kits Ninety (90) days

D-Link’s sole obligation shall be to repair or replace the defective Hardware during the Warranty Period

at no charge to the original owner or to refund at D-Link’s sole discretion.  Such repair or replacement will

be rendered by D-Link at an Authorized D-Link Service Office.  The replacement Hardware need not be

new or have an identical make, model or part.  D-Link may in its sole discretion replace the defective

Hardware (or any part thereof) with any reconditioned product that D-Link reasonably determines is

substantially equivalent (or superior) in all material respects to the defective Hardware.  Repaired or

replacement Hardware will be warranted for the remainder of the original Warranty Period from the date

of original retail purchase.  If a material defect is incapable of correction, or if D-Link determines in its sole

discretion that it is not practical to repair or replace the defective Hardware, the price paid by the original

purchaser for the defective Hardware will be refunded by D-Link upon return to D-Link of the defective

Hardware.  All Hardware (or part thereof) that is replaced by D-Link, or for which the purchase price is

refunded, shall become the property of D-Link upon replacement or refund.

Limited Software Warranty:  

D-Link warrants that the software portion of the product (“Software”)

will substantially conform to D-Link’s then current functional specifications for the Software, as set forth

in the applicable documentation, from the date of original retail purchase of the Software for a period of

ninety (90) days (“Warranty Period”), provided that the Software is properly installed on approved

hardware and operated as contemplated in its documentation. D-Link further warrants that, during the

Warranty Period, the magnetic media on which D-Link delivers the Software will be free of physical

defects.  D-Link’s sole obligation shall be to replace the non-conforming Software (or defective media)

with software that substantially conforms to D-Link’s functional specifications for the Software or to

refund at D-Link’s sole discretion.  Except as otherwise agreed by D-Link in writing, the replacement

Software is provided only to the original licensee, and is subject to the terms and conditions of the

license granted by D-Link for the Software.  Software will be warranted for the remainder of the original

Warranty Period from the date or original retail purchase.  If a material non-conformance is incapable of

correction, or if D-Link determines in its sole discretion that it is not practical to replace the non-

conforming Software, the price paid by the original licensee for the non-conforming Software will be

refunded by D-Link; provided that the non-conforming Software (and all copies thereof) is first returned

to D-Link.  The license granted respecting any Software for which a refund is given automatically

terminates.

Non-Applicability of Warranty:  

The Limited Warranty provided hereunder for hardware and software

of D-Link’s products will not be applied to and does not cover any refurbished product and any product

purchased through the inventory clearance or liquidation sale or other sales in which D-Link, the sellers,

or the liquidators expressly disclaim their warranty obligation pertaining to the product and in that case,

the product is being sold “As-Is” without any warranty whatsoever including, without limitation, the

Limited Warranty as described herein, notwithstanding anything stated herein to the contrary.

Submitting A Claim

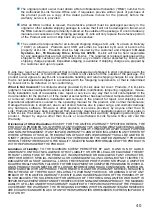
:  The customer shall return the product to the original purchase point based on its

return policy.  In case the return policy period has expired and the product is within warranty, the

customer shall submit a claim to D-Link as outlined below:

The customer must submit with the product as part of the claim a written description of the

Hardware defect or Software nonconformance in sufficient detail to allow D-Link to confirm

the same.

„

Warranty and Registration
„

„

„

„

„

Содержание AirPro DWL-AB650

Страница 1: ...Manual Building Networks for People 2 4GHz 5GHz Dual Band Multimode Wireless Cardbus Adapter DWL AB650 AirPro D Link TM...

Страница 2: ...ents 3 Introduction 4 Wireless Basics 6 Getting Started 10 Using the Configuration Utility 13 Networking Basics 18 Troubleshooting 31 Technical Specifications 36 Contacting Technical Support 38 Warran...

Страница 3: ...2 11a 802 11b Multimode Access Point e g DWL 6000AP or DI 764 or an 802 11a Access Point e g DWL 5000AP for Infrastructure Mode or an 802 11b Access Point e g DWL 900AP or an 802 11a wireless adapter...

Страница 4: ...eless networks at 54 Mbps 108 Mbps in proprietary Turbo mode or 802 11b wireless networks at 11Mbps The D Link AirPro DWL AB650 delivers the fastest IEEE standards based wireless technology in the ind...

Страница 5: ...ching Supports wireless data encryption with 64 bit WEP 128 bit WEP 802 11b and 152 bit WEP for security with Dynamic Keying for 802 11a transmissions Built in dual diversity antenna for better wirele...

Страница 6: ...ngly in both home and office environments and public areas such as airports coffee shops and universities Innovative ways to utilize WLAN technology are helping people to work and communicate more eff...

Страница 7: ...in locations where installation of wiring may be impractical Installation Speed and Simplicity Installing a wireless LAN system can be fast and easy and can eliminate the need to pull cable through w...

Страница 8: ...in most environments within the specified range of this device you will be able to transfer large files quickly or even watch a movie in MPEG format over your network without noticeable delays This te...

Страница 9: ...AirPro Wireless product s range from 3 90 feet 1 30 meters Position your devices so that the number of walls or ceilings is minimized 2 Be aware of the direct line between network devices A wall that...

Страница 10: ...re network contains an Access Point or Router The Infrastructure Network example shown on the following page contains the following D Link network devices your existing network may be comprised of oth...

Страница 11: ...ncluded with your router If you are connecting a desktop computer to your network install the D Link AirPro DWL AB520 wireless PCI adapter into an available PCI slot on your desktop computer You may a...

Страница 12: ...an IP Address to each computer on the Ad Hoc network See Box below When assigning IP Addresses to the computers on the network please remember that the IP Address for each computer must be in the sam...

Страница 13: ...the icon in your taskbar at the bottom right corner on the desktop If you wish to change the default settings or optimize the performance of the DWL AB650 D Link has included a configuration utility...

Страница 14: ...twork Default Key Select the default key Keys 1 4 Input up to 4 keys Key Length Select the key length 802 11b networks use 64 or 128 bit key lengths 802 11a networks use 64 128 or 152 bit key lengths...

Страница 15: ...k to which you wish to connect Select from the following options in the Advanced pop up window WLAN type to connect Infrastructure network only Choose this option to connect to Infrastructure networks...

Страница 16: ...isplays the signal strength Radio Status ON or OFF Turbo Mode Enable or Disable Disable is the default setting Click OK or Apply Click Apply to save the changes WEP Status Either Enable or Disable MAC...

Страница 17: ...xceeding the 2346 byte setting will be fragmented before transmission Request to Send threshold measures the value in bytes Any packet size exceeding 2346 will trigger the DWL AB650 to use RTS CTS mec...

Страница 18: ...oft Windows XP Note Please refer to websites such as http www homenethelp com and http www microsoft com windows2000 for information about networking computers using Windows 2000 ME or 98SE Go to Star...

Страница 19: ...ctions in this window Networking Basics Click Next In the following window select the best description of your computer If your computer connects to the internet through a gateway router select the se...

Страница 20: ...20 Enter a Computer description and a Computer name optional Networking Basics Click Next Enter a Workgroup name All computers on your network should have the same Workgroup name Click Next...

Страница 21: ...wait while the Network Setup Wizard applies the changes Networking Basics When the changes are complete click Next Please wait while the Network Setup Wizard configures the computer This may take a fe...

Страница 22: ...ct the option that fits your needs In this example Create a Network Setup Disk has been selected You will run this disk on each of the computers on your network Click Next Insert a disk into the Flopp...

Страница 23: ...the information under Here s how in the screen below After you complete the Network Setup Wizard you will use the Network Setup Disk to run the Network Setup Wizard once on each of the computers on yo...

Страница 24: ...ings will take effect when you restart the computer Click Yes to restart the computer You have completed configuring this computer Next you will need to run the Network Setup Disk on all the other com...

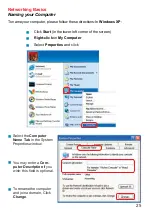
Страница 25: ...dows XP Click Start in the lower left corner of the screen Right click on My Computer Select Properties and click Select the Computer Name Tab in the System Properties window You may enter a Com puter...

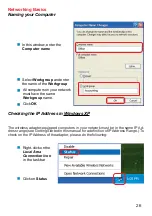
Страница 26: ...e Getting Started in this manual for a definition of IPAddress Range To check on the IPAddress of the adapter please do the following Right click on the Local Area Connection icon in the task bar Clic...

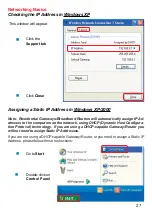
Страница 27: ...Routers will automatically assign IP Ad dresses to the computers on the network using DHCP Dynamic Host Configura tion Protocol technology If you are using a DHCP capable Gateway Router you will not n...

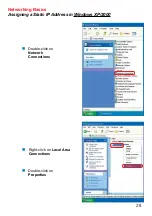
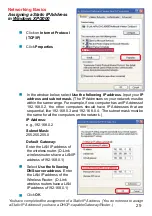
Страница 28: ...28 Networking Basics Assigning a Static IP Address in Windows XP 2000 Double click on Network Connections Double click on Properties Right click on Local Area Connections...

Страница 29: ...ss routers have a LAN IP address of 192 168 0 1 In the window below select Use the following IP address Input your IP address and subnet mask The IP Addresses on your network must be within the same r...

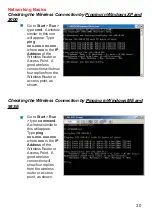
Страница 30: ...xx xxx xxx where xxx is the IP Address of the Wireless Router or Access Point A good wireless connection will show four replies from the Wireless Router or access point as shown Go to Start Run type c...

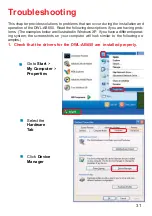
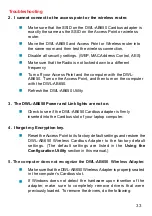
Страница 31: ...lutions to problems that can occur during the installation and operation of the DWL AB650 Read the following descriptions if you are having prob lems The examples below are illustrated in Windows XP I...

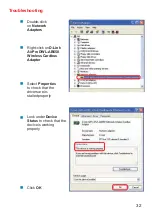
Страница 32: ...t click on D Link AirPro DWL AB650 Wireless Cardbus Adapter Select Properties to check that the drivers are in stalled properly Click OK D Link AirPro DWL AB650 Wireless Cardbus Adapter Look under Dev...

Страница 33: ...xactly the same as the SSID on the Access Point or wireless router Move the DWL AB650 and Access Point or Wireless router into the same room and then test the wireless connection Disable all security...

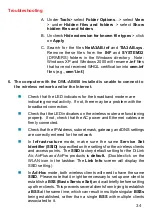
Страница 34: ...Check that the IPAddress subnet mask gateway and DNS settings are correctly entered for the network In Infrastructure mode make sure the same Service Set Identifier SSID is specified on the settings f...

Страница 35: ...onfigured properly Select AP Infrastructure when connecting to an access point and select Ad Hoc mode when connecting without an access point Double click on the WLAN icon in the taskbar click on Conf...

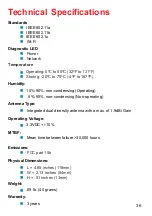
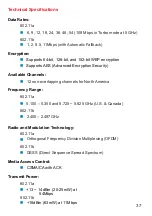
Страница 36: ...s 54mm H 51 inches 13mm Physical Dimensions 3 3VDC 10 Antenna Type Integrated dual diversity antenna with a max of 1 9dBi Gain Operating Voltage Power Network Diagnostic LED Temperature Operating 0 C...

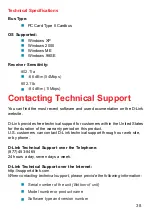
Страница 37: ...WEP encryption Supports AES Advanced Encryption Security 802 11b 6 9 12 18 24 36 48 54 108 Mbps in Turbo mode at 5 GHz CSMA CAwith ACK Media Access Control Orthogonal Frequency Division Multiplexing...

Страница 38: ...through our web site or by phone D Link Technical Support over the Telephone 877 453 5465 24 hours a day seven days a week D Link Technical Support over the Internet http support dlink com When contac...

Страница 39: ...specifications for the Software as set forth in the applicable documentation from the date of original retail purchase of the Software for a period of ninety 90 days Warranty Period provided that the...

Страница 40: ...on and removal of the product for repair and shipping costs Operational adjustments covered in the operating manual for the product and normal maintenance Damage that occurs in shipment due to act of...

Страница 41: ...ass B product In a domestic environment this product may cause radio interference in which case the user may be required to take adequate measures FCC Statement This equipment has been tested and foun...

Отзывы: