114
D-Link DIR-878 User Manual
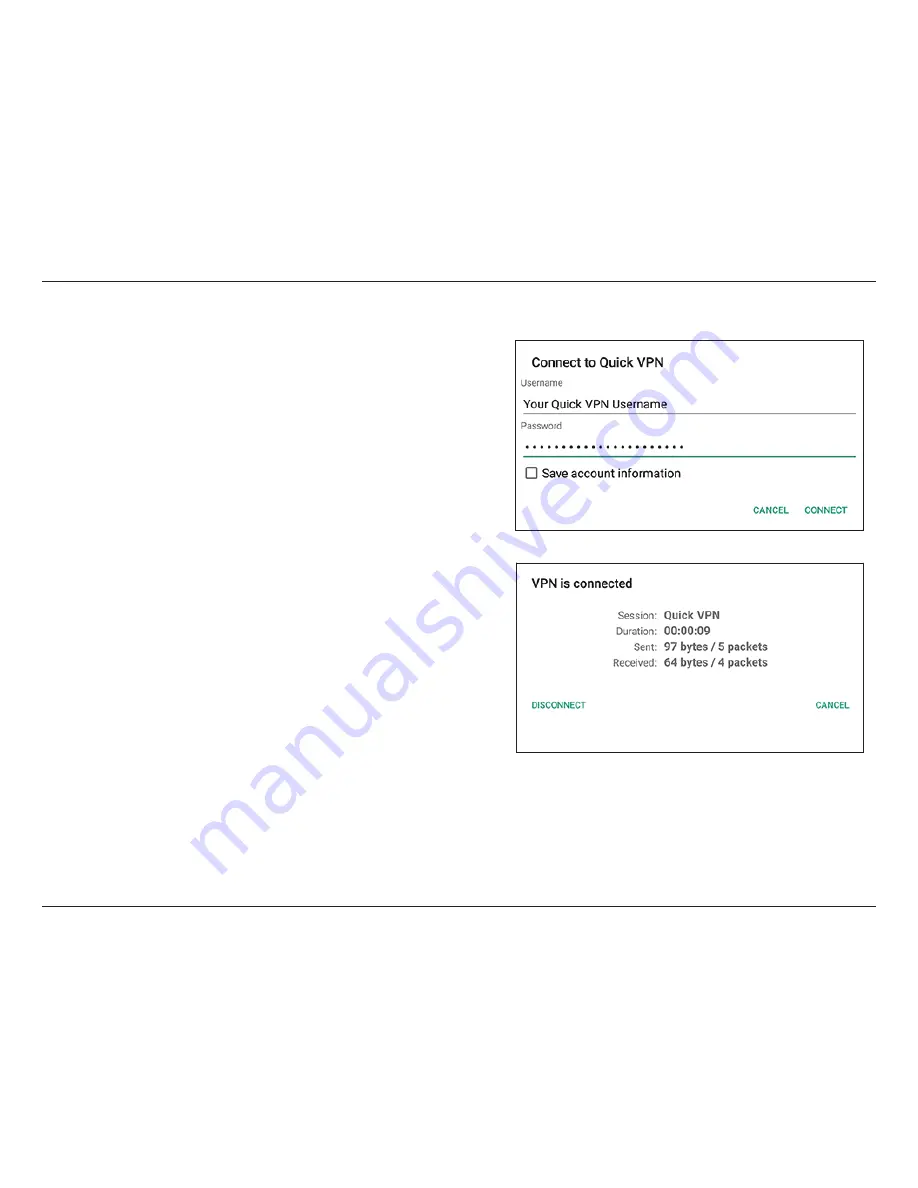
Section 5 - Quick VPN
To connect, enter your
Username
and
Password
and select
$0//&$5
.
To disconnect, select
%*4$0//&$5
Connect or Disconnect (Continued)
Страница 1: ...Version 1 01 2016 06 03 User Manual DIR 878 AC1900 MU MIMO Wi Fi Gigabit Router ...
Страница 2: ...er countries App StoreSM is a service mark of Apple Inc Chrome browser Google Play and Android are trademarks of Google Inc Internet Explorer Windows and the Windows logo are trademarks of the Microsoft group of companies Copyright 2016 by D Link Corporation Inc All rights reserved This publication may not be reproduced in whole or in part without prior expressed written permission from D Link Cor...
Страница 3: ...S Mobile App 14 Setup Wizard 19 Configuration 23 Home 24 Internet 24 DIR 878 25 Connected Clients 26 Settings 27 Wizard 27 Internet 27 IPv6 37 VLAN 57 Wireless 59 Guest Zone 62 Network 63 Features 65 QoS Engine 65 Firewall Settings 66 IPv4 IPv6 Rules 68 Port Forwarding 69 Virtual Server 70 Website Filter 71 Static Routes 72 IPv6 73 Dynamic DNS 74 IPv6 Host 75 Quick VPN 76 User 78 User continued 79...
Страница 4: ...Wireless Client to your Router 115 WPS Button 115 Windows 10 116 Windows 8 118 WPA WPA2 118 Windows 7 120 WPA WPA2 120 WPS 123 Windows Vista 127 WPA WPA2 128 Troubleshooting 130 Wireless Basics 134 What is Wireless 135 Tips 137 Wireless Modes 138 Networking Basics 139 Check your IP address 139 Statically Assign an IP address 140 Wireless Security 141 What is WPA 141 Technical Specifications 142 Re...
Страница 5: ...wersupplywithadifferentvoltageratingthantheoneincludedwiththeDIR 878willcausedamageandvoidthewarranty for this product If any of the above items are missing or damaged please contact your reseller DIR 878 Ethernet Cable Power Adapter Quick Installation Guide L L RQ JXUDWLRQ 1RWH Wi Fi Configuration Card ...
Страница 6: ...SBUJOH TZTUFN t O JOTUBMMFE UIFSOFU BEBQUFS Browser Requirements t OUFSOFU YQMPSFS PS IJHIFS t JSFGPY PS IJHIFS t 4BGBSJ PS IJHIFS t ISPNF PS IJHIFS Windows Users Make sure you have the latest version of Java installed Visit www java com to download the latest version QRS Mobile Requirements t J1IPOF J1BE J1PE 5PVDI OESPJE PS 8JOEPXT TNBSUQIPOF or tablet please refer to the mobile app s store page...
Страница 7: ...aces where you need them The DIR 878 s Smart Connect Technology makes connecting to wireless networks easy by eliminating the confusion of multiple networks Ever since the introduction of 5 GHz multi band wireless technology users have had to guess whether the 5 GHz or 2 4 GHz band network would provide them with better range and speed Smart Connect simplifies this by only presenting a single wire...
Страница 8: ...AC1900 MU MIMO Wi Fi Gigabit Router provides incredible speeds smart antenna technology fast ports cloud features and terrific security features It also features an innovative design and easy installation options 1 Maximum wireless signal rate derived from IEEE Standard 802 11a 802 11g 802 11n and 802 11ac specifications Actual data throughput will vary Network conditions and environmental factors...
Страница 9: ...ether to connect a device to the 2 4 or 5 GHz band thereby providing the best speed and range for each device and optimally distributing devices to each network t EWBODFE JSFXBMM FBUVSFT The web based user interface displays a number of advanced network management features Easily apply content filtering based on MAC address URL and or domain name Schedule these filters to be active on certain days...
Страница 10: ...power supply The light will be a solid orange during boot up 2 OUFSOFU A solid light indicates connection on the Internet port If the LED is orange the router cannot connect to the Internet 3 8JSFMFTT A solid light indicates that the 2 4 GHz wireless band is enabled 4 8JSFMFTT A solid light indicates that the 5 GHz wireless band is enabled 3 4 2 1 ...
Страница 11: ...model to the port 3 Reset Button Insert a paperclip in the hole wait for 10 seconds and release to reset the router to default settings 4 WPS Button Press to start the WPS process and automatically create a secure connection to a WPS client 5 8J J VUUPO Press this button turn off or turn on the wireless networks 6 Power Connector Connector for the supplied power adapter 7 Power Button Press the po...
Страница 12: ... the Internet port on the router and then turn the modem back on In some cases you may need to call your Internet Service Provider ISP to change connection types USB to Ethernet t G DPOOFDUJOH UP B 4 NPEFN NBLF TVSF UP IBWF ZPVS 4 TFSWJDF JOGPSNBUJPO QSPWJEFE CZ ZPVS OUFSOFU 4FSWJDF Provider handy This information is likely to include your DSL account s Username and Password Your ISP may also supp...
Страница 13: ...1 5 feet thick 0 5 meters at a 45 degree angle appears to be almost 3 feet 1 meter thick At a 2 degree angle it looks over 42 feet 14 meters thick Position devices so that the signal will travel straight through a wall or ceiling instead of at an angle for better reception 3 Building materials make a difference A solid metal door or aluminum studs may have a negative effect on range Try to positio...
Страница 14: ...e network connection possible In order to maximize performance fully extend the antennas into a 115 degree angle to provide optimal wireless coverage Keep the router in an open area for better wireless coverage 3 Turn off and unplug the power and Ethernet cable to your cable or DSL broadband modem This is required In some cases you may need to turn it off for up to five minutes DIR 878 Modem DIR 8...
Страница 15: ...er to the router and a power outlet press the power button and wait approximately one minute until the LED indicator on the front of the device changes from orange to solid white DIR 878 Modem DIR 878 Modem 4 Use the included Ethernet cable to connect your modem to the yellow port labeled 5 3 5 on the router DIR 878 Modem Note This unit is to be used with power supply model DA 60N12 ...
Страница 16: ...7 If you are configuring the DIR 878 wirelessly from a PC connect to a Wi Fi network printed on the included Wi Fi Configuration Card You can also find the Wi Fi network names and passwords printed on the label attached to the bottom your router DIR 878 Modem DIR 878 Modem 8 If you are connecting to a broadband service that uses a dynamic connection not PPPoE you may be online already Try opening ...
Страница 17: ...your clients t 234 PCJMF QQ Use your Android device iPhone iPad or iPod touch to configure your router Refer to 234 PCJMF QQ on page 14 t JOL 4FUVQ 8J BSE This wizard will launch when you log into the router for the first time Refer to 4FUVQ 8J BSE on page 19 t Manual Setup Log in to the router and manually configure your router Refer to Configuration Router Mode on page 23 ...
Страница 18: ...ed you may now configure your router Connect to the router wirelessly by going to your wireless utility on your device Scan for the Wi Fi name SSID as listed on the supplied info card Select and then enter your Wi Fi password Step 3 Once you connect to the router launch the QRS Mobile app from the Home screen of your device Note The following steps show the Android interface of the QRS Mobile app ...
Страница 19: ...U once the Operation Mode screen appears Step 5 At this point please ensure that your router is connected to a modem Plug one end of the provided Ethernet cable into your DSL or cable modem and plug the other end into the port marked 5 3 5 on the DIR 878 Tap FYU to automatically detect your Internet connection and proceed to the next step QRS Mobile App continued ...
Страница 20: ...isused Tap FYUto proceed Step 6 You will be asked to configure your 2 4 GHz wireless network Enter a network name SSID of your choice or leave it unchanged to accept the default SSID Next choose a Wi Fi password of at least 8 characters Any device trying to connect to the router wirelessly will need to enter this password the first time it connects Tap FYU to configure your 5 GHz wireless network ...
Страница 21: ...ush notifications whenever a new firmware update is available check the Notify me when new firmware is available box and tap FYU Otherwise just tap FYU to proceed Step 9 You will be presented with a summary of your chosen settings Tap Save to complete the setup QRS Mobile App continued ...
Страница 22: ...DIR 878 User Manual Section 3 Installation Congratulations your device has been successfully configured You can share this information by tapping 4IBSF Z NBJM or tap JOJTI to exit the app QRS Mobile App continued ...
Страница 23: ...BM in the address bar Alternatively enter the IP address of the router default IUUQ PleasewaitwhileyourrouterdetectsyourInternetconnectiontype Iftherouter detects your Internet connection you may need to enter your ISP information such as username and password If the router does not detect a valid Internet connection a list of connection types to choose from will be displayed Select your Internet ...
Страница 24: ...E username and password and click FYU to continue Note MakesuretoremoveyourPPPoEsoftwarefromyourcomputer Thesoftware is no longer needed and will not work through a router If the router detected or you selected Static enter the IP and DNS settings supplied by your ISP Click FYU to continue Setup Wizard continued ...
Страница 25: ...ct feature presents a single wireless network When connecting clients to an extension network they will be automatically added to the best band either 2 4 GHz or 5 GHz To disable the Smart Connect featureandindividuallyconfigure2 4GHzand5GHznetworks referto Wireless on page 59 Inordertosecuretherouter pleaseenteranewpassword Youwillbeprompted for this password every time you want to use the router...
Страница 26: ...summary of your settings Click FYU to finalize the settings or Back to make changes At the end of the wizard you will be presented with a final summary of your settings Click JOJTI to close the wizard Congratulations your device has been successfully configured Setup Wizard continued ...
Страница 27: ...e the router to its default settings To access the configuration utility open a web browser such as Internet Explorer and enter IUUQ EMJOLSPVUFS MPDBM or you may also connect by typing the IP address of the router by default this is IUUQ in the address bar The router s home page will open displaying its current connection status The bar at the top of the page has quick access to Settings and Manag...
Страница 28: ...ome page displays whether or not the router is currently connected to the Internet If it is disconnected click Click to repair to bring up the setup wizard refer to 4FUVQ 8J BSE on page 19 for more information To bring up more details about your Internet connection click on the Internet icon Click IPv4 or IPv6 to see details of the IPv4 connection and IPv6 connection respectively Click Release to ...
Страница 29: ...4 address and IPv6 address To reconfigure the network settings either click Go to settings on the lower left or click Settings at the top of the page and then Network on the menu that appears Refer to Network on page 63 for more information To reconfigure the wireless settings either click Go to settings on the lower right or click Settings at the top of the page and then Wireless on the menu that...
Страница 30: ...ent s settings click the pencil icon on the client you want to edit Name Enter a custom name for this client Vendor Displays the vendor of the device MAC Address Displays the MAC address of the device IP Address Displays the current IP address of this client Reserve IP Enable to reserve this IP address for this client IP Address Reserved Specify an IP address for the DIR 878 s DHCP server to assig...
Страница 31: ...the top of the page click Internet to see the Internet configuration options For ZOBNJD 1 1 refer to page 28 For Static IP refer to page 29 For 111P refer to page 30 For PPTP refer to page 32 For 51 refer to page 34 For 4 JUF refer to page 36 To configure an IPv6 connection click the IPv6 link Refer to page 37 My Internet Connection Is ChooseyourInternetconnectiontypefromthedrop downmenu You will ...
Страница 32: ...ry DNS server IP address assigned by your ISP This address is usually obtained automatically from your ISP Secondary DNS Server Enter the secondary DNS server IP address assigned by your ISP This address is usually obtained automatically from your ISP MTU Maximum Transmission Unit you may need to change the MTU for optimal performance with your ISP MAC Address Clone ThedefaultMACaddressissettotheI...
Страница 33: ... Primary DNS Server Enter the primary DNS server IP address assigned by your ISP Advanced Settings Secondary DNS Server Enter the secondary DNS server IP address assigned by your ISP MTU Maximum Transmission Unit you may need to change the MTU for optimal performance with your ISP MAC Address Clone ThedefaultMACaddressissettotheInternetport sphysicalinterface MAC address on the router You can use ...
Страница 34: ...t connection is maintained during inactivity To disable this feature select MXBZT on as the reconnect mode Advanced Settings Address Mode Select Static IP if your ISP assigned you the IP address subnet mask gateway andDNSserveraddresses Inmostcases selectDynamicIP Dynamic IP Service Name Enter the ISP service name optional Primary DNS Server Enter the primary DNS server IP address assigned by your...
Страница 35: ...e Enter the ISP service name optional Primary DNS Server Enter the primary DNS server IP address assigned by your ISP Secondary DNS Server Enter the secondary DNS server IP address assigned by your ISP MTU Maximum Transmission Unit you may need to change the MTU for optimal performance with your ISP MAC Address Clone ThedefaultMACaddressissettotheInternetport sphysicalinterface MAC address on the ...
Страница 36: ...nd or Manual Maximum Idle Time Enter a maximum idle time during which the Internet connection is maintained during inactivity To disable this feature select MXBZT on as the reconnect mode Advanced Settings Address Mode Select Static IP if your ISP assigned you the IP address subnet mask gateway andDNSserveraddresses Inmostcases selectDynamicIP Dynamic IP Primary DNS Server Enter the primary DNS se...
Страница 37: ... IP only PPTP Gateway IP Address Enter the gateway IP address provided by your ISP Static IP only Primary DNS Server Enter the primary DNS server IP address assigned by your ISP Secondary DNS Server Enter the secondary DNS server IP address assigned by your ISP MTU Maximum Transmission Unit you may need to change the MTU for optimal performance with your ISP Click Save when you are done PPTP conti...
Страница 38: ...ual Maximum Idle Time Enter a maximum idle time during which the Internet connection is maintained during inactivity To disable this feature select MXBZT on as the reconnect mode Advanced Settings Address Mode Select Static IP if your ISP assigned you the IP address subnet mask gateway andDNSserveraddresses Inmostcases selectDynamicIP Dynamic IP Primary DNS Server Enter the primary DNS server IP a...
Страница 39: ... IP only L2TP Gateway IP Address Enter the gateway IP address provided by your ISP Static IP only Primary DNS Server Enter the primary DNS server IP address assigned by your ISP Secondary DNS Server Enter the secondary DNS server IP address assigned by your ISP MTU Maximum Transmission Unit you may need to change the MTU for optimal performance with your ISP Click Save when you are done L2TP conti...
Страница 40: ...y DS Lite DHCPv6 B4 IPv6 Address Enter the B4 IPv4 address value used here WAN IPv6 Address Once connected the WAN IPv6 address will be displayed here IPv6 WAN Default Gateway Once connected the IPv6 WAN default gateway address will be displayed here Manual AFTR IPv6 Address Enter the AFTR IPv6 address used here B4 IPv6 Address Enter the B4 IPv4 address value used here WAN IPv6 Address Once connec...
Страница 41: ...UP POöHVSBUJPO 4 1W refer to page 42 For 111P refer to page 45 For IPv6 in IPv4Tunnel refer to page 49 For 6 to 4 refer to page 52 For 6rd refer to page 54 For PDBM POOFDUJWJUZ 0OMZ refer to page 56 My Internet Connection Is Choose your IPv6 connection type from the drop down menu You will be presented with the appropriate options for your connection type Click EWBODFE 4FUUJOHT to expand the list ...
Страница 42: ...ess is selected Primary DNS Server If you selected Use the following DNS address above enter the primary DNS server address Secondary DNS Server If you selected Use the following DNS address above enter the secondary DNS server address LAN IPv6 Address Settings Enable DHCP PD Enable or disable DHCP Prefix Delegation LAN IPv6 Link Local Address Displays the router s LAN link local address If Enable...
Страница 43: ...refixthan 64 i e allowing for a larger address allocation such as 63 Contact your ISP for more information Autoconfiguration Type Select4 3 44 4 4UBUFMFTT 1 orStatefulDHCPv6 If you selected 4 3 44 or 4 4UBUFMFTT 1 as the AutoconfigurationType Router Advertisement Lifetime Enter the router advertisement lifetime in minutes If you selected Stateful DHCPv6 as the Autoconfiguration Type IPv6 Address R...
Страница 44: ...y DNS Server Enter the primary DNS server address Secondary DNS Server Enter the secondary DNS server address If Use Link Local Address is disabled these additional parameters are available for configuration IPv6 Address Enter the address supplied by your ISP Subnet Prefix Length Enter the subnet prefix length supplied by your ISP LAN IPv6 Address Settings LAN IPv6 Address Enter the LAN local IPv6...
Страница 45: ...lDHCPv6 If you selected 4 3 44 or 4 4UBUFMFTT 1 as the AutoconfigurationType Router Advertisement Lifetime Enter the router advertisement lifetime in minutes If you selected Stateful DHCPv6 as the Autoconfiguration Type IPv6 Address Range Start EnterthestartingIPv6addressfortheDHCPserver sIPv6assignment IPv6 Address Range End Enter the ending IPv6 address for the DHCP server s IPv6 assignment IPv6...
Страница 46: ...tomatically or Use the following DNS address If Use the following DNS address is selected Primary DNS Server Enter the primary DNS server address Secondary DNS Server Enter the secondary DNS server address LAN IPv6 Address Settings Enable DHCP PD Enable or disable prefix delegation services LAN IPv6 Link Local Address Displays the router s LAN link local address If Enable DHCP PD is disabled these...
Страница 47: ... subnet prefix than 64 i e allowing for a larger address allocation such as 63 Contact your ISP for more information Autoconfiguration Type Select4 3 44 4 4UBUFMFTT 1 orStatefulDHCPv6 If you selected 4 3 44 or 4 4UBUFMFTT 1 as the AutoconfigurationType Router Advertisement Lifetime Enter the router advertisement lifetime in minutes If you selected Stateful DHCPv6 as the Autoconfiguration Type IPv6...
Страница 48: ...isabled in LAN IPv6 Address Settings IPv6 Address Range Start EnterthestartingIPv6addressfortheDHCPserver sIPv6assignment IPv6 Address Range End Enter the ending IPv6 address for the DHCP server s IPv6 assignment IPv6 Advertisement Lifetime Enter the IPv6 address lifetime in minutes Click Save when you are done ...
Страница 49: ...smission Unit you may need to change the MTU for optimal performance with your ISP If you selected Static IP as the Address Mode and Share with IPv4 as the PPPoE Session IP Address Enter the IP address provided by your ISP MTU Maximum Transmission Unit you may need to change the MTU for optimal performance with your ISP If you selected Create a new session as the PPPoE Session Username Enter the u...
Страница 50: ...T PO or Manual MTU Maximum Transmission Unit you may need to change the MTU for optimal performance with your ISP IPv6 DNS Settings DNS Type Select either Obtain DNS server address automatically or Use the following DNS address If Use the following DNS address is selected Primary DNS Server Enter the primary DNS server address Secondary DNS Server Enter the secondary DNS server address LAN IPv6 Ad...
Страница 51: ...onfiguration Settings Enable Automatic IPv6 Address Assignment Enable or disable the Automatic IPv6 Address Assignment feature If DHCP PD is enabled in LAN IPv6 Address Settings Enable Automatic DHCP PD in LAN Enable or disable DHCP PD for other IPv6 routers connected to the LAN interface Note This feature requires a smaller subnet prefix than 64 i e allowing for a larger address allocation such a...
Страница 52: ...IPv6 Address Range End Enter the ending IPv6 address for the DHCP server s IPv6 assignment If DHCP PD is disabled in LAN IPv6 Address Settings IPv6 Address Range Start EnterthestartingIPv6addressfortheDHCPserver sIPv6assignment IPv6 Address Range End Enter the ending IPv6 address for the DHCP server s IPv6 assignment IPv6 Advertisement Lifetime Enter the IPv6 address lifetime in minutes Click Save...
Страница 53: ...use Remote IPv6 Address Enter the IPv6 remote address you will use Local IPv4 Address Displays the current local IPv4 address Local IPv6 Address Enter the IPv6 local address you will use Subnet Prefix Length Enter the subnet prefix length supplied by your ISP IPv6 DNS Settings DNS Type Select either Obtain DNS server address automatically or Use the following DNS address If Use the following DNS a...
Страница 54: ...IPv6 address for the router LAN IPv6 Link Local Address Displays the router s LAN link local address Advanced Settings Address Autoconfiguration Settings Enable Automatic IPv6 Address Assignment Enable or disable the Automatic IPv6 Address Assignment feature If DHCP PD is enabled in LAN IPv6 Address Settings Enable Automatic DHCP PD in LAN Enable or disable DHCP PD for other IPv6 routers connected...
Страница 55: ...startingIPv6addressfortheDHCPserver sIPv6assignment IPv6 Address Range End Enter the ending IPv6 address for the DHCP server s IPv6 assignment If DHCP PD is disabled in LAN IPv6 Address Settings IPv6 Address Range Start EnterthestartingIPv6addressfortheDHCPserver sIPv6assignment IPv6 Address Range End Enter the ending IPv6 address for the DHCP server s IPv6 assignment IPv6 Advertisement Lifetime E...
Страница 56: ...connectivity between IPv6 sites and hosts across the IPv4 Internet 6to4 Address Displays the 6 to 4 address 6to4 Relay Enter the 6 to 4 relay supplied by your ISP Primary DNS Server Enter the primary DNS server address Secondary DNS Server Enter the secondary DNS server address LAN IPv6 Address Settings LAN IPv6 Address Enter the LAN local IPv6 address for the router LAN IPv6 Link Local Address Di...
Страница 57: ...oconfiguration Type Select4 3 44 4 4UBUFMFTT 1 orStatefulDHCPv6 If you selected Stateful DHCPv6 as the Autoconfiguration Type IPv6 Address Range Start EnterthestartingIPv6addressfortheDHCPserver sIPv6assignment IPv6 Address Range End Enter the ending IPv6 address for the DHCP server s IPv6 assignment IPv6 Advertisement Lifetime Enter the IPv6 address lifetime in minutes Click Save when you are don...
Страница 58: ...e method of networking 6rd Configuration Choose the 6rd DHCPv4 Option to automatically discover and populate the data values or Manual Configuration to enter the settings yourself If you selected Manual configuration 6rd IPv6 Prefix Enter the 6rd IPv6 prefix and mask length supplied by your ISP WAN IPv4 Address Displays the router s IPv4 address 6rd Border Relay IPv4 Address Enter the 6rd border r...
Страница 59: ...toconfiguration Type Select4 3 44 4 4UBUFMFTT 1 orStatefulDHCPv6 If you selected Stateful DHCPv6 as the Autoconfiguration Type IPv6 Address Range Start EnterthestartingIPv6addressfortheDHCPserver sIPv6assignment IPv6 Address Range End Enter the ending IPv6 address for the DHCP server s IPv6 assignment IPv6 Advertisement Lifetime Enter the IPv6 address lifetime in minutes Click Save when you are do...
Страница 60: ...IPv6 ULA Settings Enable ULA Click here to enable Unique Local IPv6 Unicast Addresses settings IPv6 ULA Settings Enable this option to use the default ULA prefix If you selected OBCMF 6 and disabled FGBVMU 6 1SFöY ULA Prefix Enter your own ULA prefix Current IPv6 ULA Settings Current ULA Prefix Displays the current ULA prefix LAN IPv6 ULA Displays the LAN s IPv6 ULA Click Save when you are done ...
Страница 61: ...ess bands Note If Smart Connect is enabled Guest Zone is unavailable Triple Play Status Click to enable or disable Triple Play VLAN functionality This allows you to assign dedicated VLANs for Internet IPTV and VOIP traffic Priority ID Enable or disable traffic priority ID for the Internet IPTV and VOIP VLANs Higher priority ID traffic takes precedence over traffic with a low priority ID tag If Sta...
Страница 62: ...rity ID Select a priority ID from the drop down menu to assign to the corresponding VLAN InterfaceTrafficType Setting LAN 1 4 Wireless Guest Zone SelectwhichVLANtoassigneachoftheinterfaceportsto Theoptions are Internet IPTV or VOIP Click Save when you are done ...
Страница 63: ...the desired wireless transmission power Schedule Use the drop down menu to select the time schedule that the rule will be enabled on The schedule may be set to MXBZT OBCMF or you can create your own schedules in the Schedules section Refer to Schedule on page 81 for more information Wi Fi Protected Setup The easiest way to connect your wireless devices to the router is withWi Fi Protected Setup WP...
Страница 64: ...work are JYFE C H O JYFE H O 802 11n only 802 11 Mode 5 GHz Select the desired wireless networking standards to use The available options for the 5 GHz wireless network are JYFE B O BD JYFE O BD BD POMZ JYFE B O JYFE O POMZ or 802 11a only Wi Fi Channel Select the desired channel The default is VUP recommended Transmission Power Select the desired wireless transmission power Channel Width 2 4 GHz ...
Страница 65: ...dule that the rule will be enabled on The schedule may be set to MXBZT OBCMF or you can create your own schedules in the Schedules section Refer to Schedule on page 81 for more information Wi Fi Protected Setup The easiest way to connect your wireless devices to the router is withWi Fi Protected Setup WPS Using WPS PIN disabled by default due to security vulnerabilities WPS PBC Status Enable or di...
Страница 66: ...k You may configure different zones for the 2 4 GHz and 5 GHz wireless bands Note If Smart Connect is enabled Guest Zone is unavailable 2 4 GHz 5 GHz Status Enable or disable the 2 4 GHz 5 GHz wireless network Wi Fi Name SSID Create a name for your wireless network using up to 32 characters Password Create a password to use for wireless security Home Network Access Internet Access Only Enabling th...
Страница 67: ...1 If you change the IP address once you click Save you will need to enter the new IP address in your browser to get back into the configuration utility Subnet Mask Enter the subnet mask of the router The default subnet mask is 255 255 255 0 Management Link The default address to access the router s configuration is IUUQ EMJOLSPVUFS MPDBM Here you can replace dlinkrouter with a name of your choice ...
Страница 68: ...ss lease in minutes Always Broadcast Enable this feature to broadcast your network s DHCP server to LAN WLAN clients Advanced Settings WAN Port Speed You may set the port speed of the Internet port to 10 Mbps 100 Mbps 1000 Mbps or VUP recommended UPnP Enable or disable Universal Plug and Play UPnP UPnP provides compatibilitywithnetworkingequipment software andperipherals IPv4 Multicast Stream Enab...
Страница 69: ... If some are off screen you can use the and buttons to scroll through the cards A maximum of one device can be assigned Highest priority A maximum of two devices can be assigned High priority A maximum of eight devices can be assigned Medium priority If no devices are explicitly assigned a priority they will all be treated with equal priority If some devices are not assigned a priority and others ...
Страница 70: ...over the Internet and is not recommended in ordinary situations DMZ IP Address If you enabled DMZ enter the IP address of the client you wish to expose or use the drop down menu to quickly select it Enable SPI IPv4 Enabling Stateful Packet Inspection SPI helps to prevent cyber attacks by validating that the traffic passing through the session conforms to the protocol Enable Anti Spoof Checking Ena...
Страница 71: ... trouble connecting with your corporate network try turning this ALG off Please check with the system administrator of your corporate network whether your VPN client supports NAT traversal RTSP Allows applications that uses RealTime Streaming Protocol RTSP to receive streaming media from the Internet SIP Allows devices and applications using VoIP Voice over IP to communicate across NAT Some VoIP a...
Страница 72: ...h to create a new rule click the EE 3VMFT button Click Save when you are done If you edit or create a rule the following options will appear Name Enter a name for the rule Source IP Address Range Enterthe sourceIP addressrangethattherulewillapplyto andusing the drop down menu specify whether it is a 8 or IP address Destination IP Address Range Enter the destination IP address range that the rule w...
Страница 73: ...g options will appear Name Enter a name for the rule Local IP Enter the IP address of the computer on your local network that you want to allow the incoming service to Alternatively select the device from the drop down menu TCP Port Enter the TCP ports that you want to open You can enter a single port or a range of ports Separate ports with a comma for example 24 1009 3000 4000 UDP Port Enter the ...
Страница 74: ...he following options will appear Name Enteranamefortherule Alternatively selecttheprotocol Application from the drop down menu Local IP Enter the IP address of the computer on your local network that you want to allow the incoming service to Alternatively select the device from the drop down menu Protocol Select the protocol of the traffic to allow or deny TCP UDP Both or Other Protocol Number If ...
Страница 75: ...sites to block select DMJFOU BDDFTT UP 0 these sites from the drop down menu All other sites will be accessible If you want to specify a list of sites to allow select 08 DMJFOUT BDDFTT UP 0 these sites from the drop down menu All other sites will be blocked You may specify a maximum of fifteen web sites To add a new site to the list click EE 3VMF Next under Website URL Domain enter the URL or doma...
Страница 76: ... click on its pencil icon in the Edit column If you wish to create a new rule click the EE 3PVUF button Click Save when you are done If you edit or create a rule the following options will appear Name Enter a name for the rule Destination Network Enter the IP address of packets that will take this route Mask Enter the subnet mask of the route Gateway Enter your next hop gateway to be taken if this...
Страница 77: ... 3VMFT button Click Save when you are done If you edit or create a rule the following options will appear Name Enter a name for the rule DestNetwork This is the IP address of the router used to reach the specified destination PrefixLen Enter the IPv6 address prefix length of the packets that will take this route Gateway Enter your next hop gateway to be taken if this route is used Metric Enter the...
Страница 78: ...he IPv6 host settings To configure an IPv6 dynamic DNS host refer to IPv6 Host on page 75 Enable Dynamic DNS Enable or disable dynamic DNS Enabling this feature will reveal further configuration options Status Displays the current dynamic DNS connection status Server Address Enter the address of your dynamic DNS server or select one from the drop down menu Host Name Enter the host name that you re...
Страница 79: ...a rule click on its pencil icon in the Edit column If you wish to create a new rule click the EE 3FDPSE button Click Save when you are done If you edit or create a rule the following options will appear Host Name Enter the host name that you registered with your dynamic DNS service provider IPv6 Address EntertheIPv6addressofthedynamicDNSserver Alternatively select the server device in the drop dow...
Страница 80: ...signed an IP address from your ISP using DHCP it may frequently change requiring clients credentials to be set up again and a simple DDNS address will be easier than an IP address In the Features menu on the bar on the top of the page click Dynamic DNS Configure the following options Enable Dynamic DNS Enable or disable the Quick VPN server If Quick VPN is enabled the following options are availab...
Страница 81: ...ngs Address Autoconfiguration Settings Authentication Protocol Choosetheauthenticationprotocoltype 4 1W 1 1 or 1 4 1W is the default MPPE Select the encryption cipher strength None RC4 40 or RC4 128 RC4 128 is the default Click Save when you are done Quick VPN continued ...
Страница 82: ...mn If you wish to edit a user account click on its pencil icon in the Edit column If you wish to create a new user click the Create User button Click Save when you are done If you edit or create a rule the following options will appear User Name Enter a username for the new user account Password Enter a password for the new user account SAMBA Status Enable or disable the Windows File Sharing funct...
Страница 83: ...ble or disable ftp server access for this user Permission If 51 is enabled choose to assign either Read Only or 3FBE 8SJUF permission Folder VPN Status Enable or disable Virtual Private Network VPN functionality for this user Click Save when you are done User continued ...
Страница 84: ...click Schedule and refer to Schedule on page 81 Time Configuration Time Zone Select your time zone from the drop down menu Time Displays the current date and time of the router Daylight Saving Enable or disable daylight saving time AutomaticTime Configuration Update Time Using an NTP Server EnableordisabletoallowanNTPserverontheInternettosynchronize the time and date with your router If you enable...
Страница 85: ... pencil icon in the Edit column If you wish to create a new rule click the EE 3VMF button Click Save when you are done If you edit or create a rule the following screen will appear First enter the name of your schedule in the Name field Each box represents one hour with the time at the top of each column To add a time period to the schedule simply click on the start hour and drag to the end hour Y...
Страница 86: ...router logs to a SysLog Server If Logging to the Syslog Server is OBCMFE Syslog Server IP Address Enter the IP address for the Syslog server If the Syslog server is connected to the extender select it from the drop down menu to automatically populate the field Email Settings Enable E mail Notification Enable this option if you want the logs to be automatically sent to an email address If E mail no...
Страница 87: ...l Log When Full or On Schedule Send When Log Full If enabled this option will set the router to send the log when it is full Send on Schedule If enabled this option will set the router to send according to a set schedule Schedule If you enable Send On Schedule use the drop down menu to select a schedule to apply The schedule may be set to MXBZT OBCMF or you can create your own schedules in the Sch...
Страница 88: ...yed on the screen to prevent online hackers and unauthorized users from gaining access to your router s network settings Advanced Settings Administration Enable HTTPS Server ChecktoenableHTTPStoconnecttotheroutersecurely Insteadofusing IUUQ EMJOLSPVUFS MPDBM you must use IUUQT EMJOLSPVUFS MPDBM in order to connect to the router Enable Remote Management Remote management allows the DIR 878 to be co...
Страница 89: ...ill be lost including any rules that you have created If you want to save the current router configuration settings use the 4BWF 4FUUJOHT 5P PDBM BSE SJWF button above Auto Reboot Configuration Reboot The Device Click to reboot the router immediately Auto Reboot YoumaysettheDIR 878toautomaticallyrebootatasettime Theoptions are Never Daily Weekly You may set the hour using a 24 hour format the minu...
Страница 90: ... the page click Upgrade Firmware Firmware Information The current firmware s version and date will be displayed Check for New Firmware Click this button to prompt the router to automatically check for a new firmwareversion Ifanewerversionisfound itwillpromptyoutoinstallit Upgrade Manually Upgrade Firmware Ifyouwishtoupgrademanually firstdownloadthefirmwarefileyouwish toupgradeto Next clickthe6QHSB...
Страница 91: ... router on the WAN LAN and wireless segments In the Management menu on the bar on the top of the page click Statistics You can view the Internet 8J J or 8J J by clicking on the respective tabs at the top The graph will update in real time To clear the information on the graph click Clear The traffic counter will reset if the device is rebooted ...
Страница 92: ...le device to places with free untrusted Wi Fi hotspots in places like coffee shops and hotels by encrypting and relaying it through your home Internet connection This extra hop reduces the chances of hackers stealing your information such as logins passwords and credit card numbers When traveling Quick VPN lets you watch sports and use video streaming services without experiencing blackouts or fil...
Страница 93: ... NBZ XBSO ZPV UIBU ZPVS JOGPSNBUJPO NBZ CF JOUFSDFQUFE TJODF ZPV DPOUSPM UIF 2VJDL 71 TFSWFS ZPV NBZ JHOPSF UIJT t 6 1 1PSUT BOE 1 1PSU NVTU CF PQFO JO PSEFS GPS 2VJDL 71 UP XPSL t 51 1TFD 71 VTBHF NBZ CF SFTUSJDUFE JO TPNF DPVOUSJFT BOE PO TPNF OFUXPSLT G ZPV IBWF USPVCMF VTJOH 2VJDL 71 PO TPNF networks but not others and are not violating network access rules try contacting your ISP or network a...
Страница 94: ...ou enable Quick VPN the following options are available Username Enter a username between 1 and 20 characters Password Enter a password between 1 and 20 characters PSK Enter a passkey between 6 and 64 characters Authentication Protocol Choosetheauthenticationprotocoltype 4 1W 1 1 or 1 4 1W is the default MPPE Select the encryption cipher strength none RC4 40 or RC4 128 RC4 128 is the default Click...
Страница 95: ...es VPN Setup Instructions This section provides QuickVPN setup instructions for iOS devices using the YQPSU Profilefunction Referto QuickVPNServerSetupInstructionsonpage90formore information Open the e mail containing your Quick VPN profile Open the attachment ...
Страница 96: ...DIR 878 User Manual Section 5 Quick VPN The Install Profile dialog will appear tap Install in the upper right hand corner of your screen Enter your device s passcode when prompted VPN Setup Instructions Continued ...
Страница 97: ... is now configured to connect to your Quick VPN server Enter the Shared Secret PSK from the Quick VPN configuration page Tap Done Acknowledge the disclaimer by tapping Install in the upper right hand corner Tap the red Install button VPN Setup Instructions Continued ...
Страница 98: ... Disconnect To connect or disconnect from to your Quick VPN server open Settings and tap the button next to VPN TheVPN icon will appear in the notification area at the top of your screen indicating that your device is currently connected to the Quick VPN server ...
Страница 99: ...ccount password when prompted Close the Profiles dialog Mac OS X VPN Setup Instructions This section provides Quick VPN setup instructions for OS X using the YQPSU Profile function Refer to Quick VPN Server Setup Instructions on page 90 for more information Go to Ò System Preferences Network and select the QuickVPN connection and click VUIFOUJDBUJPO 4FUUJOHT ...
Страница 100: ... DIR 878 User Manual Section 5 Quick VPN Enter your Passkey in the Shared Secret text box and click 0 QQMZ then OK Your Mac is now configured to connect to your Quick VPN server VPN Setup Instructions Continued ...
Страница 101: ...ser Manual Section 5 Quick VPN Connect or Disconnect To connect to or disconnect from your Quick VPN server go to Ò System Preferences Network Select the Quick VPN connection and click on the Connect or Disconnect button ...
Страница 102: ...s and files box Select 4FU VQ B WJSUVBM QSJWBUF OFUXPSL 71 DPOOFDUJPO Enter the 1 4 BEESFTT of your Quick VPN server in the Internet address box create a name for your connection in the Destination Name check Don t Connect now just set it up so I can connect later and click FYU Windows 7 VPN Setup Instructions ...
Страница 103: ... save your password enter your Password and check Remember this password Click Create to continue Do not click Connect Now Click Close Click the Start button and type view network connections into the Search programs and files text box Select View network connections VPN Setup Instructions Continued ...
Страница 104: ...ow configured to connect to your Quick VPN server Click EWBODFE TFUUJOHT Enter your Passkey in the Key text box under Use preshared key for authentication Click OK to close EWBODFE 1SPQFSUJFT and click OK to close Quick VPN Connection Properties VPN Setup Instructions Continued ...
Страница 105: ...o or disconnect from your Quick VPN server click on the Network Settings icon in the notification area of the Windows taskbar and from the Dial Up and VPN section click on your Quick VPN connection and click on the Connect or Disconnect button Connect or Disconnect ...
Страница 106: ...uick VPN Windows 8 1 8 VPN Setup Instructions This section provides Quick VPN setup instructions for Windows 8 1 8 Click the Start button and type vpn Select Manage virtual private networks From the Network Settings page click EE B 71 POOFDUJPO ...
Страница 107: ...ame for your VPN connection 3 Enter your 1 4 BEESFTT of your Quick VPN server 4 Select User name and password from Type of sign in info 5 If you would like windows to remember your sign in information enter your 6TFS OBNF 1BTTXPSE and select Remember my sign in info 6 Choose Save Add a VPN Connection ...
Страница 108: ...Manual Section 5 Quick VPN Select the Securitytab For the TypeofVPN select BZFS 5VOOFMJOH XJUI 1TFD 51 14FD Right click on the Quick VPN Connection you just created and left click on Properties VPN Setup Instructions Continued ...
Страница 109: ...e Start button and type view network connections Select View network connections Right click your Quick VPN Connection and left click Properties Select the Security tab For the Type of VPN select BZFS 5VOOFMJOH XJUI 1TFD 51 14FD VPN Setup Instructions Continued ...
Страница 110: ...UUJOHT Enter your Passkey in the Key text box under Use preshared key for authentication Click OK to close EWBODFE 1SPQFSUJFT and click OK to close Quick VPN Properties YourWindows8 1 8systemisnowconfiguredtoconnecttoyourQuickVPNserver VPN Setup Instructions Continued ...
Страница 111: ...k VPN Connect or Disconnect To connect to or disconnect from your Quick VPN server click on the Network Settings icon in the notification area of the Windows taskbar Click on your Quick VPN connection and click on the Connect or Disconnect button ...
Страница 112: ...78 User Manual Section 5 Quick VPN Click Start Settings Network Internet FUXPSL BOE 4IBSJOH FOUFS 71 EE B 71 POOFDUJPO Windows 10 VPN Setup Instructions This section provides Quick VPN setup instructions for Windows 10 ...
Страница 113: ...of your Quick VPN server 4 Select 51 14FD with pre shared key from VPN type 5 Enter the Passkey 6 Select User name and password from Type of sign in info If you would like windows to remember your sign in information enter your 6TFS OBNF 1BTTXPSE and select Remember my sign in info 7 Choose Save YourWindows10systemisnowconfiguredtoconnecttoyourQuickVPNserver Add a VPN Connection ...
Страница 114: ...nnect To connect to or disconnect from your Quick VPN server click on the Network Settings icon in the notification area of the Windows taskbar and click on your Quick VPN connection The Network Internet Settings page will open Click on the Connect or Disconnect button ...
Страница 115: ...78 User Manual Section 5 Quick VPN This section provides Quick VPN setup instructions for Android devices Your device s screens may vary Go to Settings More from the Wireless networks 71 Android VPN Setup Instructions ...
Страница 116: ...name for your VPN connection 2 Select 51 14FD PSK for Type 3 Enter the 1 4 BEESFTT of your Quick VPN server 4 Enter your Passkey in IPSec pre shared key field 5 Choose Save Your Android device is now configured to connect to your Quick VPN server Edit VPN Profile ...
Страница 117: ...IR 878 User Manual Section 5 Quick VPN Connect or Disconnect To connect to or disconnect from your Quick VPN server go to Settings More from the Wireless networks VPN and select the Quick VPN connection you created ...
Страница 118: ...114 D Link DIR 878 User Manual Section 5 Quick VPN To connect enter your Username and Password and select 0 5 To disconnect select 4 0 5 Connect or Disconnect Continued ...
Страница 119: ...players Blu ray DVD players wireless printers and cameras will have a WPS button or a software utility with WPS that you can press to connect to the DIR 878 router Please refer to your user manual for the wireless device you want to connect to make sure you understand how to enable WPS Once you know follow the steps below Step 1 Press the WPS button on the DIR 878 for about 1 second The LED on the...
Страница 120: ...can find the default network name and Wi Fi password here Otherwise refer to the product label for the default Wi Fi network SSID and password or enter the Wi Fi credentials set during the product configuration To join an existing network locate the wireless network icon in the taskbar next to the time display and click on it Wireless Icon Clicking on this icon will display a list of wireless netw...
Страница 121: ...eck box You will then be prompted to enter the Wi Fi password network security key for the wireless network Enter the password into the box and click FYU to connect to the network Your computer will now automatically connect to this wireless network when it is detected You can also use Wi Fi Protected Setup WPS to connect to the router Press the WPS button on your D Link device and you will be aut...
Страница 122: ...r wireless adapter If you are joining an existing network you will need to know the security key Wi Fi password being used To join an existing network locate the wireless network icon in the taskbar next to the time display Wireless Icon Clicking on this icon will display a list of wireless networks that are within connecting proximity of your computer Select the desired network by clicking on the...
Страница 123: ...nter the password into the box and click FYU If you wish to use Wi Fi Protected Setup WPS to connect to the router you can also press the WPS button on your router during this step to enable the WPS function When you have established a successful connection to a wireless network the word Connected will appear next to the name of the network to which you are connected to ...
Страница 124: ... your wireless router or access point before configuring your wireless adapter If you are joining an existing network you will need to know the security key or passphrase being used 1 Click on the wireless icon in your system tray lower right corner 2 The utility will display any available wireless networks in your area Wireless Icon WPA WPA2 ...
Страница 125: ...ID you would like to connect to and click the Connect button If you get a good signal but cannot access the Internet check your TCP IP settings for your wireless adapter Refer to the Networking Basics section in this manual for more information 4 The following window appears while your computer tries to connect to the router ...
Страница 126: ...word that is on your router and click Connect You can also connect by pushing the WPS button on the router It may take 20 30 seconds to connect to the wireless network If the connection fails please verify that the security settings are correct The key or passphrase must be exactly the same as the one on the wireless router ...
Страница 127: ...ireless Client WPS The WPS feature of the DIR 878 can be configured using Windows 7 Carry out the following steps to use Windows 7 to configure the WPS feature 1 Click the Start button and select Computer from the Start menu 2 Click Network on the left side ...
Страница 128: ... DIR 878 User Manual Section 6 Connecting a Wireless Client 3 Double click the DIR 878 4 Input the WPS PIN number on the router label in the Setup Wireless Setup menu in the Router s Web UI and click FYU DIR 878 ...
Страница 129: ...125 D Link DIR 878 User Manual Section 6 Connecting a Wireless Client 5 Type a name to identify the network 6 To configure advanced settings click the icon Click FYU to continue ...
Страница 130: ...s being configured Wait for the configuration to complete 8 The following window informs you that WPS on the DIR 878 has been set up successfully Make a note of the security key as you may need to provide this security key if adding an older wireless device to the network in the future 9 Click Close to complete WPS setup ...
Страница 131: ...lity as seen below Right click on the wireless computer icon in your system tray lower right corner next to the time Select Connect to a network If you receive the Wireless Networks Detected bubble click on the center of the bubble to access the utility or The utility will display any available wireless networks in your area Click on a network displayed using the SSID and click the Connect button ...
Страница 132: ...ireless Utility by right clicking on the wireless computer icon in your system tray lower right corner of screen Select Connect to a network It is recommended that you enable wireless security WPA WPA2 on your wireless router or access point before configuring your wireless adapter If you are joining an existing network you will need to know the security key or passphrase being used ...
Страница 133: ...ty key or passphrase Wi Fi password that is on your router and click Connect It may take 20 30 seconds to connect to the wireless network If the connection fails please verify that the security settings are correct The key or passphrase must be exactly the same as the one on the wireless router ...
Страница 134: ...the device itself Your computer must be on the same IP subnet to connect to the web based utility t BLF TVSF ZPV IBWF BO VQEBUFE BWB FOBCMFE XFC CSPXTFS 8F SFDPNNFOE UIF GPMMPXJOH Microsoft Internet Explorer 10 or higher Mozilla Firefox 28 or higher Google Chrome 28 or higher Apple Safari 6 or higher t 7FSJGZ QIZTJDBM DPOOFDUJWJUZ CZ DIFDLJOH GPS TPMJE MJOL MJHIUT PO UIF EFWJDF G ZPV EP OPU HFU B ...
Страница 135: ...VUFS JO UIF BEESFTT CBS 5IJT should open the login page for your web management t G ZPV TUJMM DBOOPU BDDFTT UIF DPOöHVSBUJPO VOQMVH UIF QPXFS UP UIF SPVUFS GPS TFDPOET BOE QMVH CBDL JO 8BJU BCPVU seconds and try accessing the configuration If you have multiple computers try connecting using a different computer 2 What can I do if I forgot my password If you forgot your password you must reset your...
Страница 136: ...wering the MTU in increments of ten Ex 1492 1482 1472 etc To find the proper MTU Size you ll have to do a special ping of the destination you re trying to go to A destination could be another computer or a URL t MJDL PO Start and then click Run t 8JOEPXT BOE F VTFST UZQF JO command Windows NT 2000 XP Vista and 7 users type in cmd and press OUFS or click OK t 0ODF UIF XJOEPX PQFOT ZPV MM OFFE UP EP...
Страница 137: ...ing with 1452 28 1480 Once you find your MTU you can now configure your router with the proper MTU size To change the MTU rate on your router follow the steps below t 0QFO ZPVS CSPXTFS FOUFS UIF 1 BEESFTT PG ZPVS SPVUFS BOE DMJDL OK t OUFS ZPVS VTFSOBNF BENJO BOE QBTTXPSE CMBOL CZ EFGBVMU MJDL OK to enter the web configuration page for the device t MJDL PO Setup and then click Manual Configure t 5...
Страница 138: ...ireless LANs are used increasingly in both home and office environments and public areas such as airports coffee shops and universities Innovative ways to utilize WLAN technology are helping people work and communicate more efficiently Increased mobility and the absence of cabling and other fixed infrastructure have proven to be beneficial for many users Wireless users can use the same application...
Страница 139: ...hat transmit data from one point A to point B But wireless technology has restrictions as to how you can access the network You must be within the wireless network range area to be able to connect your computer There are two different types of wireless networksl Wireless Local Area Network WLAN and Wireless Personal Area Network WPAN 8JSFMFTT PDBM SFB FUXPSL 8 In a wireless local area network a de...
Страница 140: ... speakers and other devices that operate on batteries Who uses wireless Wireless technology as become so popular in recent years that almost everyone is using it whether it s for home office business D Link has a wireless solution for it PNF 6TFT FOFöUT t JWFT FWFSZPOF BU IPNF CSPBECBOE BDDFTT t 4VSG UIF XFC DIFDL FNBJM JOTUBOU NFTTBHF FUD t FUT SJE PG UIF DBCMFT BSPVOE UIF IPVTF t 4JNQMF BOE FBTZ...
Страница 141: ...f setting up a wireless network Tips Here are a few things to keep in mind when you install a wireless network FOUSBMJ F ZPVS SPVUFS PS BDDFTT QPJOU Make sure you place the router access point in a centralized location within your network for the best performance Try to place the router access point as high as possible in the room so the signal gets dispersed throughout your home If you have a two...
Страница 142: ...peer to peer communication using wireless network adapters on each computer such as two or more DIR 878 wireless network USB adapters An Infrastructure network contains an access point or wireless router All the wireless devices or clients will connect to the wireless router or access point An Ad hoc network contains only clients such as laptops with wireless USB adapters All the adapters must be ...
Страница 143: ...our IP address please follow the steps below Click on Start Run In the run box type cmd and click OK Windows 7 Vista users type cmd in the Start Search box At the prompt type ipconfig and press OUFS This will display the IP address subnet mask and the default gateway of your adapter If the address is 0 0 0 0 check your adapter installation security settings and the settings on your router Some fir...
Страница 144: ...t click on the PDBM SFB POOFDUJPO which represents your network adapter and select Properties Step 3 Highlight OUFSOFU 1SPUPDPM 5 1 1 and click Properties Step 4 Click Use the following IP address and enter an IP address that is on the same subnet as your network or the LAN IP address on your router Example If the router s LAN IP address is 192 168 0 1 make your IP address 192 168 0 X where X is a...
Страница 145: ...1i and uses Advanced Encryption Standard AES instead of TKIP t 6TFS BVUIFOUJDBUJPO XIJDI JT HFOFSBMMZ NJTTJOH JO 8 1 UISPVHI UIF FYUFOTJCMF BVUIFOUJDBUJPO QSPUPDPM 1 8 1 regulates access to a wireless network based on a computer s hardware specific MAC address which is relatively simple to be sniffed out and stolen EAP is built on a more secure public key encryption system to ensure that only auth...
Страница 146: ...32 to 104 F t Storage 20 to 65 C 4 to 149 F Humidity t Operating 10 to 90 maximum non condensing t Storage 5 to 95 maximum non condensing Certifications t FCC t CE t UL cUL t C Tick t IPv6 t Wi Fi Protected Setup WPS t Wi Fi Multimedia WMM Dimensions Weight t L x W x H 258 8 x 183 4 x 44 9 mm 10 2 x 7 2 x 1 8 in t x g x oz 1 Maximum wireless signal rate derived from IEEE Standard 802 11a 802 11g 8...
Страница 147: ...pment into an outlet on a circuit different from that to which the receiver is connected Consult the dealer or an experienced radio TV technician for help Non modifications Statement Any changes or modifications not expressly approved by the party responsible for compliance could void the user s authority to operate this equipment This transmitter must not be co located or operating in conjunction...
Страница 148: ... du Canada OOPWBUJPO 4DJFODF BOE DPOPNJD FWFMPQNFOU BOBEB 4 4UBUFNFOU This device complies with ISED licence exempt RSS standard s Operation is subject to the following two conditions 1 this device may not cause interference and 2 this device must accept any interference including interference that may cause undesired operation of the device Le présent appareil est conforme aux CNR d ISED applicab...
Страница 149: ... the e i r p limits specified for point to point and non point to point operation as appropriate and iii Users should also be advised that high power radars are allocated as primary users i e priority users of the bands 5650 5850 MHz and that these radars could cause interference and or damage to LE LAN devices Avertissement i les dispositifs fonctionnant dans la bande 5150 5250 MHz sont réservés ...
Страница 150: ...方得繼續使用 前項合法通信 指依電信法規定作業之無線電通信 低功率射頻電機須忍受合法通信或工 業 科學及醫療用電波輻射性電機設備之干擾 1 警語 電磁波曝露量MPE標準值 MPE 1 mW cm2 本產品使用時建議應距離人體 0 cm UHTXHQF DQG V UHTXHQ EDQG UpTXHQFH EDQGH V DQGDV GH UHFXHQFLD UHTXHQ D H UHTXHQWLH V 0D 2XWSXW 3RZHU 53 0D 2XWSXW 3RZHU RQVRPPDWLRQ G pQHUJLH PD 3RWHQFLD Pi LPD GH 6DOLGD 3RWHQ D PD 2XWSXW 0D 2XWSXW 3RZHU 5 G 5 15 5 25 GHz 200 mW 5 25 5 35 GHz 200 mW 5 47 5 725 GHz 1 W 2 4 G 2 4 2 ...
Страница 151: ... accessories and software are in compliance with directive 2014 53 EU The full text of the EU Declaration of Conformity and product firmware are available for download from the product page at www dlink com Español Spanish Por la presente D Link Corporation declara que este producto accesorios y software cumplen con las directivas 2014 53 UE El texto completo de la declaración de conformidad de la...
Страница 152: ...ware a termék oldaláról tölthető le a www dlink com címen Polski Polish JOL PSQPSBUJPO OJOJFKT ZN PǴXJBED B ȈF UFO QSPEVLU BLDFTPSJB PSB PQSPHSBNPXBOJF Tnj HPEOF EZSFLUZXBNJ 6 1F FO UFLTU EFLMBSBDKJ HPEOPǴDJ 6 PSB PQSPHSBNPXBOJF TQS ǗUPXF EP QSPEVLUV można pobrać na stronie produktu w witrynie www dlink com Português Portuguese Desta forma a D Link Corporation declara que este produto os acessórios...
Страница 153: ...nguna í heild sinni og fastbúnað vörunnar af vefsíðu vörunnar á www dlink com Norsk Norwegian Herved erklærer D Link Corporation at dette produktet tilbehøret og programvaren er i samsvar med direktivet 2014 53 EU Den fullstendige teksten i EU erklæring om samsvar og produktets fastvare er tilgjengelig for nedlasting fra produktsiden på www dlink com Warning Statement The power outlet should be ne...
Страница 154: ... whether your product uses 2 4 GHz and or 5 GHz wireless 8 4 63 7 38 6 70 3 5 04 5 8 3 8 3 6301 4 4 5 63 Ã3 3 5 04 4 130 6 5 t Der Betrieb dieses Geräts in der Europäischen Gemeinschaft bei Nutzung von Kanälen im 5 15 5 35 GHz Frequenzband ist ausschließlich auf Innenräume beschränkt um das Interferenzpotential zu reduzieren t Bei diesem Gerät handelt es sich um ein zum Einsatz in allen EU Mitglie...
Страница 155: ... 5 GHz au sein de l UE t Merci de vous référer au guide d utilisation ou de la fiche technique afin de vérifier si votre produit utilise 2 4 GHz et ou 5 GHz sans fil 7 40 640 3 0 3 0 6 6301 40 0 1 3 130 6 50 3 0 t El uso de este dispositivo está restringido a interiores cuando funciona en la Comunidad Europea utilizando canales en la banda de 5 15 5 35 GHz para reducir la posibilidad de interferen...
Страница 156: ...ower Control richieste per operare a 5 Ghz nell Unione europea t Ti invitiamo a fare riferimento al manuale del prodotto o alla scheda tecnica per verificare se il tuo prodotto utilizza le frequenze 2 4 GHz e o 5 GHz 4 7 7 3 004 3 0 36 6301 4 4 1 7003 3 004 130 6 5 t Dit toestel is beperkt tot gebruik binnenshuis wanneer het wordt gebruikt in de Europese Gemeenschap gebruik makend van kanalen in d...
Страница 157: ...heitsvorschriften dienen als Hilfe zur Gewährleistung Ihrer eigenen Sicherheit und zum Schutz Ihres Produkts Weitere Details finden Sie in den Benutzeranleitungen zum Produkt t Statische Elektrizität kann elektronischen Komponenten schaden Um Schäden durch statische Aufladung zu vermeiden leiten Sie elektrostatische Ladungen von Ihrem Körper ab z B durch Berühren eines geerdeten blanken Metallteil...
Страница 158: ...t Débranchez toujours le produit de l alimentation avant de le nettoyer et utilisez uniquement un chiffon sec non pelucheux 4536 0 4 4 63 Las siguientes directrices de seguridad general se facilitan para ayudarle a garantizar su propia seguridad personal y para proteger el producto frente a posibles daños No olvide consultar las instrucciones del usuario del producto para obtener más información t...
Страница 159: ...egare sempre il prodotto dalla presa elettrica prima di pulirlo e usare solo un panno asciutto che non lasci filacce 7 4 03 5 De volgende algemene veiligheidsinformatie werd verstrekt om uw eigen persoonlijke veiligheid te waarborgen en uw product te beschermen tegen mogelijke schade Denk eraan om de gebruikersinstructies van het product te raadplegen voor meer informatie t Statische elektriciteit...
Страница 160: ...auf dem Produkt oder der Verpackung weist darauf hin dass dieses Produkt gemäß bestehender örtlicher Gesetze undVorschriftennichtüberdennormalenHausmüllentsorgtwerdensollte sonderneinerWiederverwertungzuzuführenist Bringen Sie es bitte zu einer von Ihrer Kommunalbehörde entsprechend amtlich ausgewiesenen Sammelstelle sobald das Produkt das Ende seiner Nutzungsdauer erreicht hat Für die Annahme sol...
Страница 161: ...n savoir plus sur les produits et emballages respectueux de l environnement veuillez consulter le www dlinkgreen com 41 º0 4 Este símbolo en el producto o el embalaje significa que de acuerdo con la legislación y la normativa local este producto no se debe desechar en la basura doméstica sino que se debe reciclar Llévelo a un punto de recogida designado por las autoridades locales una vez que ha l...
Страница 162: ...re energia e a ridurre le emissioni di anidride carbonica Per ulteriori informazioni sui prodotti e sugli imballaggi D Link a ridotto impatto ambientale visitate il sito all indirizzo www dlinkgreen com 3 4 Ditsymboolophetproductofdeverpakkingbetekentdatditproductvolgensdeplaatselijkewetgevingnietmagwordenweggegooid met het huishoudelijk afval maar voor recyclage moeten worden ingeleverd Zodra het...
Страница 163: ... X QS ZQBELV TBNZDI QSPEVLUØX KBL J PQBLPXBǩ JSNB JOL BMFDB BCZ 1BǩTUXP BXT F QSBXJE PXP XZ njD BMJ VȈZULV TXPKF QSPEVLUZ JOL HEZ OJF Tnj POF XZLPS ZTUZXBOF 1PTUǗQVKnjD X UFO TQPTØC QP XBMBKnj 1BǩTUXP PT D ǗE Bǎ FOFSHJǗ J NOJFKT Bǎ FNJTKF 0 CZ EPXJFE JFǎ TJǗ XJǗDFK OB UFNBU QSPEVLUØX J PQBLPXBǩ NBKnjDZDI XQ ZX OB ǴSPEPXJTLP QSPTJNZ BQP OBǎ TJǗ F TUSPOnj OUFSOFUPXnj www dlinkgreen com Ǝ 4 Tentosymbolnavýr...
Страница 164: ...ásában és a széndioxid kibocsátásának csökkentésében Környezetbarát termékeinkről és csomagolásainkról további információkat a www dlinkgreen com weboldalon tudhat meg NORSK NO Dette symbolet på produktet eller forpakningen betyr at dette produktet ifølge lokale lover og forskrifter ikke skal kastes sammen med husholdningsavfall men leveres inn til gjenvinning Vennligst ta det til et innsamlingsst...
Страница 165: ...ledningerne Du kan finde flere oplysninger om vores miljømæssigt ansvarlige produkter og emballage på www dlinkgreen com 460 Tämä symboli tuotteen pakkauksessa tarkoittaa että paikallisten lakien ja säännösten mukaisesti tätä tuotetta ei pidä hävittää yleisen kotitalousjätteen seassa vaan se tulee toimittaa kierrätettäväksi Kun tuote on elinkaarensa päässä toimita se lähimpään viranomaistenhyväksy...
Страница 166: ... För mer information om våra miljöansvariga produkter och förpackningar www dlinkgreen com PORTUGUÊS PT Este símbolo no produto ou embalagem significa que de acordo com as leis e regulamentações locais este produto não deverá ser eliminado juntamente com o lixo doméstico mas enviado para a reciclagem Transporte o para um ponto de recolha designado pelas suas autoridades locais quando este tiver at...