background image

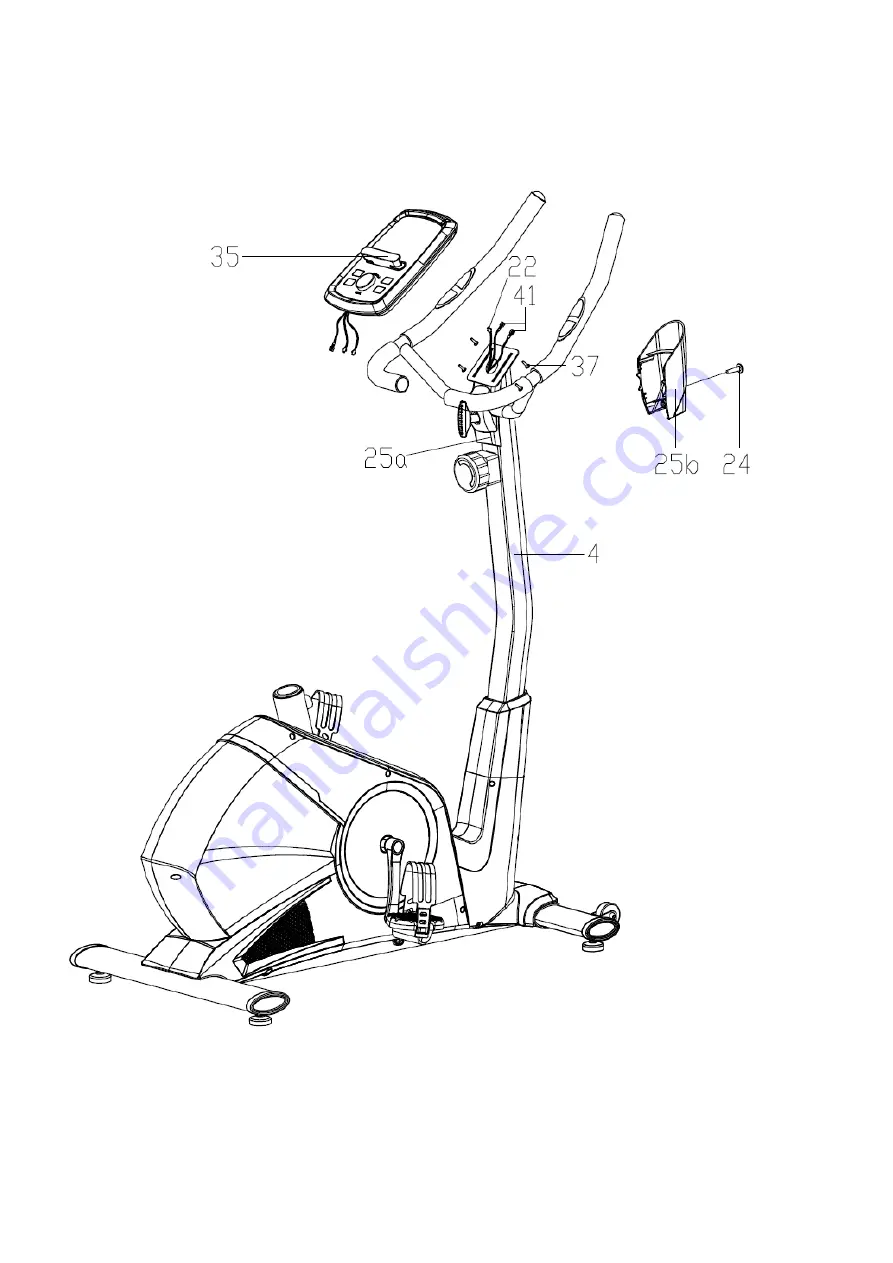
Step 5: 

1. Connect the pulse wire(41) and sensor wire(22) with the cables of the computer(35),then lock 
the computer(35) on the bracket of the handlebar post(4) with Cross head screws(37). 
 
2. Lock the protective guard(25a/b) to the handlebar post(4) with Cross head screws (24). 


Содержание Ergo Pro 3

Страница 1: ...Ergo Pro 3 MANUAL ...

Страница 2: ... 03 Set up the machine in a dry level place and leave it away from moisture and water before beginning exercising remove all objects within a radius of 2 meters from the machine 04 Place a suitable base e g rubber mat wooden board etc beneath the machine in the area of assembly or exercise to avoid scratch dirt and etc 05 Do not use aggressive cleaning articles to clean the machine remove drops of...

Страница 3: ...e power of the machine increases with increasing the speed and the reverse The machine is equipped with adjustable knob that can adjust the resistance 12 The maximum user s weight is 120KGS EXPLODED DIAGRAM ...

Страница 4: ...tube 1 10 End cap 2 34 Saddle 1 11 Arc washer 1 35 Computer 1 12 Cross head screw 1 36 Foam grip 1 2 13 Hex bolt M8xL58 4 37 Cross head screws 4 14 Spring washer D8 8 38 Tension controller 1 15 Arc washer d8x2xΦ25xR39 4 39 Cross head screws ST4 2 12 4 16 End cap 2 40 Sleeve Φ13 2 35 1 17L R Crank 1pr 41 Pulse wire 2 18L R Pedal 1pr 42 T Handle knob 1 19 Hex bolt M8x16 4 43 Protective guard 1 20 Sp...

Страница 5: ...stabilizer 2 and rear stabilizer 3 to the main frame 1 with the Hex bolt 13 spring washer 14 and arc washer 15 Step 2 Lock the pedal 18L R to the crank 17L R with wrench Please note lock the pedal 18L in counter clockwise and lock the pedal 18R in clockwise as shown And make sure the pedal 18L R are locked tightly during your movement otherwise the pedal will be broken ...

Страница 6: ...sion wire 22 with the sensor wire 21 then connect the Tension connecting wire 45 with the cable of the tension controller 38 as the picture A shown 2 Lock the handlebar post 4 on the main frame 1 with hex bolt 19 spring washer 14 and flat washer 7 then cover the protective guard 23 ...

Страница 7: ...pulse wire 41 from the hole of handlebar post 4 and out of the hole of the computer bracket 2 Lock the handlebar 5 on the handlebar post 4 with T Handle knob 42 Protective guard 43 Protective guard 25a and Flat washer 44 ...

Страница 8: ... 41 and sensor wire 22 with the cables of the computer 35 then lock the computer 35 on the bracket of the handlebar post 4 with Cross head screws 37 2 Lock the protective guard 25a b to the handlebar post 4 with Cross head screws 24 ...

Страница 9: ...orizontal tube 33 on the seat upright tube 28 with plum knob 29 and flat washer 30 and U bracket 31 3 Lock the saddle 34 on the stem of the seat horizontal tube 33 with the wrench 4 Lock the Saddle protective guard 26L R tightly on the seat upright tube 28 with Cross head screws 39 Please note Make sure the saddle 34 is locked tightly on the stem of the seat horizontal tube 33 before your movement...

Страница 10: ...ng jogging jumping jacks jump rope and running in place STRETCHING Stretching while your muscles are warm after a proper warm up and again after your strength or aerobic training session is very important Muscles stretch more easily at these times because of their elevated temperature which greatly reduces the risk of injury Stretches should be held for 15 to 30 seconds DO NOT BOUNCE Remember alwa...

Отзывы: