Cyrus Discmaster 8.0
User Instructions
2
GB
GB
Welcome to the world of Cyrus!
Congratulations on your choice of Cyrus Audio-Visual products. Our state-of-the-
art design technology and outstanding quality of manufacture has won
countless awards around the world. We are confident that you will derive
great pleasure from owning a product from one of the most recognised and
respected manufacturers of audio-visual equipment.
Please read these instructions carefully before commencing installation. They
provide full guidance to help you install your Cyrus Discmaster 8.0 safely and
correctly.
Preparations for Installation
Before installing the Discmaster 8.0 check that the following items are
included in the accessory box.
•
Warranty Card (with instruction manual)
•
AC Mains Cable
•
Remote Control Handset
•
2 x Phono leads for MC-Bus connection
After removing these items, please retain the packaging.
Install the Discmaster 8.0 in a well ventilated location away from sources of
high temperature, dust or humidity. Never stand the Discmaster 8.0 under
another unit or on any surface likely to hamper its cooling or ventilation.
INSTALLATION
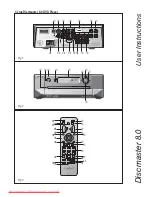
(Refer to Fig.1)
Key to the rear panel drawing:
1. Optical digital audio output
9. 5.1 rear channel audio outputs
2. S-Video output
10. 5.1 sub audio output
3. Coaxial digital audio output
11. 5.1 centre channel audio output
4. Stereo analogue audio output
12. VGA video output
5. HDMI digital video output
13. Component video output
6. Stereo DAC upgrade output
14. Composite video output
7. MC-Bus connections
15. AC power inlet
8. 5.1 front channel audio outputs
Connecting to the AC Mains Supply
Connect the socket on the AC Power cable to the Power inlet
1%
on the rear panel
of the Discmaster 8.0. Now connect the cable to a suitable AC power point.
There is no mains power switch on the Discmaster 8.0. To switch off the
mains supply to the Discmaster 8.0 remove the plug from the wall outlet. For
this reason, ensure that the plug is easily accessible when installing the unit.
Connecting the Video Output to a Television
The video output of the Discmaster 8.0 may be connected to the television or
monitor in five different ways. The choice of connection and the picture quality
achieved will depend on the options available at the TV/monitor. The
connections available from the Discmaster 8.0 are listed to follow in order of
quality. Use the connection option that appears highest in the list for best
picture quality performance-
HDMI Digital Video
The HDMI Digital Video output
e
should be used when connecting a high-
grade digital TV, projector or monitor equipped with HDMI digital input.
Component Analogue Video
The Component Video Output
1#
should be used when connecting a high
grade analogue TV, projector or monitor equipped with individual connectors
for Component Video input. Ensure that the three phono leads are connected
between the same component video signals.
VGA Analogue Video
The VGA Video Output
1@
should be used when connecting a high-grade
computer monitor, only equipped with an analogue VGA video input.
S-Video Analogue Video
The S-VIDEO (Y/C) Output
b
offers superior quality to a composite
connection and should be used if the TV has none of the preceding Video
connections. NOTE:- The S-Video connection must be switched on when
used. Refer to the Display settings section of the Menu System.
Composite Analogue Video
A Composite Video Output
1$
is also provided for TVs and monitors that only
have this connection. This is the lowest quality connection.
SCART Connection
To connect the Discmaster 8.0 to a TV, projector or monitor which only has a
SCART input connection, use a SCART break-out cable or adapter which will
give access to the S-Video or Composite video inputs, and also the audio
inputs of the TV if required.
Downloaded From DvDPlayer-Manual.com Cyrus Manuals

