(4).Operation Controls and Functions
Front Panel
1. Power:
Press the button to turn ON or turn OFF (standby) the power of the unit.
2. +/- button:
The buttons provide 3 functions:
a.
Input select ("+"):
Press the "+" button repeatedly to select your desired input
source. The input sources are toggled through in the following sequence.
b.
Auto Tune ("-"):
Press the "-" button to carry out picture auto adjust for
analog inputs (component or PC). The CP-255H will fine tune the position
(centering) and color of the output picture.
c. When in the OSD menu mode: Press the +, - button to move up or down the
highlight bar to your desired parameter. Or once a parameter is selected
with MENU/Enter button, press the button to adjust setting value of your
selected parameter.
3. Menu/Enter:
This button serves two purposes.
a. Press the button to bring up OSD main menu as shown in the
"OSD Operation". (page 7)
b. To act as a "Enter" key to enter sub menu or to adjust setting value of the
selected parameter.
4. Input LED Indicators:
When one of the LED illuminates its corresponding source
is being selected as input.
5. IR Sensor:
Infrad remote control sensor.
6. Audio L/R Input:
Stereo audio input associated with component in.
7. Component Input:
Connects this input connector to the Component output
connector of your source equipment using the enclosed 3RCA to 3RCA cable.
The CP-255H accepts both interlaced component input (480i, 576i) and
deinterlaced progressive input (480p, 576p...1080p).
The input range is 480i, 570i~1080i, 1080p.
Rear Panel
1. PC in:
Connects this PC input connector to the VGA output of your PC.
The acceptable PC resolutions range from VGA~WUXGA.
2. PC audio in:
Stereo audio input associated with PC in via 3.5mm phone jack.
3
Component PC HDMI
2
3
6
8
10
11
1
5
4
7
9
12
3. HDMI (DVI) in:
Connect this HDMI input connector to the HDMI output
connector of your HDMI source equipment using certified HDMI
cable. Or connect this HDMI input connector to the DVI output
of your DVI source equipment using DVI cable together with
DVI to HDMI adaptor. The HDMI input resolution covers
480i~1080p, and VGA~WUXGA.
4. AUX (DVI) audio in:
This audio input should be used only when a DVI source is
connected to the HDMI input. The CP-255H will convert
DVI and AUX audio input to HDMI output.
This audio input can not be used when input is HDMI signal.
5. HDMI out:
Scaled digital HDMI output. Connect this output to the HDMI or
DVI input of your HD display.
6. Power jack:
Connect to the 5V 2.6A DC power adaptor.
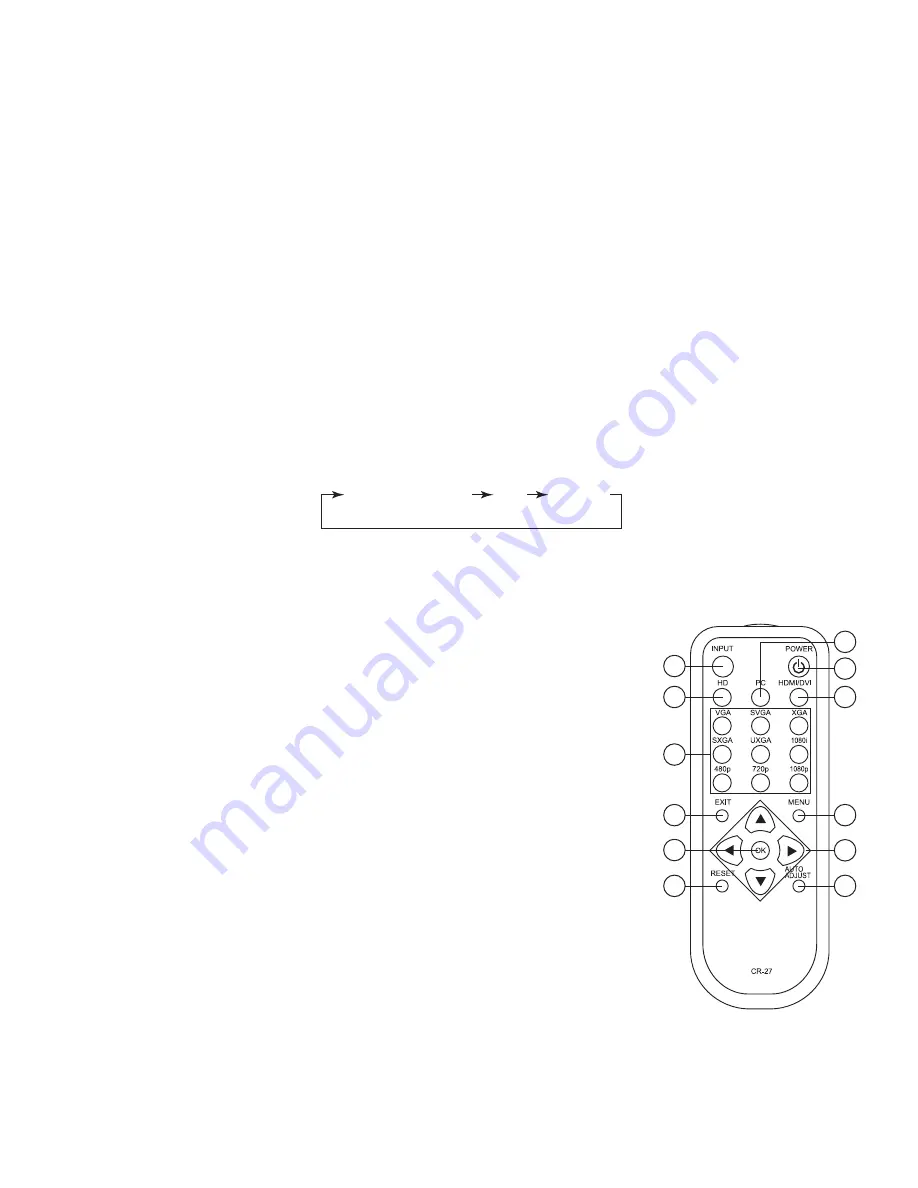
Remote Control and functions:
1. Power:
Press the button once to power on the CP-255H. Press again to enter
standby mode.
2. Input:
Press the button repeatedly to toggle through various input sources as
follows.
3. HD input:
Press the button to directly select component input.
4. PC input:
Press the button to directly select PC input.
5. HDMI/DVI input:
Press the button to directly select DVI (or HDMI) input.
6. Output resolution:
Select buttons:
Press any one of the button to directly
select output resolution.
For other output resolutions that are not
covered by these buttons please enter
Menu/Output page to select them.
7. MENU:
Press the button to bring up OSD main menu page.
8. Exit:
Press the button to exit from a sub menu or main
menu.
9. Up/Down/Left/Right:
Press the Up/Down button to move
the highlight bar to your desired
parameter during the OSD operation.
Press the Left/Right button to increase/
decrease the setting value of a
selected parameter.
10. OK (Enter):
Press the button to confirm your selection.
11. Reset:
Press the button to reset the unit's firmware setting
to the factory default value.
12. Auto Adjust:
Press the button to optimize the position of the picture
(picture centering) on the screen.
Содержание CP-255H
Страница 1: ...PC HD to 1080p HDMI Scaler Box Operation Manual CP 255H ...
Страница 11: ......
Страница 12: ......


