


5
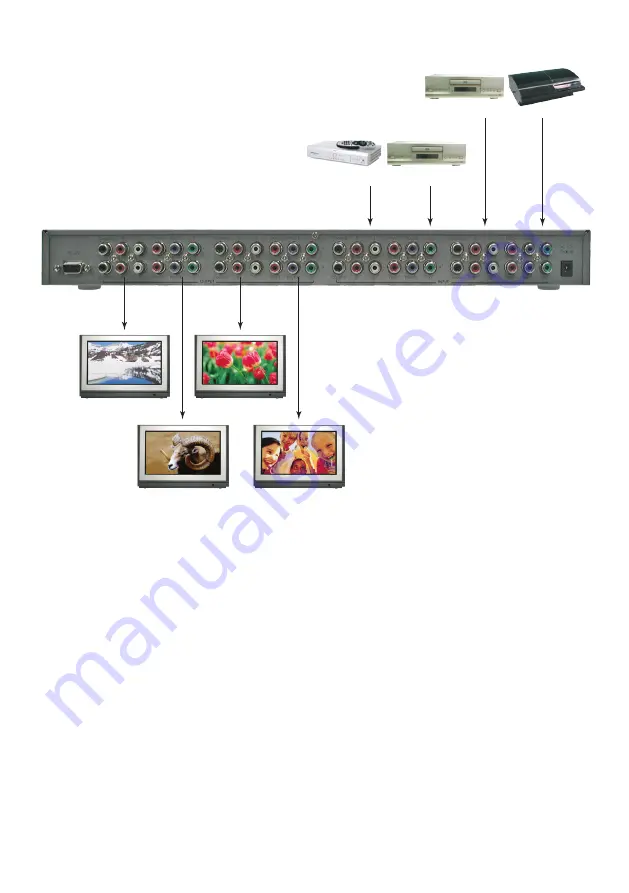
Blu-ray
STB
HD TV
HD TV
HD TV
HD TV
DVD
PS3
4. Operation Controls and Functions
4.1. Front Panel
1. Remote control sensor.
2. Power Switch & LED Indicator:
The LED will illuminate when the power is turned on.
3. Input Select/Indicators for Output A:
Press the "OUT A" button repeatedly to switch to your desired source. One of
the four LEDs will illuminate to indicate which input source is being selected,
and routed to the display.
4. Input Select/Indicators for Output B:
Press the "OUT B" button repeatedly to switch to your desired source. One of
the four LEDs will illuminate to indicate which input source is being selected,
and routed to the display.
5. Input Select/Indicators for Output C:
Press the "OUT C" button repeatedly to switch to your desired source. One of
the four LEDs will illuminate to indicate which input source is being selected,
and routed to the display.
6. Input Select/Indicators for Output D:
Press the "OUT D" button repeatedly to switch to your desired source. One of
the four LEDs will illuminate to indicate which input source is being selected,
and routed to the display.
4.2. Rear Panel
1. RS-232 Communication Port:
Connect to the COM port of your PC for the distant control over RS-232
channel.
2. Component and L/R Audio OUTPUT Ports A, B, C and D:
Connect each set of Component (3 RCA) and Audio (2 RCA) to the input of
your HDTV displays.
3. Component and L/R Audio INPUT Ports 1, 2, 3 and 4:
Connect each set of Component (3 RCA) and Audio (2 RCA) to the output of
your source equipments such as DVD player or set-top-box.
4. Power:
Plug the 12VDC power supply into the unit and connect the adaptor to AC wall
outlet.
4.3. Remote Control
1. Power:
Press the button to turn on/off the unit.
2. Input Select for Component/Audio OUT A:
Press 1, 2, 3 or 4 to select the desired input source for
Component/Audio OUT A.
3. Input Select for Component/Audio OUT B:
Press 1, 2, 3 or 4 to select the desired input source for
Component/Audio OUT B.
4. Input Select for Component/Audio OUT C:
Press 1, 2, 3 or 4 to select the desired input source for
Component/Audio OUT C.
5. Input Select for Component/Audio OUT D:
Press 1, 2, 3 or 4 to select the desired input source for
Component/Audio OUT D.
4.4. RS-232 Protocol
4.4.1. Pin Definition
*RS-232 transmission format:
Baud Rate: 9600 bps
Data bit: 8 Bits
Parity: None
Stop Bit: 1 bit
2
3
1
2
3
4
5
6
POWER
OUT A
OUT B
OUT C
OUT D
1
2
4
3
INPUT-SELECT
1
2
4
3
INPUT-SELECT
1
2
4
3
INPUT-SELECT
1
2
4
3
INPUT-SELECT
CCMX-44
HD 4x4
RS-232
R
L
R
L
Pr/Cr
Pb/Cb
Y
C
D
Pr/Cr
Pb/Cb
Y
R
L
R
L
Pr/Cr
Pb/Cb
Y
A
B
Pr/Cr
Pb/Cb
Y
R
L
R
L
Pr/Cr
Pb/Cb
Y
3
4
Pr/Cr
Pb/Cb
INPUT
OUTPUT
Y
R
L
R
L
Pr/Cr
Pb/Cb
DC 12V
Y
1
2
Pr/Cr
Pb/Cb
Y
4
3
2
1
OUTPUT
A
OUTPUT
D
OUTPUT
C
OUTPUT
B
POWER
CR-33
1
2
3
4
5
PIN
1
2
3
4
5
6
7
8
9
Definition
NC
Tx
Rx
NC
GND
NC
NC
NC
NC
PIN
1
2
3
4
5
6
7
8
9
Definition
NC
Rx
Tx
NC
GND
NC
NC
NC
NC
CCMX-44
Remote Control Console
7. Connection and Installation
6
Содержание CCMX-44DA
Страница 1: ...CCMX 44DA HD 4x4 Operation Manual CCMX 44DA ...
Страница 2: ......
Страница 10: ...5 Blu ray STB HD TV HD TV HD TV HD TV DVD PS3 7 Connection and Installation 6 ...
Страница 11: ......
Страница 12: ...20081021 MPM CCMX44DA Home page http www cypress com tw CYPRESS TECHNOLOGY CO LTD ...


