background image

Cygnus 4+ Operating Manual 

M5-CYG4P-M-01_Iss5.doc 


108 

5.


The gauge’s measurement mode 

6.


The connection state (Connected, Lost Connection, 

Disconnected) 

7.


The gauge’s battery level 

Surveys 

A Survey is a container for all your data logger records and 

measurements. A Survey can be saved to a single file which can 

be copied or send electronically to another CygLink user. The 

Survey file is binary and cannot be tampered with. 

Creating a new Survey 

You don’t have to create a Survey but it does create the container 

for any records that you transfer from the gauge. If you intend to 

save the records transferred then you will need to create a survey 

file anyway. 


1. 

From the Menu click; 

File 

 New Survey 

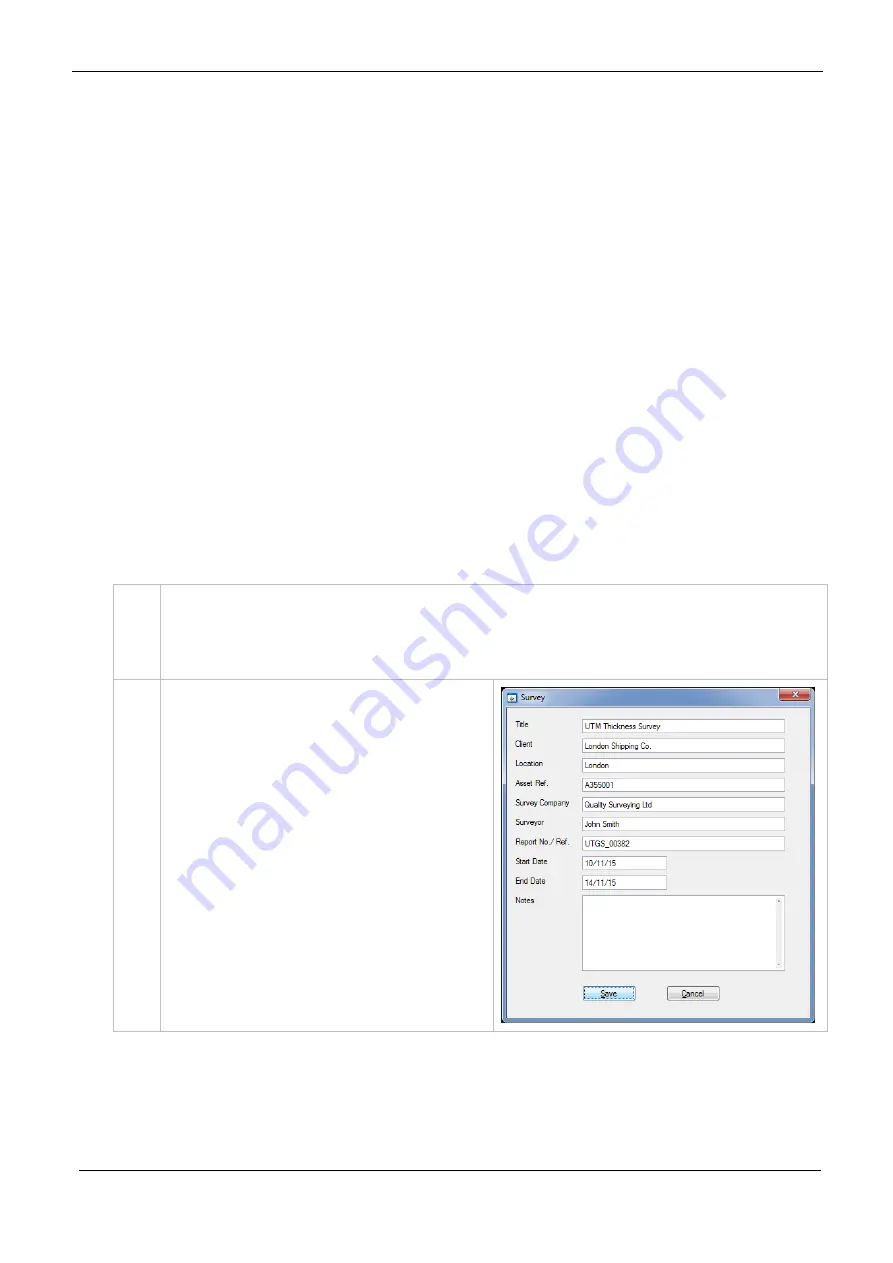
2. 

Complete as many fields as 

required, you can always go 

back and edit this 

information. 


This information will appear 

on the PDF report and the 

export to CSV file output. 


Содержание M5-C4P

Страница 1: ...Cygnus 4 Multi Mode Ultrasonic Thickness Gauge Operating Manual Covers Gauge Model M5 C4P Doc No M5 CYG4P M 01_Iss5 doc 17 December 2015...

Страница 2: ...Provide products and services that meet or exceed customer expectations in terms of performance reliability and safety Internal Systems Operate effective and safe working practices that comply with IS...

Страница 3: ...and Compared 16 Multiple Echo Mode ME Mode 3 16 Single Echo Mode SE Mode 2 16 Echo Echo Mode EE Mode 3 17 Measuring Non Steels 17 Measuring Non Metals 18 Single Element Probes and Protective Membranes...

Страница 4: ...Point Calibration 41 Ladder Step Wedge 41 Two Point Calibration Procedure 42 Probe Zero twin element probes 44 Starting a Probe Zero from the Main Menu 45 Probe Zero Function 45 Setting the Velocity o...

Страница 5: ...ng 73 Re taking the Last Measurement 73 Stepping Backwards in the Record 74 Adding Radial Points 75 Adding Measurement Comments 77 Closing and Opening a Record 78 Closing the Record 79 Opening a Recor...

Страница 6: ...r Unstable 98 Tips for Optimising Battery Life 98 15 Updating your Gauge 100 Update Software 100 Gauge Firmware Files 100 16 Care and Servicing 101 Cleaning the Gauge 101 Batteries 101 Environmental 1...

Страница 7: ...Measurements 116 Viewing an A Scan Graph 117 Deleting all Records from the Gauge 118 Measurement Comment List 119 Material Velocity List 120 Creating a PDF Survey Report 121 Exporting a Survey to a C...

Страница 8: ...f this manual proper transducer selection correct zeroing of the transducer correct sound velocity correct use of the appropriate test blocks proper cable length and proper couplant selection all play...

Страница 9: ...hich are ignored An A Scan display provides the user with information that can be used to visually verify the thickness measurement which can displayed in Metric mm or Imperial inch units A Data Loggi...

Страница 10: ...ess Gauges are designed to be simple to use and to withstand the harsh environments that they are intended for We have built up an enviable reputation with our customers in over 45 countries around th...

Страница 11: ...uch 4 Accessory Pouch containing 3 x AA Batteries Blue Couplant Gel Kit supplied with Single Element Probe 1 Ultrasonic Probe 2 Moulded Probe Cable in side pouch 3 15mm or Steel Test Block 4 Spare Mem...

Страница 12: ...on the rear of gauge The hand strap can be separated by a push button buckle to gain access to the battery cover The battery cover is removed by pressing in with your thumb the at the base to release...

Страница 13: ...able that offers superior flexibility and resistance to oils and ultraviolet light The cable will not stiffen after exposure to ultraviolet light The connector uses original Lemo connectors for reliab...

Страница 14: ...stable Neck Strap The ends of the neck strap clip onto two wire loops fitted to the gauge These wire loops are made from coated stainless steel Wire loop fitted to the gauge body Simply pass the loop...

Страница 15: ...ls Material Coating Corrosion Thickness Recommended Probe Measurement Mode Steels Any Non to Moderate 1 mm S5A Multiple Echo Steels Any Non to Moderate 2 mm S3C Multiple Echo Steels Any Non to Moderat...

Страница 16: ...asurement Also because it uses a single element or single crystal probe there are no errors due to the V path of the ultrasound beam found in all twin element probes This makes it simple to calibrate...

Страница 17: ...measures between the first two echoes This method is intended to ignore any thin surface coatings whilst still using a twin element probe Echo echo mode is not able to verify its measurements unlike M...

Страница 18: ...sity polyethylene HDPE can be measured successfully Rotationally Moulded parts can generally be measured successfully You must use Single Echo mode to measure plastics You must generally use a low fre...

Страница 19: ...wear Single Element Probe Membrane Parts Single Element Probe Membrane Locking Key Measuring Higher Temperatures The polyurethane membranes fitted to the single element probes are suitable for measuri...

Страница 20: ...ace a new membrane into the end of the Knurled Ring ensuring it locates in the groove 4 Screw the Locking Ring back inside the Knurled Ring and tighten with the Membrane Key 5 Place a few drops of Mem...

Страница 21: ...to 2 Thin metals Single Element probes Probe Type Size Frequency Range in Steel Typical Uses S2C 13mm 2 25 MHz 3 to 250 mm General purpose probe suitable for most applications that can use Multiple Ec...

Страница 22: ...Cygnus 4 Operating Manual M5 CYG4P M 01_Iss5 doc 22 The Probe Type Code S 2 C Single or Twin Crystal Frequency in MHz Size A 6mm B 8mm C 13mm D 19mm...

Страница 23: ...M5 CYG4P M 01_Iss5 doc Cygnus 4 Operating Manual 23 5 Gauge Operation Gauge Controls End view of gauge Front view of gauge Probe Connections Power Key Select Keys Menu Key Navigation Keys...

Страница 24: ...is displayed 3 The gauge details are displayed Model Serial Number Version Number Run Time 4 The gauge is ready to use Turning the Gauge Off 1 Press Hold the Power key 2 The display shows power off an...

Страница 25: ...Measurement Screen Views The gauge has three measurement screens that can be quickly changed using the left and right navigation keys These screens offer three views to suit the situation 1 Use the L...

Страница 26: ...area that shows information about the gauge s status Battery Level Velocity of Sound value Calibration Status Probe Type Measurement Mode Deep Coat Function Probe Type when the probe is connected the...

Страница 27: ...rect probe you must first perform a Probe Zero before you can begin taking measurements For instructions see Probe Zero Function on page 45 It is recommended to frequently perform a Probe Zero especia...

Страница 28: ...o detect a stable multiple echo signal it displays an Echo indication to help the operator locate a suitable position 1 1 Bar Flashing No echoes detected 2 1 steady 1 Bar Flashing Only 1 echo detected...

Страница 29: ...o Green when the measurement has been stable for 2 consecutive seconds When measuring using Single Echo or Echo Echo mode once you have a measurement keep the probe still and wait for the gauge to sig...

Страница 30: ...ement probe 75mm 3 or under you must ensure the face of the probe is correctly aligned to the curvature of the pipe otherwise measurements may be inaccurate The dividing line on the face of the probe...

Страница 31: ...ue border to indicate it s held or froze 3 Press the X Cancel key to un hold the thickness measurement Battery Life The gauge will operate continuously for approximately 10 hrs when fitted with Durace...

Страница 32: ...dication The gauge will periodically flash a red Low Battery warning sign when the batteries have approximately 1 hour of use remaining Low battery indication When the batteries are exhausted the gaug...

Страница 33: ...ssible The gauge works by generating a short pulse of ultrasound that is coupled into the object you are measuring This pulse then travels through the object and is reflected back to the probe as an e...

Страница 34: ...ving the probe to find a better reflector first rotate the probe to see if that gets a measurement if that fails then try another position Weak Signal Measuring Over Corrosion Pits You should be caref...

Страница 35: ...the A Scan can be very useful when taking measurement through coating using Echo Echo mode Echo Echo mode measures thickness by measuring the time between two consecutive echo signals in ideal condit...

Страница 36: ...e accurate Try first rotating the probe then another location Multiple Echo Mode Although Multiple Echo mode has the benefit if providing echo matched verified thickness measurements and can be used r...

Страница 37: ...sed for the thickness measurement This A Scan shows a Multiple Echo measurement from a corroded steel sample The three echo signals have been picked out ok but there is less clarity around echo 2 and...

Страница 38: ...ntly accurate This means the accuracy of any thickness gauge measurement relies principally on the velocity being correct for the material being measured There are tables listing the velocity of most...

Страница 39: ...curate than using a general velocity value For calibration instructions see page 39 If there is no test sample available the Gauge can be calibrated by Setting the Velocity of Sound directly A table o...

Страница 40: ...4 While holding the probe firmly on the sample and while a steady thickness measurement is displayed 5 use the Up and Down keys to adjust the thickness to the required value 6 When done press the OK...

Страница 41: ...ur measurement is only as good as your calibration When performing a two point calibration both sample thicknesses should be made from the same material The temperature of the sample material should b...

Страница 42: ...e step wedge then add some fresh couplant to the step wedge 3 Place the Probe on the sample and verify the gauge can get a thickness value 4 Access the Menu and scroll down to the Calibration group Th...

Страница 43: ...e thickness to the required value 7 When the correct measurement is displayed press the OK Select key 8 Next measure the Thin sample Minimum thickness 9 While holding the probe firmly on the thin samp...

Страница 44: ...obes must be zeroed to compensate for any wear or operating temperature changes The gauge will always perform a Probe Zero when first turned on or when a twin element probe is connected If the probe g...

Страница 45: ...down to the Probe group Then scroll right to the Zero item Press the Ok Select key to start the Zero function Probe Zero Function 2 Display shows the Zero Probe message Important Wipe any couplant fr...

Страница 46: ...of Sound value to calculate the material thickness value It is therefore important the velocity value is set correctly for the material being measured If you perform a Calibration the Velocity of Soun...

Страница 47: ...he velocity will alter the calibration Press the OK Select key to continue or X Cancel to abort 4 Use the Up and Down keys to adjust the velocity value as required Use the Left and Right keys to highl...

Страница 48: ...key 2 the Main Menu is displayed 3 Use the four Navigation keys to scroll around the Main Menu 4 Use the Up and Down keys to select a group in the left column 5 Press the Right key to move to the item...

Страница 49: ...9 Or press the red X Cancel key to abort 6 Press the Left key to go back to the main group if you want to make another selection 12 To exit the menu press the Menu or red X Cancel key once Settings ar...

Страница 50: ...is highlighted Pressing Up or Down will change the units value only 2 Pressing the Left key will move the highlight to the tens digit Pressing Up or Down will change this value only 3 Pressing the Lef...

Страница 51: ...ress the Ok Select key to enter the character or perform the function 2 To enter the word CYGNUS you would move the blue highlight from Ok to C then press the Ok Select key then move to the Y 3 There...

Страница 52: ...ect the probe from a list These probes can be Auto Detected T2C T5B T7A S2C These probes must be selected manually S3C S5A S5C The Probe Type is displayed is displayed at the top of the measurement sc...

Страница 53: ...n swap probes during a survey without having to re calibrate each time Automatic Probe Detection The Automatic Probe Detection feature works by listening to how the probe behaves when it is first plug...

Страница 54: ...asurement units will not affect the calibration 1 Access the Menu and scroll down to the Measurement group Then scroll right and select Units Press the Ok Select key to open the Units function 2 Use t...

Страница 55: ...elect Resolution Press the Ok Select key to open the Resolution function 2 Use the Up and Down keys to select the required Resolution 3 Press the OK Select key to save Or press the X Cancel key to exi...

Страница 56: ...this is the highest thickness measurement measurements over this value will cause an Alert This limit is optional and can be set to zero When Limits are enabled the measurement screen displays a horiz...

Страница 57: ...easurement is 5 10 mm so the bar graph shows a red bar positioned at the Minimum point Now the thickness measurement is 20 00 mm so the bar graph shows a red bar positioned at the Maximum point Now th...

Страница 58: ...and Down keys to select the Minimum Reference Maximum or Vibrate settings Press the Ok Select key to open the selected item 4 Use the navigation keys to change the setting Press the OK Select key to...

Страница 59: ...coating material allows the ultrasound to pass through soft coatings like rubber or bitumen don t transmit ultrasound very well Using Deep Coat will not affect the calibration Turn Deep Coat Off when...

Страница 60: ...Cygnus 4 Operating Manual M5 CYG4P M 01_Iss5 doc 60 When Deep Coat is turned On a DC indicator will be displayed in the status area at the top of the measurement screen DC Deep Coat is ON...

Страница 61: ...s of data logging is simply 1 Create a new Record 2 Log your thickness measurements pressing the Ok key to save each thickness measurement 3 Complete the Record when all the measurements have been tak...

Страница 62: ...nts these limits are used to colour the measurement values and in the case of the minimum limit alert the user if the measurement is under that limit 1 Ref Thk This is the Reference Thickness value fo...

Страница 63: ...l the extent of the thinning or corrosion See Adding Comments to Measurements on page 116 Measurement Comments Each measurement point can optionally have comments added to it There is a list of 8 pre...

Страница 64: ...omments from a file on the SD card The file must be named commentlist txt and contain a list of up to 8 text comments each up to 24 characters in length You can use Microsoft Excel to create a list of...

Страница 65: ...be taken there are 16 patterns available Horizontal surveying Vertical surveying When a Grid Record is created the measurement point names are assigned as follows 1 R1C1 2 R1C2 3 R1C3 etc 8 6 8 5 8 5...

Страница 66: ...be used to prompt the user when each Record begins Templates are normally created to cover a specific type of survey and the actual Template would be distributed to all the Cygnus 6 gauges in use wit...

Страница 67: ...ements expected 5 Columns Grid only number of columns required 6 Rows Grid only number of rows required 7 Direction Grid only grid measurement pattern there are 16 to choose from 8 Ref Thk Reference t...

Страница 68: ...ess measurements The measurement screen will be moved to the Data Logging view 6 At the bottom of the screen details of the record are displayed Record Type Lin Name of the Record Number of Points Tak...

Страница 69: ...Template is identical to starting a Linear or Grid Record except you may be prompted for User Field information after the Record is created User Field Input User Fields can prompt for Alphanumeric Num...

Страница 70: ...ey to open the screen 2 The User Fields will be displayed you can select using the Up and Down keys then press the key to edit the values Press the X key to exit the Review User Fields screen Logging...

Страница 71: ...ss measurements when the measurement remains stable for two seconds This means the operator can log measurements using one hand See Auto Log on page 95 to turn the Auto Log feature On or Off The Auto...

Страница 72: ...osion and thinning for example The Gauge allows the user to record either a No Reading or Obstructed measurement point as required 1 With NO thickness measurement displayed press the key once Then cho...

Страница 73: ...Units while Data Logging When a Record is active you will be unable to change the measurement units This is because each record can only contain measurements of the same units If you try and change th...

Страница 74: ...nfirm by pressing the key 3 The last measurement point has now been removed from the record Stepping Backwards in the Record If you need to step backwards in the record and re take the measurement poi...

Страница 75: ...s highlighted purple arrowed Press to select Press Cancel to abort 4 You can start logging measurements from that point Note Subsequent measurement will be overwritten The next position that will be l...

Страница 76: ...scroll right and select Add Radials Press the key to select 2 Press the key again to confirm 3 Set the number of Radial Points this can be any number from 4 to 12 Press the key to continue 4 The Measu...

Страница 77: ...he screen will revert back to the normal data logging view A small R is added to the measurement point to show it has Radial Points added Adding Measurement Comments You can add comments to ANY measur...

Страница 78: ...cted When you have selected the required comments press the key to save and exit or the X to cancel 4 In the measurement screen any measurement points that have comments will have a C displayed in the...

Страница 79: ...oll right and select Close Press the key to select 2 Confirm by pressing the key 4 Data logging has been stopped and the record has been closed The record details at the bottom of the screen bar shows...

Страница 80: ...been resumed Protecting a Record If you want to Protect a record from being deleted or modified then you can use the Protect Record feature Once protected records cannot be deleted from the gauge and...

Страница 81: ...he Data Logging group Then scroll right and select Protect Press the key to select 2 You will see a list of all the records stored on the gauges SD card listed in newest first order Use the navigation...

Страница 82: ...any protected records Opening Protected Records If you open a protected record then you will not be able to make changes to the record you will only be able to review the records contents Deleting Re...

Страница 83: ...Logging group Then scroll right and select Delete Press the key to select 2 You will see a list of all the records stored on the gauges SD card listed in newest first order Use the navigation keys to...

Страница 84: ...onfirm again by pressing the key 4 All unprotected records will have been deleted from the SD card A message will inform how many records have been deleted Continue by pressing the key Record Status T...

Страница 85: ...s5 doc Cygnus 4 Operating Manual 85 2 Depending on the Record type you will see various items listed Some items such as Ref Thk and Min Thk can be changed For Linear Records the number of Points can a...

Страница 86: ...nsferred to each Gauge ready for use Templates contain the following 1 A name and description 2 Measurement units and velocity of sound 3 A list of thickness Measurement Points with minimum and refere...

Страница 87: ...o be specified to be used as a template for the Excel document produced So a company report as an XLT file can be used to create each new blank report document that will then receive the thickness mea...

Страница 88: ...ion An optional Cell Ref field to specify where the Value should be inserted in the spreadsheet For example If the User Field Type Alphanumeric If the User Field Name Vessel Name If the User Field Cel...

Страница 89: ...nd the consequences to the measurement if the gain is set incorrectly The gauge will default back to Automatic Gain mode when the gauge is turned on or the probe is changed Manual Gain Mode When the g...

Страница 90: ...adjusted Press the key to continue 4 MG is displayed in blue at the top to show Manual Gain mode is active The Gain setting is shown in blue to show it is active 60 Manual Gain Menu When in manual ga...

Страница 91: ...igate between Menu Gain and Range The selected item will be highlighted in blue Use the key to select Use the X key to cancel Adjusting the Gain Press the Menu key and check that Gain is ticked select...

Страница 92: ...screen there are also other earlier smaller echoes that are becoming significant The thickness measurement is still ok however Ideally you would reduce the gain down to get a 100 high signal Adjustin...

Страница 93: ...asurement specified for the Twin Element probes is valid for when Automatic Gain Mode is selected this is the default gain mode when the gauge is turned on By manually adjusting the gain and observing...

Страница 94: ...set to Automatic Auto the X scale is set using the measured thickness value and the measurement mode This means when measuring a range if thicknesses the A Scan range will always be set so you can obs...

Страница 95: ...ree power saving settings these determine how long before the gauge will dim the display and ultimately turn off when the gauge is inactive inactive no key presses and no thickness measurements Power...

Страница 96: ...ncel key to save the comments and exit this screen Set Time and Set Date These two items allow the user to set the gauges Time and Date The time and date are used by the Data Logger Set Time and Date...

Страница 97: ...A Carbide Scraper can also help to prepare the surface and remove any loose rust or debris Good quality hammers and scrapers are available from Cygnus Always ensure that there is plenty of couplant p...

Страница 98: ...her on a test block if there is still no reading the Gauge may require servicing If Readings are Erratic or Unstable Check that the Probe lead is properly connected to both Probe and Gauge Check that...

Страница 99: ...ded metal with single element probes the gauge uses more power searching for a multiple echo match this can significantly reduce battery life So if you are frequently measuring on very heavy corrosion...

Страница 100: ...cal Software and look for a PDF document called M5 Surface Gauge Firmware Version Info view this document to find the latest version for your gauge along with any changes made Note you will need to cr...

Страница 101: ...e the batteries if the Gauge will not be used for more than a few days Only use leak proof batteries Cygnus recommend Duracell batteries Environmental Do not immerse the Gauge in liquids The gauge is...

Страница 102: ...reliability very often problems with getting measurements are simply due to the way the Gauge is being used However if you do need to return you re Gauge for Repair please let us know the details of t...

Страница 103: ...gged records and B Scans from the gauge Organise your records and measurement points View A Scan graphs View B Scan graphs Add comments to individual measurement points Create a PDF report of a survey...

Страница 104: ...e recommend a screen resolution of 1280 x 720 or greater 4 We recommend at least 1GB of memory 5 If using Bluetooth a Bluetooth radio must be fitted Upgrading You can check the Cygnus Instruments webs...

Страница 105: ...rst connect the gauge to the computers USB port Windows will search for a suitable driver you may notice this message from the taskbar If you click the message you should see the driver installation p...

Страница 106: ...ct Discover new Gauge and Connect 4 CygLink will search all the available Com ports listening for a Cygnus gauge If a gauge is detected then it will connect and save these settings for next time 5 Whe...

Страница 107: ...nect Disconnect from Gauge Manual Connection Settings If you need to manually set the connection settings then select the Connection Settings option from the Connect menu here you can specify the COM...

Страница 108: ...ronically to another CygLink user The Survey file is binary and cannot be tampered with Creating a new Survey You don t have to create a Survey but it does create the container for any records that yo...

Страница 109: ...y 2 You may be prompted to save any unsaved data first Editing the Survey Info 1 From the Menu click File Edit Survey Info Managing the Survey Sorting Survey Records You can sort some of the columns i...

Страница 110: ...ending or descending Points ascending or descending Type Date ascending or descending Viewing Record Information You can view the details of a record by right clicking on the record in the list which...

Страница 111: ...s screen the Details table is read only and contains details about the record and summary information about its measurements Ref and Min Thickness You can set and apply a Reference and Minimum thickne...

Страница 112: ...or deleting them Measurement Summary Stats If you scroll down the Details table you will see summary information about the measurements contained in the records Record Properties Screen Stats 2 This i...

Страница 113: ...idual record you wish to transfer or click Select All If you check Delete records after Transfer they will be deleted from the gauges memory card after transferring 3 To start the transfer click Trans...

Страница 114: ...ckness Measurements in a Record To display the list of thickness measurements in a record click on the record in the Survey Records list the Measurements tab below will display the measurements belong...

Страница 115: ...iew information about the measurement or display it s A Scan graph if it has one Note there is no undo function once deleted the measurement point is lost unless you have saved a copy of the survey or...

Страница 116: ...to Measurements You can add comments to a measurement point using the measurement properties screen The Notes field can be directly typed into or you can click the Add From Comments button to select...

Страница 117: ...the list and click Ok Viewing an A Scan Graph You can select the View A Scan item from the measurements context menu or double click the measurement row The A Scan graph will be displayed in the Logg...

Страница 118: ...ween the two cursors for relative measurements d Deleting all Records from the Gauge After you have transferred your records from the gauge in to the Survey and saved the survey file you can delete th...

Страница 119: ...or use during data logging You can edit these comments using CygLink then send them to the gauge when connected to CygLink 1 From the Menu click File Measurement Comments 2 You can then Add Edit or Re...

Страница 120: ...value CygLink comes with a pre defined list but you can create your own list of materials specifically to suit your application This list can be send to the gauge when connected to CygLink 1 From the...

Страница 121: ...PDF Survey Report A PDF report can be produced containing all the Survey Records and thickness measurements in the Survey grouped by each Survey Records Once the export process is complete your report...

Страница 122: ...of all the A Scan Graphs Appendix of all the B Scan Graphs Exporting a Survey to a CSV File You can export the textual and numeric data from the whole survey to a CSV2 file that can be opened with a s...

Страница 123: ...M5 CYG4P M 01_Iss5 doc Cygnus 4 Operating Manual 123 Survey CSV Export opened in Excel Templates Creating New Templates 1 To create a new Templates from the Menu click Setup New Template...

Страница 124: ...ned in the Edit Template screen where you can further arrange the contents and add User Fields if required Editing Templates You can Edit or Delete a Template from the Setup Manage Templates menu item...

Страница 125: ...ference Minimum Units Velocity Excel Template Optional spreadsheet cell locations Measurement Points Thickness measurement points User Fields User field items 5 The Details tab contains the basic sett...

Страница 126: ...l be taken You can set the name reference and minimum thicknesses and spreadsheet cell location 7 User Fields can be added by clicking the New button You must then enter a Name Cell location and selec...

Страница 127: ...To send Templates to the gauge from the Menu click Gauge Transfer Templates to Gauge 2 You will see the Template Manager screen Select the template you wish to send to the gauge by clicking the Select...

Страница 128: ...ected gauge so it can update its internal clock calendar 1 To set the Time and Date in the gauge from the Menu click Gauge Set Time and Date in Gauge COM Port Numbers CygLink should automatically find...

Страница 129: ...M5 CYG4P M 01_Iss5 doc Cygnus 4 Operating Manual 129 Serial Port entry Remember the COM number listed as this will need to be selected within CygLink s settings menu Windows Device Manager...

Страница 130: ...ine LR6 batteries Battery Voltage Range Min 3 0 V dc Max 4 5 V dc Battery Type AA Size LR6 Alkaline HR6 NiMH Low Battery Indication Battery level indication on display with low battery warning message...

Страница 131: ...up and after a probe change Single element probes in multiple echo mode do not need to be zeroed Measurement Modes Single Echo mode with Twin element probe Measures thickness using the time from the d...

Страница 132: ...Can be used to update the gauge firmware and load gauge settings Data Logger Maximum number of measurement points per Record 5000 Maximum number of Records 100 soft limit Maximum Grid Record size 100...

Страница 133: ...IL STD 810G Method 516 7 Shock 20g MIL STD 810G Method 516 7 Transit Drop 1 22m Use in Explosive Atmospheres Locations Class I Division 2 Group D only Tested using MIL STD 810G Method 511 5 Procedure...

Страница 134: ...sional wave velocity cl Material Velocity of Sound V Conversion Factor f m s in us Aluminium alloyed 6380 0 2512 1 078 Aluminium 2014 6320 0 2488 1 068 Aluminium 2024 T4 6370 0 2508 1 076 Aluminium 21...

Страница 135: ...Steel and merely convert the readings by multiplying by the Conversion Factor for the material being measured This method avoids unnecessary recalibration Example The Gauge is calibrated for Steel 59...

Страница 136: ...Cygnus 4 Operating Manual M5 CYG4P M 01_Iss5 doc 136 19 EU Declaration of Conformity...

Страница 137: ...recycled and reused It may contain hazardous substances that could impact health and the environment In order to avoid the dissemination of those substances in our environment and to diminish the pres...

Страница 138: ...performed or making any other claim under this warranty CYGNUS will not be liable under this warranty unless the total price for the Product was paid by the due date for payment 4 This warranty does n...

Страница 139: ...easurement Comments 63 Minimum Alert 62 Obstructions 72 Points Taken 71 Radial Points 62 Re Take 74 Deep Coat 58 Disposal 137 Echo Echo 17 Gain dB Values 89 Manual Gain 89 Gauge Cleaning 101 Display 2...

Страница 140: ...s5 doc 140 Single Echo 16 Sound Velocities 134 Templates Creating new Records 69 User Field Input 69 Test block 39 Thick Coatings 58 Thickness Measurement 27 Troubleshooting 98 Units 54 USB Port 103 W...

Отзывы: