background image

5

1. Unplug the Internet cable that connects to your computer and plug it into the NetGenie socket labelled

“WAN”.

2. Use the RJ-45 Ethernet cable provided with the NetGenie appliance to connect your computer to any of

the NetGenie sockets labelled “LAN.”

3. Switch on/Power up your NetGenie appliance. Wait till the Power and WAN LEDs turn green.
4. Switch on your computer now. NetGenie's LED labelled “LAN” will turn green and remain steady.
5. Open your browser and surf the Internet. Your computer is now secured from Internet based threats and

malware as the Quick Security feature will be turned on automatically.

If you wish to configure secure Internet access that is age-sensitive, refer the Family Protection section.
If you are not able to connect to the Internet after following the above mentioned steps, please revert back

to your original setup and refer to the support section at http://netgenie.cyberoam.com.

Note:

!

!

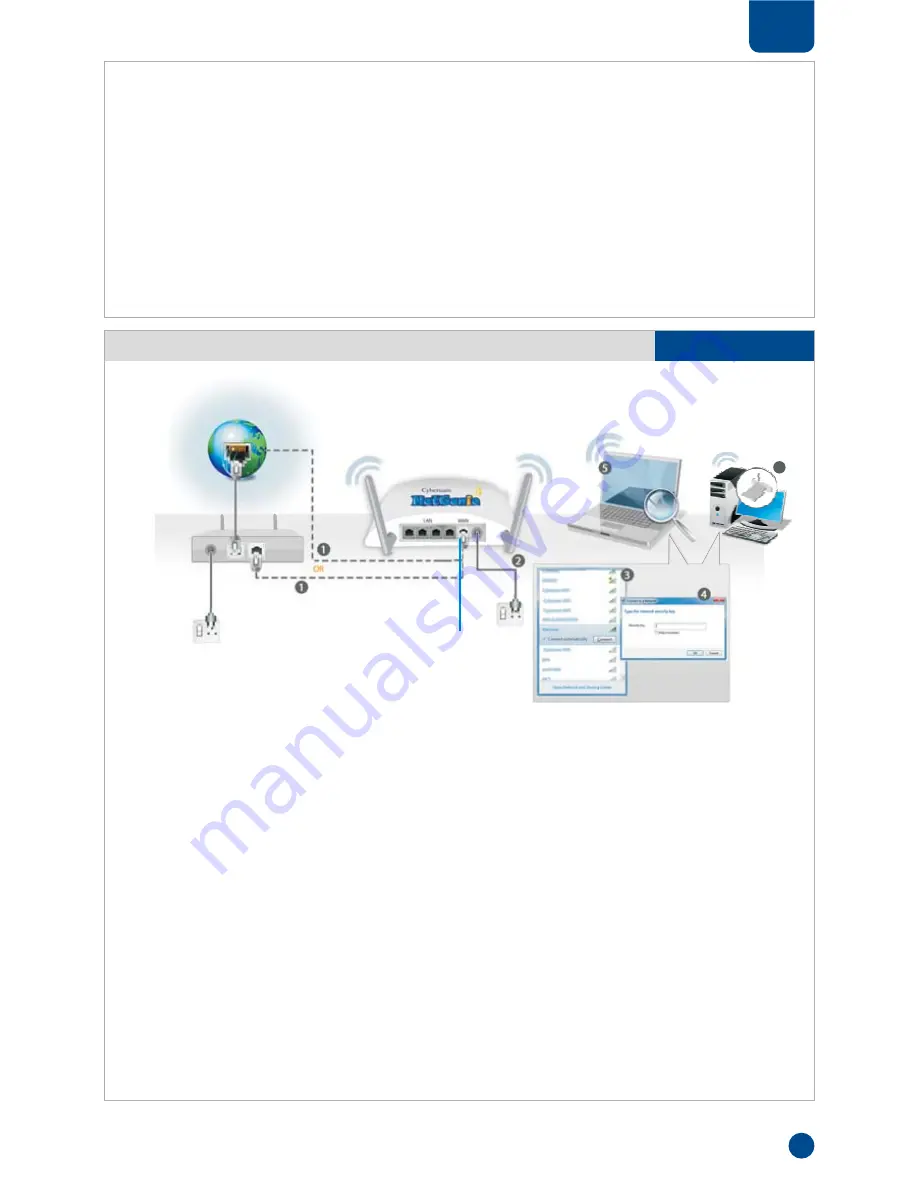
1. Use the cable that has come with your NetGenie appliance to connect it to the ADSL Router/ Cable

Modem. Insert one end of the cable in the NetGenie socket labeled “WAN” and insert the other end in
your modem “LAN”.

In case of Direct Cable Internet, please connect it directly to the NetGenie “WAN” socket.

2. Switch on/Power up your NetGenie appliance. Wait till the Power and WAN LEDs turn green. Wait till

the WLAN/WPS LED turns green and stabilizes.

3. Boot up your laptop. Make sure that your Wireless Network Adapter is enabled. Your laptop will

automatically detect the wireless network (also called SSID) named “NetGenie”. If you already
configured wireless networks before, click the network icon in your machine's system tray (bottom-left
of your screen). You will be able to see a list of available wireless networks. Select “NetGenie.”

4. Once you select “NetGenie”, you will be asked to enter the Security/Pass Key. Enter the security/pass

key printed on the sticker at the bottom of your appliance. Make sure you enter it exactly as printed.

It is advisable to turn off your router's Wi-Fi, to avoid any security breaches.

5. Open your browser and surf the Internet. Your computer is now secured from Internet based threats

and malware as the Quick Security feature will be turned on automatically.

If you wish to configure secure Internet access that is age-sensitive, refer the Family Protection section.

If you are not able to connect to the Internet after following the above mentioned steps, please revert

back to your original setup and refer to the support section at http://netgenie.cyberoam.com.

Note:

!

!

2

Section

Internet

NetGenie

Secure Home Appliance

ADSL/Cable

Modem

Modem

Power

Cable

Dir
ect
Cable

Connect your Internet

cable / WAN here

NetGenie

Power Cable

Laptop Or

Desktop Computer

Wireless

Desktop Card

Scenario 3

5

Secure Internet Connectivity over WiFi

Содержание Netgenie NG11E

Страница 1: ...ity Plug n Surf http netgenie cyberoam com NetGenie is furnished under the terms of Elitecore s End User license agreement which is available in this Quick Start Guide from page 8 By using this Appliance it shall be presumed that you have read the said license and you agree to be bound by the terms and conditions of the same Powered by ...

Страница 2: ...r NetGenie Ready Enabling Parental Protection and Control Identify Set up and Connect to the Internet 3 Secure Internet Connectivity through ADSL Cable Modem 4 Secure Internet Connectivity through Direct Cable Secure Internet Connectivity over WiFi 5 6 Scenarios How to connect NetGenie NetGenie s Family Protection Front panel Back panel Logging on to NetGenie Adding your family members Beginning S...

Страница 3: ... Parameters Netgenie The Appliance 1 Internet connectivity through a DSL Cable modem Direct Internet Cable with RJ45 Ethernet connection 2 At least one computer with an installed network interface adapter wireless network adapter 3 Any Internet Browser to surf the Internet Default IP address to access NetGenie http 10 1 1 1 Default User Name admin Default Password admin WAN Internet Connectivity L...

Страница 4: ...nie make sure the socket has been switched on This will turn green the Power LED on the front panel Depending on your home network set up you can connect NetGenie to the Internet according to the following scenarios 3 2 Section Phone Line ADSL Cable Modem PC Laptop refer Scenario 1 Phone Line ADSL Cable Modem which is also your WiFi access point PC Laptop refer Scenario 3 Phone Line ADSL Cable Mod...

Страница 5: ...t Connectivity through ADSL Cable Modem 1 Unplug the cable that connects the ADSL Router Cable Modem to your computer and plug it into the NetGenie socket labelled WAN 2 Use the RJ 45 Ethernet cable provided with the NetGenie appliance to connect your computer to any of the NetGenie sockets labelled LAN 3 Switch on Power up your ADSL Modem Cable Modem and wait till it connects to the Internet The ...

Страница 6: ...and WAN LEDs turn green Wait till the WLAN WPS LED turns green and stabilizes 3 Boot up your laptop Make sure that your Wireless Network Adapter is enabled Your laptop will automatically detect the wireless network also called SSID named NetGenie If you already configured wireless networks before click the network icon in your machine s system tray bottom left of your screen You will be able to se...

Страница 7: ...appropriate age access for each one of them The user here refers to the name of your family member for whom you want to set access policies in surfing the Internet Step1 Logging on to NetGenie 1 Enter http 10 1 1 1 in your browser s address bar the place where you type in the URL of various websites such as www google com 2 You will come across the following Admin Screen Enter admin as user name a...

Страница 8: ...le Web Activity Reporting checkbox 5 In case of any confusion in the configuration please refer to instructions given in the help panel on the right side of the screen 6 Click theApply button to save the changes 7 Click the Logout link to close the browser Please note Children below 8 years might not be able to remember or type the password Hence we recommend that you do not specify a password for...

Страница 9: ...when they are loaded into temporary memory i e RAM Note For evaluation Software and or Products for which Elitecore does not charge a fee the payment requirement does not apply You may not attempt and if You are a corporation You will prevent your employees and contractors from attempting to a modify translate reverse engineer decompile disassemble create derivative works based on license or distr...

Страница 10: ...REACH OF THIS LIMITED WARRANTY EVEN IF ELITECORE HAS BEEN ADVISED OF THE POSSIBILITY OF SUCH DAMAGES THE SOLE REMEDY FOR A BREACH OF THE FOREGOING LIMITED WARRANTY IS REPAIR REPLACEMENT OR REFUND OF THE DEFECTIVE OR NONCONFORMING PRODUCT AS SPECIFICALLY STATED IN SECTION 6 ABOVE TO THE MAXIMUM EXTENT PERMITTED BY LAW NO IMPLIED WARRANTY INCLUDING ANY IMPLIED WARRANTY OF MERCHANTABILITY FITNESS FOR...

Страница 11: ...PYING DISTRIBUTION AND MODIFICATION 0 1 2 to those sections when you distribute them as separate works But when you distribute the same sections as part of a whole which is a work based on the Program the distribution of the whole must be on the terms of this License whose permissions for other licensees extend to the entire whole and thus to each and every part regardless of who wrote it Thus it ...

Страница 12: ... conditions are different write to the author to ask for permission For software which is copyrighted by the Free Software Foundation write to the Free Software Toll Free Numbers USA 1 1 800 301 00013 877 777 0368 India Visit www cyberoam com Contact beroam com sales cy Powered by Corporate Headquarters ElitecoreTechnologies 904 SiliconTower Off C G Road Ahmedabad 380015 Gujarat India Phone 91 79 ...

Отзывы: