background image

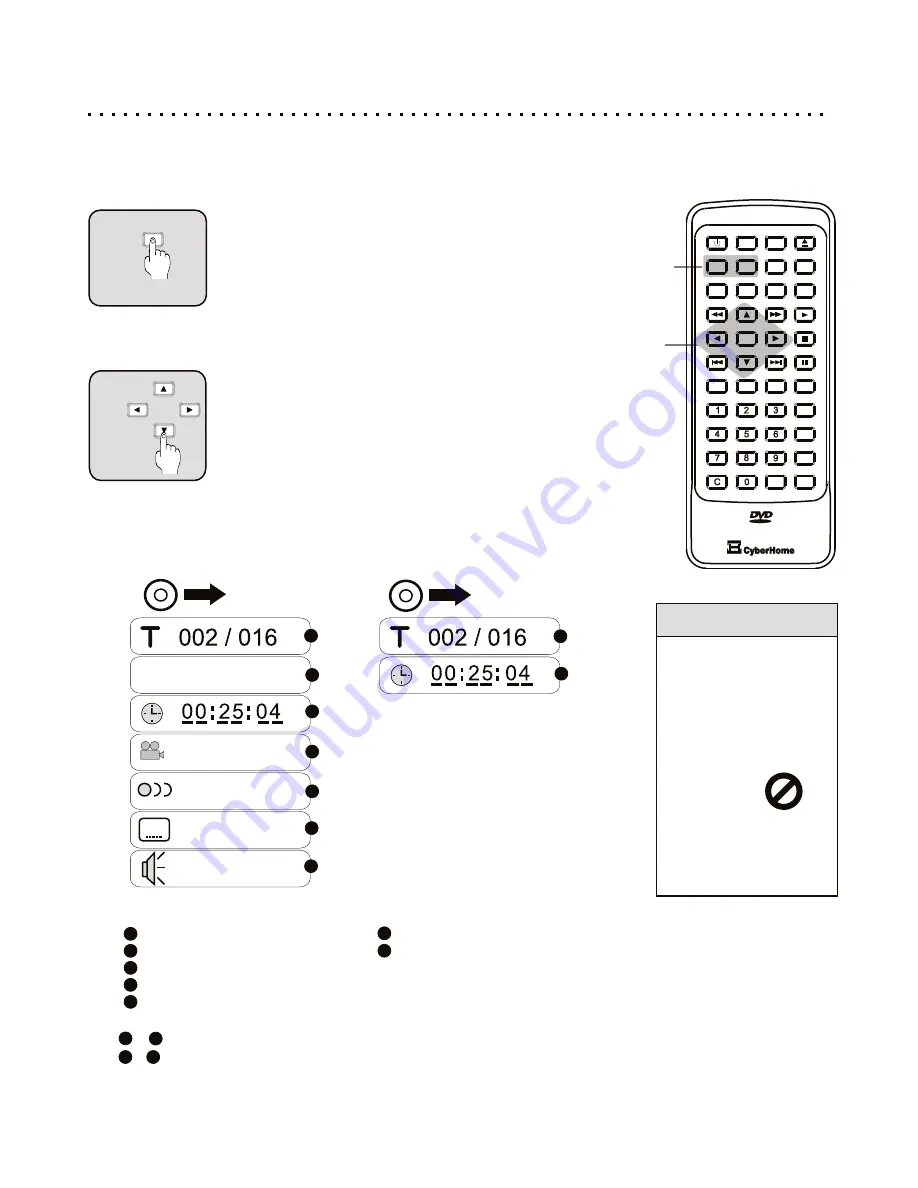
Putting it All Together with the Display Button

Get Quick Access to Playback Information and Important Functions 

Use DISPLAY to get information about the playback session, as well as direct command of 
some of the most important functions already discussed, all grouped together in one Menu 
for Quick and Easy Access. 

DISPLAY

1

Press the DISPLAY Button while a Disc is Playing

The Display button has 6 different modes.  Press the DISPLAY 
button to toggle the different display information.  The Display 
menu can be accessed any time when displayed on screen. 

Jump to Title

Subtitles

Jump to Chapter

Speaker Status

Jump to Time 
Multi-Angle
Audio Settings

1

1

1

1

2

2

3

3

3

4

4

5

5

5

6

6

6

7

7

7

2

Navigate DISPLAY Menu with the ARROW Buttons

Press the Down ARROW key to move through the menu. 
When you have selected the item to change, use the 
appropriate ARROW or NUMBER keys on the remote make 
your changes (See below sample). 

DISPLAY Menu Options with DVD and CD Audio Discs

Following list of functions available in the DISPLAY Menu for the most common disc types, 
along with the page numbers where they are discussed in-depth. 

Quick Tips

Ÿ

Most functions 
depend on the type 
of disc being used. 

Ÿ

Functions vary 
widely among DVD 
discs. The 
unavailable symbol 
will be 
displayed 
when you 
try to use a function 
that’s not available 
on your disc. 

DVD

DVD

C

003 / 022

01/ 02

01/ 02ENG

NONE

STEREO

DISPLAY MENU for DVD and Audio CD

17

Example:  DVD change to Chapter 10 

Press DISPLAY and Down Arrow Key
once until you have selected “C  005/023”
(Note the display indicates there are 23
chapters and you are on 5) 

Option #1
Press 1 and 0 key and ENTER

Option #2
Use the LEFT or RIGHT Arrow keys
Change the track player higher or lower

   to     you can use the LEFT/RIGHT Arrow keys or enter the desired number using the number keys.
   &     can only support the option of LEFT and RIGHT Arrow keys.     

1

2

DVD

1) Display Menu            2) Title Play Time              3) Title Remain Time   
4) Chapter Play Time    5) Chapter Remain Time   6) Close Display Menu

Audio CD

1) Display Menu           2) Disc Play Time               3) Disc Remain Time
4) Track Play Time       5) Track Remain Time        6) Close Remain Menu

OPEN/CLOSE

OPEN/CLOSE

A-B 

A-B 

+

10

+

10

EFFECTS

EFFECTS

INTRO

INTRO

SETUP

SETUP

POWER

POWER

TITLE

TITLE

MENU

MENU

GOTO

GOTO

DISPLAY

DISPLAY

MUTE

MUTE

SUBTITLE

SUBTITLE

AUDIO

AUDIO

ANGLE

ANGLE

ENTER

ENTER

PBC

PBC

PLAY

PLAY

STOP

STOP

PAUSE

PAUSE

RETURN

RETURN

REPEAT

REPEAT

1/ALL

1/ALL

SLOW

SLOW

ZOOM

ZOOM

BOOKMARK

BOOKMARK

PROGRAM

PROGRAM

Содержание CH-DVD 300

Страница 1: ...ayer is designed to provide a great Home Theater experience with super crisp Video and thundering Digital Sound Please retain this User Manual for future reference Remember to read the manual carefully before connecting and powering on the unit CH DVD 300 USA Version 1 1 www cyberhome com ...

Страница 2: ...ble specified by the No fingers or other objects inside Touching internal parts of this unit is dangerous and may cause manufacturer or sold with the apparatus When a cart is used use caution serious damage to the unit Do not attempt to disassemble the unit when moving the cart apparatus combination to avoid injury from tip over Do not put any foreign object on the disc tray Keep away from water a...

Страница 3: ...ting Disc Menus 16 Advanced Playback Functions Putting It All Together With the Display Button 17 Fast Forward Reverse Slow Motion Scanning 18 Skip Forward and Skip Back 18 Jumping to a Specific Chapter Track or Time Position 19 Saving Locations for Quick Play with Bookmarks 20 Repeating a Title Chapter Track or Disc 21 Repeating a Specific Time Segment 21 Playing Tracks in a Particular Order with...

Страница 4: ... Control allows you to block discs with a in the most convenient way password depending on the rating Direct track selection function MP3 and CD Standby Power with LED for quick power on and Number buttons can be used for quick selection power save of MP3 and CD titles with the remote control Digital Video Discs This player is suitable for DVDs of 12cm and 8cm sizes Single Sided and Double Sided D...

Страница 5: ... any other vaporizing substances as they may damage the disc surface Never add labels or adhesive tapes on the discs and be careful not to scratch or damage the disc surface Storage of Discs To prevent discs from becoming bent or deformed they should be vertically kept in the disc storage case To prevent damage avoid leaving discs in your car where they may be subject to direct sunlight and high t...

Страница 6: ... store the remote upside down or with any objects pressing on the buttons this could drain the battery PROGRESSIVE SCAN VIDEO CH DVD 300 OPEN CLOSE SETUP POWER TITLE MENU GOTO DISPLAY MUTE SUBTITLE AUDIO ANGLE ENTER PBC PLAY STOP PAUSE RETURN REPEAT 1 ALL A B SLOW ZOOM 10 EFFECTS INTRO BOOKMARK PROGRAM Installing the Batteries If the remote control only operates when you get closer to the DVD Play...

Страница 7: ...o navigate in the Setup Menu and other modes FAST FORWARD Press to play the disc at high speed for searching Press again to cycle available speeds 2x 4x 8x 16x 32x SKIP NEXT Press to skip to the next chapter or track PAUSE Press to pause audio track play or video on a still frame Press again to advance to next frame To return back to normal play press PLAY POWER Press the power button to put playe...

Страница 8: ...to directly select a track or chapter REPEAT 1 ALL Press to enable repeat mode Press again to cycle through choices Repeat Chapter Title or All REPEAT A B Press this button to set the start of the segment you wish to repeat Press again to set the end point of the segment BOOKMARK Press to store the current point on the disc as a bookmark that can be accessed quickly without searching See previous ...

Страница 9: ... Chapter or Track Stop Press to stop play but hold resume location Press again to completely stop play and reset playback to beginning of disc Play Pause Press to begin Playback Press again to Pause DVD Front Panel Functions 9 Quick Tips When the unit is powered off by the Remote Control it will be in standby mode The Status LED will be RED If the Remote Control is not handy you can bring the unit...

Страница 10: ...se White Red Audio Cable to connect to Audio In L R of TV or Receiver Coaxial Digital Audio Connector Use special Coaxial Digital Audio Cable to connect to Digital Receiver S Video Connector Use special S Video Cable to connect to TV s S Video In jack Back Panel Connectors 10 100 230V AC IN 100 230V AC IN ON ON OFF OFF AC SWITCH AC SWITCH COAXIAL COAXIAL L L R R VIDEO VIDEO S VIDEO S VIDEO AUDIO O...

Страница 11: ...DIO IN STEREO AUDIO IN R RED L WHITE 2 B TTER E S VIDEO IN Page 12 TV S Video Stereo Audio COAXIAL CoAxial Digital Audio 4 Page 13 Television Connections One Required In order to use your DVD Player your TV must support at least one of the Video Input types shown below To get started identify the best Video Connection shown below that your TV offers and proceed to that section If you are using you...

Страница 12: ...use this connection S Video separates brightness and color signals resulting in higher video quality than Standard Composite Video You must purchase a separate S Video Cable for this connection not included 2 TV S VIDEO IN STEREO AUDIO IN R RED L WHITE In order to activate the S VIDEO Output you must first connect the unit using the COMPOSITE Video Output as described in Section 1 Enter the SETUP ...

Страница 13: ...hat you use this connection Progressive Scan Component Video separates the Video Signal into three separate components resulting in a higher quality picture than S Video or Standard Composite Video You must purchase a set of three 3 Component Video Cables for this connection not included Note Progressive Scan Y Pb Pr and Component Video Y Cb Cr YUV Progressive Scan and Component Video Connections ...

Страница 14: ...kly start a DVD movie when pressed with the menu displayed This function varies with discs ON OFF I O Powering on with the Front Switch Once the main power switch on the back of the unit is on the Front power switch can be used to bring the player in and out of STANDBY MODE Note the STATUS LED is RED in STANDBY MODE and GREEN when Power ON Opening the Disc Tray Press the OPEN CLOSE button on the r...

Страница 15: ...old the play position Press PAUSE again to resume playback Quick Tips Screen Saver When a DVD or Video CD remains paused on a still frame for an extended length of time approximately 5 minutes the Screen Saver will be activated The Screen Saver guards against damage to your TV screen or screen burn which could result in residual images on the TV s CRT tube You can disable the Screen Saver in the D...

Страница 16: ...nu Title menus are available on some DVDs These menus allow you to select a particular Title or Chapter to play With some DVD discs pressing this button will bring up the normal DVD menu If the not available symbol is displayed on screen this feature is not available on your disc Navigate with the ARROW Buttons Use the ARROW buttons to navigate through the menu left right up down Confirm Menu Choi...

Страница 17: ...depth Quick Tips Most functions depend on the type of disc being used Functions vary widely among DVD discs The unavailable symbol will be displayed when you try to use a function that s not available on your disc DVD DVD C 003 022 01 02 01 02ENG NONE STEREO DISPLAY MENU for DVD and Audio CD 17 Example DVD change to Chapter 10 Press DISPLAY and Down Arrow Key once until you have selected C 005 023...

Страница 18: ...ing to the Next Track or Skipping Back Through Tracks Your DVD Player provides a convenient method for advancing or skipping back through tracks chapters songs or other segments on DVD VCD or Audio CD discs 1 NEXT PREVIOUS The Next and Previous Track Buttons Use the NEXT and PREVIOUS buttons to skip through the tracks on DVDs VCDs and Audio CDs Pressing the PREVIOUS button will return play positio...

Страница 19: ...ou will have the option of entering the Track Number of the current title you want to play With VCD and Audio CDs enter the number of the track you want to play in stop mode or play mode to directly jump to that position VCDs may require the PBC function to be disabled before directly selecting tracks with the number buttons The GOTO function will not work if the Display Menu is enabled since the ...

Страница 20: ... Slow Motion Scanning Press ENTER to Save the Bookmark Location Now the play position is saved as a Bookmark Notice that the Track and Time information are stored for the Bookmark in position one 6 5 BOOKMARK PLAY Press BOOKMARK to Exit the Bookmark Menu Now you can resume playback and return to the Bookmarks you ve saved at any time using the BOOKMARK button Quick Tips To clear Bookmarks from the...

Страница 21: ...eat with an Audio CD your segment must be no longer than a single track When using A B Repeat with DVDs your segment must be no longer than a single Title Using the REPEAT A B Button While viewing or listening to a disc when you get to the point that you would like to mark as the Beginning of your repeating segment press the REPEAT A B button You will see this symbol letting you know that the star...

Страница 22: ...he 10 button three times then press 2 The 10 key will not function when there are fewer than 10 tracks to choose from 3 4 Quick Tips To Exit Program Play press STOP then PLAY Programs will be erased when power is turned off or the current disc ejected To Erase or edit the current program navigate to arrow key to programed entry and use C to Clear Navigate to PLAY the Programed Title Chapters After...

Страница 23: ...irectory To quickly stroll the file directory use and keys If you wish to navigate to different folders while playing Mp3 you must press STOP first ENTER DISPLAY MIXED PLAYMODE NORMAL 00 00 00 00 ENTER Time Elapsed and Length of Song when playing MP3 Files Used to toggle between files directory to DISPLAY and PLAYMODE Menu Page UP or Down of the Displayed Directory Move cursor UP or DOWN in the me...

Страница 24: ...ile the player will return back to normal speed Skip Next Previous Press these keys move to the previous or next track 24 STOP PAUSE ZOOM Playing MP3 and JPG Files 2 of 2 4 5 2 1 Playing MP3 Files Viewing JPG files PAUSE ROTATE STOP and ZOOM Functions While view JPEG files during slide show you may choice to Pause the slide show to have a longer or better view of the image file We have also implem...

Страница 25: ...ress the PAUSE button 2X 3 Navigate with the ARROW Buttons Use the ARROW buttons to move to the parts of the screen you would like to see closer Pressing the LEFT ARROW button will move the focus of the Zoom to the left and so on Return to Normal Viewing Press the ZOOM button repeatedly until the Zoom Icon is no longer on the screen to return to normal playback mode 4 Quick Tips Picture quality of...

Страница 26: ...le languages on the disc To turn off Subtitles press SUBTITLE until OFF appears on screen EFFECT 5 EFFECT BUTTON Use the EFFECT button to access a wide variety of Equalization or Reverberation effects Toggle the EFFECTS key to change the sound effect 1 Classic 2 Rock 3 Pop 4 Jazz 5 Return back to Normal More Audio Video Functions Quick Tips Most functions depend on the type of disc Functions vary ...

Страница 27: ...t the DOWN key twice to select BRIGHTNESS Pressing the LEFT or RIGHT key allows us to adjust the BRIGHTNESS of the display 3 SETUP Press SETUP to Exit the On Screen Setup Menu You can exit the Setup menu at any time by simply pressing the SETUP key 27 Change SETUP VIDEO MENU Select Brightness Adjust Brightness and press ENTER to confirm change 2 If you want to change to another settings use the UP...

Страница 28: ...ing the YUV Outputs you can change the settings to Progressive Interlaced Scan mode Do not change these settings if you are not SURE your TV supports Progressive Scan From the VIDEO Menu press the DOWN arrow key until you have selected SCAN MODE Use Right arrow key select Interlaced Component or Progressive Then press the ENTER to confirm setting changes Exit the setup menu by pressing the SETUP b...

Страница 29: ... discs supporting multi angle features the Angle Mark continuously displays the current angle you re viewing on screen Setting ANGLE MARK to OFF will cancel continuous display and the current angle will be displayed on screen for just a few seconds after an angle change PARENTAL CONTROL LEVELS 1 8 The Parental Lock allows you to limit the use of your DVD Player to only those DVD discs that do not ...

Страница 30: ...if you wish to use the Coaxial Digital Audio Output with a Digital Receiver 30 DVD AUDIO DIGITAL OUTPUT BITSTREAM DIGITAL OUTPUT SPDIF Sony Philips Digital InterFace refers to the digital audio format used by most consumer electronics equipment as well as the Coaxial Digital Audio Output connector If you are using the Stereo Audio Outputs leave set to OFF If you wish to use the Coaxial Digital Out...

Страница 31: ...FF LOAD SETUP DEFAULT If you would like to return all settings of your DVD Player s Setup to the factory defaults choose LOAD SET DEF This will reset all values for General Audio Video and Language settings with the exception of the Parental Control Password After all the Parental Control and Password features would be of little use if your kids could simply clear them with a reset S W VERSION Sho...

Страница 32: ... few seconds then turn the unit on with the front Power Switch There must be a pause between powering the unit down and back on of a few seconds A Specific Disc Does Not Play The disc may be dirty Try cleaning the disc Make sure the disc is not in upside down The region code of the disc may not match that of the player In this case the disc cannot be used The Disc Doesn t Eject If the player is in...

Страница 33: ... 0 015 Wow and Flutter Less than 0 001 W PEAK Connections YUV P SCAN Component Video Out Y 1 0Vpp 75 Ohm Negative Sync Pb Pr 7 Vpp 75 Ohm S Video Out Mini DIN 4 Pin 75 Ohm Video Out One Pin Jack 1Vpp 75 Ohm Coaxial Digital Out One Pin Jack 5Vpp 75 Ohm Analog Audio Out Two Pin Jacks 2 0VRMS 470 Ohm Operating Conditions 5 C to 35 C 41 F to 95 F Operation Status Horizontal Power Supply AC 100 230V 50...

Страница 34: ...scs DTS Digital Theater System Another digital surround sound system with 5 1 channels DTS is supported on some newer DVD discs Dual Layer DVD A DVD disc that has two layers on each side A single sided dual layered DVD can hold almost four hours of video and audio and is also known as a DVD 9 DVD Digital Video Disc DVDs come in different formats such as single sided or double sided Each side can h...

Страница 35: ...onnection your TV must have an S Video input VCD Digital Video Disc A digital video disc format particularly popular in Asia Uses MPEG 1 video compression The picture quality is roughly that of VHS tapes 35 Copyright Protection This product incorporates copyright protection technology that is protected by method claims of certain U S Patents and other intellectual property rights owned by Macrovis...

Страница 36: ......

Страница 37: ...ype 13 28 connections 10 14 SETUP Factory Defaults 29 31 return button 8 discs 4 5 reverse button 7 display button 7 safety precautions 2 effect button 8 screen saver 15 31 effects 26 setup button 7 enter button 7 setup menu 27 31 skip ahead back 18 fast forward button 7 slow button 7 features 4 slow motion playback 18 front panel 9 specifications 33 standby power 14 glossary 34 35 still picture 1...

Страница 38: ......

Страница 39: ......

Страница 40: ......

Страница 41: ......

Отзывы: