background image


Installing the Singlewire-enabled Speaker

Device Configuration

Operations Guide

930320A

CyberData Corporation

15

2.2.6 How to Set the Factory Default Settings

2.2.6.1 RTFM Switch

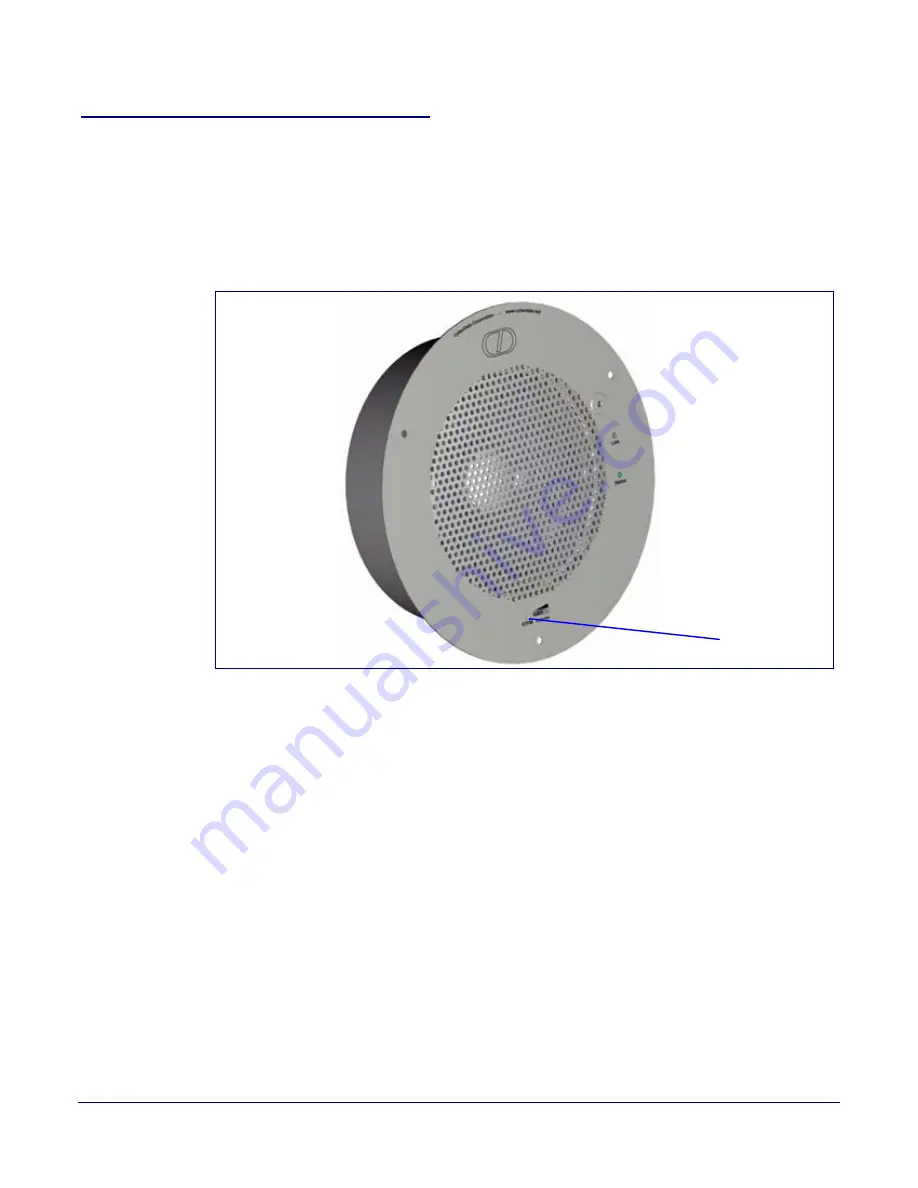
When the speaker is operational and linked to the network, use the Reset Test Function 
Management (RTFM) switch (

Figure 2-12

) on the speaker face to set the factory default settings.

Figure 2-12. RTFM Switch

To set the factory default settings: 

1. Press and hold the 

RTFM

 switch for more than five seconds.

2. The speaker announces that it is restoring the factory default settings.

Note

The speaker will use DHCP to obtain the new IP address (DHCP-assigned address or 
default to 10.10.10.10 if a DHCP server is not present).

RTFM switch

Содержание 11065

Страница 1: ...VoIP Singlewire enabled Ceiling Speaker Operations Guide Part 011065 Document Part 930320A for Firmware Version 5 0 2 CyberData Corporation 2555 Garden Road Monterey CA 93940 831 373 2601...

Страница 2: ...is manual or such products software firmware and or hardware CyberData Corporation reserves the right to make changes without notice to this manual and to any such product software firmware and or har...

Страница 3: ...CyberData Corporation 930320A Operations Guide Revision History Revision Date Released Description of Changes A 12 18 2009 This is the first release of the manual...

Страница 4: ...an electrician for replacement of the obsolete outlet 10 Protect the power cord from being walked on or pinched particularly at plugs convenience receptacles and the point where they exit from the app...

Страница 5: ...hat is a safety policy or protection of property The safety guidelines for the equipment in this manual do not purport to address all the safety issues of the equipment It is the responsibility of the...

Страница 6: ...tegory 5 DHCP Dynamic Host Configuration Protocol LAN Local Area Network LED Light Emitting Diode Mbps Megabytes per Second NTP Network Time Protocol PBX Private Branch Exchange PoE Power over Etherne...

Страница 7: ...Speaker Parameters 16 2 3 1 Log in to the Configuration Home Page 17 2 4 1 Reboot the Singlewire enabled Speaker 22 2 5 Identifying and Testing a Ceiling Speaker when Using InformaCast 4 0 or Later 23...

Страница 8: ...etworks with a single CAT5 cable connection The speaker is compatible with Singlewire s InformaCast software Its small footprint and low height allows the speaker to be discretely mounted almost anywh...

Страница 9: ...oduct To identify the VoIP Singlewire enabled Ceiling Speaker look for a model number label similar to the one shown in Figure 1 1 The model number on the label should be 011065 Figure 1 1 Model Numbe...

Страница 10: ...inglewire enabled Speaker with Auxiliary Power Section 2 2 2 1 Singlewire enabled Speaker with Extra Speaker Connection Section 2 2 2 2 Singlewire enabled Speaker with Line Out 1 3 Product Features 80...

Страница 11: ...io Encodings PCMU G 711 mu law PCMA G 711 A law Packet Time 20 ms 1 5 Product Specifications Category Specification Sensitivity 96dB 1W 1M S P Level Output 10 Watts Peak Power Operating temperature 30...

Страница 12: ...Dimensions Operations Guide 930320A CyberData Corporation 5 1 6 Dimensions Figure 1 3 shows the dimensions for the Singlewire enabled Speaker Figure 1 3 Dimensions 9 0 229 3 0 75 Dimensions are in In...

Страница 13: ...the drop ceiling and drywall mounting Note The installation template for the Singlewire enabled Speaker is located on the Installation Quick Reference Guide that is included in the packaging with eac...

Страница 14: ...Singlewire enabled Speaker to a 802 3af Compliant PoE Switch Figure 2 4 illustrates how to connect the Singlewire enabled Speaker to a 802 3af compliant PoE switch via a Cat 5 Ethernet cable Figure 2...

Страница 15: ...3af Compliant PoE Switch In Figure 2 5 if a PoE switch is not available you will need a PoE Injector part 010867A ordered separately A PoE Injector is a power supply solution for those who have a stan...

Страница 16: ...with Auxiliary Power In Figure 2 6 the power for the Singlewire enabled Speaker can either come from an 802 3af Network connection or from an external source Figure 2 6 Running the V2 Speaker with Au...

Страница 17: ...g speaker While the total speaker wattage is the same by connecting a low cost analog speaker additional coverage can be realized Speaker Setup When using the second speaker connection the digital vol...

Страница 18: ...cted directly to an auxiliary amplifier to drive additional horns or speakers This is done through the line out connection Figure 2 8 Singlewire enabled Speaker with Line Out AUX SPEAKER AUX SPEAKER G...

Страница 19: ...etwork LED comes on immediately 2 After about 23 seconds with a static IP address or 27 seconds if the board is set to use DHCP the green LED will blink twice to indicate that the board is fully boote...

Страница 20: ...nounce and confirm the speaker s IP Address test that the audio is working and check the volume Figure 2 10 RTFM Switch To announce a speaker s current IP address 1 Press and release the RTFM switch w...

Страница 21: ...5 Adjust the Volume To adjust the speaker volume turn the Volume control dial Figure 2 11 on the speaker face Note The Singlewire enabled Speaker has two volume controls Networked based as controlled...

Страница 22: ...Test Function Management RTFM switch Figure 2 12 on the speaker face to set the factory default settings Figure 2 12 RTFM Switch To set the factory default settings 1 Press and hold the RTFM switch fo...

Страница 23: ...eaker is taken care of by the InformaCast server If an InformaCast server can not be found the speaker will return to factory defaults as shown in Table 2 3 Table 2 3 Factory Network Default Settings...

Страница 24: ...e found within the InformaCast Server Test Menu Note If the network does not have access to a DHCP server the device will default to an IP address of 10 10 10 10 Note Make sure that the PC is on the s...

Страница 25: ...IP addressing setting DHCP or Static IP Address Shows the current IP address Subnet Mask Shows the current subnet mask address DNS Server 1 Shows the current DNS Server 1 address DNS Server 2 Shows th...

Страница 26: ...ndix B Setting up a TFTP Server 2 Retrieve the latest Singlewire enabled Speaker firmware from the Singlewire enabled Speaker product page at http www cyberdata net support voip index html 3 Unzip the...

Страница 27: ...ame of the file to be uploaded into the New Filename parameter field For example kernel filename 201 image spk sip bin 9 Click Upload File Note This starts the upload process Once the Singlewire enabl...

Страница 28: ...rent firmware version TFTP Server IP address Enter the IP address of your TFTP server into the TFTP Server IP parameter field 15 character limit New Filename Use this field to enter the new file name...

Страница 29: ...Speaker To reboot a Singlewire enabled Speaker log in to the web page as instructed in Section 2 3 1 Log in to the Configuration Home Page 1 Click Update Firmware to open the Upgrade Firmware page Fi...

Страница 30: ...ker when using Singlewire s InformaCast software version 4 0 or later Note If you have questions or need help please consult your InformaCast documentation and or contact the CyberData support team No...

Страница 31: ...r when Using InformaCast 4 0 or Later Operations Guide 930320A CyberData Corporation 24 2 On the IP Speaker Configuration page InformaCast will indicate that it has detected new speakers Click View Fi...

Страница 32: ...ng and Testing a Ceiling Speaker when Using InformaCast 4 0 or Later Operations Guide 930320A CyberData Corporation 25 3 The IP Speaker Configuration page will show four newly detected speakers Click...

Страница 33: ...o return to the IP Configuration page Figure 2 20 Test IP Speaker Page Note When viewing the speaker s status page via Informacast Informacast links to the wrong port and path Informacast expects our...

Страница 34: ...ing and Testing a Ceiling Speaker when Using InformaCast 4 0 or Later Operations Guide 930320A CyberData Corporation 27 8 On the IP Speaker Configuration page Click Add to add a speaker to the Informa...

Страница 35: ...or Later Operations Guide 930320A CyberData Corporation 28 9 On the Add IP Speaker page Fill out appropriate fields and click Add Figure 2 22 Add IP Speaker Page Your speaker is now registered to the...

Страница 36: ...parts for each speaker Refer to Table A 1 and Table A 2 Table A 1 Drop Ceiling Mounting Components Part of the Accessory Kit Quantity Part Name Illustration 3 8 Nylon Thumb Nuts 3 8 Fender Washers 3...

Страница 37: ...ck page of the Installation Quick Reference Guide that is delivered with each speaker Figure A 1 VoIP Speaker Assembly Ceiling Tile or Dry Wall VoIP V2 Speaker Assembly 8 Fender Washer 3x 8 Nylon Thum...

Страница 38: ...oles align with those you prepared For drywall mounting place the three PLASTIC RIBBED ANCHORS in the holes you prepared and position the VoIP SPEAKER ASSEMBLY over them aligning the screw holes in th...

Страница 39: ...s tftpboot your_directory_name B 1 2 In a Windows Environment You can find several options online for setting up a Windows TFTP server This example explains how to use the Solarwinds freeware TFTP ser...

Страница 40: ...L http www CyberData net support voip 2 Go to the support page for your product and click on the FAQs tab C 2 Documentation The documentation for this product is released in an English language versio...

Страница 41: ...e the CyberData RMA Status form at the following web address http www cyberdata net support rmastatus html C 4 Warranty CyberData warrants its product against defects in material or workmanship for a...

Страница 42: ...rns Outside of the United States If you purchased your equipment through an authorized international distributor or reseller please contact them directly for product repairs C 4 3 Spare in the Air Pol...

Страница 43: ...password 7 16 web login username and password 17 default gateway 7 16 default login address 17 device configuration 7 dimensions 4 5 drivers 33 drop ceiling mounting of speaker 31 drywall mounting of...

Страница 44: ...actory default settings 15 return and restocking policy 35 RMA returned materials authorization 34 RMA status 34 RTFM switch 13 15 S sales 34 Second Speaker Setup 10 sensitivity 4 service 34 setting u...

Страница 45: ...VoIP speaker assembly 31 volume adjusting 13 W warranty 34 warranty RMA returns outside of the United States 35 warranty RMA returns within the United States 35 warranty and RMA returns page 35 warran...

Отзывы: