Customatic Rize ELEVATION RI-ABE-A25-WH Скачать руководство пользователя страница 7

Installation Guide

STEP 10.

Assemble the Headboard Bracket

i.

Use the hand control to elevate the head of the bed so 

the bed base frame is reachable.
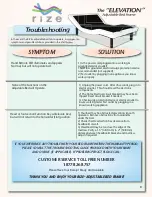
iv.

When headboard brackets are assembled, make sure there is a space of 1.5 (38.1 mm) to 2 inches (50.8 mm) 

between the edge of the bed base and the headboard brackets.

v.

Securely fasten the headboard bolts (not included with your adjustable bed) to the end of the headboard bracket assembly. 

vi.

Measure the distance from the center of one mounting hole in the headboard to the center of the other.

vii.

Measure the distance from the center of one mounting hole in the headboard bracket assembly to the center of the other.

viii.

If you need to adjust the headboard brackets, unscrew the bolts holding the outer headboard brackets and move them 

the necessary distance. Reinstall the bolts and securely tighten.

STEP 11.

Place your mattress on the adjustable bed frame surface. Your adjustable bed and headboard installation is now complete.
If the bed comes with a programming option, refer to the hand Control Guide for more information.

5

IMPORTANT NOTES:

Failure to follow the installation steps as they appear in this

guide could result in damage to your adjustable bed frame. 

Make sure to position the bottom of the headboard cross

member no more than 3 inches (76.2 mm) between the 

headboard and the top of the mattress. 
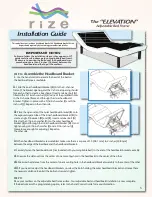
ii.

Slide the inner headboard bracket (

D

) into the C-channel

frame. (The bracket opening and the C-channel opening should
face each other to create a box shape.) Insert a retainer bolt (

G

)

fitted with a 5/16 inch washer (

I

) into one of the predrilled holes

in the C-channel frame and through the inner headboard
bracket. Tighten in place with a 5/16 inch washer (

I

) and 5/16

inch nut (

J

). Repeat on the other side.
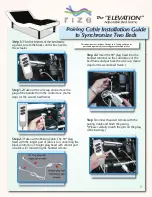
iii.

Place the open side of the outer headboard bracket (

E

) onto

the exposed square tube of the inner headboard bracket (

D

) to

create a tight fit between (

D

) and (

E

). Insert a retainer bolt (

G

)

fitted with a 5/16 inch washer (

I

) into the outer headboard

bracket (

E

) and through the inner headboard bracket (

D

). Hand

tighten using a 5/16 inch washer (

I

) and a 5/16 inch nut (

J

).

(Leave loose enough for adjusting.) Repeat on 
the other side.

Adjustable Bed Frame

The 

“ELEVATION”

This model does not include a headboard bracket kit. Headboard bracket kit can

be purchased separately by contacting your authorized retailer

Содержание Rize ELEVATION RI-ABE-A25-WH

Страница 1: ...RIGHT 2013 CUSTOMATIC ADJUSTABLE BEDZ OWNER S MANUAL Adjustable Bed Frame The ELEVATION This product and all our bedding products are covered by one or more of the following issued and pending U S pat...

Страница 2: ...The ELEVATION Safety Precautions 1 Parts List 3 Installation Guide 4 Hand Control Operation Guide 6 Synchronize Installation Guide 7 Troubleshooting 8 Warranty Registration 9 Model Number RI ABE A25...

Страница 3: ...erly grounded outlet for this product will compromise this important grounding safety feature The use of adapters is not recommended unless the outlet is checked by a qualified electrician to ensure t...

Страница 4: ...oduct and may void the warranty Weight Restrictions The recommended weight limits on our adjustable beds are Twin TXL Split QN Split CA King 575 Pounds Full FXL 600 Pounds Queen 650 Pounds The structu...

Страница 5: ...4 C NOTE Before discarding any packing materials check the adjustable bed frame carton and verify all items in the parts list are included A Remote Control 1 B Mattress Retainer Bracket 1 C Bed Leg 4...

Страница 6: ...all functions on the hand control to ensure all features are operational If the bed does not work refer to Troubleshooting on p 14 STEP 8 Return bed to flat or level position STEP 9 Assembling The Mat...

Страница 7: ...IMPORTANT NOTES Failure to follow the installation steps as they appear in this guide could result in damage to your adjustable bed frame Make sure to position the bottom of the headboard cross membe...

Страница 8: ...Bed C Raises the Foot of the Bed D Lowers the Foot of the Bed F Lowers the Head Foot of the Bed E Raises the Head Foot of the Bed Safety The input transformer voltage is AC120V 60HZ the output voltage...

Страница 9: ...frame and put back the wire cap Same steps for the second bed frame Step 3 Connect handset remote with the pairing Cable and finish the paring Please carefully match the pins on the plug while inserti...

Страница 10: ...ress Verify a 1 5 38 1mm to 2 50 8mm distance between headboard brackets and mattress Adjust if required 1 Unplug the power cord After 45 seconds plug in to electrical outlet This should reset the ele...

Страница 11: ...MATIC ADJUSTABLE BEDZ adjustable bed shall bear the remainder of the cost of the replacement part This nineteen 19 year warranty shall not apply if purchaser does not return any and all defective part...

Страница 12: ...D FROM THIS AGREEMENT The above limitation or exclusion may not apply to every purchaser as some states disallow exclusions or limitations of incidental or consequential damages This warranty allows t...

Страница 13: ...THE WARRANTY PERIOD PLEASE CONSULT THE TROUBLESHOOTING GUIDE PROVIDED WITH YOUR FRAME AND ONLINE IF APPLICABLE IF PROBLEMS PERSIST PLEASE CALL CUSTOMER SERVICE TOLL FREE NUMBER 1 877 826 8757 Please...

Отзывы: