background image

10.6 

Paper speciication

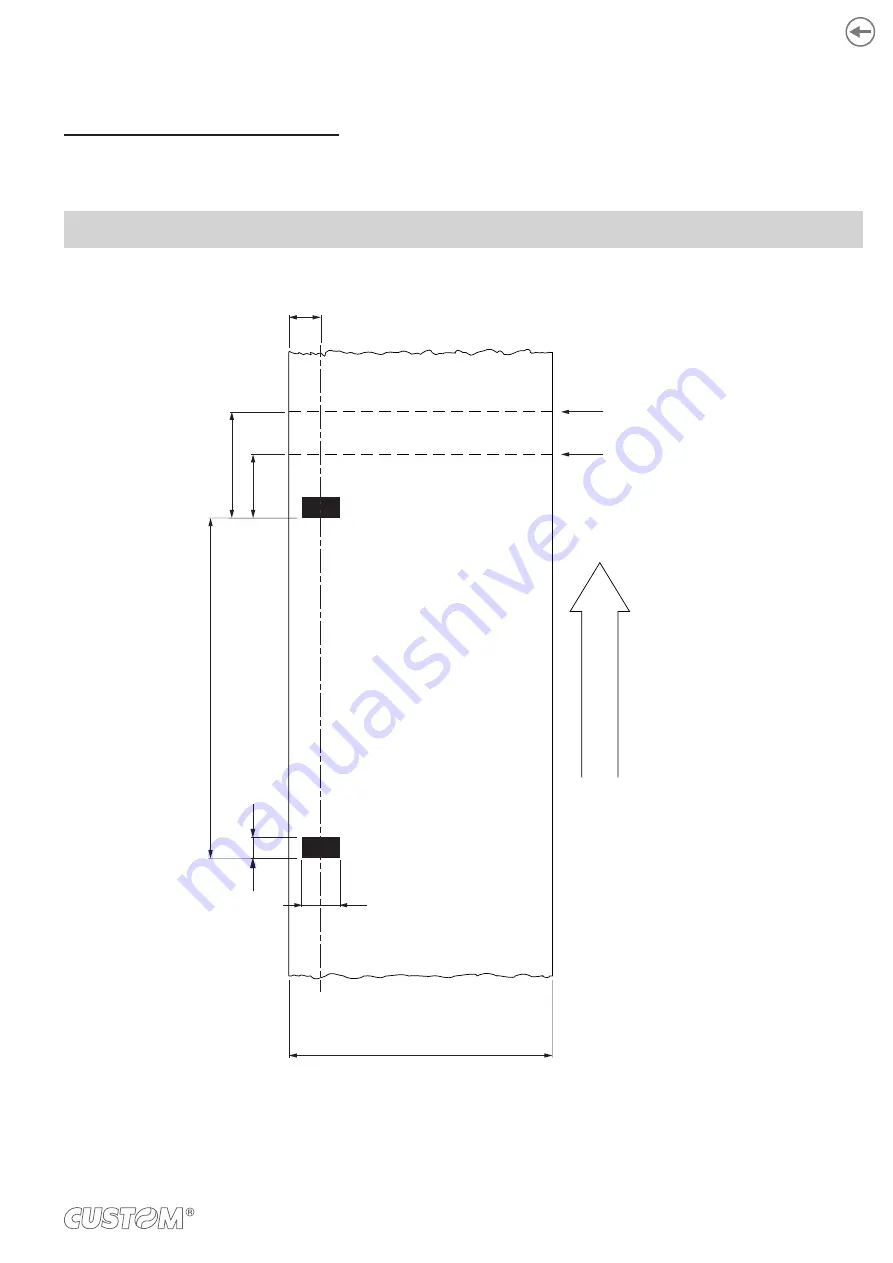
Paper with black mark for ixed sensor

The following image shows the placement of the black mark on the thermal side of the paper. For more information about 
the use of paper with black mark see 

chapter 8

.

All the dimensions shown in following igures are in millimetres.

12

mi

n

 5

0

1

3

2

8

PAPER WIDTH 80 mm

T

H

ER

MAL

 SI

D

E

Printing line

Cutting line

10

+0.5

0

4

 ÷

 6

89

Содержание Q3X

Страница 1: ...CUSTOM S p A USER MANUAL Q3x ...

Страница 2: ......

Страница 3: ...ire and is protected by a differential switch Before any type of work is done on the machine disconnect the power supply Use the type of electrical power supply indi cated on the device label These devices are intended to be powered by a separately certiied power module hav ing an SELV non energy hazardous output IEC60950 1 second edition Only POS equipment The energy to the equipment must be prov...

Страница 4: ...ions may cause harmful interference to radio communications However there is no guarantee that interference will not occur in a particular installation If this equipment does cause harmful interfer ence to radio or television reception which can be determined by turning the equipment off and on the user is encouraged to try and correct the interference by one or more of the following measures Reor...

Страница 5: ...MANUAL For details on the commands refer to the manual with code 77200000001400 For further information about the use of PrinterSet tool refer to the manual with code 78200000001800 ...

Страница 6: ......

Страница 7: ...8 3 6 Key functions standby 19 3 7 Status lashes 20 4 INSTALLATION 23 4 1 Connections 23 4 2 Pinout 25 4 3 Driver and SDK 31 5 OPERATION 33 5 1 Switch the device ON OFF 33 5 2 Opening cover 34 5 3 Loading the paper roll 35 6 CONFIGURATION 37 6 1 Coniguration by keys 37 6 2 Coniguration by software 42 6 3 Device status 43 6 4 Communication parameters 44 6 5 Operating parameters 47 6 6 Alignment par...

Страница 8: ... ALIGNMENT 65 8 1 Enable alignment 66 8 2 Calibration 68 8 3 Alignment parameters 70 8 4 Printing area 73 9 MAINTENANCE 75 9 1 Paper jam 75 9 2 Planning of cleaning operations 76 9 3 Cleaning 77 9 4 Firmware upgrade 80 10 SPECIFICATION 81 10 1 Hardware speciications 81 10 2 Character speciications 84 10 3 Device dimensions 85 10 4 Power supply and power cord dimensions 86 10 5 Dimensions of power ...

Страница 9: ... the autotest routi ne and prints out the Setup report The printer permits the configuration of default parameters CCCC During power up if the LF LINE FEED key is held down the printer enters the auto test routine and prints out the Setup report The printer permits the configuration of default parameters Numbered title for chapter Numbered title for paragraph Information valid for devices AAAA BBB...

Страница 10: ...10 ...

Страница 11: ...THE MODELS NOMENCLATURE DESCRIPTION Q3x Q3x base coniguration with RS232 serial and USB interfaces Q3x ETH Q3x base coniguration with Ethernet interface Q3x Wi Fi Q3x with Wi Fi module Q3x BTH Q3x with Bluetooth module 11 ...

Страница 12: ...12 ...

Страница 13: ...e re used if the device is to be transported in the future Make sure that all the components illustrated below are present and that there are no signs of damage If there are contact customer service 1 Device 2 StandardAC power supply cable or US market AC power supply cable 3 Documentation Short guide 4 AC power supply 4 3 1 2 13 ...

Страница 14: ...Paper compartment cover 2 Paper compartment cover opening lever 3 Paper out 4 Status LED 5 FEED key 6 RS232 serial port 7 USB port 8 Drawer port 9 Power supply port 10 ON OFF key 11 WiFi or Bluetooth board only for Q3x BTH and Q3x Wi Fi 2 1 3 4 5 10 9 8 7 11 6 14 ...

Страница 15: ...Q3x ETH 1 Paper compartment cover 2 Paper compartment cover opening lever 3 Paper out 4 Status LED 5 FEED key 6 Ethernet port 7 Drawer port 8 Power supply port 9 ON OFF key 2 1 3 4 5 9 8 7 6 15 ...

Страница 16: ...3 3 Device components internal view 1 Sensor for printhead temperature 2 Sensor for paper end and black mark detection 3 Sensor for cover open 2 3 1 16 ...

Страница 17: ...3 4 Product label PC Product code 14 digits SN Serial number HW Hardware release XXXXXXXXXXXXXX Rx 0000000000000000000 HW PC SN 17 ...

Страница 18: ...EED FEED FEED FEED Fast push Fast push modify selected parameter next parameter enter the SETUP MODE POWER UP Hold down Hold down Hold down Hold down Hold down Hold down skip the SETUP MODE Fast push Fast push Print the SETUP report 18 ...

Страница 19: ...3 6 Key functions standby STANDBY FEED Hold down Hold down FEED advance the paper manual feed advance the paper preset length Fast push Fast push 19 ...

Страница 20: ...VICE OFF WHITE BLU WHITE BLUE ON DEVICE ON READY MODE BLUE COMMUNICATION STATUS x 1 RECEIVE DATA x 2 RECEPTION ERRORS PARITY FRAME ERROR OVERRUN ERROR x 3 COMMAND NOT RECOGNIZED x 4 COMMAND RECEPTION TIME OUT YELLOW RECOVERABLE ERROR x 2 PRINTHEAD OVERHEATED x 3 PAPER END x 5 POWER SUPPLY VOLTAGE INCORRECT x 6 COVER OPEN RED UNRECOVERABLE ERROR x 3 RAM ERROR x 4 EEPROM ERROR x 5 AUTOCUTTER ERROR 2...

Страница 21: ... RECEPTION TIME OUT YELLOW NOTIFICATION STATUS x 2 HEADING OVER TEMPERATURE x 3 PAPER END x 5 POWER SUPPLY VOLTAGE INCORRECT x 6 COVER OPEN YELLOW WiFi BLUETOOTH STATUS x 1 INITIALIZATION MODULES Wi Fi OR INITIALIZATION MODULES BLUETOOTH GREEN WiFi BLUETOOTH STATUS ON DEVICE ON NO ERROR WIRELESS COMMUNICATION ACTIVE WAITING TO OPEN A Wi Fi SOCKET OR PAIRING BLUETOOTH IS IN PROGRESS VIOLET WiFi BLU...

Страница 22: ...22 ...

Страница 23: ...for the device POWER SUPPLY DRAWER PC USB DEVICE PC SERIAL DEVICE Serial standard cable optional Power supply cable included USB standard cable optional DC24V RS232 DK NOTE When RS232 and USB communication cables are connected to the device simultaneously the communication takes place via the USB port 23 ...

Страница 24: ...Q3x ETH The following igure shows the possible connections for the device DC24V ETH DK POWER SUPPLY DRAWER PC Power supply cable included Ethernet standard CrossOver cable 24 ...

Страница 25: ...NTION Respect power supply polarity NOTE Power supply cable The following igure shows the connector pinout of the power supply cable for the device Tripolar male connector 24 V n c GND Power supply cable 1 2 3 4 USB INTERFACE Female USB type B connector J2 1 USB PLUG in 2 D in out 3 D in out 4 GND SH1 SHIELD SH2 SHIELD 25 ...

Страница 26: ... logic value 0 is associated with voltage value VRS232 corresponds to a voltage level of between 3Vdc and 15Vdc and logic value 1 is associated with voltage value VRS232 cor responds to a voltage level of between 3Vdc and 15Vdc DEVICE PC connection The following picture shows an example of connections between the device and a personal computer using a 9 pin RS232 serial connectors DEVICE PC DTR TX...

Страница 27: ...prevent a current overload check and set correctly the kind of cash drawer PIN 2 DRAWER 1 PIN 4 NOTE The solenoid of the drawer 1 must be connected from Pin 2 to Pin 4 on the drawer connector NOTE DEVICE DRAWER optional connection Use an optional adapter cable RJ12 Jack to connect the device to a drawer Refer to the picture below for the connec tor pin signals DEVICE JACK RJ12 DRAWER SOL 24Vdc 27 ...

Страница 28: ...ctor J12 1 GND 2 24 Vdc 3 GND 4 Frame GND ATTENTION Respect power supply polarity NOTE Power supply cable The following igure shows the connector pinout of the power supply cable for the device Tripolar male connector 24 V n c GND Power supply cable 28 ...

Страница 29: ... green color the LED lights up when occurs a data reception or transmission For 10 100Base TX connection LED FUNCTION LED LNK The LED light yellow color on when a connection is active and lashes wnen occurs a data reception or transmission LED LAN The LED light green color on when occurs a 100 Mbit connection and off when occurs a 10 Mbit connection The device automatically recognizes the type of ...

Страница 30: ...prevent a current overload check and set correctly the kind of cash drawer PIN 2 DRAWER 1 PIN 4 NOTE The solenoid of the drawer 1 must be connected from Pin 2 to Pin 4 on the drawer connector NOTE DEVICE DRAWER optional connection Use an optional adapter cable RJ12 Jack to connect the device to a drawer Refer to the picture below for the connec tor pin signals DEVICE JACK RJ12 DRAWER SOL 24Vdc 30 ...

Страница 31: ...ow the instruction get back on the README txt ile You can ind it in the software package downloaded in advance macOS Driver for macOS X Follow the instruction in the pkg ile You can ind it in the software package downloaded previously Android Library for CustomAndroidAPI Extract the zipped folder to the the destination path desired Follow the instructions present in the software package that you d...

Страница 32: ...32 ...

Страница 33: ...y ON OFF the LED is switched on and the device is ready Switch device off pressing key ON OFF IN DC 24V 1A ON OFF IN DC 24V 1A VIn 24Vdc For printing receipts with wide black zones we recommend to replace the included power supply with the optional power supply that provides a peak current higher for larger time intervals see technical specification for power supplies codes Power supply cable supp...

Страница 34: ...5 2 Opening cover To open the device cover proceed as follows 1 2 Lift the opening lever Open the device cover 34 ...

Страница 35: ...pecting the correct direction of rotation shown in figure and pull out the paper for a few centimetres Use paper rolls in accordance with the measure for the double roll up of the paper at the roll core MAX 10mm CORE PAPER VROOM Open the device cover see paragraph 5 2 Place the roll in the paper compartment respecting the correct direction of rotation shown in igure and pull out the paper for a fe...

Страница 36: ...36 ...

Страница 37: ...the operating parameters of the device proceed as follows 1 2 While pressing the FEED key switch on the device by pressing the ON OFF key The device prints the report with the settings parameters Follow the instruction printed on paper to proceed with configuration procedure PRINTERSETUP ON OFF FEED 37 ...

Страница 38: ...R ON COUNTER 4 PAPER PRINTED cm 40 CUT COUNTER 1 Wireless OFF RS232 Baud Rate 19200 bps RS232 Data Length 8 bits chr RS232 Parity None RS232 Handshaking Xon Xoff Busy Condition RxFull USB Address Number 0 USB Virtual COM Disabled Autofeed CR Disabled Print Mode Normal Chars inch A 15 B 20 cpi Speed Quality Normal Black Mark Alignment Enabled Black Mark Threshold 40 Black Mark Distance mm 15 PaperE...

Страница 39: ...ient Disabled IP Address 192 168 10 52 Subnet Mask 255 255 255 0 Default Gateway 192 168 0 5 Ethernet MAC Address Ethernet 00 00 00 00 00 00 Autofeed CR Disabled Print Mode Normal Chars inch A 15 B 20 cpi Speed Quality Normal Black Mark Alignment Enabled Black Mark Threshold 40 Black Mark Distance mm 15 PaperEnd Buffer Clear Disabled Font Type International Code Table num 00 Print Density 0 PUSH k...

Страница 40: ...Type NONE Wireless ON MAC Address WiFi 00 00 00 00 00 00 Wireless ON RS232 Baud Rate 19200 bps RS232 Data Length 8 bits chr RS232 Parity None RS232 Handshaking Xon Xoff Busy Condition RxFull USB Address Number 0 USB Virtual COM Disabled Autofeed CR Disabled Print Mode Normal Chars inch A 15 B 20 cpi Speed Quality Normal Black Mark Alignment Enabled Black Mark Threshold 40 Black Mark Distance mm 15...

Страница 41: ...t Disabled Pairing BT Disabled RS232 Baud Rate 19200 bps RS232 Data Length 8 bits chr RS232 Parity None RS232 Handshaking Xon Xoff Busy Condition RxFull USB Address Number 0 USB Virtual COM Disabled Autofeed CR Disabled Print Mode Normal Chars inch A 15 B 20 cpi Speed Quality Normal Black Marck Alignment Enabled Black Marck Threshold 40 Black Marck Distance mm 15 PaperEnd Buffer Clear Disabled Fon...

Страница 42: ...SAVE PORT LOAD Select a configuration file as follows Click on LOAD From file and select a psc file on your PC Drag and drop a psc file Enabled Parameter Enabled Parameter Disabled Parameter Disabled Parameter Enabled Parameter 2 Parameter Disabled Parameter SETUP Info Parameters Parameters Parameters Parameters SAVE LOAD PORT To Device To File Disabled Parameter Enabled Parameter Enabled Parameter Dis...

Страница 43: ...lty STATIC RAM TEST OK appears if functioning and NOT OK if faulty EXTERNAL MEMORY TEST OK appears if functioning and NOT OK if faulty CUTTER TEST OK appears if functioning and NOT OK if faulty HEAD VOLTAGE voltage of the head HEAD TEMPERATURE temperature of the head POWER ON COUNTER number of power ups made PAPER PRINTED centimetres of paper printed CUT COUNTER number of cuts performed BT PRINTER...

Страница 44: ...nterface RS232 HANDSHAKING Handshaking XON XOFF D software handshaking Hardware hardware handshaking CTS RTS NOTES Parameter valid only with serial interface When the receive buffer is full if handshaking is set to XON XOFF the device sends the XOFF 0x13 on the serial port When the receive buffer has cleared once again if handshaking is set to XON XOFF the device sends the XON 0x11 on the serial p...

Страница 45: ...by keys DEFAULT GATEWAY This parameter identiies the Gateway IP address used to send applications to the external network NOTE This parameter can t be modiied by keys TCP PRINTER PORT This parameter sets the TCP port number NOTE This parameter is not printed on setup report SECURITY TYPE Security Protocol None D protocol disabled WPA WPA protocol enabled WPA2 WAP2 protocol enabled NOTE This parame...

Страница 46: ...rrupted power off stand by etc Before enabling this function you must perform the pairing between the Apple device and printer NOTE The parameter is printed only for Q3x BTH models PAIRING BT Setting the paring function for the Bluetooth devices Disabled D pairing function disabled No passkey is requested to make association Enabled pairing function enabled To set it entering the pincode passkey i...

Страница 47: ...ed and printing quality Normal D High Quality PAPEREND BUFFER CLEAR Cleaning mode of the data in receive buffer if the printing is stopped due to lack of paper Disabled D the data remain in the receive buffer When the paper runs out the device keeps the remaining data in the receive buffer and prints the remaining portion of the ticket after that the new paper is loaded Enabled when the paper runs...

Страница 48: ...ng the digit for tens 0 D 2 4 1 3 5 Code Table num x 1 Setting the digit for units 0 D 2 4 6 8 1 3 5 7 9 NOTE See the paragraph 10 7 to learn about the character tables corresponding to the identiication numbers set with this parameter The character tables set with this parameter are the same set with the command 0x1B 0x74 refer to the commands manual of the device PRINT DENSITY Adjusting the prin...

Страница 49: ... Distance is the minimum distance in millimeters between the upper edge of ticket and the black mark see chapter 8 The numeric value of the distance is made up with the following four parameters for the setting of three digits two for the integer part of the number one for the decimal part and of the sign B MARK DISTANCE mm x 10 Setting the digit for tens 0 D 1 2 B MARK DISTANCE mm x 1 1 Setting t...

Страница 50: ... a key is pressed or characters are received through the communication port Hexa decimal Dump mode For each character sent the receipt contain an indication of the hexadecimal and ASCII values if the characters are underlined the receive buffer is full Shown below is an example of a Hexadecimal Dump 31 32 33 34 35 39 30 31 32 33 37 38 39 75 69 68 6B 6A 73 64 73 64 66 6B 6A 66 73 64 66 6B 65 69 6F ...

Страница 51: ...ending on the version of the operating system 7 1 Bluetooth pairing with Windows devices Q3x BTH Turn on the printer see paragraph 5 1 On the PC status bar click the Bluetooth icon Configure the parameters Wireless to ON and BT AutoReconnect to Disabled in one of the modes described in the previous paragraphs see chapter 6 ON OFF Write down the 16 digits serial number indicated on the label of the...

Страница 52: ...l device_serial number Bluetooth Other Add a device Select a device to add to this computer Windows will continue to look for new devices and display them here What if Windows doesn t find my device Next Cancel device_serial number Bluetooth Other Add and device Select a pairing option How can I tell if my device has a pairing code Next Cancel device_serial number Create a pairing code for me The ...

Страница 53: ...sh before your device is ready to use To verify if this device finished installin properly look for it in Device and Printers What if Windows doesn t find my device Close device_serial number All control panel item Device and printer Search Devices and Printer Add aa device Add a printer device_serial number Monitor PC Device 3 12 11 NOTE Once that has occurred the association pairing between the ...

Страница 54: ...n the PC status bar click the Bluetooth icon In the dropdown menu click OPEN BLUETOOTH PREFERENCES Pairing BT Disabled Configure the parameters Wireless to ON and BT AutoReconnect to Disabled in one of the modes described in the previous paragraphs see chapter 6 Wireless ON BT AutoReconnect Disabled Turn on the printer see paragraph 5 1 ON OFF 1 2 4 3 6 5 Write down the 16 digits serial number ind...

Страница 55: ...th On Options Bluetooth Search Devices dievice_dserial number Pairnig falled Pair Advanced Show Bluetooth in menu bar Turn Bluetooth Off Now discoverable as Bluetooth Bluetooth On Options Pair Cancel Enter the code show on device_serial number to pair it with See the documentation that came with your Bluetooth device if you don t know the code or are having troble pairing Code 1234 7 8 9 If the pa...

Страница 56: ...x xx xx xx xx XXXXXXXXXXXXXX serial number Write down the 16 digits serial number indicated on the label of the printer see paragraph 3 4 Configure the parameters Wireless to ON and BT AutoReconnect to Disabled in one of the modes described in the previous paragraphs see chapter 6 Wireless ON BT AutoReconnect Disabled Turn on the printer see paragraph 5 1 ON OFF 4 6 5 1 2 3 Write down the 16 digit...

Страница 57: ...K Stop Adapter Bluetooth Devices Device View help Search Setup device_serial number Helmet xx xx xx xx xx xx Pairing BT Disabled Adapter Bluetooth Devices Device View help Search Setup device_serial number Unknown xx xx xx xx xx xx Connect To Serial Port ISend a File Browse Device Pair Trust Setup Rename device Remove Disconnect 7 8 9 In the dropdown menu click the PAIR key If the parameter Pairin...

Страница 58: ...he printer see paragraph 3 4 Configure the parameters Wireless to ON and BT AutoReconnect to Disabled in one of the modes described in the previous paragraphs see chapter 6 Wireless ON BT AutoReconnect Disabled Turn on the printer see paragraph 5 1 ON OFF 6 4 5 1 2 3 Turn on the printer see paragraph 5 1 Conigure the parameters Wireless to ON and BT AutoReconnect to Disabled in one of the modes de...

Страница 59: ...device_serial number Type the device s required PIN _________________________________ Usually 0000 or 1234 PINcontains letters or symbols You may also need to type this PIN on the other device Cancel OK 8 7 If the parameter Pairing BT of the printer is set to Enabled see paragraph 6 4 enter the PIN 1234 and click OK to conirm If the parameter Pairing BT of the printer is set to Disabled see paragr...

Страница 60: ...f the printer see paragraph 3 4 Configure the parameters Wireless to ON and BT AutoReconnect to Disabled in one of the modes described in the previous paragraphs see chapter 6 Wireless ON BT AutoReconnect Disabled Turn on the printer see paragraph 5 1 ON OFF 6 4 5 1 2 3 Write down the 16 digits serial number indicated on the label of the printer see paragraph 3 4 Conigure the parameters Wireless t...

Страница 61: ...TUV 9 WXYZ 0 Cancel device_serial number Pair PIN Locate your printer device_serial number and select it with a click 8 7 If the parameter Pairing BT of the printer is set to Enabled see paragraph 6 4 enter the PIN 1234 and press the PAIR key to conirm If the parameter Pairing BT of the printer is set to Disabled see paragraph 6 4 pairing is automatically performed Once pairing is completed do not...

Страница 62: ...n the label of the printer see paragraph 3 4 Configure the parameters Wireless to ON and BT AutoReconnect to Disabled in one of the modes described in the previous paragraphs see chapter 6 Wireless ON BT AutoReconnect Disabled Turn on the printer see paragraph 5 1 ON OFF 4 1 2 3 5 6 Conigure the parameters Wireless to ON and BT AutoReconnect to Disabled in one of the modes described in the previou...

Страница 63: ...anced Bluetooth device tag to pair device_serial number tag to pair Locate your printer device_serial number and select it with a click 8 7 If the parameter Pairing BT of the printer is set to Enabled see paragraph 6 4 enter the PIN 1234 and press the PAIR key to conirm If the parameter Pairing BT of the printer is set to Disabled see paragraph 6 4 pairing is automatically performed Once pairing i...

Страница 64: ...peration of the device in wireless mode the following communication parameters must be appropriately conigured using one of the methods described in chapter 6 Wireless ON Wi Fi SSID IP address of Wi Fi network Wi Fi Net Password password for Wi Fi communication 64 ...

Страница 65: ...relection sensor this kind of sensor emits a band of light and detects the quantity of light relected to it The presence of the black mark is therefore detected by the amount of light that returns to the sensor considering that the light is relected by the white paper and absorbed by the black mark The following paragraphs show how to correctly set the coniguration parameters of device in order to...

Страница 66: ...nt it is necessary enable the parameter Black Mark Alignment during the setup procedure see chapter 6 and set the correct value of this parameter as described in the following table VALUE OF THE BLACK MARK ALIGNMENT PARAMETER USING MODE OF SENSOR BLACK MARK TYPE Disabled Alignment disabled Enabled Relection Black mark printed on the thermal side of paper SENSOR 66 ...

Страница 67: ...Paper with black mark on the thermal side The following igure show the usable format of paper and the corresponding sensor used for alignment Direction of paper feed SENSOR THERMAL SIDE 67 ...

Страница 68: ... the device offers the execution of the function of paper characterization Char acterize paper and the change of the Black Mark Threshold parameter which represents the detection threshold of the black mark Choosing the YES value for the Characterize paper parameter the device prints a graphic representation see following igures of the outgoing voltage of the alignment sensor expressed as a percen...

Страница 69: ...ed about halfway between the peak value and the maximum value of the noise Peak THERMAL SIDE NON THERMAL SIDE Noise Black Mark Threshold If the maximum value of noise read by the sensor is very close to the peak value it might be dificult to place the value of the Black Mark Threshold at an intermediate point In these cases it is mandatory that the portion of paper between the point of printing en...

Страница 70: ...t point is deined as Black Mark Distance Referring to the front of the black mark the value of Black Mark Distance value varies from 0 mm minimum and 22 mm maximum If the Black Mark Distance value is set to 0 the alignment point is set at the beginning of the black mark 0 PRINTING DIRECTION Alignment point black marck front Alignment point positive values of Black Mark Distance 70 ...

Страница 71: ... device with the paper path and the distances in mm between the alignment sensor the print head cutter cutting line and paper out mouth B A A distance between printing head and cutter 13 5 mm B distance between printing head and alignment sensor 15 mm 71 ...

Страница 72: ...nce parameter see paragraph 6 5 For example to set a black mark distance of 15 mm between the black mark and the alignment point the parameters must be set on the following values Black Mark Distance mm x 10 1 Black Mark Distance mm x 1 5 Black Mark Distance mm x 1 0 The Black Mark Distance parameter can be modiied as described in chapter 6 72 ...

Страница 73: ...e Cutting line Printing line A Non printable area of 15 mm generated from Distance between black mark front cutting line Distance between black mark front printing line where Distance between black mark front cutting line 28 mm ixed distance Distance between black mark front printing line 13 mm ixed distance H Distance between the irst and the last print line called Height of the printing area L T...

Страница 74: ...74 ...

Страница 75: ...he cover Lift the damage paper check and remove possible scraps of paper along the cutter path Pull the paper in order to have the damaged part outside the device Open the device cover see paragraph 5 2 Open the device cover see paragraph 5 2 75 ...

Страница 76: ...nthead Use isopropyl alcohol Platen roller Use isopropyl alcohol EVERY 5 PAPER CHANGES Cutter Use compressed air Paper path Use compressed air or tweezers Sensors Use compressed air EVERY 6 MONTHS OR AS NEEDED Printer case Use compressed air or a soft cloth For speciic procedures see the following pages NOTE If you use the device in dusty environments you must reduce the intervals between the clea...

Страница 77: ...ter or other liquids get inside the device ON Alcohol solvent Disconnect the power supply cable and open the device cover see paragraph 5 2 Clean the area involved in the passage of paper by using compressed air ATTENTION Do not use alcohol solvents or hard brushes Do not let water or other liquids get inside the device ON Alcohol solvent Disconnect the power supply cable and open the device cover...

Страница 78: ...side the device ON Clean the platen roller by using a non abrasive cloth moistened with isopropyl Disconnect the power supply cable and open the device cover see paragraph 5 2 ATTENTION Do not use solvents or hard brushes Do not let water or other liquids get inside the device ON ISOPROPYL ALCOHOL ISOPROPYL ALCOHOL Disconnect the power supply cable and open the device cover see paragraph 5 2 Disco...

Страница 79: ...s get inside the device ON Alcohol solvent Disconnect the power supply cable and open the device cover see paragraph 5 2 Clean the cutter compartment from the inside using compressed air ATTENTION Do not use alcohol solvents or hard brushes Do not let water or other liquids get inside the device ON Alcohol solvent Disconnect the power supply cable and open the device cover see paragraph 5 2 79 ...

Страница 80: ...ick on UPGRADE and follow the instructions shown on the screen From Device From File SAVE PORT LOAD Select a configuration file as follows Click on LOAD From file and select a psc file on your PC Drag and drop a psc file From Device From File SAVE PORT LOAD SETUP FONTS UPGRADE To perform an upgrade select a file as fo For firmware upgrade click on OPEN and a psw or pfw file on your PC For module upgrade c...

Страница 81: ... 64 bit with or without silent installation OPOS Linux 32 64 bit Android Windows Phone iOS macOSX INTERFACES USB port only for Q3x Q3x BTH and Q3x Wi Fi 12 Mbit s USB 2 0 full speed RS232 serial port only for Q3x Q3x BTH and Q3x Wi Fi from 1200 bps to 115200 bps RJ12 drawer port 24 V Ethernet port only for Q3x ETH 10 Mbit s MEMORIES Receive buffer 20 kB Flash memory 4 MB 1 MB internal to the micro...

Страница 82: ...ntable barcode UPCA UPCE EAN13 EAN8 CODE39 ITF CODABAR CODE93 CODE128 CODE32 PDF417 QR code Printing speed 1 3 Normal 140 mm s High Quality 100 mm s PAPER Type of paper Thermal rolls heat sensitive side on outside of roll Paper width 80 mm 0 5 mm Paper weight from 55 g m2 to 60 g m2 Paper thickness 63 μm Recommended types of paper KANZAN KF50 MITSUBISHI PF5067 External roll diameter max 80 mm Inte...

Страница 83: ...NS only for Q3x BTH Communication speed 2 0 Class 2 SPP Serial port proile PRINTER ELECTRICAL SPECIFICATIONS Power supply 24 Vdc 10 optional external power supply Medium consumption 3 1 A Typical consumption 4 1 A Stand by consumption 0 05 A ELECTRICAL SPECIFICATIONS POWER SUPPLY code 963GE020000041 5 Power supply voltage from 100 Vac to 240 Vac Frequency from 47 Hz to 63 Hz Output 24 V 2 5 A Powe...

Страница 84: ...Damages caused by scratches ESD and electromigration are excluded 3 Referred to the UL measurements 4 Reffered to a standard CUSTOM receipt L 10 cm Density 12 5 dots on 4 For receipts with wide black zones is recommended the optional power supply code 963GE020000046 that pro vides a peak current higher for larger time intervals 10 2 Character speciications Character set 3 Character density 11 cpi ...

Страница 85: ...ensions Length 150 mm Height 117 mm with cover closed Width 140 mm Weight 920 g NOTES Dimensions referred to devices without paper roll All the dimensions shown in following igures are in millimetres 140 150 117 85 85 ...

Страница 86: ...wing table shows the dimensions of the power supply and the power cord supplied with the device POWER CORD code 26100000000311 Length 2000 mm POWER SUPPLY code 963GE020000041 Width 52 5 mm Length 116 mm Height 33 mm POWER CORD code 26100000000311 2000 86 ...

Страница 87: ...POWER SUPPLY code 963GE020000041 1 3 2 n c GND 24V 52 5 116 1200 50 33 AC INLET DC OUTPUT WIRE 87 ...

Страница 88: ...f power supply code 963GE020000046 optional Length 127 mm Height 35 5 mm Width 56 mm NOTE All the dimensions shown in following igures are in millimetres 1500 39 DC OUTPUT WIRE 35 5 1 2 3 n c GND 24V 56 127 AC INLET 88 ...

Страница 89: ...he placement of the black mark on the thermal side of the paper For more information about the use of paper with black mark see chapter 8 All the dimensions shown in following igures are in millimetres 12 min 50 13 28 PAPER WIDTH 80 mm THERMAL SIDE Printing line Cutting line 10 0 5 0 4 6 89 ...

Страница 90: ...es that can be installed on the device Code Table CHARACTER TABLES 0 PC437 U S A Standard Europe 1 Katakana 2 PC850 Multilingual 3 PC860 Portuguese 4 PC863 Canadian French 5 PC865 Nordic 11 PC851 Greek on request 12 PC853 Turkish on request 13 PC857 Turkish from irmware release 4 1 and subsequent 14 PC737 Greek 15 ISO8859 7 Greek on request 16 WPC1252 on request 17 PC866 Cyrillic 2 18 PC852 Latin ...

Страница 91: ...8 Farci on request 42 PC1118 Lithuanian on request 43 PC1119 Lithuanian on request 44 PC1125 Ukrainian on request 45 WPC1250 Latin 2 46 WPC1251 Cyrillic on request 47 WPC1253 Greek on request 48 WPC1254 Turkish on request 49 WPC1255 Hebrew on request 50 WPC1256 Arabic on request 51 WPC1257 Baltic Rim on request 52 WPC1258 Vietnamese on request 53 KZ1048 Kazakh on request 255 Space page 91 ...

Страница 92: ...92 ...

Страница 93: ...11 CONSUMABLES The following table shows the list of available consumables for device DESCRIPTION CODE THERMAL PAPER ROLL weight 58 g m2 width 80 mm Ø external 80 mm Ø core 12 mm 67300000000398 93 ...

Страница 94: ...94 ...

Страница 95: ...ailable accessories for device DESCRIPTION CODE POWER SUPPLY for technical speciications see paragraph 10 1 963GE020000046 SERIAL CABLE 9 pin male connector 9 pin female connector length 1 8 m 26500000000352 USB CABLE A B type length 1 8 m 26500000000356 95 ...

Страница 96: ...96 ...

Страница 97: ...the identiication data of the product at hand The product code the serial number and the hardware release number can be found on the product label see paragraph 3 4 The irmware release number SCODE can be found on the setup report see paragraph 6 1 connecting the device to a PC and starting the PrinterSet tool see paragraph 6 2 by consulting the setup ini ile if available 97 ...

Страница 98: ...98 ...

Страница 99: ......

Страница 100: ...om biz CUSTOM S p A World Headquarters Via Berettine 2 B 43010 Fontevivo Parma ITALY Tel 39 0521 680111 Fax 39 0521 610701 info custom biz www custom biz All rights reserved Part Number 76200000005100 Rev 1 30 ...

Отзывы: