background image

Tuning

Your antenna is now ready for tuning.  Remove it from your assembly area and mount it on a temporary
mast at least 8 feet off the ground.  Using a SWR analyzer or radio and SWR meter,  check for 
a dip in swr at or about 144.300 MHZ.   You should see a dip in the SWR.  If not, Check all connections
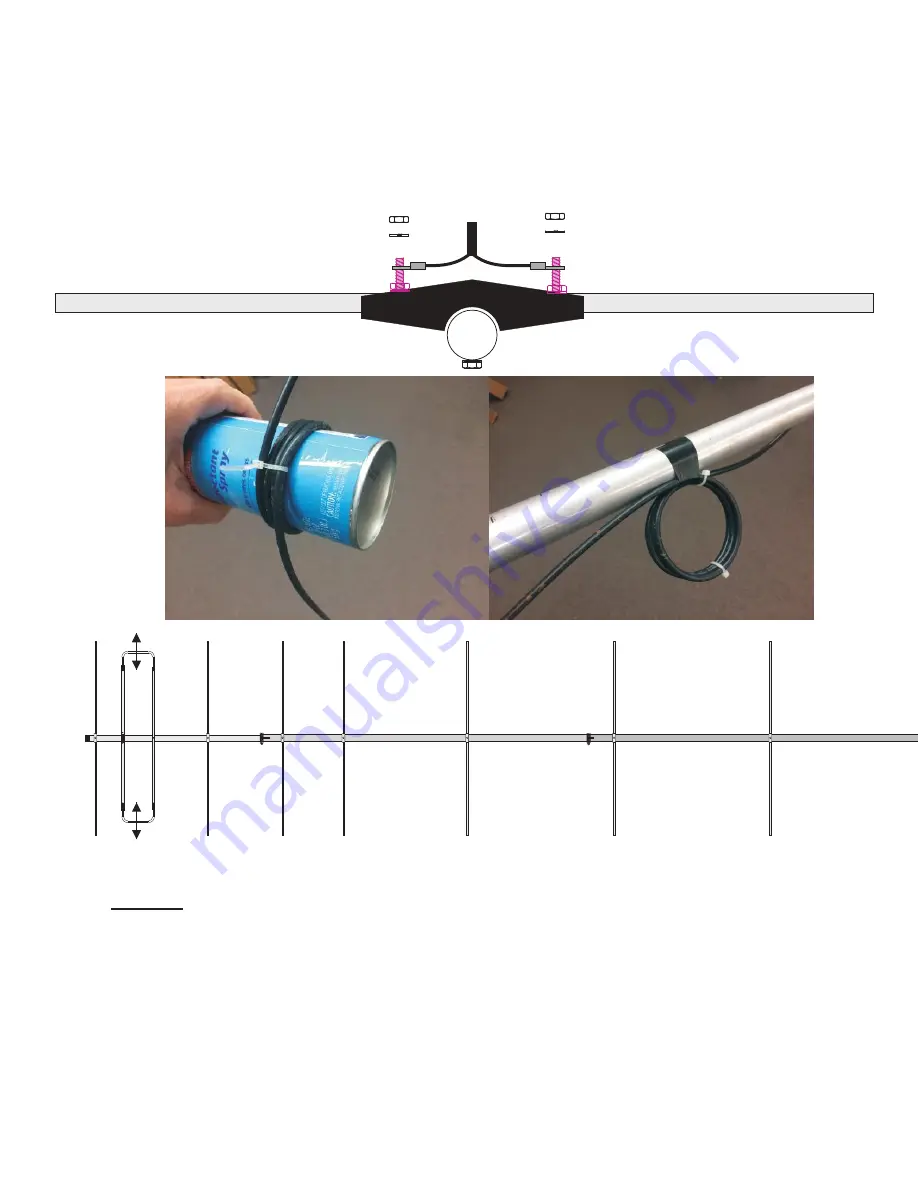
and retest.  If the dip is too low in frequency, move the loop ends in toward the boom.  Move each side the 
same and keep them both the same distance from the boom.  If the dip is too high in frequency, move the 
loop ends out away from the boom.  It is not necessary to tighten the clamps each time for tuning.  Once 
the dip is centered where you want it, tighten the clamps on the tubes.  Do not use a wrench or powered 
device to tighten the clamps.  A nut driver or screwdriver is plenty to do the job.    

Move out to shift frequency down

Attach your coax to the feed loop using the remaining 8-32 nuts and lock washers.  
Make the distance of the exposed conductors as short as possible.  Seal this connection
using a appropriate sealant to prevent water from entering the coax.  Wind a choke balun
into the coax using a household cleaner or spray paint can.  Put 3 turns around the can and
secure the coax together using cable ties.  Attach the balun to the boom with tape and route 
the coax along the boom to the mast and go down from there.

Содержание LFA-2M12EL

Страница 1: ...ing Equipment 308 Industrial Park Road Starkville MS 39759 USA Tel 662 323 9538 Fax 662 323 6551 VERSION 1A LFA 2M12EL 12 Element Loop Feed Beam For 2 Meters INSTRUCTION MANUAL Cushcraft Amateur Radio...

Страница 2: ...OBSTRUCTIONS FAILURE TO EXERCISE THIS CARE COULD RESULT IN SERIOUS OR FATAL INJURY 2 The LFA Loop Fed Array Low Noise Yagi is very different from the traditional dipole fed Yagi in many ways with its...

Страница 3: ...o set the insertion depth into the middle boom section If the tubes are put together incorrectly the elements will be out of place and the antenna will not work properly Rear of antenna holes close to...

Страница 4: ...rting next section BOOM ASSEMBLY Insert each tube 3 inches into the next using the marks you made Try your best to align the holes in each tube Tighten the hose clamps just enough so that the tubes do...

Страница 5: ...and tighten the nuts but do not crush the tubes Mount the long 7 16 tube to the third hole from the rear of the boom using a longer 8 32 x 2 1 4 bolt half washer and element saddle 8 32 x 2 1 4 half...

Страница 6: ...ter This is by design Each element is marked with a color band These color bands follow resistor color code numbers A chart is provided and the element bands are shown for each element Install them on...

Страница 7: ...nce between the elements that have boom joints between them If the insertion depth is not correct then move the boom to make these measurements correct Rotate the sections to align the elements if nee...

Страница 8: ...tighten the clamps each time for tuning Once the dip is centered where you want it tighten the clamps on the tubes Do not use a wrench or powered device to tighten the clamps A nut driver or screwdriv...

Страница 9: ...e last time to make sure everything is in place and secure If you haven t already Place the plastic end caps over the end of the booms ALWAYS have a friend over to help you install the antenna The ant...

Страница 10: ......

Страница 11: ......

Страница 12: ......

Отзывы: