background image


3

User Interface

The 'Exit ' key will remove all digital menus.
The exception to this is for persistent banners i.e. encrypted service 
etc and for service locked/censorship PIN entry OSDs.
All menus will automatically be removed after 30 seconds unless 
otherwise stated.
The menus use a 256-colour palette.
The menus will currently support just English language.

2) Volume Control

A bar is to be displayed when volume is changed by pressing Vol+ or 

Vol-. The bar will disappear after a predefined time following the last 

Vol+ or Vol- key press.Automatically removed after 2 seconds.

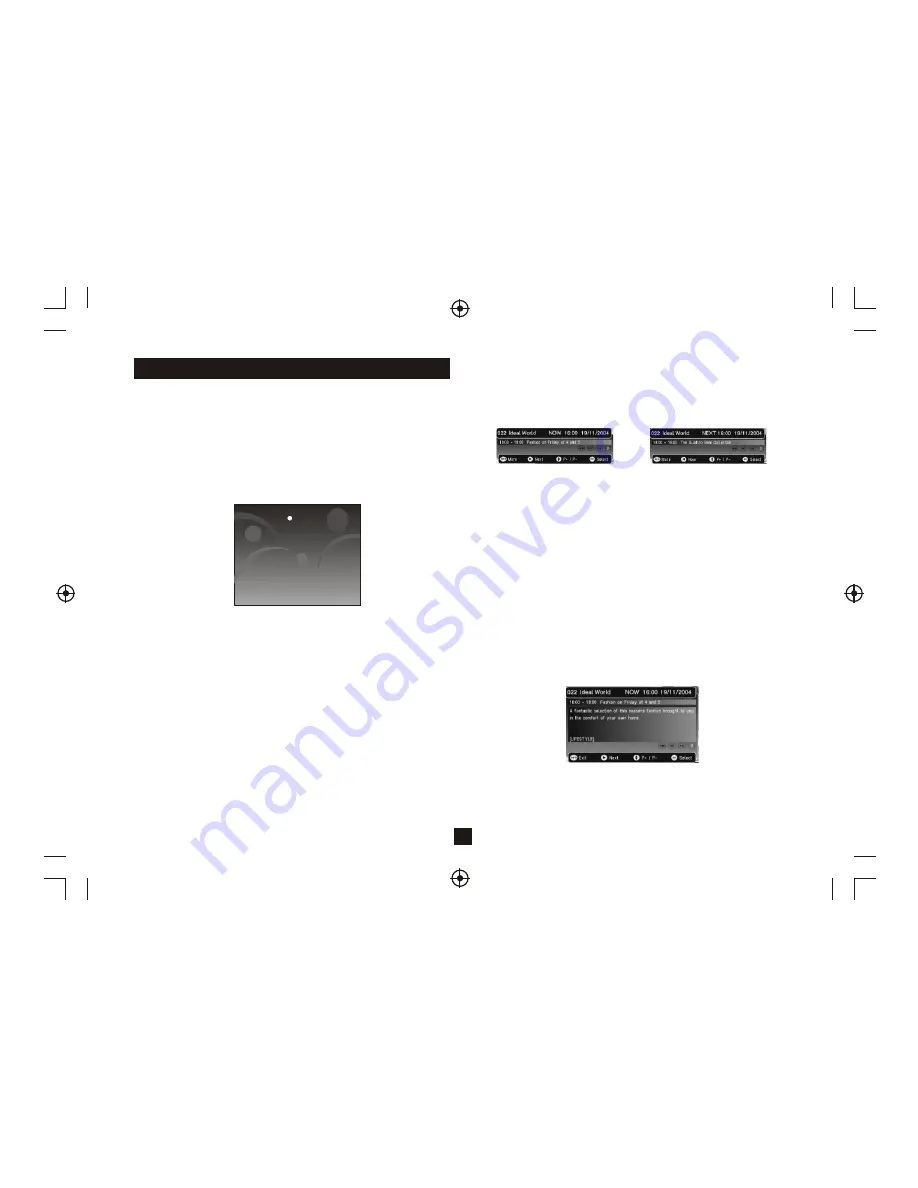
7) Digital Information

When viewing a digital program, a single press of the INFO key will bring 

up the first level of program information shown below. This shows the 

time, logical channel number, channel name and 'Now' program 

information. It also shows the current favourite list that is been 

used/selected. The information banner appears at the bottom of the 

screen.

3) Mute Symbol

Pressing the Mute key mutes the sound and a symbol is displayed,
Automatically removed after 2 seconds.

4) Screen Freeze

Pressing the Pause key to Freeze the Screen and a pause symbol is 
displayed. Press the Pause key again to exit Freezing.

5) Direct Digit Entry

When the user initiates a channel change using the number keys, the 
user can press the OK key to force the channel change before all 3 
digits have been entered. If all 3 digits are entered then the channel 
change will occur.

5 seconds after the last key press, the channel change will be initiated 
if all digits have not been entered.

6) TV/Radio Switch

Press TV/Radio button on the remote to toggle between TV channels 
and Radio stations, then you can change among the TV channels or 
Radio stations by pressing CH+/- buttons. This mode can be removed 
later if you select a channel by Direct Digit Entry or Service Organiser.

The user can scroll through information for other channels in the 
currently selected favourites list or the full service list if a favourites list 
is not enabled. This is done using the up and down keys. Whilst 
information for other channels is displayed the actual channel being 
viewed will not change. The OK key will jump to the new channel. After a 
channel change, the information banner will be removed after 4 
seconds. In addition the user can toggle between 'Now' and 'Next' 
information using the left and right keys. To display 'Next' information 
from the 'Now' banner, the user presses the right key. 

7.2) Small Next Information

The user can return from 'Next' to 'Now' Information using the left 
arrow key.
A second press of the INFO key will bring up the extended program 
information, and example is shown below.

 Now Information

Next Information

7.3) Large Now Information

Large Information

7.1) Small Now Information

Press  


to set-up services on your receiver

OK  

1)Welcome Screen

When the STB is powered up for the first time or is brought out of 
standby with no services, then a welcome screen will be displayed. 
This will tell the user to press the OK key to start a full frequency 
service scan.

Содержание DVB203UK

Страница 1: ...USER S MANUAL Of Digital Set Top Box Please read this UserManual carefully to ensureproper use of thisproduct and keep thismanual for future reference DVB203UK DVB203UK ...

Страница 2: ...r wall mounting alwaysensure the area tobe drilled is freefrom electrical wires water and gas pipes byusing a suitable locatordevice Do not expose thisproduct to dripping orsplashing or place anyobjects filled with liquids such as vases on the product Never put a nakedflame source such aslighted candles on ornear the product Pull the mains plugout of the wallsocket and disconnect theexternal aeria...

Страница 3: ...ure andshelf finishes DISPOSAL You must dispose of thisappliance and its packagingaccording to local lawsand regulations Because this appliance contains electroniccomponents and may containbatteries the appliance and its accessoriesmust be disposed ofseparately from household wastewhen the appliance reaches itsend of life Contact your local authority tolearn about disposal andrecycling The applian...

Страница 4: ...ean all menus and return to non menu state for playing 7 CH Used to move around the menu screens or selecting the channels in non menu state 8 VOL Used to move around the menu screens or changing the volume in non menu state 9 OK Used to confirm a selection within a menu 11 PAGE Used to page up when there are pages i e channel list 12 DTV VCR Used to switch between the VCR SCART input and the DTV ...

Страница 5: ...op box at anangle of up to60 degrees The remote control willnot operate if itspath is blocked Sunlight or very brightlight will decrease thesensitivity of the remote control Connections Caution Make sure to checkthe voltage specification ofthe wall outlet isthe same rating with the receiver Toprevent the risk ofelectric shock do notopen the cover or the back of thereceiver 2 Note When connecting t...

Страница 6: ...channel change will occur 5 seconds after the last key press the channel change will be initiated if all digits have not been entered 6 TV Radio Switch Press TV Radio button on the remote to toggle between TV channels and Radio stations then you can change among the TV channels or Radio stations by pressing CH buttons This mode can be removed later if you select a channel by Direct Digit Entry or ...

Страница 7: ...t age rating 18 15 The event is not suitable for children under the age of 15 Broadcast age rating 15 17 12 The event is not suitable for children under the age of 12 Broadcast age rating 12 14 6 The event is not suitable forchildren under the ageof 6 Broadcast age rating 6 11 0 The event is suitable for all ages Broadcast age rating 0 5 The event has NOT been given an age rating andmay contain un...

Страница 8: ...s display will be presented 12 TV Guide Pressing the EPG keydisplays the following guidemenu The guide contains all the channelsin the service listrather than just thefavourites list This allows the user to viewthe now and nextevent information for every service as wellas the extended informationfor a selected event Also a video audio previewis given which showsthe program that is currently being ...

Страница 9: ...nu 2 Scroll to favourites 3 Press green button tocreate favourite list 4 Press yellow to showedit list 5 Sroll up down to selectchannel 6 Press OK to addto list 7 Repeat process to addfurther channels Favourite Menu Favorite Edit Right List Favourite List Depending on which list the user has selected the help will Change Left List Service List Left List Help Info Right List Help Info 2 1 Favourite...

Страница 10: ...o enter the PIN number to remove viewing restrictions with the following menu Enter PIN to remove censorship locking The restricted program added in the timer list If the PIN isnot entered before atimeout or it isskipped then the event will still be addedand viewing restrictions willapply to the event depending on its censorshiplevel This is because the censorship value of the eventis not known at...

Страница 11: ...ncountered Enter PIN to view the censored service Change PIN The limit is raised to that of the broadcast program until the TV is put into standby If the PIN is not entered then this OSD will be displayed at all normal viewing times i e After leaving the menus this display will return TV Setup Menu The options are Television type Selects the type of tube that the set top box is connected to The op...

Страница 12: ...ull Scan Add New Services When the scan is complete the progress bar will show 100 and a message stating how many new services have been found is displayed Show how many services added 4 4 2 Full Scan Replace Existing Services When Full Scan Replace Existing Services option is selected the same as the Full Scan Add New Services menu is displayed except that the existing services in the system are ...

Страница 13: ...ces that have been added along with the service name and provider name of the previewing service The user can thenskip through the foundservices by using theP and P keys If no new services are added then the preview window will stay blanked and no service or provider name will be displayed The following will be displayedin the preview windows NO SERVICES ADDED The options are Transmission Mode 2K ...

Страница 14: ...his message is broadcast as part of the download and isn t hard coded into the interface The message maydescribe new features of the download or a contact number in case of download failure A progress bar and a time remaining countdown is displayed during the download If the download fails the following error message will be displayed Downloading Download Fail If the television uses one FLASH chip...

Страница 15: ...eiver or its installation in the first instance please read carefully the relevant sections of this User Manual and this Troubleshooting section Troubleshooting Specifications The Scart interface not connect hard Reconnect the STB and the TV set ...

Отзывы: