background image

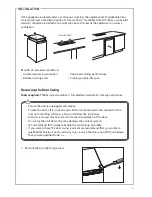
INSTALLATION

8

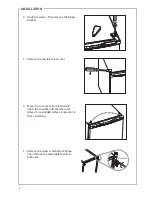
2.  Undo the screws. Then remove the hinge 

bracket.

3.  Remove the top left screw cover.

4.  Move the core cover from left side to 

right side. And then lift the door and 

place it on a padded surface to prevent it 

from scratching.

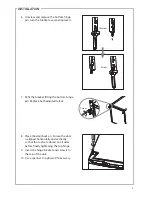
5.  Remove the screws and bottom hinge. 

Then remove the adjustable feet from 

both side.

Unscrew

Содержание CTT50W12

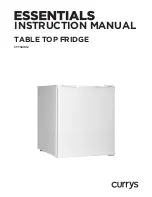
Страница 1: ...INSTRUCTION MANUAL TABLE TOP FRIDGE CTT50W12 ...

Страница 2: ......

Страница 3: ...0 Product Overview 11 Font View 11 Rear View 11 Operation 12 Switching On Your Unit 12 Adjusting the Temperature 12 Noises Inside the Unit 12 Tips for Keeping Food in the Unit 12 Cleaning 13 Defrosting 13 Cleaning the Interior and the Exterior of the Unit 13 Maintenance 14 Care When Handling Moving the Unit 14 Servicing 14 Switching Off for Long Periods of Time 14 Condensation 14 Disposal 14 Speci...

Страница 4: ...iators or fires as refrigerant and vesicant are burnable Do not damage the refrigerant circuit The refrigerant is a very environmentally friendly gas but is also combustible Take care when transporting or moving the unit to ensure that the refrigeration circuit is not damaged In the event of damage avoid naked flames or ignition sources and ventilate the room in which the unit is placed for a few ...

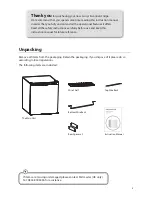
Страница 5: ...ur new Currys Essentials Fridge We recommend that you spend some time reading this instruction manual in order that you fully understand all the operational features it offers Read all the safety instructions carefully before use and keep this instruction manual for future reference If items are missing or damaged please contact Partmaster UK only Tel 0844 800 3456 for assistance Instruction Manua...

Страница 6: ...perly This unit is not designed for use in a garage or outdoor installation Do not drape the unit with any covering Levelling the Unit To do this adjust the two levelling feet at the front of the unit If the unit is not level the doors and magnetic seal alignments will not be covered properly Installing the Spacers Screw the spacers to the left and right side of the unit s rear part Free Space Req...

Страница 7: ... required Phillips style screwdriver Flat bladed screwdriver Hexagonal spanner Ensure the unit is unplugged and empty To take the door off it is necessary to tilt the unit backwards You should rest the unit on something solid e g a chair just below the top panel All parts removed must be saved to do the reinstallation of the door Do not lay the unit flat as this may damage the coolant system We re...

Страница 8: ... 3 Remove the top left screw cover 4 Move the core cover from left side to right side And then lift the door and place it on a padded surface to prevent it from scratching 5 Remove the screws and bottom hinge Then remove the adjustable feet from both side Unscrew ...

Страница 9: ...cket fitting the bottom hinge pin Replace both adjustable feet 8 Place the door back on Ensure the door is aligned horizontally and vertically so that the seals are closed on all sides before finally tightening the top hinge 9 Insert the hinge bracket and screw it to the top of the unit 10 Use a spanner to tighten it if necessary ...

Страница 10: ...e shelf in warm soapy water and dry completely before replacing in the unit Clean the exterior of the unit with a damp cloth If you require more information refer to the Cleaning section Before Using Your Unit Before placing any food in your unit turn it on and wait for 24 hours to make sure it is working properly and to allow it time to fall to the correct temperature Your unit should not be over...

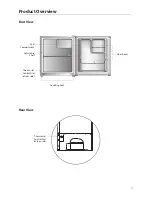
Страница 11: ...11 Product Overview Font View Adjustable Shelf Thermostat Control Dial at rear side Thermostat Control Dial at rear side Chill Compartment Levelling Feet Door Racks Rear View ...

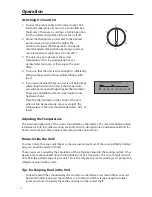
Страница 12: ...ter in the centre of the unit where it can be read easily Leave overnight the temperature in the unit should be between 18 C or lower Adjusting the Temperature The internal temperature of the unit is controlled by a thermostat The recommended position is between 1 to 3 for colder working environments i e during winter and between 4 to 5 for hotter environments Please adjust according to the enviro...

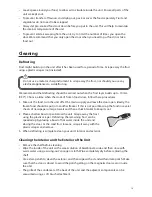
Страница 13: ...1 Take out the food turn the unit off at the mains supply and leave the door open Ideally the frozen food should be put into another freezer If this is not possible wrap the food in several sheets of newspaper or large towels and then a thick blanket to keep it cool 2 Place a shallow bowl or pan below the unit Scrape away the frost using the plastic scraper Defrosting the remaining frost can be sp...

Страница 14: ...he door ajar to prevent unpleasant smells Condensation Condensation may appear on the outside of the unit This may be due to a change in room temperature Wipe off any moisture residue If the problem continues please contact a qualified technician for assistance Disposal Old units still have some residual value An environmentally friendly method of disposal will ensure that valuable raw materials c...

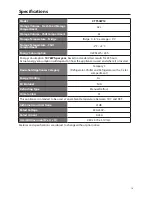
Страница 15: ...y consumption will depend on how the appliance is used and where it is located Household Appliances Category Category 3 Refrigerator Chiller and Refrigerator with a 0 star compartment Energy Grading A EU Ecolabel N A Defrosting Type Manual Defrost Climate Class ST This appliance is intended to be used at an ambient temperature between 16 C and 38 C Airborne Acoustical Noise 41dB Rated Voltage 220 ...

Страница 16: ...ll help conserve natural resources and ensure that it is recycled in a manner that protects human health and the environment For more information about where you can drop off your waste for recycling please contact your local authority or where you purchased your product Visit Partmaster co uk today for the easiest way to buy electrical spares and accessories With over 1 million spares and accesso...

Отзывы: