background image


S

VENSKA


3


BESKRIVNING ............................................................................................................................................. 3


MONTERING ................................................................................................................................................ 4


N

ORSK


7


BESKRIVELSE ............................................................................................................................................. 7


MONTERING ................................................................................................................................................ 8


P

OLSKI


11


OPIS ........................................................................................................................................................... 11


MONTA

Ż

 ..................................................................................................................................................... 12


E

NGLISH


15


DESCRIPTION ........................................................................................................................................... 15


INSTALLATION .......................................................................................................................................... 16


Содержание 433 Series

Страница 1: ...etørker Instrukcja obsługi suszarki ręcznikowej Installation Instructions for Heated Towel Rail 433 016 433 17 SV Bruksanvisning i original NO Bruksanvisning i original PL Instrukcja obsługi w oryginale EN Operating instructions in original 09 10 2012 Jula AB ...

Страница 2: ...SVENSKA 3 BESKRIVNING 3 MONTERING 4 NORSK 7 BESKRIVELSE 7 MONTERING 8 POLSKI 11 OPIS 11 MONTAŻ 12 ENGLISH 15 DESCRIPTION 15 INSTALLATION 16 ...

Страница 3: ...3 SVENSKA BESKRIVNING Läs bruksanvisningen noggrant innan användning Beskrivning Antal Handukstork Blindplugg Avluftningsplugg Väggfäste Plugg för stenvägg Lång skruv Liten skruv Distans Ändkåpa Skruv Låsstycke ...

Страница 4: ...garna med en trasa för att undvika repor 3 Anslut radiatorventilledningarna medföljer inte till de två nedre gängade hålen 4 Väggfästena ska monteras cirka 10 cm från produktens kant 1 fäste upptill 2 fästen nedtill För att underlätta inpassning kan fästena placeras vid vilken tvärslå som helst Markera fästpunkterna med blyertspenna 5 Montering på tegel slaggblock eller liknande Borra hål på lämpl...

Страница 5: ...unna justeras 7 Placera handukstorken A på fästena och för in skruven J genom låsstycket K Placera skruven mellan tvårslårna på önskat ställe och för in den i väggfästet Låsstyckets raka del ska vara parallell med tvärslån 8 Placera produkten parallellt med väggen på önskat avstånd och lås fast med de små skruvarna Tryck fast ändkåporna 1 över låsstyckena 9 Anslut radiatorventilledningarna till ra...

Страница 6: ...v produktens yta med en mjuk fuktig trasa Använd inte slipande rengöringsmedel Vi rekommenderar att lämpligt inhiberingsmedel tillsätts i värmeledningssystemet för att förhindra korrosion och kalkavlagringar invändigt Rätten till ändringar förbehålles Vid eventuella problem kontakta vår serviceavdelning på telefon 0200 88 55 88 Jula AB Box 363 532 24 SKARA www jula se ...

Страница 7: ...K 7 NORSK BESKRIVELSE Les bruksanvisningen nøye før bruk Beskrivelse Antall Håndkletørker Blindplugg Lufteplugg Veggfeste Plugg til steinvegg Lang skrue Liten skrue Avstandsstykke Endehette Skrue Låsestykke ...

Страница 8: ...or å unngå riper 3 Koble radiatorventilledningene følger ikke med til de to nedre gjengede hullene 4 Veggfestene skal monteres cirka 10 cm fra kanten av produktet ett feste øverst to fester nederst For å gjøre tilpasningen enklere kan festene plasseres ved hvilken som helst av tverrstengene Marker festepunktene med en blyant 5 Montering på murstein slaggblokker eller liknende Bor hull på egnede st...

Страница 9: ...res 7 Plasser håndkletørkeren A på festene og før skruen J inn gjennom låsestykket K Plasser skruen mellom tverrstengene på ønsket sted og før den inn i veggfestet Den rette delen av låsestykket skal være parallell med tverrstangen 8 Plasser produktene parallelt med veggen med ønsket avstand og lås fast med de små skruene Trykk fast endehettene 1 over låsestykkene 9 Koble radiatorventilledningene ...

Страница 10: ...flate med en myk fuktig klut Ikke bruk slipende rengjøringsmidler Vi anbefaler at det tilsettes et egnet inhiberingsmiddel i varmeledningssystemet for å forhindre korrosjon og kalkavleiringer på innsiden Med forbehold om endringer Ved eventuelle problemer kan du kontakte vår serviceavdeling på telefon 67 90 01 34 Jula Norge AS Solheimsveien 6 8 1471 LØRENSKOG www jula no ...

Страница 11: ... Przed użyciem uważnie przeczytaj instrukcję obsługi Opis Liczba Suszarka ręcznikowa Zatyczka Uchwyt ścienny Kołek rozporowy do kamienia Długi wkręt Mały wkręt Element dystansowy Zaślepka Wkręt Blokada Korek odpowietrzający ...

Страница 12: ...ką w celu uniknięcia zarysowań 3 Podłącz przewody grzewcze nie wchodzą w skład zestawu do dwóch dolnych gwintowanych otworów 4 Uchwyty ścienne należy zamontować około 10 cm od krawędzi produktu 1 uchwyt u góry 2 uchwyty na dole Aby ułatwić dopasowanie uchwyty można zamocować przy dowolnej poprzeczce Zaznacz ołówkiem punkty mocowania 5 Montaż na ścianie z cegły pustaków itp W odpowiednich miejscach...

Страница 13: ...czna jest możliwość ich regulowania 7 Umieść suszarkę A na uchwytach i wprowadź wkręt J w blokadę K Umieść wkręt w wybranym miejscu pomiędzy poprzeczkami i wsuń go w uchwyt ścienny Prosta część blokady musi być położona równolegle do poprzeczki 8 Umieść produkt równolegle do ściany i w wybranej odległości od niej Do unieruchomienia go użyj małych wkrętów Dociśnij zaślepki 1 do blokad 9 Podłącz prz...

Страница 14: ...wilgotną szmatką Nie używaj ściernych środków czyszczących Zalecamy zastosowanie odpowiedniego środka zabezpieczającego wnętrze systemu grzewczego przed korozją i osadzaniem się kamienia Z zastrzeżeniem prawa do zmian W razie ewentualnych problemów skontaktuj się telefonicznie z naszym działem obsługi klienta pod numerem 801 600 500 Jula Poland Sp z o o ul Malborska 49 03 286 Warszawa Polska www j...

Страница 15: ...GLISH DESCRIPTION Read the Installation Instructions carefully before use Description Qty Heated towel rail Blind plug Air vent plug Wall Support Plug for stone wall Long screw Small screw Spacer End cap Screw Lock ...

Страница 16: ...cloth to avoid scratching 3 Connect the radiator valve pipes not supplied to the two bottom threaded holes 4 The wall brackets should be fitted about 10 cm from the edge of the product 1 bracket at top 2 brackets at bottom To simplify adjustment place the brackets on the most convenient crosspiece Mark the attachment points with a pencil 5 Installation on brick or concrete wall Drill holes at suit...

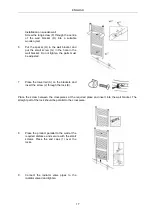
Страница 17: ...be adjusted 7 Place the towel rail A on the brackets and insert the screw J through the lock K Place the screw between the crosspieces at the required place and insert into the wall bracket The straight part of the lock should be parallel to the crosspiece 8 Place the product parallel to the wall at the required distance and secure with the small screws Press the end caps 1 over the locks 9 Connec...

Страница 18: ...the product Wipe the surface of the product with a soft damp cloth Do not use abrasive detergents We recommend adding a suitable inhibitor to the central heating system to prevent internal corrosion and lime deposits Jula reserves the right to make changes In the event of problems please contact our service department www jula com ...

Отзывы: