background image

38

Эксплуатация

Uso

Benutzung

Utilisation

Use

Cleaning the appliance

Warnings

Before carrying out any cleaning operations, it is neces-
sary to disconnect the power supply of the appliance 
(using the system switch), wear suitable personal pro-

tection equipment (e.g. gloves, etc.). The user must carry out 
only routine maintenance, for extraordinary maintenance, con-
tact a Service Centre requesting service from an authorised 
technician. The Manufacturer warranty does not cover damag-
es due to negligent or incorrect maintenance or cleaning (e.g. 
use of unsuitable detergents). 

When cleaning any part or accessory do NOT use:
•  abrasive or powder detergents;
•  aggressive or corrosive detergents (e.g. hydrochloric 

or sulphuric acid, caustic soda, etc,). Caution! Never use these 
substances also when cleaning the substructure/floor under 
the appliance or its base;

•  abrasive or sharp tools (e.g. abrasive sponges, scrapers, steel 

brushes, etc.);

•  steamed or pressurised water jets.

It is best to have an authorized service centre perform 
maintenance and inspection on the appliance at least 
once a year to ensure top working and safety conditions.

Cleaning the appliance

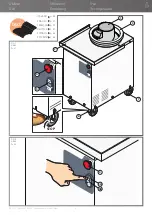
Cleaning the external steel parts


Fig.10. 

Use a cloth soaked in hot soapy water and finish with a thor-
ough rinsing and drying, taking care to remove all traces of de-
tergent.

Cleaning the control panel and emergency button

Clean the control panel and emergency button with a soft 
cloth and a little detergent for delicate surfaces. Avoid using 
considerable quantities of product since any infiltration may 
seriously damage the controls. Avoid also using very aggressive 
detergents that may damage the material the display is made 
of (polycarbonate).

Cleaning the wheels

Clean the wheels with a soft cloth and a little detergent for del-
icate surfaces. Avoid also using very aggressive detergents that 
may damage the material the wheels are made of.

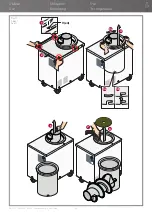
Cleaning the tray, outer cylinder, auger and inner disk


Fig.11. 

1

 Remove the 4 “V” screws that hold the tray to the machine 

body and 

2

 remove it.

3a

 Rotate the outer cylinder anticlockwise until you feel a block 

3b

4

 then lift it upwards to extract it.

 Lift the auger upwards until it is completely extracted.

6

 Remove the lower disk.

7

 Vacuum the compartment inside the machine to remove 

any residues.

The tray, outer cylinder, auger and bottom disk can be cleaned 
with a soft cloth moistened with warm water and some dish 
soap.
Finish cleaning with a thorough rinsing and drying. 
Reassemble the pieces only when they are perfectly dry.

Removing the auger in case of difficulty


Fig.12. 

If the manual removal of the auger proves difficult, for example, 
because there are many encrustations of dough, it is possible to 
extract it by force.

1

 Take the M10 screw from inside the envelope provided with 

the appliance and get a 17mm wrench (not supplied).

2

 Remove the tray and outer cylinder as explained in the 

previous chapter.

3

 Place the machine on its side; protect the side in contact 

with the floor with cardboard to avoid scratching the stainless 
steel surfaces.

4

  Insert the M10 screw into the hole on the underside of 

the machine and screw it clockwise with the 17mm wrench. 
The screw might resist; in this case, exert more force until it 
completely enters the machine body. At this point the auger will 
be free and can be extracted by pulling it out from the top of the 
machine. Unscrew the M10 screw and keep it for future use.

Downtime for prolonged periods

During any downtime, switch the power off. Protect the steel 
outside surfaces passing over them with a soft cloth slightly 
damp with Vaseline oil. 
Before resuming operations: 
•  accurately clean the equipment and accessories;
•  reconnect the equipment to the power;
•  inspect the equipment before using it.

Disposing of food residues

The ash and food residues removed when cleaning must 

be disposed of according to the regulations in force in 
the country where the product is used. 

If in doubt, we suggest contacting the local authorities to ask 
for the correct method of disposal.

Utilizzo

Содержание Dough Rounder

Страница 1: ...Dough Rounder ROUNDING MACHINE Quick Guide ...

Страница 2: ...von 48 Stunden nach der Installation durchgeführt werden muss www cuppone com de garantie ES REGÍSTRESE AHORA PARA ACTIVAR LA GARANTÍA DE SU PRODUCTO CUPPONE Recordamos que el procedimiento debe realizarse dentro de las 48 horas siguientes a la instalación www cuppone com es garantia RU ЗАРЕГИСТРИРУЙТЕСЬ СЕЙЧАС ЧТОБЫ ЗАДЕЙСТВОВАТЬ ГАРАНТИЮ НА ВАШ ТОВАР CUPPONE Напоминаем что процедура должна быть ...

Страница 3: ...halt der vorliegenden Anleitung lesen und für Auskünfte an den Hersteller wenden falls etwas nicht klar sein sollte FR Cher installateur cher utilisateur nous vous remercions d avoir choisi un produit conçu et réalisé avec des technologies à l avant garde Avant la livraison au client l appareil est contrôlée et testée dans les ateliers du constructeur La feuille de contrôle du processus de product...

Страница 4: ...al applications for example in restau rant kitchens canteens hospitals and commercial companies such as bakeries butcher shops etc but not for the continuous and mass production of food To avoid risks if the power cable is damaged it must be replaced by the Retailer its service agent or qualified personnel Failure to follow these regulations may cause damage or even fatal injury subsequently inval...

Страница 5: ...e If you notice any anomaly e g damaged power cable etc malfunction or fault do not use the appliance and contact a Service Centre author ized by the Retailer Demand original spare parts or the Warranty will be null and void To avoid risks if the power cable is damaged it must be replaced by a Service Centre the Retailer its service agent or qualified personnel Place the emergency phone numbers in...

Страница 6: ...or any print or transcription errors reserving the right to make changes where deemed suitable without prior notice Partial reproduction without the manufacturer s consent is prohibited Measurements are purely indicative and not binding The original language used to prepare this manual is Italian the Manufacturer is not responsible for any translation interpretation or print errors Main regulation...

Страница 7: ...BOTEN Bei sich bewegenden Maschinenelementen ist das Reinigen Schmieren und Einstellen VERBOTEN Symboles appliqués sur l appareil Consignes de sécurité Attention organes mécaniques en mouvement Attention risque d écrasement des mains INTERDICTION de retirer les dispositifs de sécurité INTERDICTION de nettoyer lubrifier et régler les éléments de la machine lorsqu ils sont actionnés Safety instructi...

Страница 8: ...Й с 30 Год изготовления Напряжение Модель Заводской номер Потребление Установка Año de producción Tensión Modelo Matrícula Absorción Instalación DEUTSCH S 28 Baujahr Spannung Modell Seriennummer Stromaufnahme Installation FRANÇAIS p 27 ESPAÑOL p 29 Année de production Voltage Modèle Plaque signalétique Absorption Installation ENGLISH p 26 Year of production Tension Model Serial number Absorption I...

Страница 9: ...24 1 2 Fig 5 Abb 5 Pис 5 Fig 6 Abb 6 Pис 6 Установка Instalación Installation Installation Installation Installazione ...

Страница 10: ...s going to be used and with the specifica tions indicated on the appliance rating plate on the LH side of the product single phase machines have the connection cable and the plug already fitted for the connection just insert the plug in a socket of suitable capacity Fig 5 three phase machines have the power cable already in stalled a plug not supplied must be fitted to it of suit able capacity Thi...

Страница 11: ...rotondatrice Quick Guide 31 text 2 1 3 4 5 6 7 STOP 5A 4 5B Fig 7 Abb 7 Pис 7 Fig 8 Abb 8 Pис 8 РУССКИЙ с 45 Эксплуатация Uso DEUTSCH S 41 Benutzung FRANÇAIS p 39 ESPAÑOL p 43 Utilisation ENGLISH p 37 Use ITALIANO p 35 Utilizzo ...

Страница 12: ...32 1 3 4 2 g Fig 10 Abb 10 Pис 10 H2O Fig 9 Abb 9 Pис 9 Эксплуатация Uso Benutzung Utilisation Use Utilizzo ...

Страница 13: ...Ed 0121 70702603 REV00 Arrotondatrice Quick Guide 33 Fig 11 Abb 11 Pис 11 4 3a 3a 3b 2 V x4 1 5 6 4 3a 3b 7 Эксплуатация Uso Benutzung Utilisation Use Utilizzo ...

Страница 14: ...34 Fig 12 Abb 12 Pис 12 17 1 2 3 M10 3 4 17 Эксплуатация Uso Benutzung Utilisation Use Utilizzo ...

Страница 15: ...e is on 6 Wheel with brake during normal use always keep the appliance blocked lowering the brakes of the front wheels 7 Wheel without brake Using the appliance Fig 8 Turn on the machine by pressing the I button 5A located on the control panel after pressing it the white light 5B comes on and the cylinder rotates If the machine does not turn on check if emergency STOP button 4 has been pressed if ...

Страница 16: ...ter cylinder auger and inner disk Fig 11 1 Remove the 4 V screws that hold the tray to the machine body and 2 remove it 3a Rotate the outer cylinder anticlockwise until you feel a block 3b 4 then lift it upwards to extract it 5 Lift the auger upwards until it is completely extracted 6 Remove the lower disk 7 Vacuum the compartment inside the machine to remove any residues The tray outer cylinder a...

Страница 17: ...impacts négatifs sur l environnement et en améliorant l efficacité d utilisation des ressources en appliquant les principes de pollueurs payeurs prévention préparation pour la réutilisation recyclage et récupération Ne pas oublier que l élimination abusive du produit comporte l application des sanctions prévues par la réglementation législative en vigueur Entretien EN Disposal at end of life To av...

Страница 18: ...CUPPONE 1963 Cuppone F lli S r l Via Sile 36 31057 Silea TV ITALY T 39 0422 361143 F 39 0422 360993 info cuppone com www cuppone com ...

Отзывы: