3
5
4
7
2
1
3
4
NOTICE
The stand mixer has a three wire
grounded plug. To reduce the risk of
electric shock, this plug will fit in a
polarized outlet only one way. If the
plug does not fit fully in the outlet,
reverse the plug. If it still does not fit,
contact a qualified electrician.
Do not modify the plug in any way.
UNPACKING
INSTRUCTIONS
. Place the gift box containing your
Cuisinart
™
Stand Mixer Food
Processor
Attachment on a flat
sturdy surface before unpacking.
. Remove the instruction booklet
and other printed materials.
3. Remove the top corrugated
insert. Carefully lift out the box
with the reversible slicing/shred-
ding disc.
4. The bowl contains the chopping
blade. Remove the lid, then
carefully remove the chopping
blade as it is very sharp.
5. Carefully lift the Cuisinart
™
Stand
Mixer
Food Processor
Attachment from the box.
To assemble the food processor
attachment, follow the Assembly
Instructions on page 4. Replace all
corrugated inserts in the box and
save the box for repackaging.
Before using for the first time: Wash
all parts according to the Cleaning
and Maintenance section on page 6
of this booklet to remove any dust or
residue.
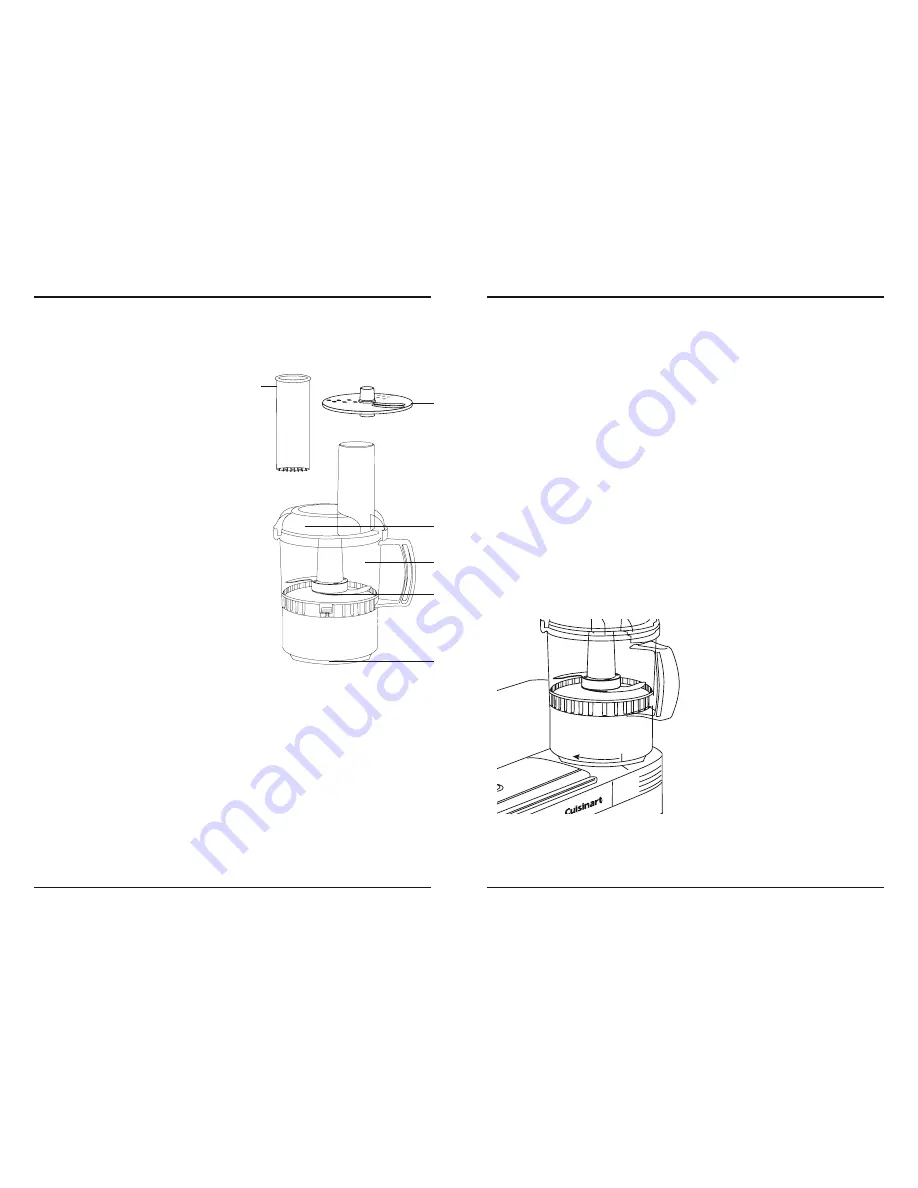
PARTS AND DIAGRAMS
1. Food pusher with oil dispenser
2. Stainless steel reversible slicing/
shredding disc
3. Work bowl cover with
feed tube
4. Clear work bowl
5. Stainless steel chopping blade
6. Adapter stem (not shown)
7. Gear collar
ASSEMBLY
INSTRUCTIONS
. Hold the gear collar in one hand
and work bowl handle in the
other. Twist work bowl clockwise
onto collar.
. Place the adapter stem in the
work bowl.
3. Place the chopping blade or the
slicing/shredding disc onto the
adapter stem in the work bowl.
Be sure to handle the blade
and disc with care as they are
razor sharp!
4. Put cover on work bowl by turn-
ing it clockwise until it fits into
position.
5. The food pusher fits in feed tube
with the more rounded side
toward the outside of the bowl.
6. Open the top cover on your
stand mixer and connect the gear
collar of your food processor
attachment onto the outlet by
matching the marked line on the
collar to the marked line on the
stand mixer and turning the collar
clockwise until it is firmly in place
(see diagram).
USING THE FOOD
PROCESSOR TO SLICE
AND SHRED
The slicing/shredding disc can
slice and shred a variety of fruits,
vegetables and cheeses.
. Begin with the work bowl
attached to the high speed
power outlet, and the slicing/
shredding disc on the adapter
stem with the desired cutting
blade facing up.
.
To slice:
Attach disc to stem with
the raised edge of slicer on top.
To shred:
Attach disc to stem
with the raised shredding slots on
top. Be sure to handle the metal
blade with care, as it is razor
sharp.
3. Place cover on work bowl, with
feed tube at about o’clock.
Turn cover clockwise until it fits
into position.
4. Hold pusher with more rounded
side toward the outside of the
bowl and insert it in feed tube
over food.
Fruits and vegetables:
Put food
in feed tube, press ON button
and push food through.
Medium-hard
cheeses (like


