5
BEFORE FIRST USE
Place the package containing the Cuisinart
®
Cordless
Rechargeable Multi-Grater on a sturdy surface and unpack
all pieces, being sure to remove all packaging materials from
in and around the unit.
To remove any dust that may have accumulated during
packaging, wipe the charging base and main body with
a clean, damp cloth.
The 3 drums, drum cover, hopper assembly and pusher can
all be removed from the unit and washed with warm soapy
water or placed on top rack of dishwasher.
Be sure to rinse and dry thoroughly.
Read all instructions completely for detailed operating
procedures.
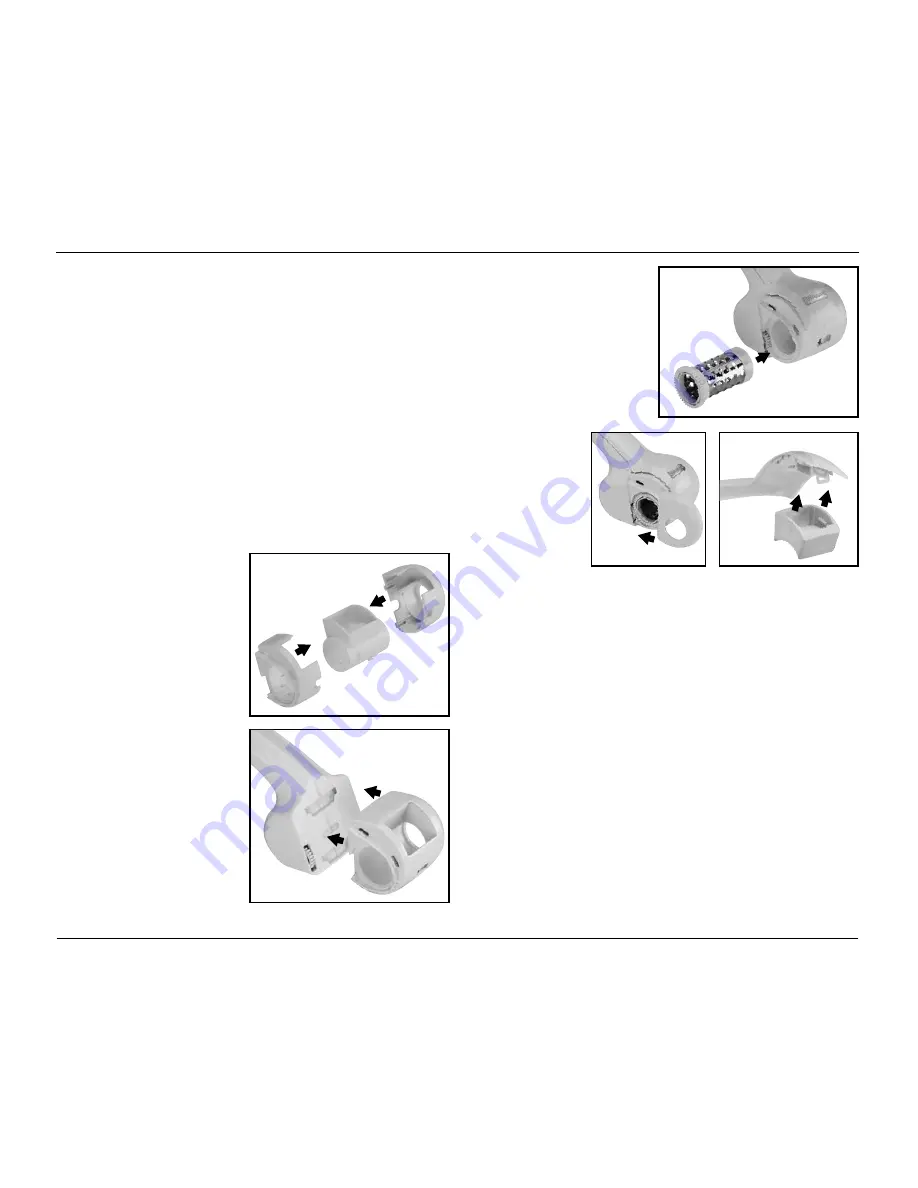
ASSEMBLING YOUR MULTI-GRATER
After your multi-grater has
been thoroughly cleaned, be
sure it is properly assembled
before using.
1. Be sure that all parts
are completely dry prior
to assembly.
2. Insert the hopper into
the left hopper cover,
lining up the 2 tabs. It
will click into place.
3. Attach the right hopper
cover, ensuring it clicks
to lock into place.
4. Attach the hopper
assembly to the main
body of the unit by
inserting the tabs on
the bottom of hopper
assembly into the open
slots on the main body.
5. Slide away from the
handle to secure.
6. Insert the desired
processing drum into
the hopper, being sure
the end with gear is
facing out.
7. Slide the drum cover
into position.
8. Attach the food pusher
to the handle, pressing
it firmly into place.
9. Your multi-
grater is
now ready
to charge.
CHARGING YOUR MULTI-GRATER
NOTE:
The batteries included in this unit are not charged.
Before initial use, the batteries must be charged for 24 hours to
insure maximum operating capability. For best performance,
fully discharge and recharge the battery 3 times before first use.
1. Ensure the multi-grater is properly assembled.
2. Attach the DC plug of the charger cable to the
charging base.
3. Place assembled multi-grater onto charging base,
ensuring the multi-grater locks into place.
4. Plug charger into a 120V - 60Hz AC outlet only.
5. The red light will illuminate to indicate the main unit
has been correctly placed on charging base and that
it's accepting a charge. If the red light is not illuminated,
lift and reposition unit on the charging base.
6. If after repositioning, the red light is still not illuminated,
check to ensure that the power cord is securely plugged
into outlet and the DC plug is securely plugged into the
charging base.


