background image

Wired Touch Panels

20

© CUE, a.s. | All Rights Reserved.

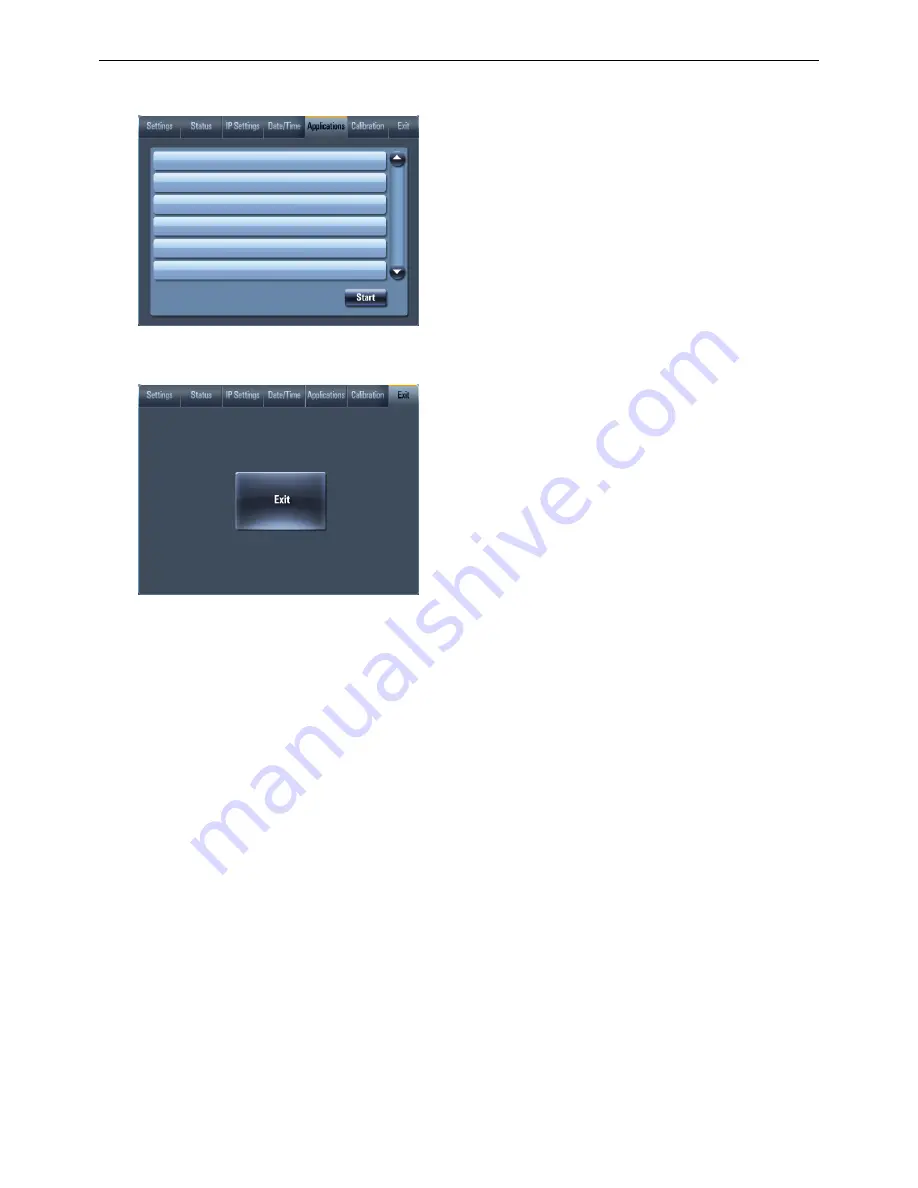
Applications

TestApp_TouchPanel1.cvca

DemoApp_TouchPanel1.cvca

This screen is used for selection, start and stop of 

uploaded applications. All uploaded applications 

are listed on this page.
Select application and press button Start. A 

“running flag” denotes the active application. 

Active application starts automatically after 

switch on the unit. The running application can 

be stopped via the Stop button.
Files are uploaded from a personal computer 

to the touch panel using Cue Visual Composer 

software or using Admin Web.

Exit

touchCUE-7  CS0451.R01.000001

6.10h (Jul 30, 2015)

Closes the On Screen Display.
On this page the product name, product code and 

current firmware version are displayed.

Содержание touchCUE-12

Страница 1: ...Wired Touch Panels User Manual...

Страница 2: ...cation 15 Overview 15 Using Cue Visual Composer 16 Using Admin Web 17 Factory Default and System Default 18 On Screen Display 18 Access On Screen Display 18 Startup Menu 18 Settings 18 Status 19 IP Se...

Страница 3: ...h tech homes Models and Accessories Model Product Code Description Note touchCUE 5 CS0371 Wired tabletop touch panel 4 3 touchCUE 7 CS0451 Wired tabletop touch panel 7 touchCUE 12 CS0466 Wired tableto...

Страница 4: ...e 1 1 1 Cleaning tissue 1 1 1 Declaration of Conformity 1 1 1 Data Sheet 1 1 1 Cue System Connector Wiring 1 1 1 Built In Models touchCUE 5 B touchCUE 7 B touchCUE 12 B Touch panel touchCUE 5 B 1 Touc...

Страница 5: ...ble PoE power supply Ethernet cable PoE power supply Ethernet cable Built In Models touchCUE 5 B touchCUE 7 B touchCUE 12 B Product code CS0372 CS0452 CS0467 Display type Color IPS LCD with LED backli...

Страница 6: ...lt Integrated tabletop stand Light sensor Proximity sensor touchCUE 7 102 mm 115 mm Network connector Button System Default Integrated tabletop stand Speakers LCD display with touch sensor 199 mm Micr...

Страница 7: ...Button System Default Speakers Bottom View Fixing screw 136 mm 81 mm 11 26 mm 88 mm Wall adapter 72 mm Light sensor Proximity sensor touchCUE 7 B LCD display with touch sensor Microphone Network conne...

Страница 8: ...erved touchCUE 7 B Light sensors LCD display with touch sensor Microphone Network connector Front View Rear View Top View Button System Default Speakers Bottom View Fixing screw 320 mm 200 mm 21 26 18...

Страница 9: ...function has to be enabled using On Screen Display or Admin Web Touch screen display Touch screen display with active matrix color LCD and resistive membrane touch overlay Speakers The built in stere...

Страница 10: ...models are compatible with standard European UK electrical wall boxes as described in the following picture Electrical wall box Wall adapter Touch panel Step 1 Step 2 Step 3 Fixing screw Electrical wa...

Страница 11: ...an soft texture cloths cotton 2 Spray bottle of cleaning solution without alcohol window cleaner 3 Aluminium parts should be cleaned using a special cleaning solution Steps are 1 Turn the touch panel...

Страница 12: ...standard for 4 3 and 7 models IEEE 802 3at PoE Plus standard for 12 models Power over Ethernet integrates data and power on the same wires It keeps the structured cabling safe and does not interfere...

Страница 13: ...ion steps are as follows 1 Attach one end of a RJ 45 Ethernet straight through cable to the CUEnet LAN port on touch panel and attach the other end of this cable to OUT port of PoE PoE Adapter 2 Attac...

Страница 14: ...l choose the option to switch to Classic View 3 Double click Network Connections Following steps are 1 Right click on network adapter used for connection with touch panel and then right click and sele...

Страница 15: ...d in chapter PC Connection 2 Run Cue Visual Composer on your PC 3 Open appropriate project in Cue Visual Composer It s necessary to have appropriated touch panel properly inserted and configured 4 Use...

Страница 16: ...alog box 5 Be sure your touch panel is checked 6 Use button Export All to export application and store it in file cvca 7 Run the Internet browser on your PC and type in the same touch panel IP address...

Страница 17: ...ation Name Empty Not changed IP settings Host name Empty Not changed IP address 192 168 1 128 192 168 1 128 Subnet mask 255 255 255 0 255 255 255 0 Default gateway 192 168 1 1 192 168 1 1 DNS Primary...

Страница 18: ...Display button launches menu described below Settings 1 min The Backlight Saver will switch off automatically display backlight Time in minutes can be set by buttons and Time set to 0 means that Back...

Страница 19: ...For control systems with more than one unit a unique IP address must be given to each CUEunit For setting please select appropriate field using Edit button and then use numeric keypad Be sure to click...

Страница 20: ...button Start A running flag denotes the active application Active application starts automatically after switch on the unit The running application can be stopped via the Stop button Files are uploade...

Страница 21: ...he Password box and click the Login button to enter the CUEunit web pages Remember that the password is case sensitive For changing your password use the Password menu after you are logged in Configur...

Страница 22: ...e Host name is optional However for control systems that are connected to a larger network please obtain the Host name from the network administrator and enter it into the corresponding box DHCP is no...

Страница 23: ...n your CUEunit The current date time and time zone are shown on the Current time line The time zone box can be selected to enter changes to the Time zone Be sure to click the Apply button for any chan...

Страница 24: ...e CUEunit to a personal computer by clicking the File name Files are easily deleted with the Delete button The button Total stop stops a running application This application will not be automatically...

Страница 25: ...l switch off automatically display backlight Time in minutes can be set Time set to 0 means that Backlight Saver is disabled LCD Backlight sets display backlight level If Adaptive Brightness is switch...

Страница 26: ...basic information about your CUEunit s hardware The CPU type CPU frequency and the flash and RAM memory sizes are shown Format data area To completely clear all data and restore factory default setti...

Страница 27: ...ders click the File Storage menu Restore READ ALL IMPORTANT NOTES THAT FOLLOW BEFORE USING THIS OPERATION The page is used for the restoring of all applications files and folders Restore copies of all...

Страница 28: ...Wired Touch Panels 28 CUE a s All Rights Reserved Reset To restart your CUEunit click the Reset button License This page describes software license...

Страница 29: ...ly provided in this License b translate disassemble decompile reverse program or otherwise reverse engineer the Software and Firmware c sublicense or lease the Software or its documentation d use this...

Страница 30: ...Wired Touch Panels 30 CUE a s All Rights Reserved Notes...

Страница 31: ...Wired Touch Panels 31 CUE a s All Rights Reserved...

Страница 32: ...CUE a s K Nouzovu 6 143 00 Praha 4 Czech Republic www cuesystem com support cuesystem com...

Отзывы: