


Step 2 – Installing Batteries and SD Card
1) Turn the rotary knob to the
OFF
position.
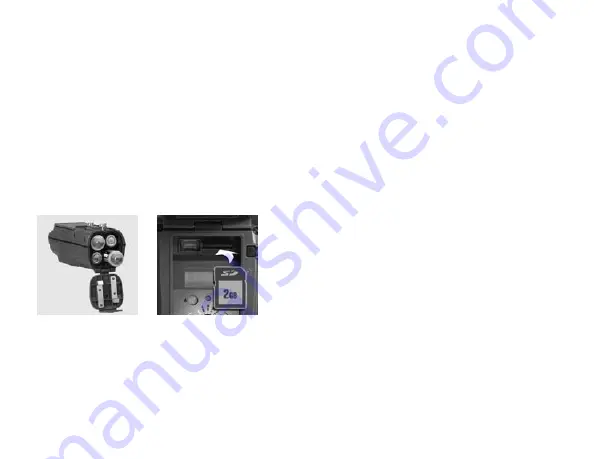
2) Loosen the battery thumb screw and open the battery
compartment door. Install four brand new alkaline D cell
batteries. Make sure to observe correct polarity. Close the
door and tighten the thumb screw completely.
3) You may notice a series of numbers displayed. These are
Attack IR’s hardware and software version numbers.
4) Wait until the LCD display goes blank and the green and red
LEDs are off.
5) Install your SD card. Be sure to observe the correct polarity
with clipped corner on the card to the right.
Step 3 – Setting up the Attack IR
1) Turn the rotary knob to
Time
position, press A and B to set.
Time is AM/PM format.
2) Turn the rotary knob to
Date
position, press A and B to set.
3) Turn the rotary knob to
Year
position, press A and B to set.
4) Later you will read
Step 8 – More Features
for information
on the USB and MENU positions.
Bottom View
Battery Install
SD Card Install
3
Viewing Images
You will need an external viewing device or computer to view
images. First, remove the SD card from the camera. Make sure to
only remove the SD card when the
worm
is not visible. Here is a
list of some viewing options.
1) You can view the images with an optional viewer or a point-
and-shoot camera that is able to read Attack IR images (Note:
not all SD based cameras can view Attack IR images,
please test any camera before purchasing).
2) Replace the SD card with a fresh SD card and take the
original SD card with you to view on your PC or other device.
3) Cuddeback’s CuddeView viewer will allow you to view the
images, copy the images to a second SD card and erase the
images from the SD card. You can then put the original SD
card back into Attack IR. CuddeView allows you to transfer
images from multiple cameras to a single SD card.
See www.cuddeback.com for more information
on CuddeView. (Note: CuddeView may not be able to copy
all the images taken in Guard Duty mode. If you are using
Guard Duty we recommend you view the images on a computer.)
Use Windows PC to Manage Cuddeback Images with Trophy Room
Trophy Room
software makes it easy to manage your Cuddeback images.
Trophy Room
1) Automatically copies images from your SD card to your PC
and organizes them by year and date.
2) Allows you to rename each folder to make it easy to find
your images.
12


