Cubix Xpander Rackmount 8 5URP24 Скачать руководство пользователя страница 4


Cubix Corporation 

 2800 Lockheed Way 

 Carson City, NV 89706-

0713 ● Page 4 

Sales 800.829.0550 


http://www.cubix.com


 [email protected] 

 xprm8g3-825urp24-20181001 


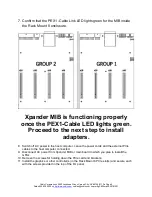
7.  Confirm that the PEX1 -Cable Link LED lights green for the MIB inside 

the Rack Mount 8 enclosure.  


Xpander MIB is functioning properly 

once the PEX1-Cable LED lights green. 

Proceed to the next step to install 

adapters. 


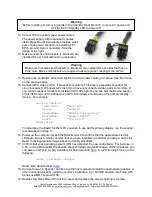
8.  Switch off AC power to the host computer. Leave the power cords and the external PCIe 

cables to the host computer connected. 

9.  Disconnect AC power from Xpander MIB or main board in which you plan to install the 

GPUs. 

10. Remove the screws for holding down the PCIe card end brackets. 
11. Install the graphics or other controller(s) in the Rack Mount 8 PCIe slot(s) and secure each 

with the screws provided in the top of the I/O panel. 

Содержание Xpander Rackmount 8 5URP24

Страница 1: ...epro W9100 Contact Cubix Customer Service customerservice cubix com if you have questions XPRM8G3 5URP24 provides two sets of four PCIe x16 for a total of eight slots for GPUs for use with high performance computing HPC and other Compute Unified Device Architecture CUDA or OpenCL OpenGL enabled applications Rack Mount 8 also supports other PCIe adapters with multiple Input Output IO ports such as ...

Страница 2: ...us x16 cable connected 8 0Gbps 5 0Gbps or 2 5Gbps x16 link speed x16 cable Connected or not connected status Slot 1 8 x16 transfer rate theoretical PCIe Gen 3 0Gbps x16 128 0Gbps LCD panel backlight Toggle on off using right button Storage devices Serial Attached SCSI SAS direct attached with 24 port RAID controller SSD Maximum Devices 24 Drive Format 2 5 inch 63 5mm SSD 3 5 inch 88 5mm SSD Transf...

Страница 3: ...d loads device drivers Start up Installation Test Procedure with Detail Each Rack Mount 8 provides two MIBs with four slots for a total of eight PCIe x16 slots The MIB supports either one or two host computers During this procedure place the Rack Mount 8 enclosure on a stable surface Use a Philips 2 screwdriver for this procedure Make sure all AC power to Xpander is disconnected Do not install gra...

Страница 4: ...1 Cable LED lights green Proceed to the next step to install adapters 8 Switch off AC power to the host computer Leave the power cords and the external PCIe cables to the host computer connected 9 Disconnect AC power from Xpander MIB or main board in which you plan to install the GPUs 10 Remove the screws for holding down the PCIe card end brackets 11 Install the graphics or other controller s in ...

Страница 5: ...n To determine the BusID for the GPU you wish to use as the primary display run the scanpci tool discussed in Step 17 16 Power up the computer s and the Rack Mount 8 to confirm that the appropriate slot link LEDs are lit green which confirms that you have installed a controller correctly in each slot Refer to the appropriate image above to identify slot LEDs 17 Confirm that your operating system O...

Страница 6: ...ttom line This is the Start menu Access all other main menu items by pressing the left button for a MIB the middle button for a menu selection and then the right button for a sub menu selection The upper right corner of the LCD shows a flashing asterisk This indicates that the on board Micro Controller Unit MCU is running properly If the asterisk is not flashing or the LCD is not responding reset ...

Страница 7: ...b Menu 1 Display the temperature of the 3 temperature sensors in degrees Celsius Note If a temperature sensor fails FLT fault appears under the failed sensor Sub Menu 2 Bridge left Bridge right IC Temperature Range 20C 125C C when power is off Menu 4 Fan Status Menu Sub menu Sub menu Sub menu Submenu Menu 4 Fan Status Sub Menu 1 4 Indicates fan status for fans 1 4 Note Fan speed is controlled by a...

Страница 8: ...ard edge Fan Profile JP8 PIC_RB0 JP7 PIC_RB1 Performance Mode 1 2 1 2 Quiet Mode 1 2 2 3 High Performance Mode 2 3 1 2 GPU Mode 2 3 2 3 Fan Profile Guidelines GPU Mode supports 4 x double wide GPUs like NVIDIA Quadro or GTX Series High Performance Mode supports 2 3 double wide GPUs and Performance Mode Performance Mode supports 2 x double wide GPUs Quiet Mode supports 1 x double wide GPU or 4 x si...

Страница 9: ...ion Check the following Confirm that the HIC is firmly seated in a PCIe slot within the host computer Confirm that the cable connector is firmly seated HIC connector port Issue Cable LED inside Xpander flashes green even though I have a PCIe x16 HIC and cable Resolution The internal Cable LED should light steady green If the Cable LED flashes it is transferring data at a reduced bandwidth because ...

Страница 10: ...wledge the first fault the LCD will jump to the next fault and the LCD backlight will once again flash on off This continues until you clear all faults Resolution Press the MIB button momentarily to identify the MIB with the fault Acknowledge the fault by pressing the Menu button which will either stop the LCD flashing and the LCD will remain at the fault or the LCD will jump to the next fault and...

Отзывы: